Cherry MX-LP 2.1 Bruksanvisning
Cherry Tangentbord MX-LP 2.1
Läs gratis den bruksanvisning för Cherry MX-LP 2.1 (2 sidor) i kategorin Tangentbord. Guiden har ansetts hjälpsam av 24 personer och har ett genomsnittsbetyg på 4.1 stjärnor baserat på 9 recensioner. Har du en fråga om Cherry MX-LP 2.1 eller vill du ställa frågor till andra användare av produkten? Ställ en fråga
Sida 1/2
1
①Starten Sie die CHERRY Gaming-Software. Um
die Tastatur mit der Gaming-Software zu
programmieren, müssen Sie sie zunächst über
das USB-Kabel anschließen. Drücken Sie (fn +
), um auf diese Funktion zuzugreifen.
②Windows-Taste. Drücken Sie fn + , um den
Gaming-Modus zu aktivieren / deaktivieren.
③fn-Taste für den Zugriff auf die Zusatzfunktionen
der Tasten. Drücken und halten Sie die Taste, um
den Verbindungsstatus anzuzeigen.
④Halten Sie die fn-Taste und die Backspace-Taste
zusammen für 5 Sekunden gedrückt, um die
Tastatur auf die Werkseinstellungen
zurückzusetzen.
Halten Sie die fn-Taste gedrückt, und drücken Sie die
folgenden Tasten, um auf die gewünschten
Funktionen zuzugreifen:
⑤Verbindung über das USB-Kabel aktivieren
⑥Verbindung über Bluetooth aktivieren
⑦Funkverbindung aktivieren
⑧Bluetooth Kanal 1, 2 oder 3 aktivieren. Halten Sie
die Taste 3 Sekunden lang gedrückt, um den
Verbindungsmodus zu aktivieren.
⑨Standard-Webbrowser öffnen
⑩Windows-Explorer öffnen (Dieser PC)
⑪Vorheriger Titel
⑫Wiedergabe / Pause
⑬Nächster Titel
⑭Hintergrundbeleuchtungseffekt ändern
⑮Hintergrundbeleuchtung heller
⑯Hintergrundbeleuchtung dunkler
⑰Hintergrundbeleuchtungseffekt langsamer
⑱Hintergrundbeleuchtungseffekt schneller
⑲Stummschalten / Stummschaltung aufheben
⑳Lautstärke erhöhen
Lautstärke verringern
Bevor Sie beginnen ...
Die Tastaturen CHERRY MX-LP 2.1 und 6.1 Compact
Wireless bieten drei Verbindungsarten (über 2,4GHz-
Funk, Bluetooth 5.2 und USB-Kabel) für die
Bedienung von PCs und Notebooks. Sie wurden
speziell für den Gaming-Bereich entwickelt.
Für Informationen zu weiteren Produkten, Downloads
und vielem mehr, besuchen Sie bitte
www.cherry-world.com oder www.cherry.de.
1Zu Ihrer Sicherheit
Erstickungsgefahr durch Verschlucken von
Kleinteilen
•Bewahren Sie das Gerät außerhalb der Reichweite
von Kindern unter 3 Jahren auf.
Brandgefahr durch fest eingebauten aufladbaren
Akku
•Zerstören Sie die Tastatur nicht, indem Sie sie
zum Beispiel zerlegen, zerquetschen, erhitzen
oder verbrennen.
RSI steht für „Repetitive Strain Injury“
(Verletzungen durch wiederholte Belastung).
Eine RSI entsteht durch kleine Bewegungen, die über
einen langen Zeitraum hinweg wiederholt werden. Um
RSI zu verhindern:
•Richten Sie Ihren Arbeitsplatz ergonomisch ein.
•Positionieren Sie Tastatur und Maus so, dass sich
Ihre Oberarme und Handgelenke seitlich vom
Körper befinden und ausgestreckt sind.
•Machen Sie mehrere kleine Pausen, ggf. mit
Dehnübungen.
•Ändern Sie oft Ihre Körperhaltung.
2Tastatur ein-/ausschalten
So schalten Sie das Gerät ein:
•Verbinden Sie die Tastatur mithilfe des USB-
Kabels mit dem Computer.
Oder:
•Schalten Sie das Gerät mit dem I/O-Schalter (Ein
= I, Aus = O) auf der Rückseite der Tastatur ein.
Wenn die Tastatur eingeschaltet wird, leuchten alle
Tasten-LEDs 2 Sekunden lang weiß.
So schalten Sie das Gerät aus:
•Trennen Sie das USB-Kabel, und schalten Sie das
Gerät mithilfe des I/O-Schalters auf der Rückseite
der Tastatur aus.
Die Tastatur schaltet bei Nichtbenutzung nach 30
Sekunden in den Energiesparmodus, in dem sie sehr
wenig Energie benötigt. In diesem Modus werden die
LEDs und die Tastaturbeleuchtung ausgeschaltet.
Wenn eine beliebige Taste gedrückt wird, wird die
Tastatur wieder in den normalen Betriebsmodus
versetzt, und die Hintergrundbeleuchtung wird
wieder eingeschaltet.
Weil die Tastatur im Energiesparmodus noch immer
Energie verbraucht, sollten Sie sie bei längerer
Nichtbenutzung und zum Transport manuell
ausschalten.
3Tastatur mit einem Gerät verbinden
Sie können die Tastatur über das Kabel, über
Bluetooth oder mit dem Empfänger über eine
2,4GHz-Funkverbindung mit dem PC / Notebook oder
anderen Geräten (z. B. Spielekonsole oder Fernseher)
verbinden.
Die Bluetooth-Verbindung ist praktisch, wenn Sie die
Tastatur mit mehreren Geräten verwenden möchten:
Sie müssen nur einmal eine Verbindung herstellen
und brauchen den Empfänger nicht. Sie können über
Bluetooth bis zu drei Geräte mit der Tastatur
verbinden und auch zwischen ihnen wechseln.
3.1Tastatur über das USB-Kabel verbinden
1Schließen Sie die Tastatur an einem USB-
Anschluss Ihres PCs oder Notebooks an.
2Halten Sie die fn-Taste gedrückt und drücken Sie
die Z-Taste ().
Die LED auf der ESC-Taste leuchtet orange, wenn die
Batterie geladen wird.
DE
BEDIENUNGS-
ANLEITUNG
Jedes Gerät ist anders!
In der Bedienungsanleitung erhalten Sie
Hinweise zur effektiven und zuverlässigen
Verwendung.
•Lesen Sie die Bedienungsanleitung
aufmerksam durch.
•Bewahren Sie die Bedienungsanleitung auf, und
geben Sie sie bei Bedarf an andere Benutzer
weiter.
3.2Tastatur über Bluetooth verbinden
Da die Tastatur über 3 Bluetooth-Kanäle verfügt,
können Sie sie mit 3 verschiedenen Geräten
verbinden.
1Schalten Sie die Tastatur ein. (Stellen Sie den
Schalter auf der Rückseite der Tastatur auf „I“.)
2Öffnen Sie an dem Gerät, das Sie mit der Tastatur
verbinden möchten, die Suche nach Bluetooth-
Geräten (zum Beispiel am Windows-PC über
Start > Einstellungen > Geräte > Bluetooth).
3Folgen Sie den Anweisungen des
Betriebssystems.
4Aktivieren Sie die Bluetooth-Verbindung der
Tastatur, indem Sie bei gedrückter fn-Taste die
Taste "Bluetooth" () drücken.
Die Tastatur durchsucht alle drei Bluetooth-
Kanäle nach zuvor eingerichteten Verbindungen
und versucht, eine Verbindung mit dem
entsprechenden Gerät herzustellen, falls eine
gefunden wird.
Wenn die Verbindung nicht hergestellt werden
konnte und ein nicht verwendeter Kanal zur
Verfügung steht, startet die Tastatur automatisch
den Kopplungsmodus über diesen nicht
verwendeten Kanal. Die LED der entsprechenden
Taste blinkt blau. Die Kanäle werden in der
Reihenfolge ihrer Nummern von 1 bis 3
durchsucht. Wenn es einen aktiven Kanal gibt (der
zuvor verwendet wurde), beginnt die Suche mit
diesem aktiven Kanal bis zu Kanal 3 und dann
wieder bei Kanal 1.
5Wenn alle Bluetooth-Kanäle belegt sind, halten
Sie die fn-Taste + die Bluetooth-Kanaltaste
(, , ) 3 Sekunden lang gedrückt, um die
Verbindung mit einem neuen Gerät zu starten.
Die vorherigen Verbindungsinformationen für
diesen Kanal werden gelöscht.
6Folgen Sie den Anweisungen auf dem Gerät, das
Sie mit der Tastatur verbinden möchten. Suchen
Sie auf Ihrem Gerät nach dem Tastaturnamen
MX-LP x.1-BTx. Schließen Sie den
Verbindungsvorgang innerhalb von 30 Sekunden
ab, da sonst die Suchzeit abläuft. Starten Sie in
diesem Fall den Verbindungsprozess auf Ihrer
Tastatur erneut (Schritt 4).
Bitte beachten Sie, dass die Schritte 2, 3 und 6 nur
gelten, wenn Sie Verbindungen mit neuen Geräten
herstellen.
Bei erfolgreicher Verbindung leuchtet die Tasten-LED
des gewählten Kanals 3 Sekunden lang blau.
3.3Tastatur über Empfänger verbinden
Führen Sie die folgenden Schritte aus, um Ihre
Tastatur über die 2,4GHz-Funkverbindung zu
verbinden.
1Schalten Sie die Tastatur ein. (Stellen Sie den
Schalter auf der Rückseite der Tastatur auf „I“.)
2Verbinden Sie den Empfänger mit einem USB 2.0-
Anschluss an Ihrem Gerät.
3Halten Sie die fn-Taste gedrückt und drücken Sie
die Funk-Taste ().
Die Tastatur ist mit Ihrem Gerät (PC, Notebook, etc.)
verbunden.
4Verbindungsart wechseln
Wenn Sie die Verbindung über Kabel, Bluetooth und
über den Empfänger hergestellt haben, können Sie
mit der fn-Taste und der entsprechenden Taste
zwischen den Verbindungsarten wechseln.
•Drücken Sie bei gedrückter fn-Taste die
entsprechende Taste aus der Tabelle.
Die LED der gewählten Taste blinkt weiß, wenn die
Verbindung hergestellt wird. Die LED kehrt in den
normalen Beleuchtungsmodus zurück, wenn der
Verbindungstyp erfolgreich geändert wurde.
4.1Bluetooth-Gerät wechseln
Falls Sie die Tastatur über die 3 Bluetooth-Kanäle
mit mehreren Geräten (z. B. PC, Spielekonsole und
Fernseher) verbunden haben, können Sie zwischen
diesen Geräten wechseln.
1Wechseln Sie zur Bluetooth-Verbindung.
2Drücken Sie die fn-Taste und die Bluetooth-
Kanaltaste (, , ) für den gewünschten
Kanal.
Die Tastatur ist über Bluetooth mit dem
entsprechenden Gerät verbunden.
4.2Verbindungsstatus anzeigen
Um den ausgewählten Verbindungstyp und den
Bluetooth-Kanal zu sehen, drücken Sie die fn-Taste.
Die LED der entsprechenden Verbindungstaste (Z, X,
C) leuchtet weiß. Die LED der entsprechenden
Bluetooth-Kanaltaste (Q, W, E) leuchtet blau (nur bei
bestehender Bluetooth-Verbindung). Wenn die
gewählte Verbindung nicht aktiv ist, leuchtet die LED
rot. Die Beleuchtung leuchtet so lange, wie die fn-
Taste gedrückt wird.
5CHERRY Gaming-Software
installieren
Um das volle Potenzial der MX-LP 2.1 oder 6.1
Tastatur zu nutzen, müssen Sie die CHERRY Gaming
Software auf Ihrem PC / Notebook installieren. Mit
der CHERRY Gaming-Software können Sie den
Modus, die Farbe und die Geschwindigkeit der
Hintergrundbeleuchtung ändern, den Tasten Makros
zuweisen und Parameter zur Steuerung des
Tastaturverhaltens anpassen. Makros können
aufgezeichnet und bearbeitet werden.
Die Bedienung der CHERRY Gaming-Software ist
selbsterklärend und enthält eine Hilfe-Funktion. Evtl.
können Sie unseren Support kontaktieren.
1Verwenden Sie nur die aktuellste Software.
Bluetooth 5.2 benötigt Windows 10 oder
höher
Verwenden Sie das Gerät nur an PCs /
Notebooks mit dem Betriebssystem
Windows 10 oder höher oder schließen Sie es über
USB-Kabel an.
FN-Taste + TasteFunktion
Verbindung über USB-Kabel
Verbindung über Bluetooth
Verbindung über Funk mit
Empfänger (2,4GHz)
2Schließen Sie die Tastatur über das Kabel an.
3Laden Sie die Software als kostenlosen Download
von: www.cherry-world.com oder www.cherry.de.
Oder:
Drücken Sie die CHERRY-Tastenkombination
(fn + ), um den Weblink zum Herunterladen
der CHERRY Gaming-Software zu öffnen.
4Folgen Sie den Anweisungen auf dem Bildschirm.
5.1CHERRY Gaming-Software starten
Wenn die CHERRY Gaming-Software installiert ist,
können Sie die CHERRY-Tastenkombination drücken,
um die Anwendung zu starten.
5.2Firmware aktualisieren
Wenn eine neuere Version der Firmware verfügbar
ist, fordert die CHERRY Gaming-Software Sie auf,
Ihre Tastatur-Firmware zu aktualisieren. Die
Aktualisierung der Firmware auf die neueste Version
gewährleistet die beste Leistung Ihrer Tastatur.
Schließen Sie den USB-Empfänger an, um
sicherzustellen, dass auch dessen Firmware auf die
neueste Version aktualisiert wurde.
6Zusatzfunktionen entdecken
Die Tastatur verfügt über viele integrierte
Funktionen, von denen einige durch Symbole
gekennzeichnet sind, die auf der Unterzeile
aufgedruckt sind. Um eine gewünschte Funktion
auszuführen, halten Sie die fn-Taste gedrückt und
drücken Sie zusätzlich die entsprechende Taste.
Einzelheiten dazu finden Sie in der nachstehenden
Tabelle. Beispiel: Drücken Sie [fn + Y], um die
Funktion zum Drucken des Bildschirms [Druck]
auszuführen.
Um die fn-Taste im aktiven (festgestellten) Zustand
zu halten, halten Sie die strg-Taste gedrückt und
drücken dann die fn-Taste. Die LED der fn-Taste
leuchtet rot, wenn die fn-Taste festgestellt ist.
Drücken Sie erneut strg + fn, um die fn-Taste zu
lösen.
7Gaming-Modus verwenden
Ihre Tastatur verfügt über einen Gaming-Modus.
Wenn Sie spielen, sollten Sie die -Taste
deaktivieren, um unerwünschte Unterbrechungen zu
vermeiden.
1Halten Sie die fn-Taste gedrückt und drücken Sie
dann die -Taste, um den Gaming-Modus zu
aktivieren.
Die LED der -Taste leuchtet rot. Im Gaming-
Modus sind die folgenden Tasten oder
Tastenkombinationen deaktiviert:
, , alt + fn
+ F4, alt + tab, strg + alt + entf, strg + esc.
2Drücken Sie erneut fn + , um den Gaming-
Modus zu verlassen
8Tastatur laden
Wenn die Batterie der Tastatur schwach ist, blinkt die
LED auf der esc-Taste rot und die
Hintergrundbeleuchtung ist deaktiviert. Sie sollten
Ihre Tastatur bald aufladen.
Verwenden Sie zum Aufladen der Tastatur das
mitgelieferte USB-Kabel. Verbinden Sie damit den
USB-Anschluss auf der Rückseite der Tastatur mit
einem USB-Anschluss am PC oder Notebook.
Die LED auf der esc-Taste leuchtet orange und zeigt
damit an, dass der Ladevorgang läuft. Die LED auf
der esc-Taste leuchtet wieder normal, wenn die
Tastatur vollständig aufgeladen ist. Die
Ladeschaltung verhindert ein Überladen.
Die Batterie der Tastatur wird aufgeladen, solange
der PC / das Notebook eingeschaltet ist. Sie können
während des Ladevorgangs weiterarbeiten. Die
gewählte Kabel-, Bluetooth- oder Funkverbindung
bleibt erhalten.
9Tastatur auf Werkseinstellungen
zurücksetzen
Um die Tastatur auf die Werkseinstellungen
zurückzusetzen, halten Sie die fn-Taste und die
Backspace-Taste gleichzeitig 5 Sekunden lang
gedrückt. Um das Zurücksetzen zu bestätigen,
leuchten die LEDs der Tastatur 2 Sekunden lang
weiß.
In den seltenen Fällen, in denen ein Hard Reset
erforderlich ist, können Sie einen Stift (oder eine
Büroklammer) in das kleine Loch an der Unterseite
der Tastatur stecken und 3 Sekunden lang gedrückt
halten. Zusätzlich zum Zurücksetzen auf die
Werkseinstellungen werden auch die Bluetooth-
Verbindungsinformationen gelöscht.
10Tastatur reinigen
HINWEIS: Die Verwendung aggressiver
Reinigungsmittel oder das Eindringen von
Flüssigkeit in die Tastatur kann zu Beschädigungen
führen!
1Schalten Sie die Tastatur aus, und ziehen Sie das
USB-Kabel ab.
2Reinigen Sie die Tastatur mit einem leicht
feuchten Tuch und einem milden Reinigungsmittel
(z. B. Geschirrspülmittel).
•Verwenden Sie keine Lösungsmittel wie
Benzin, Benzol oder Alkohol und keine
Scheuermittel oder Scheuerschwämme.
•Verhindern Sie, dass Flüssigkeit in die Tastatur
gelangt.
3Trocknen Sie die Tastatur mit einem fusselfreien,
weichen Tuch.
11Fehlerbehebung
Wenn bei der Verwendung der Tastatur Probleme
auftreten, versuchen Sie Folgendes:
•Schalten Sie die Tastatur aus und wieder ein.
•Verwenden Sie einen anderen USB-Anschluss an
Ihrem PC oder Notebook.
•Überprüfen Sie, ob die Tastatur defekt ist. Testen
Sie sie an einem anderen PC oder Notebook.
•Setzen Sie im BIOS des PCs oder Notebooks die
Optionen „USB Keyboard Support“ und „USB
Legacy Mode“ auf „Enabled“ (aktiviert).
•Laden Sie die Tastatur über das USB-Kabel
(siehe: 8 Tastatur laden).
•Entfernen Sie störende Gegenstände zwischen der
Tastatur und dem PC oder Notebook. Störungen
verursachen vor allem metallische oder
elektrische Gegenstände, beispielsweise Kabel,
Lautsprecher oder USB-Hubs.
Tastatur-Firmware im Kabelmodus
aktualisieren
Um Fehler aufgrund einer leeren Batterie
zu vermeiden, schließen Sie immer das USB-Kabel
an, bevor Sie die Firmware aktualisieren.
FunktionDrücken
F1 – F9fn + 1 – 9
F10fn + 0
F11fn + (- _)
F12fn + (= +)
Druckfn + Y
Rollenfn + U
Pausefn + I
Startseitefn + (, <)
Endefn + (. >)
Menüfn + (/ ?)
` Zeichenfn + esc
~ Zeichenfn + shift + esc
Hintergrundbeleuchtung
anpassen
fn + H
•Verringern Sie den Abstand zwischen den Geräten
und dem PC oder Notebook.
•Falls es bei der Nutzung von USB 3.0-Geräten in
der direkten Umgebung des Empfängers zu
Störungen kommt: Verwenden Sie für den
Empfänger oder das USB 3.0-Gerät einen
anderen, weiter entfernten Anschluss, ein anderes
Kabel oder einen USB-Hub.
11.1Fehlerbehebung bei Störungen der
Bluetooth-Verbindung
•Wenn sich Ihr PC oder Notebook im
Energiesparmodus befindet, ist eine erneute
Aktivierung durch die Nutzung von Bluetooth-
Geräten nicht möglich. Schalten Sie den PC bzw.
das Notebook manuell ein.
•Falls die Tastatur auf dem gewählten Kanal
bereits mit einem anderen Gerät verbunden
wurde, können Sie keine parallele Verbindung
herstellen. Schalten Sie das erste Gerät aus, oder
deaktivieren Sie die Verbindung.
•Schalten Sie nicht benötigte Bluetooth-Geräte
aus.
•Entfernen Sie die Verbindung zur Tastatur in der
Bluetooth-Konfiguration, und fügen Sie die
Tastatur als neues Gerät wieder hinzu.
•Einige ältere Betriebssystemversionen
unterstützen Bluetooth 5.2 möglicherweise nicht.
Verwenden Sie einen externen Bluetooth-
Empfänger.
•Wenn Sie verschiedene Bluetooth-Kanäle
zugewiesen haben: Wechseln Sie gegebenenfalls
den Bluetooth-Kanal (siehe: 4.1 Bluetooth-Gerät
wechseln).
11.2Fehlerbehebung bei Störungen der
Funkverbindung
•Schließen Sie den Empfänger an einen USB 2.0-
Anschluss des PCs oder Notebooks an (USB 2.0-
Anschlüsse haben in der Regel eine weiße oder
schwarze Führung). An USB 3.0-Buchsen (blaue
Führung) kommt es manchmal zu Fehlfunktionen.
•Schließen Sie den Empfänger an einen anderen
USB 2.0-Anschluss am PC bzw. Notebook an.
•Verringern Sie den Abstand zwischen dem
Empfänger und der Tastatur, indem Sie den
Empfänger an einen USB-Anschluss anschließen,
der sich nah an der Tastatur befindet.
•Verwenden Sie ein USB-Verlängerungskabel, um
den Empfänger möglichst nah an der Tastatur zu
platzieren.
•Verwenden Sie die CHERRY-Gaming-Software, um
den Empfänger erneut mit der Tastatur zu
koppeln.
12Geräte entsorgen
•Entsorgen Sie Geräte mit diesem Symbol
nicht mit dem Hausmüll.
•Entsorgen Sie die Geräte, entsprechend
den gesetzlichen Vorschriften, bei Ihrem
Händler oder den kommunalen
Sammelstellen.
13Technische Daten
14Kontakt
Cherry Europe GmbH
Cherrystraße 2
91275 Auerbach/OPf.
Internet: www.cherry-world.com oder www.cherry.de
Telefon: +49 (0) 9643 2061-100*
*zum Ortstarif aus dem deutschen Festnetz, abweichende
Preise für Anrufe aus Mobilfunknetzen möglich
15EU-Konformitätserklärung
Hiermit erklärt die Cherry Europe GmbH,
Auerbach/OPf., Deutschland, dass dieser
Funkanlagentyp der Richtlinie 2014/53/EU
entspricht. Den vollständigen Text der EU-
Konformitätserklärung finden Sie unter folgender
Internet-Adresse: www.cherry.de/compliance.
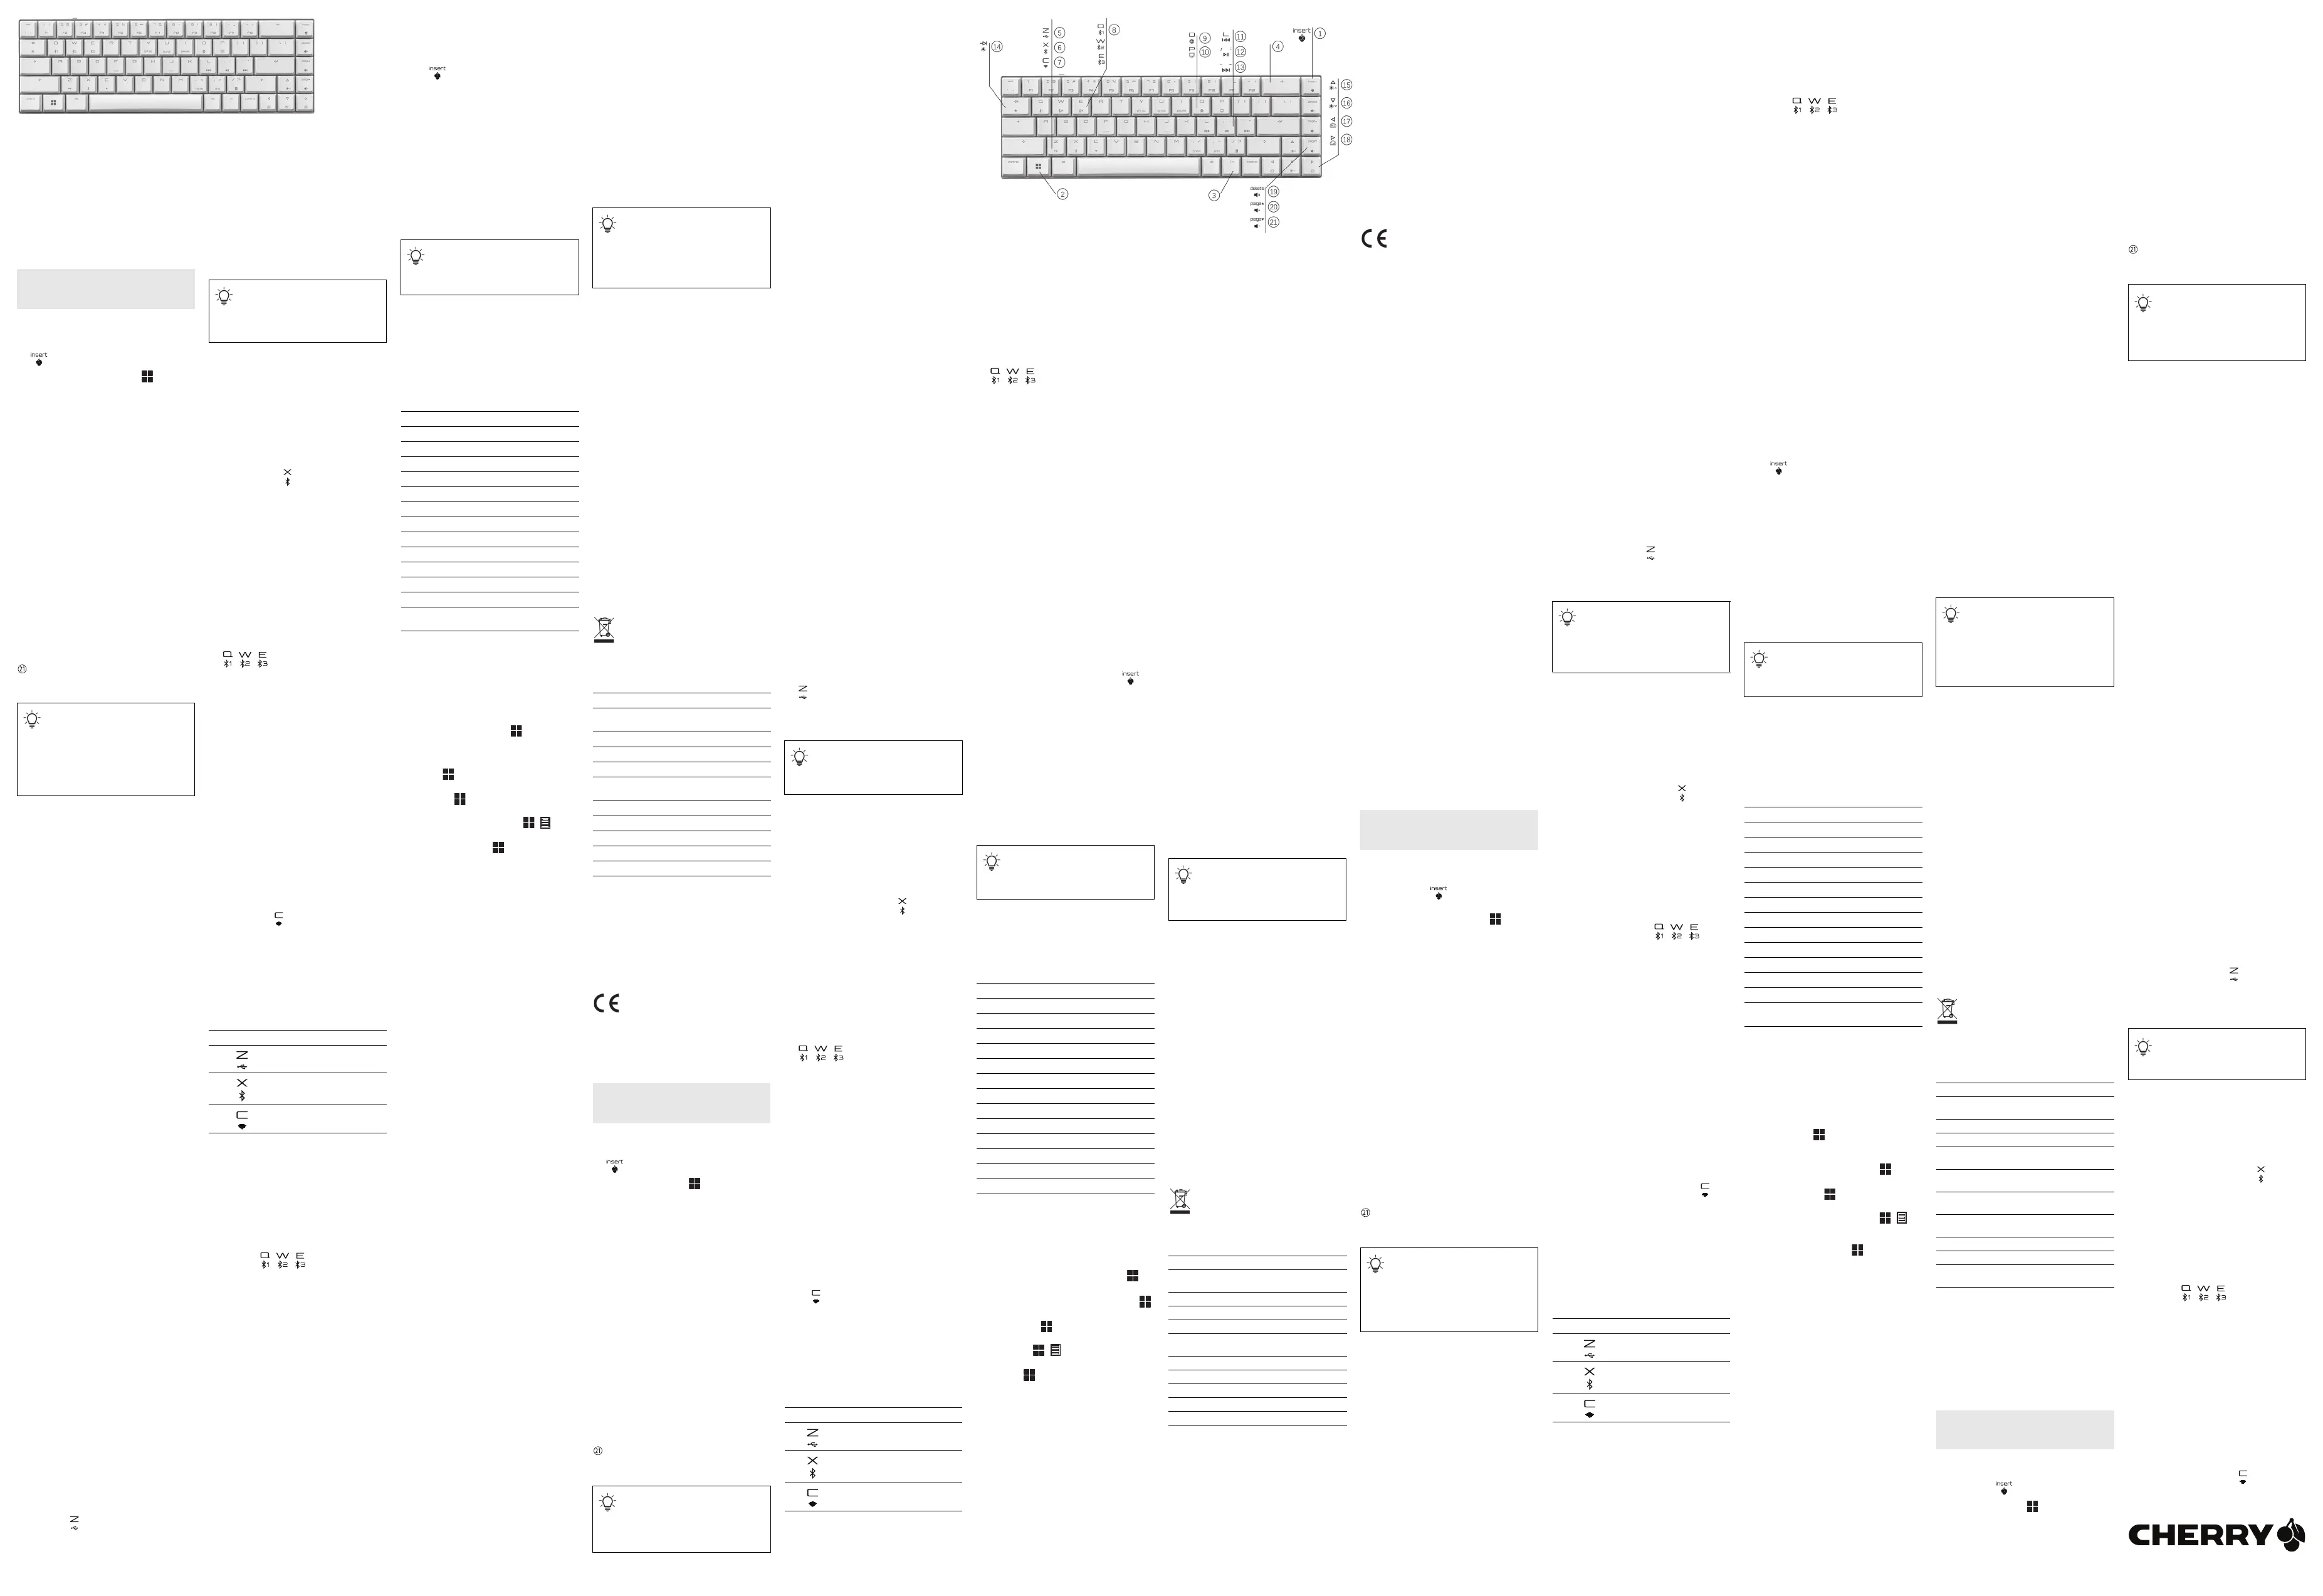
①Start the CHERRY Gaming Software. To program
the keyboard with the gaming software, you need
first to connect it via the USB cable. Press fn +
to access this function.
②Windows Key. Press fn + to enable / disable
the Gaming Mode.
③fn key to access secondary functions of keys.
Press and hold it to view the connection status.
④Hold down fn + backspace for 5 seconds to reset
the keyboard to factory default settings.
Hold down the fn key and press the following keys to
access desired functions:
⑤Enable connection via USB cable.
⑥Enable connection via Bluetooth.
⑦Enable connection via 2.4GHz RF wireless.
⑧Enable Bluetooth Channel 1, 2 or 3. Hold down
the key combinations for 3 seconds to enter the
pairing mode using the designated Bluetooth
channel.
⑨Open the default web browser.
⑩Open Windows explorer (This PC).
⑪Previous track
⑫Play / Pause
⑬Next track
⑭Change backlighting effect
⑮Backlighting brighter
⑯Backlighting darker
⑰Backlighting effect slower
⑱Backlighting effect faster
⑲Mute / Unmute
⑳Sound volume increase
Sound volume decrease
Before You Begin ...
Betrieb mehrerer Bluetooth-Geräte an
einem PC / Notebook
Ihr PC oder Notebook kann über Bluetooth
nur mit einer begrenzten Anzahl aktiver Geräte
verbunden werden. Wenn weitere Geräte
hinzugefügt werden, können Profilkonflikte
auftreten und Anschlüsse nicht mehr zur
Verfügung stehen.
BezeichnungWert
VersorgungsspannungEmpfänger:
5,0 V/DC ± 5% SELV
LadespannungTyp. 5,0 V/DC
LadestromMax. 1000 mA
StromaufnahmeMax. 500 mA
BatterieAufladbare Lithium-Ionen-
Batterie, 2800 mAh
Sendefrequenz2402 ... 2480 MHz
SendeleistungMax. 10 mW (EIRP)
Bluetooth5.2
Lagertemperatur-20 °C ... +45 °C
Betriebstemperatur0 °C ... +45 °C
EN
OPERATING
MANUAL
Every Device is Different!
The operating manual contains information
on effective and reliable use.
•Read the operating manual carefully.
•Keep the operating manual and pass it on to
other users when needed.
CHERRY MX-LP 2.1 and 6.1 Compact Wireless
keyboards are tri-mode (2.4GHz Wireless + Bluetooth
5.2 + Corded USB) keyboards for operating PCs and
laptops. They are developed especially for gaming.
For information on other products, downloads and
much more, visit us at www.cherry-world.com or
www.cherry.de.
1For Your Safety
Risk of choking from swallowing small parts
•Keep the device out of the reach of children under
3 years.
Possible fire hazard due to permanently installed
rechargeable battery
•Do not destroy the keyboard by, e.g.,
disassembling, crushing, heating, or burning it.
RSI stands for "Repetitive Strain Injury".
RSI arises due to small movements continuously
repeated over a long period of time. To avoid RSI,
suggest that you:
•Set up your workspace ergonomically.
•Position the keyboard and mouse in such a
manner that your upper arms and wrists are
outstretched and to the sides of your body.
•Take several short breaks, with stretching
exercises if necessary.
•Change your posture often.
2Switching the Keyboard On / Off
To turn on the keyboard:
•Connect the keyboard to the computer using the
USB cable.
Or:
•Power on the device using the I/O (On = I, Off = O)
switch on the back of the keyboard.
When the keyboard powers on, all the key LEDs show
white for 2 seconds.
To turn off the keyboard:
•Disconnect the USB cable and power off the
device using the I/O switch on the back of the
keyboard.
When not in use for longer than 30 seconds, the
keyboard switches to the sleep mode, which requires
very little power. In this mode the LEDs and keyboard
backlighting are turned off. It wakes up to the normal
working mode when any key is pressed, and the
backlighting resumes.
Because the keyboard still consumes power in the
energy-saving mode, switch it off manually before
longer periods out of use or for transport.
3Connecting the Keyboard to a
Device
You can connect the keyboard to your PC, laptop, or
other devices (such as a game console or TV) via the
USB cable, Bluetooth, or via the receiver using a
2.4GHz wireless connection.
The Bluetooth connection is convenient if you wish to
use the keyboard with several devices: you need only
to connect once and do not need the receiver. You can
use Bluetooth to connect up to 3 devices to the
keyboard and also switch between them.
3.1Connecting the Keyboard via the USB
Cable
1Connect the keyboard to any USB port of the PC or
laptop.
2While holding down the fn key, press the Z key
( ).
The LED on the esc key glows orange if the battery is
being charged.
3.2Connecting the Keyboard via Bluetooth
As the keyboard has 3 Bluetooth channels, you can
connect it to 3 different devices.
1Turn the keyboard on (set the switch to "I" on the
back of the keyboard).
2Search for Bluetooth connections on the device
you want to connect to the keyboard (for example,
on a Windows PC select Start > Settings >
Devices > Bluetooth).
3Follow the instructions of the operating system.
4Activate the Bluetooth connection of the keyboard
by pressing the Bluetooth key () while holding
down the fn key.
The keyboard searches all 3 Bluetooth channels for
previously established connections and try to
connect your device if one exists.
If the connection is not successful and there is an
unused channel, the keyboard automatically enters
the pairing mode on that unused channel. The LED
on the corresponding key flashes blue. The search
sequence is from Channel 1 to Channel 3. If there
is an active channel (previously in use), the search
starts from that active channel, up to Channel 3 and
then back to Channel 1.
5In case all Bluetooth channels are used, you need
to press fn and the desired Bluetooth channel key
(, , ) for 3 seconds to start pairing with
a new device.
The previous pairing information on this channel is
deleted.
6Follow the instructions on the device which you
want to connect to the keyboard. Look for
keyboard name MX-LP x.1-BTx on your host
device. Please complete the connection process
within 30 seconds, otherwise, the search timer
will expire. In this case, please re-initiate the
pairing process on your keyboard (step 4).
Please note that steps 2, 3 and 6 are applicable only
when you are making connections with new devices.
If the connection is successful, the key LED of the
selected channel glows blue for 3 seconds.
3.3Connecting the Keyboard via the
Receiver
Follow the steps below to connect your keyboard
using the 2.4GHz Wireless receiver.
1Turn the keyboard on (set the switch to "I" on the
back of the keyboard).
2Connect the receiver to a USB 2.0 compatible port
on your device.
3While holding down the fn key, press the Wireless
key ().
The keyboard shall now be connected to your host
device (PC, laptop, etc.).
4Changing the Connection Type
If you have established several connections via the
USB cable, Bluetooth, or the wireless receiver, you
can switch between the connection types using the fn
key and the corresponding key.
•Hold down the fn key and press the appropriate
key as shown in the table.
The LED of the selected key flashes white when the
connection is being established. The LED returns to
Bluetooth 5.2 Requires Windows 10 or
Above
Only use the keyboard with PCs or laptops
with operating system Windows 10 or above
or connect it via a USB cable as an alternative.
fn key + keyFunction
Connection via the USB cable
Connection via Bluetooth
Connection via the 2.4GHz wireless
receiver
the normal backlighting mode when the connection
type is successfully changed.
4.1Switching Bluetooth Devices
If you have connected the keyboard to several devices
(e.g., PC, game console and TV) via the 3 Bluetooth
channels, you can switch between these devices.
1Switch to the Bluetooth connection.
2Press the fn key and the Bluetooth channel key
(, , ) for the desired channel.
The keyboard is connected to the corresponding
device via the selected Bluetooth channel.
4.2Viewing the Connection Status
You can view the selected connection type and
Bluetooth channel by pressing the fn key. The LED on
the corresponding connection type key (Z, X, C) lights
up white. The LED on the corresponding Bluetooth
channel key (Q, W, E) lights up blue (only when
Bluetooth connection is in use). If the selected
connection is not active, the LED shows red. The
lighting stays on as long as the fn key is pressed.
5Installing the CHERRY Gaming
Software
To use MX-LP 2.1 or 6.1 keyboard to its full potential,
you need to install the CHERRY Gaming Software on
your PC or laptop. With the CHERRY Gaming
Software, you can change the backlighting mode,
color, and speed, assign macros to the keys, and
adjust parameters to control keyboard behaviors.
Macros can be recorded and edited.
The CHERRY Gaming Software is intuitive to operate
and includes a help function. You can also contact our
support if needed.
1Always use the latest software.
2Connect the keyboard via the cable.
3Download the free software from:
www.cherry-world.com or www.cherry.de.
Or:
Press the CHERRY key combination (fn+ ) to
open the web link which directs you to download
the CHERRY Gaming Software.
4Follow the instructions on the screen.
5.1Running the CHERRY Gaming Software
When the CHERRY Gaming Software is installed, you
can press the CHERRY key combination to launch the
application.
5.2Updating the Firmware
If a newer version of the firmware is available, the
CHERRY Gaming Software will prompt to update your
keyboard firmware. Updating the firmware to the
latest version ensures the best performance of your
keyboard.
Please plug in the wireless receiver to make sure its
firmware is also updated to the latest version.
6Discovering Additional Functions
Your keyboard comes with many built-in functions,
some of which are identified by symbols printed on
the subline. To perform a desired function, press and
hold the fn key and press the appropriate key. Please
refer to the table below for details. Example: press
[fn + Y] to perform the Print Screen [prt sc] function.
To keep the fn key in the active (locked) state, press
and hold the control key and then press the fn key.
The fn key LED lights up red when the fn key is
locked. Press control + fn again to unlock the fn key.
7Using the Gaming Mode
Your keyboard comes with a Gaming Mode. When
playing games, you might want to disable the key
to avoid unwanted interruptions.
1Press and hold the fn key, and then press the
key to activate the Gaming Mode.
The LED on the key lights up red. In the
Gaming Mode, following keys or key combinations
are disabled: , , alt + fn + F4, alt + tab,
control + alt + delete, control + esc.
2Press fn + again to exit the Gaming Mode.
8Charging the Keyboard
When the battery of the keyboard is low, the LED on
esc key flashes red and the backlighting is disabled.
You should charge your keyboard soon.
To charge your keyboard, use the provided USB cable
to connect the USB port on the back of the keyboard
and a USB port on the PC or laptop.
The LED on the esc key lighting up orange indicates
the charging is in progress. The LED on the esc key
returns to normal backlighting when the keyboard is
fully charged. The charging circuit prevents
overcharging.
The keyboard battery is charged as long as the PC or
laptop is switched on. You can continue working while
charging. The cable, Bluetooth or wireless
connection selected is retained.
Updating the Keyboard Firmware in the
Cable Mode
To prevent faults due to an empty battery,
please always connect the keyboard via the USB
cable before updating the firmware.
FunctionPress
F1 – F9fn + 1 – 9
F10fn + 0
F11fn + (- _)
F12fn + (= +)
Prt Scfn + Y
Scroll Lockfn + U
Pausefn + I
Homefn + (, <)
Endfn + (. >)
Menufn + (/ ?)
` characterfn + esc
~ characterfn + shift + esc
Customizing Backlightingfn + H
9Resetting the Keyboard to Factory
Defaults
Press and hold fn + backspace for 5 seconds to reset
the keyboard to its factory default settings. All LEDs
on the keyboard light up white for 2 seconds to
confirm the reset.
In rare scenarios that a hard reset is needed, you can
insert a pin (or paper clip) into the small hole at the
bottom of the keyboard and keep pressing for 3
seconds. In addition to restoring to factory defaults,
Bluetooth pairing information is cleared.
10Cleaning the Keyboard
NOTICE: Damage may occur due to using aggressive
cleaning agents or letting liquid get into the
keyboard!
1Switch the keyboard off and disconnect the USB
cable.
2Clean the keyboard with a slightly damp cloth and
some mild cleaning agent (such as dishwashing
liquid).
•Do not use solvents such as gasoline, benzene,
alcohol, scouring agents or abrasive scourers.
•Prevent any liquid from getting inside the
keyboard.
3Dry off the keyboard with a soft, lint-free cloth.
11Troubleshooting Problems
If you experience problems while using the keyboard,
please try the following:
•Switch the keyboard off and on again.
•Use another USB port on the PC or laptop.
•Make sure that the keyboard is not defective. Test
it with another PC or laptop.
•Set the option “USB Keyboard Support” and “USB
Legacy Mode” to “Enabled” in the BIOS of the PC.
•Charge the keyboard via the USB cable
(refer to: 8 Charging the Keyboard).
•Remove any objects causing interference between
the keyboard and the PC or laptop. Interference is
caused in particular by metallic or electrical
objects such as cables, loudspeakers, or USB
hubs.
•Reduce the distance between the devices and the
PC or laptop.
•Should any interference be encountered when you
use USB 3.0 devices right near the receiver: use
another port that is further away, use an
alternative cable, or a USB hub for the receiver or
USB 3.0 device.
11.1Troubleshooting Bluetooth Connection
Failures
•If your PC or laptop is in the sleep mode, it cannot
be woken up using Bluetooth devices. Switch on
the PC or laptop manually.
•If the keyboard has been already connected to
another device on the selected channel, you
cannot establish a parallel connection. Switch off
the first device or deactivate the connection.
•Turn off any unnecessary Bluetooth devices.
•Remove the connection to the keyboard in the
Bluetooth configuration and add it again as a new
device.
•Some older versions of operating systems may not
support Bluetooth 5.2. Use an external Bluetooth
receiver.
•If you have assigned different Bluetooth channels:
switch the Bluetooth channel if necessary (refer
to: 4.1 Switching Bluetooth Devices).
11.2Troubleshooting Wireless Connection
Failures
•Connect the receiver to a USB 2.0 port on your PC
or laptop (USB 2.0 port usually has a white or
black guide). Malfunctions occasionally occur on
USB 3.0 ports (blue guide).
•Connect the receiver to another USB 2.0 port on
the PC or laptop.
•Reduce the distance between the receiver and the
keyboard by connecting the receiver to a USB port
that is close to the devices.
•Use a USB extension cable to place the receiver
as close to the keyboard as possible.
•Use the CHERRY Gaming Software to re-pair the
receiver with the keyboard.
12Disposing of Devices
•Do not dispose of devices with this symbol
in household waste.
•Dispose of the devices in accordance with
statutory regulations: at your local dealer
or at municipal recycling centers.
13Technical Data
Operation of Several Bluetooth Devices on
a PC / Laptop
Your PC or laptop can only connect to a
limited number of active devices using Bluetooth.
Profile conflicts and unavailability of ports may
occur when more devices are added.
DesignationValue
Supply voltageReceiver:
5.0 V/DC ± 5% SELV
Charging voltageTyp. 5.0 V/DC
Charging currentMax. 1000 mA
Current consumptionMax. 500 mA
BatteryRechargeable lithium-ion
battery, 2800 mAh
Operating frequency2402 ... 2480 MHz
Effective radiated powerMax. 10 mW (EIRP)
Bluetooth5.2
Storage temperature-20 °C ... +45 °C
Operating temperature0 °C ... +45 °C
14Contact
For Europe
Cherry Europe GmbH
Cherrystraße 2
91275 Auerbach/OPf.
Germany
Internet: www.cherry-world.com or www.cherry.de
For USA
Cherry Americas, LLC
5732 95th Avenue
Suite 850
Kenosha, WI 53144
USA
Tel.: +1 262 942 6508
Email: sales@cherryamericas.com
Internet: www.cherry-world.com or www.cherry.de
15Certifications
15.1EU Declaration of Conformity
The company Cherry Europe GmbH,
Auerbach/OPf., Germany hereby declares
that this radio system model conforms to
the European guideline 2014/53/EU. The full text of
the EU declaration of conformity can be found under
the following Internet address:
www.cherry.de/compliance.
15.2Federal Communications Commission
(FCC) Radio Frequency Interference
Statement
This device complies with part 15 of the FCC Rules.
Operation is subject to the following two conditions:
(1) This device may not cause harmful interference,
and (2) this device must accept any interference
received, including interference that may cause
undesired operation.
Note: This equipment has been tested and found to
comply with the limits for a Class B digital device,
pursuant to part 15 of the FCC Rules. These limits
are designed to provide reasonable protection against
harmful interference in a residential installation. This
equipment generates, uses and can radiate radio
frequency energy and, if not installed and used in
accordance with the instructions, may cause harmful
interference to radio communications. However,
there is no guarantee that interference will not occur
in a particular installation. If this equipment does
cause harmful interference to radio or television
reception, which can be determined by turning the
equipment off and on, the user is encouraged to try to
correct the interference by one or more of the
following measures:
•Reorient or relocate the receiving antenna.
•Increase the separation between the equipment
and receiver.
•Connect the equipment into an outlet on a circuit
different from that to which the receiver is
connected.
•Consult the dealer or an experienced radio / TV
technician for help.
Caution: Any changes or modifications not expressly
approved by the party responsible for compliance
could void the user's authority to operate the
equipment.
15.3RF Exposure Statement
This device complies with the RF exposure
requirements for mobile and fixed devices. However,
the device shall be used in such a manner that the
potential for human contact during normal operation
is minimized.
15.4UKCA
UK Authorised Representative:
Authorised Representative Service
The Old Methodist Chapel
Great Hucklow
SK17 8RG
UK
①Lancer le logiciel CHERRY Gaming. Pour
programmer le clavier avec le logiciel de gaming,
vous devez d'abord le connecter via le câble USB.
Appuyez sur fn + pour accéder à cette
fonction.
②Touche Windows. Appuyez sur fn + pour
activer / désactiver le mode Gaming.
③Touche fn pour accéder aux fonctions
secondaires des touches. Maintenez cette touche
enfoncée pour afficher l'état de la connexion.
④Maintenez les touches fn + Retour arrière
enfoncées pendant 5 secondes pour rétablir les
paramètres d’usine du clavier.
Maintenez la touche fn enfoncée et appuyez sur les
touches suivantes pour accéder aux fonctions
souhaitées :
⑤Activer la connexion via un câble USB.
⑥Activer la connexion via Bluetooth.
⑦Activer la connexion sans fil 2,4GHz RF.
⑧Activer le canal Bluetooth 1, 2 ou 3. Maintenez les
combinaisons de touches enfoncées pendant 3
secondes pour accéder au mode de couplage en
utilisant le canal Bluetooth désigné.
⑨Ouvrir le navigateur web par défaut.
⑩Ouvrir l’Explorateur Windows (Ce PC).
⑪Piste précédente
⑫Lecture / Pause
⑬Piste suivante
⑭Modifier l'effet de rétroéclairage
⑮Rétroéclairage plus lumineux
⑯Rétroéclairage plus sombre
⑰Effet de rétroéclairage plus lent
⑱Effet de rétroéclairage plus rapide
⑲Désactiver le son / Réactiver le son
⑳Augmenter le volume sonore
Réduire le volume sonore
Avant de commencer...
Les claviers sans fil compacts CHERRY MX-LP 2.1 et
6.1 Compact sont des claviers tri-mode (2,4GHz sans
fil + Bluetooth 5.2 + USB filaire) pour les ordinateurs
de bureau et les ordinateurs portables. Ils sont
spécialement conçus pour le gaming.
Pour plus d'informations sur d'autres produits, des
téléchargements et bien plus encore, rendez-vous
sur www.cherry-world.com ou www.cherry.de.
1Pour votre sécurité
Risque d'étouffement en cas d’ingestion de petites
pièces
•Conservez l'appareil hors de portée des enfants
de moins de 3 ans.
Risque d'incendie dû à une batterie rechargeable
installée en permanence
•Ne détruisez pas le clavier par exemple en le
démontant, en l'écrasant, en le chauffant, ou en le
brûlant.
TMS signifie « Troubles musculo-squelettiques ».
FR
MANUEL
D’UTILISATION
Chaque appareil est différent !
Le manuel d'utilisation contient des
informations pour une utilisation efficace et
fiable.
•Lisez attentivement le manuel d'utilisation.
•Conservez le manuel d'utilisation et
transmettez-le à d'autres utilisateurs si
nécessaire.
Les TMS sont dus à la répétition de petits
mouvements effectués de manière continue sur une
longue période. Pour éviter les TMS, nous vous
recommandons de prendre les mesures suivantes :
•Aménagez votre espace de travail de manière
ergonomique.
•Positionnez le clavier et la souris de manière à ce
que vos bras et vos poignets soient tendus, le long
du corps.
•Faites régulièrement de petites pauses avec, si
nécessaire, des exercices d’étirement.
•Changez souvent de posture.
2Mise en marche et arrêt du clavier
Pour mettre en marche le clavier :
•Connectez le clavier à l'ordinateur à l'aide du
câble USB.
Ou bien :
•Allumez le clavier en utilisant le commutateur I/O
(On = I, Off = O) situé à l'arrière du clavier.
Lorsque le clavier s'allume, toutes les LED des
touches s'allument en blanc pendant 2 secondes.
Pour éteindre le clavier :
•Débranchez le câble USB et mettez l'appareil hors
tension à l'aide du commutateur I/O situé à
l'arrière du clavier.
Lorsqu'il n'est pas utilisé pendant plus de 30
secondes, le clavier passe en mode veille, qui
consomme très peu d’énergie. Dans ce mode, les
LED et le rétroéclairage du clavier sont éteints. Il se
réactive en mode de fonctionnement normal
lorsqu'une touche est enfoncée. Le rétroéclairage
reprend également.
Comme le clavier consomme toujours de l'énergie en
mode économie d'énergie, éteignez-le manuellement
avant de le transporter ou si vous prévoyez de ne pas
l'utiliser pendant des périodes prolongées.
3Connexion du clavier à un appareil
Vous pouvez connecter le clavier à votre ordinateur
de bureau, à votre ordinateur portable ou à d’autres
appareils (comme une console de jeux ou un
téléviseur) via le câble USB, Bluetooth ou via le
récepteur en utilisant une connexion sans fil 2,4GHz.
La connexion Bluetooth est pratique si vous souhaitez
utiliser le clavier avec plusieurs appareils : vous
n'avez besoin de vous connecter qu'une seule fois et
vous n'avez pas besoin du récepteur. Vous pouvez
utiliser Bluetooth pour connecter jusqu'à 3
périphériques au clavier et basculer d’un
périphérique à l’autre.
3.1Connexion du clavier via le câble USB
1Connectez le clavier à votre appareil à l'aide du
câble USB.
2Tout en maintenant la touche fn enfoncée,
appuyez sur la touche Z ().
Le voyant LED de la touche Échap s'allume en orange
si la batterie est en cours de chargement.
3.2Connexion du clavier via Bluetooth
Comme le clavier dispose de 3 canaux Bluetooth,
vous pouvez le connecter à 3 appareils différents.
1Mettez le clavier en marche (mettez le
commutateur sur « I » à l'arrière du clavier).
2Recherchez les connexions Bluetooth sur le
périphérique que vous souhaitez connecter au
clavier (par exemple, sur un PC fonctionnant sous
Windows, sélectionnez Démarrer > Paramètres >
Périphériques > Bluetooth).
3Suivez les instructions du système d'exploitation.
4Activez la connexion Bluetooth du clavier en
appuyant sur la touche Bluetooth () tout en
maintenant la touche fn enfoncée.
Le clavier recherche les 3 canaux Bluetooth et
tente de connecter votre appareil.
Si la connexion échoue et qu'un canal n'est pas
utilisé, le clavier passe automatiquement en mode
de couplage sur ce canal inutilisé. La LED de la
touche correspondante clignote en bleu. La
séquence de recherche va du canal 1 au canal 3. Si
un canal est actif (précédemment utilisé), la
recherche commence à partir de ce canal actif,
jusqu'au canal 3, puis revient au canal 1.
5Si tous les canaux Bluetooth sont utilisés, vous
devez appuyer sur la touche fn et sur la touche de
canal Bluetooth souhaitée (, , )
pendant 3 secondes pour démarrer le couplage
avec un nouvel appareil.
Les informations de couplage précédentes sur ce
canal sont supprimées.
6Suivez les instructions qui s'affichent sur
l'appareil que vous souhaitez connecter au clavier.
Recherchez le nom de clavier MX-LP x.1-BTx sur
votre périphérique hôte. Veuillez terminer le
processus de connexion dans les 30 secondes,
faute de quoi le temporisateur de la recherche
expirera. Dans ce cas, veuillez relancer le
processus de couplage sur votre clavier (étape 4).
Veuillez noter que les étapes 2, 3 et 6 s'appliquent
uniquement lorsque vous connecter un nouvel
appareil.
Si la connexion est établie, le voyant LED du canal
sélectionné s'allume en bleu pendant 3 secondes.
3.3Connexion du clavier via le récepteur
Suivez les étapes ci-dessous pour connecter votre
clavier par le biais de la connexion sans fil 2,4GHz.
1Mettez le clavier en marche (mettez le
commutateur sur « I » à l'arrière du clavier).
2Connectez le récepteur à un port USB 2.0 de votre
appareil.
3Tout en maintenant la touche fn enfoncée,
appuyez sur la touche du réseau sans fil ().
Le clavier doit maintenant être connecté à votre
périphérique hôte (ordinateur de bureau, ordinateur
portable, etc.).
4Modification du type de connexion
Si vous avez établi une connexion via un câble USB,
Bluetooth ou un récepteur, vous pouvez basculer
entre les types de connexion à l'aide de la touche Fn
et de la touche correspondante.
•Maintenez la touche fn enfoncée et appuyez sur la
touche appropriée comme indiqué dans le
tableau.
La LED de la touche sélectionnée clignote en blanc
lorsque la connexion est en train d’être établie. La
LED revient en mode de rétroéclairage normal
lorsque le type de connexion est modifié.
Bluetooth 5.2 nécessite Windows 10 ou
une version ultérieure
Utilisez le clavier uniquement avec des
ordinateurs de bureau ou des ordinateurs
portables dotés du système d'exploitation Windows
10 ou version ultérieure, ou connectez-le à l'aide
d'un câble USB.
Touche fn + toucheFonction
Connexion par câble USB
Connexion via Bluetooth
Connexion via un récepteur
sans fil (2,4GHz RF)
4.1Basculement entre des appareils
connectés via Bluetooth
Si vous avez connecté le clavier à plusieurs appareils
(par exemple, un ordinateur de bureau, une console
de jeux et un téléviseur) via les 3 canaux Bluetooth,
vous pouvez basculer entre ces appareils.
1Passez à la connexion Bluetooth.
2Appuyez sur la touche fn et sur la touche de canal
Bluetooth (, , ) pour sélectionner le
canal souhaité.
Le clavier est connecté au périphérique
correspondant via Bluetooth.
4.2Affichage de l'état de la connexion
Vous pouvez afficher le type de connexion et le canal
Bluetooth sélectionnés en appuyant sur la touche fn.
La LED de la touche correspondant au type de
connexion (Z, X, C) s'allume en blanc. La LED de la
touche correspondant au canal Bluetooth (Q, W, E)
s'allume en bleu (uniquement lorsque la connexion
Bluetooth est utilisée). Si la connexion sélectionnée
n'est pas active, la LED s'allume en rouge.
L'éclairage reste allumé tant que la touche fn est
enfoncée.
5Installation du logiciel CHERRY
Gaming
Pour exploiter pleinement le potentiel du clavier MX-
LP 2.1 ou 6.1, vous devez installer le logiciel CHERRY
Gaming sur votre ordinateur de bureau ou sur votre
ordinateur portable. Avec le logiciel CHERRY Gaming,
vous pouvez modifier le mode, la couleur et la vitesse
de rétroéclairage, attribuer des macros aux touches
et régler les paramètres pour contrôler les
comportements du clavier. Les macros peuvent être
enregistrées et modifiées.
Le logiciel CHERRY Gaming a une commande
intuitive et comprend une fonction d'aide. Vous
pouvez également contacter notre assistance si
nécessaire.
1Utilisez toujours la dernière version du logiciel.
2Connectez le clavier via le câble.
3Téléchargez le logiciel gratuit sur :
www.cherry-world.com ou www.cherry.de.
Ou bien :
Appuyez sur la combinaison de touches CHERRY
(fn+ ) pour ouvrir le lien web qui vous
redirigera vers la page de téléchargement du
logiciel CHERRY Gaming.
4Suivez les instructions qui s’affichent sur l'écran.
5.1Exécution du logiciel CHERRY Gaming
Lorsque le logiciel CHERRY Gaming est installé, vous
pouvez appuyer sur la combinaison de touches
CHERRY pour lancer l'application.
5.2Mise à jour du micrologiciel
Si une version plus récente du micrologiciel est
disponible, le logiciel CHERRY Gaming vous invite à
mettre à jour le micrologiciel de votre clavier. La
mise à jour du micrologiciel vers la dernière version
garantit des performances optimales de votre clavier.
Branchez le récepteur sans fil pour vous assurer que
son micrologiciel est également mis à jour vers la
dernière version.
6Découverte de fonctions
supplémentaires
Votre clavier est fourni avec de nombreuses fonctions
intégrées, dont certaines sont identifiées par des
symboles imprimés sur la sous-ligne. Pour exécuter
la fonction souhaitée, maintenez la touche fn
enfoncée et appuyez sur la touche appropriée.
Reportez-vous au tableau ci-dessous pour plus de
détails. Exemple : appuyez sur [fn + y] pour exécuter
la fonction d’impression écran [Prt Sc].
Pour maintenir la touche fn active (verrouillée),
appuyez sur la touche control et maintenez-la
enfoncée, puis appuyez sur la touche fn. La LED de la
touche fn s'allume en rouge lorsque la touche fn est
verrouillée. Appuyez de nouveau sur les touches
control + fn pour déverrouiller la touche fn.
7Utilisation du mode Gaming
Votre clavier est fourni avec un mode Gaming.
Lorsque vous jouez à des jeux vidéo, vous pouvez
désactiver la touche pour éviter les interruptions
indésirables.
1Appuyez sur la touche fn et maintenez-la
enfoncée, puis appuyez sur la touche pour
activer le mode Gaming.
La LED de la touche s'allume en rouge. En
mode Gaming, les touches ou combinaisons de
touches suivantes sont désactivées : , , alt
+ fn + F4, alt + tab, control + alt + Suppr., control +
esc.
2Appuyez de nouveau sur fn + pour quitter le
mode Gaming.
8Chargement du clavier
Lorsque la batterie du clavier est faible, la LED de la
touche Échap clignote en rouge et le rétroéclairage
est désactivé. Cela indique que vous devez bientôt
charger votre clavier.
Pour charger votre clavier, utilisez le câble USB
fourni et raccordez-le au port USB à l'arrière du
clavier et à un port USB de l'ordinateur de bureau ou
de l'ordinateur portable.
La LED de la touche Échap s'allume en orange pour
indiquer que le chargement est en cours. La LED de
la touche Échap revient au rétroéclairage normal
lorsque le clavier est complètement chargé. Le
circuit de charge empêche la surcharge.
La batterie du clavier est chargée tant que
l’ordinateur de bureau ou l'ordinateur portable est
allumé. Vous pouvez continuer à travailler pendant le
chargement. La connexion par câble, Bluetooth ou
sans fil sélectionnée est conservée.
9Réinitialisation des paramètres
d’usine du clavier
Appuyez sur les touches fn + Retour arrière et
maintenez-les enfoncées pendant 5 secondes pour
réinitialiser les paramètres d’usine du clavier. Toutes
les LED du clavier s'allument en blanc pendant 2
secondes pour confirmer la réinitialisation.
Dans de rares cas où une réinitialisation matérielle
est nécessaire, vous pouvez insérer une épingle (ou
Mise à jour du micrologiciel du clavier en
mode câble
Pour éviter les erreurs dues à une batterie
vide, connectez toujours le câble USB avant de
mettre à jour le micrologiciel.
FonctionAppuyez sur
F1 – F9fn + 1 – 9
F10fn + 0
F11fn + (- _)
F12fn + (= +)
Prt Scfn + Y
Arrêt défilementfn + U
Pausefn + I
Accueilfn + (, <)
Finfn + (. >)
Menufn + (/ ?)
Caractère `fn + esc
Caractère ~fn + maj + esc
Personnalisation du
rétroéclairage
fn + H
un trombone) dans le petit trou situé au bas du
clavier et appuyer pendant 3 secondes. Parallèlement
à la réinitialisation des paramètres d’usine, les
informations de couplage Bluetooth sont effacées.
10Nettoyage du clavier
REMARQUE : Le clavier peuvent être endommagés
en cas d’utilisation de détergents agressifs ou de
pénétration de liquide dans le clavier !
1Éteignez le clavier et débranchez le câble USB.
2Nettoyez le clavier à l'aide d'un chiffon
légèrement humide et d'un détergent doux
(comme du liquide vaisselle).
•N'utilisez pas de solvants tels que de la
gazoline, du benzène, de l'alcool, des agents
abrasifs ou des tampons à récurer abrasifs.
•Veillez à ce qu’aucun liquide ne pénètre dans
le clavier.
3Séchez le clavier à l'aide d'un chiffon doux non
pelucheux.
11Résolution des problèmes
Si vous rencontrez des problèmes lors de l'utilisation
du clavier, essayez les solutions suivantes :
•Éteignez puis rallumez le clavier.
•Utilisez un autre port USB de votre ordinateur de
bureau ou ordinateur portable.
•Assurez-vous que le clavier n'est pas défectueux.
Testez-le avec un autre ordinateur de bureau ou
ordinateur portable.
•Réglez les options « USB Keyboard Support »
(prise en charge du clavier USB) et « USB Legacy
Mode » (mode USB hérité) sur « Enabled » (activé)
dans le BIOS de votre PC.
•Chargez le clavier à l'aide du câble USB (voir : « 8
Chargement du clavier »).
•Retirez tout objet causant des interférences entre
le clavier et l’ordinateur de bureau ou l'ordinateur
portable. Les interférences sont causées en
particulier par des objets métalliques ou
électriques tels que des câbles, des haut-parleurs
ou des concentrateurs USB.
•Réduisez la distance entre les périphériques et
l’ordinateur de bureau ou l'ordinateur portable.
•En cas d'interférences lorsque vous utilisez des
appareils USB 3.0 à proximité du récepteur :
utilisez un autre port plus éloigné, utilisez un
autre câble ou un hub USB pour le récepteur ou
l'appareil USB 3.0.
11.1Résolution des échecs de connexion
Bluetooth
•Si votre ordinateur de bureau ou ordinateur
portable est en mode veille, vous ne pouvez pas le
réactiver en utilisant des périphériques Bluetooth.
Allumez manuellement l’ordinateur de bureau ou
l'ordinateur portable.
•Si le clavier a déjà été connecté à un autre
périphérique sur le canal sélectionné, vous ne
pouvez pas établir de connexion parallèle.
Éteignez le premier appareil ou désactivez la
connexion.
•Désactivez tous les périphériques Bluetooth
inutiles.
•Supprimez la connexion avec le clavier dans la
configuration Bluetooth et ajoutez-la de nouveau
en tant que nouveau périphérique.
•Il se peut que certaines versions antérieures des
systèmes d'exploitation ne prennent pas en
charge Bluetooth 5.2. Utilisez un récepteur
Bluetooth externe.
•Si vous avez attribué différents canaux Bluetooth :
changez de canal Bluetooth si nécessaire (voir : «
4.1 Basculement entre des appareils connectés
via Bluetooth »).
11.2Résolution des échecs de connexion
sans fil
•Connectez le récepteur à un port USB 2.0 de votre
ordinateur de bureau ou de votre ordinateur
portable (il s'agit généralement d'un port de
couleur blanche ou noire). Des
dysfonctionnements se produisent parfois sur les
ports USB 3.0 (USB de couleur bleue).
•Connectez le récepteur à un autre port USB 2.0 de
l’ordinateur de bureau ou de l'ordinateur portable.
•Réduisez la distance entre le récepteur et le
clavier en connectant le récepteur à un port USB
situé à proximité des appareils.
•Utilisez une rallonge USB pour placer le récepteur
le plus près possible du clavier.
•Utilisez le logiciel CHERRY Gaming pour coupler à
nouveau le récepteur avec le clavier.
12Mise au rebut des appareils
•Ne jetez pas les appareils portant ce
symbole dans les ordures ménagères.
•Mettez les appareils au rebut
conformément à la réglementation en
vigueur : en les apportant à votre
revendeur local ou dans les centres de
recyclage municipaux.
13Données techniques
14Contact
Cherry Europe GmbH
Cherrystraße 2
91275 Auerbach/OPf.
Allemagne
Internet : www.cherry-world.com ou www.cherry.de
①启动CHERRY电竞驱动软件。要使用电竞驱动软件
对键盘进行编程,首先必须通过USB线缆建立连
接。按住fn +键访问这个功能。
②Windows键。按住fn +启用/禁用电竞模式。
③fn键可用来访问按键的辅助功能。按住可查看连接
状态。
Fonctionnement de plusieurs périphé-
riques Bluetooth sur un ordinateur de
bureau / ordinateur portable
Votre ordinateur de bureau ou ordinateur portable
ne peut se connecter qu'à un nombre limité de
périphériques actifs utilisant le Bluetooth. Des
conflits de profil et une indisponibilité des ports
peuvent se produire lors de l'ajout d'autres
périphériques.
DésignationValeur
Tension d'alimentation
Récepteur :
5,0 V/CC ± 5 % SELV
Tension de chargeType 5,0 V/CC
Courant de chargeMax. 1000 mA
Consommation de
courant
Max. 500 mA
Batterie
Batterie lithium-ion
rechargeable, 2800 mAh
Fréquence de
fonctionnement
2402 ... 2480 MHz
Puissance rayonnée
effective
Max. 10 mW (EIRP)
Bluetooth5.2
Température de stockage-20 °C ... +45 °C
Température de
fonctionnement
0 °C ... +45 °C
简体字
操作手册
④长按fn + 退格键 5秒,可将键盘重置为出厂默认设
置。
按住fn键并按下以下按键访问您想要的功能:
⑤启用 USB 线缆连接功能。
⑥启用蓝牙连接功能。
⑦启用 2,4GHz RF 无线连接功能。
⑧启用蓝牙通道1,2,或3。长按此按键组合3秒钟
将在指定蓝牙通道重新建立配对。
⑨打开默认网页浏览器。
⑩打开 Windows 浏览器(此电脑)
⑪上一首
⑫播放/暂停
⑬下一首
⑭更改背光效果
⑮调亮背光效果
⑯调暗背光效果
⑰减慢背光效果
⑱加速背光效果
⑲静音/取消静音
⑳调高音量
调低音量
在开始操作之前...
CHERRY MX-LP 2.1和6.1 紧凑型无线键盘是三模键
盘,提供三种连接方式:2.4GHz无线连接+ 5.2蓝牙
连接+有线USB线缆连接。此款键盘专为电竞领域开
发,用于操作电脑或笔记本电脑。
有关其它产品、软件下载和更多信息,请访问
CHERRY全球网站 www.cherry-world.com 或
CHERRY中国官网www.cherry.cn 。
1安全指南
吞咽小零件可能会引起窒息危险。
•请将键盘妥善保存在 3 岁以下儿童无法够及之
处。
固定安装的可充电电池可导致火灾。
•请勿通过拆解、挤压、加热或燃烧等方式毁坏键
盘。
RSI 代表“Repetitive Strain Injury”,即“重复性劳
损”。
RSI 是由于频繁重复的小幅度运动造成的。为避免此
种情况发生,建议您:
•按照人体工程学设置您的工作环境
•将键盘和鼠标置于合适位置,确保您的上臂和手腕
可以在身体两侧自然伸展。
•多加休息,必要时进行伸展运动。
•经常变换您的身体姿势。
2开/关键盘
开启键盘电源:
•使用USB线缆把键盘与电脑连接。
或者:
•使用键盘背面的 I/O (开 = I, 关 = O ) 开关打开键盘
电源。
通电后,所有按键的 LED 灯都会显示白色2秒钟。
关闭键盘电源:
•断开USB线缆并使用键盘背面的I/O开关关闭设备
电源。
键盘在无操作状态超过 30 秒时将进入睡眠模式,仅需
消耗很小的电量。在此模式下,LED 指示灯和键盘背
光会被关闭。按下任意键可唤醒键盘,使其恢复到正
常工作模式,背光也同时恢复。
键盘在节能模式下仍会消耗电量。因此,如果长时间
不使用或需要运输时,应将电源开关置于关闭状态。
3连接键盘与设备
您可以通过 USB 线缆、蓝牙或使用 2.4GHz 无线接收
器将键盘连接到电脑、笔记本电脑或其他设备(如游
戏机或电视机)。
如果在多台设备上使用键盘,通过蓝牙连接会十分方
便:您只需要建立一次连接,并且不需要接收器。您
还可以通过蓝牙将最多三个设备与键盘相连,并在它
们之间进行切换。
3.1通过 USB 线缆连接键盘
1把键盘连接到电脑或笔记本电脑的任何一个 USB
端口。
2按住fn键的同时按下Z键()。
如果键盘正在充电,则 esc 键上的 LED 灯亮橙色
光。
3.2通过蓝牙连接键盘
由于键盘具有3个蓝牙通道,您可以将其与3个不同的
设备相连。
1开启键盘电源(把键盘背面的开关设置为“I” )。
2在您想要与键盘相连的设备上,打开对蓝牙设备的
搜索(例如,在 Windows 电脑上选择“开始” > “
设置” > “设备” > “蓝牙” )。
3请遵循操作系统的说明。
4按住fn键的同时按下“蓝牙”键 (),以激活键
盘的蓝牙连接。键盘会搜索所有3个蓝牙通道,并
尝试连接设备。
如果连接不成功且有未使用的通道,键盘会自动在
该通道上进入配对模式。
相应按键上的LED指示灯闪烁蓝光。搜索顺序是从
通道1到通道3。如果当前有一个活动通道(上一次
用过的),搜索将从该活动通道开始,一直到通道
3,然后返回到通道1。
5如果所有蓝牙通道都已被占用,您需要按住fn键+
蓝牙通道键(,,) 3秒钟,即可以开始与
新设备配对。
此通道上以前的配对信息将被删除。
6按照设备上的说明操作,键盘将连接到此设备上。
在主机设备上查找键盘名MX-LP x.1-BTx。请在
30秒内完成连接过程,否则搜索计时器将超时。这
种情况下,请在键盘上重新启动配对过程(步骤
4)。
请注意,步骤 2、3 和 6 仅在连接新设备时适用。
如果连接成功,则所选通道的按键 LED 灯会亮蓝光
3
秒钟。
3.3通过无线接收器连接键盘
按照以下步骤使用 2.4GHz 无线接收器来连接键盘:
1开启键盘电源(把键盘背面的开关设置为“I” )。
2把无线接收器连接到设备上的 USB 2.0 兼容端口。
3按住fn键的同时按下无线键 ()。
设备各不相同!
从操作手册中您可以获取有关可靠高效操作
的说明。
•请仔细阅读操作手册。
•请保管好操作手册,必要时将其转交给其他用
户。
蓝牙 5.2 需要 Windows 10 或以上版本
只能在操作系统为 Windows 10 或更高版本
的电脑、笔记本电脑上使用该键盘;或通过
USB 线缆连接。
64410165-02, DE, EN, FR, ZHs, ZHt, KO, ID, © Nov 2022 (G80-386xLxxx-X = Mod. G80-386A, G80-3882R)
CHERRY MX-LP 2.1 / 6.1 Compact Wireless
Gaming Keyboard (RGB)
Produktspecifikationer
| Varumärke: | Cherry |
| Kategori: | Tangentbord |
| Modell: | MX-LP 2.1 |
| Enhetsplacering: | Ingebouwd |
| Inbyggd display: | Ja |
| Timer: | Ja |
| Bredd: | 596 mm |
| Djup: | 580 mm |
| Höjd: | 820 mm |
| Typ av laddare: | Voorbelading |
| Dörrfärg: | Wit |
| Fördröjd starttimer: | Ja |
| Startfördröjning: | 24 uur |
| Indikering av återstående tid: | Ja |
| Barnlås: | Ja |
| Energieffektivitetsklass (gammal): | A |
| Lämplig för paneljustering: | Ja |
| Tvätt energiförbrukning: | - kWu |
| Vattenförbrukning per cykel: | - l |
| Var klass: | A |
| Årlig tvättenergiförbrukning: | 218 kWu |
| Centrifuger läkemedelsklass: | B |
| Ljudnivå (tvätt): | 56 dB |
| Övervakning av lödderskum: | Ja |
| Obalans kontrollsystem: | Ja |
| Maximal centrifugeringshastighet: | 1400 RPM |
| Dörrpanel ingår: | Nee |
| Ljudnivå under centrifugering: | 72 dB |
| Årlig tvättvattenförbrukning: | 10340 l |
| Antal tvättprogram: | 15 |
| AquaStop-funktion: | Ja |
| Halvlastad: | Ja |
| Genomgående öppningsvinkel: | 110 ° |
| Nominell kapacitet: | 7 kg |
| Wasprogramma's: | Hygiene/anti-allergy, Black, Wool, Quick |
Behöver du hjälp?
Om du behöver hjälp med Cherry MX-LP 2.1 ställ en fråga nedan och andra användare kommer att svara dig
Tangentbord Cherry Manualer

19 Oktober 2025
19 Oktober 2025
19 Oktober 2025
23 Augusti 2025
4 Augusti 2025
13 Juni 2025
6 Februari 2025
6 Februari 2025
4 Februari 2025
4 Februari 2025
Tangentbord Manualer
Nyaste Tangentbord Manualer
3 April 2026
2 April 2026
1 April 2026
31 Mars 2026
31 Mars 2026
29 Mars 2026
29 Mars 2026
29 Mars 2026
28 Mars 2026