Cisco SPA 508G Bruksanvisning
Läs gratis den bruksanvisning för Cisco SPA 508G (2 sidor) i kategorin Telefon. Guiden har ansetts hjälpsam av 14 personer och har ett genomsnittsbetyg på 4.6 stjärnor baserat på 2 recensioner. Har du en fråga om Cisco SPA 508G eller vill du ställa frågor till andra användare av produkten? Ställ en fråga
Sida 1/2
Quick Start Guide
Cisco Small Business
IP Phone Models SPA501G, SPA502G, SPA504G,
SPA508G, and SPA509G
Package Contents
•IP Telephone
•Phone Stand
•RJ-45 Ethernet Cable
•Quick Start Guide
•Documentation on CD-ROM
Welcome
Thank you for choosing the Cisco Small Business IP phone. This guide
describes how to install your phone and how to perform some basic tasks. The
features available on your phone depend on the type of system to which your
phone is connected. Your phone system might not provide all of the features
mentioned in this document. Contact your phone system administrator for
questions about phone features.
Installing Your IP Phone
Use these procedures to install the phone and connect it to your network.
1
S1TEPTurn the phone body over to expose the ports on the back of the unit.
CAUTIONDo not insert a telephone line cord into the auxiliary port.
S2TEPInsert the long end of the phone cord into the handset port on the
phone body that is marked with a phone symbol.
S3TEP(Optional) Route the phone cord through the cable slot.
S4TEPInsert the other end of the phone cord into the port at the bottom of the
handset (not shown).
S5TEP(Optional) Connect the phone stand by lining up the tabs on the stand
with the slots on the phone body. Slide the bottom tabs into the lower
slots on the phone body and lightly press down on the stand. It should
easily slide into the upper stand slots. Do not force.
S6TEPIf you are using an external power source, insert one end of the power
cord into an outlet and insert the other end of the power cord into the
power port on the phone body.
S7TEPConnect your phone to the network:
•Using an Ethernet Connection—Insert one end of the Ethernet cable
into the network port on the phone body marked “SW.” Insert the
other end of the Ethernet cable into the appropriate device, such as
a network switch, on your network.
•Using a Wireless Connection—You can use a Cisco WBP54G
Wireless-G Bridge with the IP phone to create a wireless
connection between the phone and the network. See the WBP54G
documentation on Cisco.com for more information. The Where to
Go From Here section contains links to the documentation area on
Cisco.com
S8TEP(Optional) To provide network access to a PC, connect one end of an
additional Ethernet cable (not provided) to the PC port on the back of
the phone body. Connect the other end of the Ethernet cable to the
network port on your PC.
S9TEP(Optional) To install the phone on a vertical surface, use the Cisco
MB100 Wall Mount bracket. See the
Cisco Small Business IP Phone
SPA50X User Guide (SIP)
or the
Cisco Unified Communications
Manager Express for the Cisco Small Business IP Phone SPA50X
documents on Cisco.com for more information. The Where to Go From
Here section contains links to the documentation area on Cisco.com.
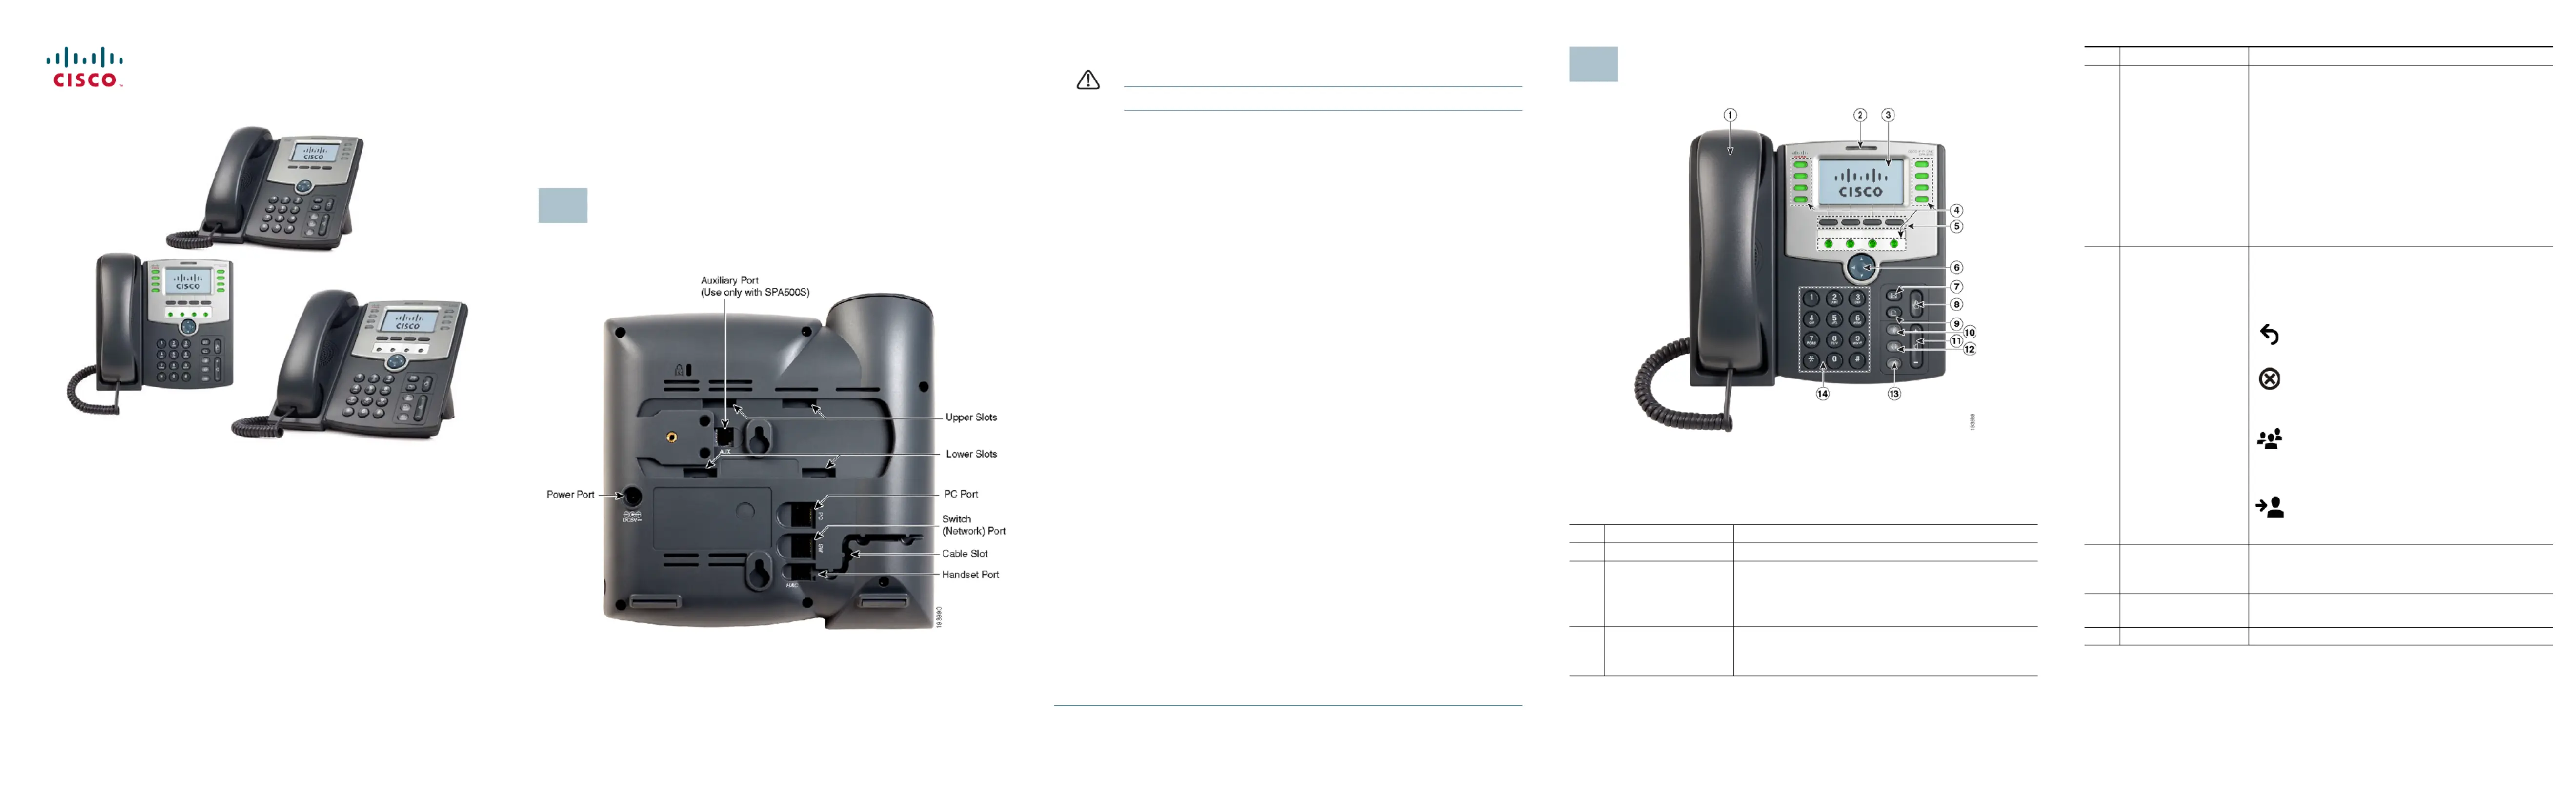
Phone Lines and Buttons
The photo above shows the Cisco SPA509G. Other models differ.
Numbered objects in the photo are explained in the following table.
#Phone FeatureDescription
1HandsetPick up to place or answer a call.
2Message Waiting
Indicator
Displays solid red when you have a new voice
mail message. Flashes red during an incoming call
or when the phone’s firmware is being updated.
(Behavior may differ depending on phone system.)
3LCD ScreenDisplays date and time, phone station name, line
extensions, and softkey options. (Not available on
the Cisco SPA501G.)
2
4Line keysIndicates phone line status. (Not available on the
Cisco SPA502G.) These keys can also be
programmed by your phone system administrator
to perform functions such as speed dial, call
pickup, or monitoring an extension.
Line colors depend on the type of phone system
to which your phone is connected. (SIP or SPCP).
See the User Guide for your phone for more
information. The Where to Go From Here section
contains links to the documentation area on
Cisco.com.
5Softkey buttonsPress a softkey button to perform the action
shown on the label on the LCD screen above.
Note
Note
Note
NoteNote: The Cisco SPA501G has the following four
buttons:
Redial—Dials the last number called.
Cancel—Cancels an action (such as a
transfer).
Conference—While on a call, press to start
a conference call and dial another number.
After the second party answers, press
Conf
Conf
Conf
ConfConference
erence
erence
erenceerence again to create the conference.
Transfer—While on a call, press to transfer,
then dial the number to which to transfer.
Press Tr
Tr
Tr
TrTra
a
a
aan
n
n
nns
s
s
ssf
f
f
ffe
e
e
eer
r
r
rr again to transfer the call.
6Navigation buttonPress an arrow to scroll left, right, up, or down
through items shown on the LCD screen. (Not
available on the Cisco SPA501G.)
7Messages buttonPress to access voice mail (must be set up by
your phone system administrator).
8Hold buttonPress to place a call on hold.
#Phone FeatureDescription
Produktspecifikationer
| Varumärke: | Cisco |
| Kategori: | Telefon |
| Modell: | SPA 508G |
| Inbyggd display: | Ja |
| Vikt: | 900 g |
| Bredd: | 214 mm |
| Djup: | 212 mm |
| Höjd: | 44 mm |
| Upplösning: | 128 x 64 pixlar |
| Antal färger: | monokrom |
| Samtalsblockering: | Ja |
| Trådlösa anslutningar: | Nej |
| Full duplex: | Ja |
| Hörlursanslutning: | 2,5 mm |
| Strömförsörjning via Ethernet (PoE) stöd: | Ja |
| Antal LAN (RJ-45) anslutningar: | 2 |
| Vidarekoppling: | Ja |
| Samtal väntar: | Ja |
| Högtalartelefon: | Ja |
| Displaytyp: | LCD |
| Snabbuppringning: | Ja |
| Mac-kompatibel: | Nej |
| LED på basenheten: | Ja |
| Ringsignalens placering: | Bas |
| Klarar konferenssamtal: | Ja |
| Pausat samtal: | Ja |
| Internet-anslutning: | Ja |
| On-hook-uppringning: | Ja |
Behöver du hjälp?
Om du behöver hjälp med Cisco SPA 508G ställ en fråga nedan och andra användare kommer att svara dig
Telefon Cisco Manualer

13 Juni 2025
3 Oktober 2024
20 September 2024
31 Augusti 2024
29 Augusti 2024
25 Augusti 2024
25 Augusti 2024
24 Augusti 2024
23 Augusti 2024
21 Augusti 2024
Telefon Manualer
Nyaste Telefon Manualer
2 April 2026
2 April 2026
27 Mars 2026
26 Mars 2026
16 Mars 2026
14 Mars 2026
13 Mars 2026
4 Mars 2026
30 Januari 2026
25 Januari 2026