Energizer ECA002 Bruksanvisning
Energizer ej kategoriserat ECA002
Läs gratis den bruksanvisning för Energizer ECA002 (7 sidor) i kategorin ej kategoriserat. Guiden har ansetts hjälpsam av 19 personer och har ett genomsnittsbetyg på 5.0 stjärnor baserat på 4 recensioner. Har du en fråga om Energizer ECA002 eller vill du ställa frågor till andra användare av produkten? Ställ en fråga
Sida 1/7
UM_1_ ECA002_EN_2.1
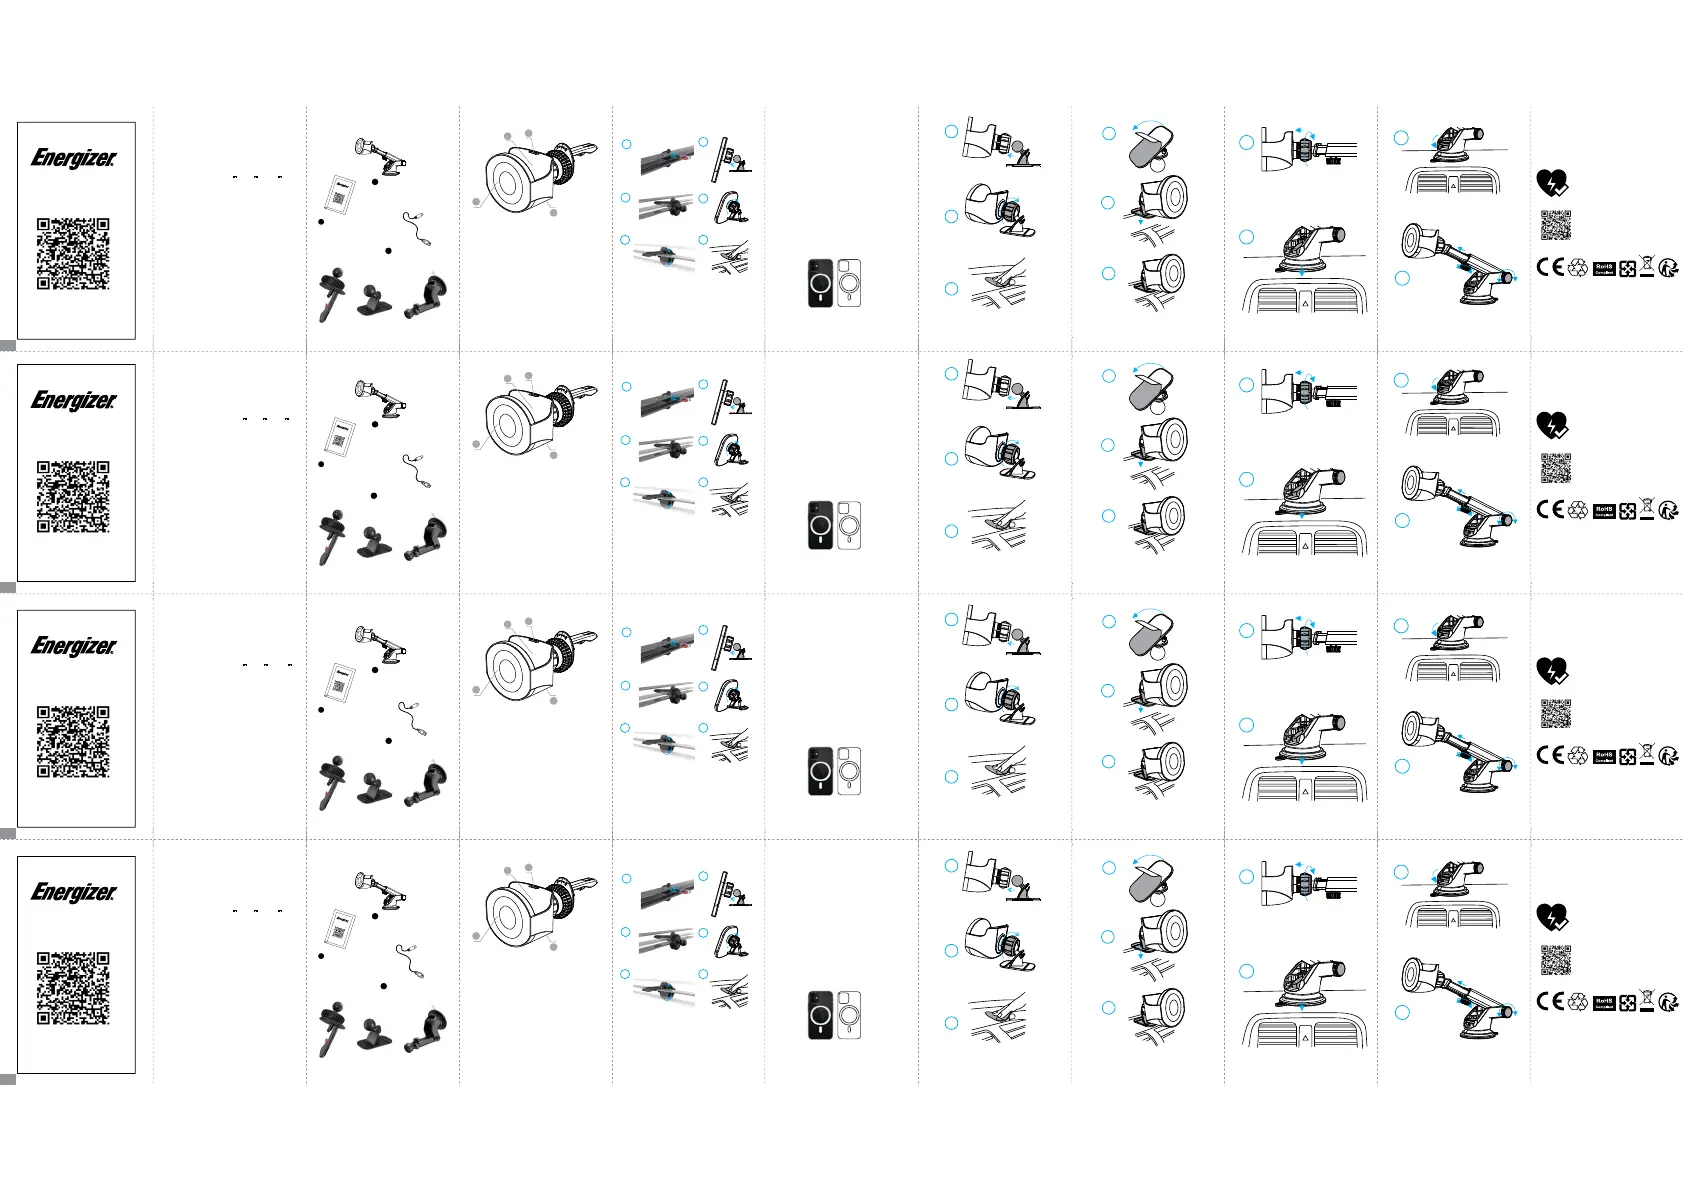
Package Contents
How to USE
1 ECA002
2 User Manual
3 Charging Cable
Dispose the baמּery properly, seek for local disposal facility for advice.
Do not dispose, dissemble, damage, or incinerate the baמּery at all time.
WARRANTY
All products from the date of purchase are qualified for limited time
warranty. For more warranty information, please visit:
hמּp://www.energizerpowerpacks.com
Safety Instructions
• Avoid water, heat, fire, penetration of the product, and
severe drops at all times.
• Do not insert other object to the USB ports other than the
USB connectors.
• During charging, your device and the product may feel
slightly warm, this is normal.
• Do not clean the product with water or other cleaning
products, clean the exterior with a lightly weמּed cloth or napkin.
• Any intentional and physical damage to the product will not
be under the warranty conditions.
• Do not place any metal or flammable object on top of
this product.
• This product is not suitable for extreme climates, please
store and use this product properly.
1. Unscrew the back of the charging pad to install the air vent clip
2. Install the charging pad to the air vent clip
3. Screw the charging pad tightly onto the air vent clip
4. Install the air vent clip to the air vent
5. Adjust the air vent clip and charging pad to your preferred angle
6. Tighten the screw on the air vent clip to stablize the charging pad
7. Connect the charging cable to the charging pad to begin charging
1. Install the charging pad to the windshield mount
2. Place your windshield mount on the windshield or dashboard
1. Install the charging pad onto the dash mount
2. Screw the charging pad tightly onto the dash mount
3. Clean the surface to ensure beמּer aמּachment
4. Remove the back of the sticker
5. Place your dash mount where it’s suitable for your viewing
6. Connect USB charging cable to the charging pad to
begin charging
LED Light Indicator
Blue light: Smartphone is charging
Green light: Earbuds is charging
Flashing blue light: Foreign object detection, please remove the
object immediately
Flashing green light: Foreign object detection, please remove
the object immediately
1
2
3
4
5
6
1
2
3
4
1. Smartphone Magnetic Charging Pad
2. LED Indicator
3. USB-C Port
4. Earbuds Wirelss Charger
3. Press down the stabilizer for strong aמּachment
4. Adjust the legth and angle to your preferred angle
Download Manual
UM_1_ ECA002_FR_2.1
Contenu du package
Comment UTILISER
1 ECA002
2 Manuel de l'utilisateur
3 Câble de chargement
Éliminez correctement la baמּerie, demandez conseil à un centre de
recyclage local.
Ne pas jeter, démonter, endommager ou incinérer la baמּerie en aucun cas.
GARANTIE
Tous les produits à partir de la date d'achat sont admissibles à une
garantie limitée. Pour plus d'informations sur la garantie, veuillez visiter:
hמּp://www.energizerpowerpacks.com
nstructions de sécurité
• Évitez l'eau, la chaleur, le feu, la pénétration du produit et les
chutes importantes en tout temps.
• Ne pas insérer d'autres objets dans les ports USB autre que les
connecteurs USB.
• Pendant la charge, votre appareil et le produit peuvent être
légèrement chauds, ceci est normal.
• Ne nettoyez pas le produit avec de l'eau ou d'autres produits
de nettoyage, nettoyez l'extérieur avec un chiffon ou une
serviette légèrement humide.
• Tout dommage intentionnel et physique au produit ne sera pas
couvert par la garantie.
• Ne placez aucun objet métallique ou inflammable sur ce produit.
• Ce produit n'est pas adapté aux climats extrêmes, veuillez
donc le ranger et l'utiliser correctement.
1. Dévissez l'arrière du pad de charge pour installer le clip de ventilation
2. Installez le pad de charge sur le clip de ventilation
3. Vissez fermement le pad de charge sur le clip de ventilation
4. Installez le clip de ventilation sur la grille d'aération
5. Ajustez le clip de ventilation et le pad de charge à l'angle souhaité
6. Serrez la vis sur le clip de ventilation pour stabiliser le pad de charge
7. Connectez le câble de charge au pad de charge pour commencer la charge
1. Installer le tapis de chargement sur le support de pare-brise
2. Placer votre support de pare-brise sur le pare-brise ou le tableau
de bord
1. Installer le tapis de chargement sur le support de tableau de bord
2. Visser fermement le tapis de chargement sur le support de
tableau de bord
3. Neמּoyer la surface pour assurer une meilleure fixation
4. Retirer l'arrière de l'autocollant
5. Placer votre support de tableau de bord là où il est adapté à
votre vision
6. Connecter le câble de charge USB au tapis de chargement pour
commencer la charge
Indicateur lumineux LED
Lumière bleue : Le smartphone est en charge
Lumière verte : Les écouteurs sont en charge
Lumière bleue clignotante : Détection d'un objet étranger, veuillez le
retirer immédiatement
Lumière verte clignotante : Détection d'un objet étranger, veuillez le
retirer immédiatement
1
2
3
4
5
6
1
2
3
4
1. Pad de chargement magnétique pour smartphone
2. Indicateur LED
3. Port USB-C
4. Chargeur sans fil pour écouteurs
3. Appuyer sur le stabilisateur pour une fixation solide
4. Ajuster la longueur et l'angle selon vos préférences
Télécharger le manuel
UM_1_ ECA002_ES_2.1
Contenido del paquete
Cómo USAR
1 ECA002
2 Manual del usuario
3 Cable de carga
Deseche la batería adecuadamente, busque un centro de eliminación local
para obtener asesoramiento.
No deseche, desmonte, dañe o incinere la batería en ningún momento.
Garantía
Todas los productos desde la fecha de compra están calificados para
garantía limitada de tiempo. Para obtener más información sobre la
garantía, visite: hמּp://www.energizerpowerpacks.com
Instrucciones de seguridad
• Evite el agua, el calor, el fuego, la penetración del producto y
las caídas severas en todo momento.
• No inserte ningún otro objeto en los puertos USB que no sean
los conectores USB.
• Durante la carga, su dispositivo y el producto pueden sentirse
ligeramente cálidos, esto es normal.
• No limpie el producto con agua u otros productos de limpieza,
limpie el exterior con un paño o servilleta ligeramente
humedecidos.
• Cualquier daño intencional o físico al producto no estará
cubierto por las condiciones de garantía.
• No coloque ningún objeto metálico o inflamable encima de
este producto.
• Este producto no es adecuado para climas extremos, por favor,
guarde y use este producto correctamente.
1. Desenrosque la parte trasera del almohadilla de carga para instalar el clip
de la ventilación del aire.
2. Instale la almohadilla de carga en el clip de la ventilación del aire.
3. Atornille firmemente la almohadilla de carga en el clip de la ventilación
del aire.
4. Instale el clip de la ventilación del aire en la salida de aire.
5. Ajuste el clip de la ventilación del aire y la almohadilla de carga a su ángulo
preferido.
6. Apriete el tornillo en el clip de la ventilación del aire para estabilizar la
almohadilla de carga.
7. Conecte el cable de carga a la almohadilla de carga para comenzar a cargar.
1. Instale la almohadilla de carga en el soporte para parabrisas.
2. Coloque su soporte para parabrisas en el parabrisas o en el tablero.
1. Instale la almohadilla de carga en el soporte del tablero.
2. Atornille firmemente la almohadilla de carga en el soporte
del tablero.
3. Limpie la superficie para asegurar una mejor fijación.
4. Retire la parte posterior de la pegatina.
5. Coloque su soporte del tablero donde sea adecuado para su
visualización.
6. Conecte el cable de carga USB a la almohadilla de carga para
comenzar a cargar.
Indicador de luz LED
Luz azul: El smartphone se está cargando
Luz verde: Los auriculares se están cargando
Luz azul intermitente: Detección de objeto extraño, por favor retire
el objeto inmediatamente
Luz verde intermitente: Detección de objeto extraño, por favor retire
el objeto inmediatamente
1
2
3
4
5
6
1
2
3
4
1. Almohadilla de carga magnética para smartphone
2. Indicador LED
3. Puerto USB-C
4. Cargador inalámbrico de auriculares
3. Presione hacia abajo el estabilizador para una fuerte sujeción.
4. Ajuste la longitud y el ángulo a su ángulo preferido.
Descargar Manual
UM_1_ ECA002_IT_2.1
Contenuto della confezione
Come USARE
1 ECA002
2 Manuale utente
3 Cavo di ricarica
Smaltisci correמּamente la baמּeria, cerca un centro di smaltimento locale
per consigli.
Non smaltire, smontare, danneggiare o incenerire la baמּeria in nessun
momento.
GARANZIA
Tuמּi i prodoמּi dalla data di acquisto sono idonei per la garanzia
limitata. Per ulteriori informazioni sulla garanzia, visita:
hמּp://www.energizerpowerpacks.com
Istruzioni per la sicurezza
• Evitare l'acqua, il calore, il fuoco, la penetrazione del prodotto
e le cadute gravi in ogni momento.
• Non inserire altri oggetti nelle porte USB oltre ai connettori USB.
• Durante la ricarica, il dispositivo e il prodotto possono diventare
leggermente caldi, questo è normale.
• Non pulire il prodotto con acqua o altri prodotti per la pulizia,
pulire l'esterno con un panno leggermente umido o una salvietta.
• Qualsiasi danno intenzionale e fisico al prodotto non sarà
coperto dalle condizioni di garanzia.
• Non posizionare nessun oggetto metallico o infiammabile
sopra questo prodotto.
• Questo prodotto non è adatto per climi estremi, si prega di
conservare e utilizzare correttamente questo prodotto.
1. Svitare il retro del pad di ricarica per installare la clip della presa d'aria
2. Installare il pad di ricarica sulla clip della presa d'aria
3. Avvitare saldamente il pad di ricarica sulla clip della presa d'aria
4. Installare la clip della presa d'aria sulla presa d'aria
5. Regolare la clip della presa d'aria e il pad di ricarica all'angolo preferito
6. Stringere la vite sulla clip della presa d'aria per stabilizzare il pad di ricarica
7. Collegare il cavo di ricarica al pad di ricarica per iniziare la ricarica
1. Installare il pad di ricarica sul supporto per parabrezza.
2. Posizionare il supporto per parabrezza sul parabrezza o sul
cruscoמּo.
1. Installare il pad di ricarica sul supporto per cruscoמּo.
2. Avvitare saldamente il pad di ricarica sul supporto per cruscoמּo.
3. Pulire la superficie per garantire una migliore aderenza.
4. Rimuovere il retro dell'adesivo.
5. Posizionare il supporto per cruscoמּo dove è adaמּo alla tua visione.
6. Collegare il cavo di ricarica USB al pad di ricarica per iniziare
la ricarica.
Indicatore a LED
Luce blu: Lo smartphone si sta caricando
Luce verde: Gli auricolari si stanno caricando
Luce blu lampeggiante: Rilevamento di un oggeמּo estraneo,
rimuovere immediatamente l'oggeמּo
Luce verde lampeggiante: Rilevamento di un oggeמּo estraneo,
rimuovere immediatamente l'oggeמּo
1
2
3
4
5
6
1
2
3
4
1. Piastra di ricarica magnetica per smartphone
2. Indicatore a LED
3. Porta USB-C
4. Caricatore wireless per auricolari
3. Premere verso il basso lo stabilizzatore per un fissaggio
robusto.
4. Regolare lunghezza e angolo secondo le tue preferenze.
Manuale di download
©2024 Energizer. Energizer, Energizer Character and certain graphic designs
are trademarks of Energizer Brands, LLC and related subsidiaries and are
used under license by TennRich International Corp..
EN
Specification :
Model Name : ECA002
Cell Type : Lithium Polymer
Rated Input : USB-C 5V 3A,9V 3A,12V 3A
Mobile Phone : 15W/10W/7.5W/5W
Earphone Output : 5W (Max.)
Dimensions : 62(L) x66.5(W) x60(H) mm
Weight : 78.5g±10g
ECA002
Package Content :
Mangentic Wireless Car Charger
Air Vent Mount
Windshield Mount
Dash Mount
USB-C Charging Cable
Air Vent Mount
Dash MountWindshield Mount
1
2
36
4
5
How to Pick the Right Case
Please use comptatible magnetic case for optimal results.
iPhone 11/X/8/SE series can charge wirelessly with a magnetic
case that’s compatible with the charging stand.
2
4
1
3
Guarantees against short circuit and
over-charging for your power bank and
devices.
PowerSafe Management
Customer Service
For any question about the product,
please contact us at
Do
wn
l
o
a
d
M
a
nu
a
l
E
N
E
C
A00
2
©2024 Energizer. Energizer, le personnage Energizer et certains dessins
graphiques sont des marques de commerce de Energizer Brands, LLC et de
ses filiales associées et sont utilisés sous licence par TennRich International
Corp..
FR
Spécification :
Nom du modèle : ECA002
Type de cellule : Lithium Polymère
Entrée nominale : USB-C 5V 3A,9V 3A,12V 3A
Téléphone portable : 15W/10W/7.5W/5W
Sortie pour écouteurs : 5W (Max.)
Dimensions : 62(L) x66.5(W) x60(H) mm
Poids : 78.5g±10g
ECA002
Contenu de l'emballage :
Chargeur de voiture sans fil magnétique
Support de ventilation
Support de pare-brise
Support de tableau de bord
Câble de chargement USB-C
Support de
ventilation
Support de
tableau de bord
Support de
pare-brise
1
2
36
4
5
Comment choisir le bon étui
Veuillez utiliser un étui magnétique compatible pour des
résultats optimaux.
Les séries iPhone 11/X/8/SE peuvent être chargées sans fil
avec un étui magnétique compatible avec le support de charge.
2
4
1
3
Garantit contre les courts-circuits et la
surcharge pour votre baמּerie externe et vos
appareils.
Gestion PowerSafe
Service client
Pour toute question sur le produit,
veuillez nous contacter à
Do
wn
l
o
a
d
M
a
nu
a
l
E
N
E
C
A0
0
2
©2024 Energizer. Energizer, Energizer Character y ciertos diseños gráficos
son marcas comerciales de Energizer Brands, LLC y subsidiarias relacionadas
y son utilizadas bajo licencia por TennRich International Corp..
ES
Especificaciones :
Nombre del modelo: ECA002
Tipo de celda: Polímero de litio
Entrada nominal: USB-C 5V 3A, 9V 3A, 12V 3A
Teléfono móvil: 15W/10W/7.5W/5W
Salida de auriculares: 5W (máx.)
Dimensiones: 62(L) x 66.5(W) x 60(H) mm
Peso: 78.5g ± 10g
ECA002
Contenido del paquete :
Cargador de coche inalámbrico magnético
Soporte de ventilación
Soporte de parabrisas
Soporte de tablero
Cable de carga USB-C
Soporte de
ventilación
Soporte de
tablero
Soporte de
parabrisas
1
2
36
4
5
Cómo elegir la funda adecuada
Por favor, use una funda magnética compatible para obtener
resultados óptimos.
Los modelos iPhone 11/X/8/SE pueden cargarse de forma
inalámbrica con una funda magnética compatible con el
soporte de carga.
2
4
1
3
Garantiza contra cortocircuitos y
sobrecargas para su banco de energía y
dispositivos.
PowerSafe Management
Servicio al Cliente
Para cualquier pregunta sobre el producto,
por favor contáctenos en
Do
wn
l
o
a
d
M
a
nu
a
l
E
N
E
C
A0
0
2
©2024 Energizer. Energizer, Energizer Character e determinati disegni
grafici sono marchi registrati di Energizer Brands, LLC e relative sussidiarie
e sono utilizzati su licenza da TennRich International Corp..
IT
Specifiche :
Nome Modello: ECA002
Tipo di cella: Polimero di litio
Input nominale: USB-C 5V 3A,9V 3A,12V 3A
Telefono cellulare: 15W/10W/7.5W/5W
Uscita cuffie: 5W (Max.)
Dimensioni: 62(L) x66.5(W) x60(H) mm
Peso: 78.5g±10g
ECA002
Contenuto della confezione :
Caricatore per auto wireless magnetico
Supporto per griglia d'aria
Supporto per parabrezza
Supporto per cruscoמּo
Cavo di ricarica USB-C
Supporto per
griglia d'aria
Supporto per
cruscotto
Supporto per
parabrezza
1
2
36
4
5
Come scegliere la custodia giusta
Si prega di utilizzare una custodia magnetica compatibile
per oמּenere risultati oמּimali.
Le serie iPhone 11/X/8/SE possono essere caricate senza
fili con una custodia magnetica compatibile con la base
di ricarica.
2
4
1
3
Garantisce contro cortocircuiti e sovraccarichi
per la tua power bank e i tuoi dispositivi.
Gestione sicura dell'alimentazione
Servizio clienti
Per qualsiasi domanda sul prodoמּo,
ti preghiamo di contaמּarci all'indirizzo
Do
wn
l
o
a
d
M
a
nu
a
l
E
N
E
C
A0
0
2
Produktspecifikationer
| Varumärke: | Energizer |
| Kategori: | ej kategoriserat |
| Modell: | ECA002 |
Behöver du hjälp?
Om du behöver hjälp med Energizer ECA002 ställ en fråga nedan och andra användare kommer att svara dig
ej kategoriserat Energizer Manualer

26 September 2025
26 September 2025
26 September 2025
25 September 2025
29 Juli 2025
28 Juli 2025
ej kategoriserat Manualer
Nyaste ej kategoriserat Manualer
3 April 2026
3 April 2026
3 April 2026
3 April 2026
3 April 2026
3 April 2026
3 April 2026
3 April 2026
3 April 2026