Epson WorkForce WF-2540 Bruksanvisning
Läs gratis den bruksanvisning för Epson WorkForce WF-2540 (155 sidor) i kategorin Skrivare. Guiden har ansetts hjälpsam av 9 personer och har ett genomsnittsbetyg på 4.1 stjärnor baserat på 5 recensioner. Har du en fråga om Epson WorkForce WF-2540 eller vill du ställa frågor till andra användare av produkten? Ställ en fråga
Sida 1/155
Start Here
4Load paper against the right edge guide and behind the
tab line on the left edge guide, with the printable side
faceup.
Caution: Don’t load the paper sideways; always load it short
edge first.
5Slide the edge guide against the left edge of the paper,
but not too tightly.
6Flip the feeder guard back.
6
Connect the fax line
To fax, connect the included phone cord to a telephone wall
jack and to the LINE port on the back of your product. To
connect a telephone or answering machine, use the EXT. port
on your product. See the Quick Guide for more details.
Note: If you’re connecting to a DSL phone line, you must use a DSL
filter or you won’t be able to fax. Contact your DSL provider for the
necessary filter.
Read these instructions before using your product.
Note for Spanish speakers/Nota para hispanohablantes: Para
obtener instrucciones de configuración en español, consulte la Guía de
instalación en www.epson.com/support/wf2540sp (requiere una conexión
a Internet).
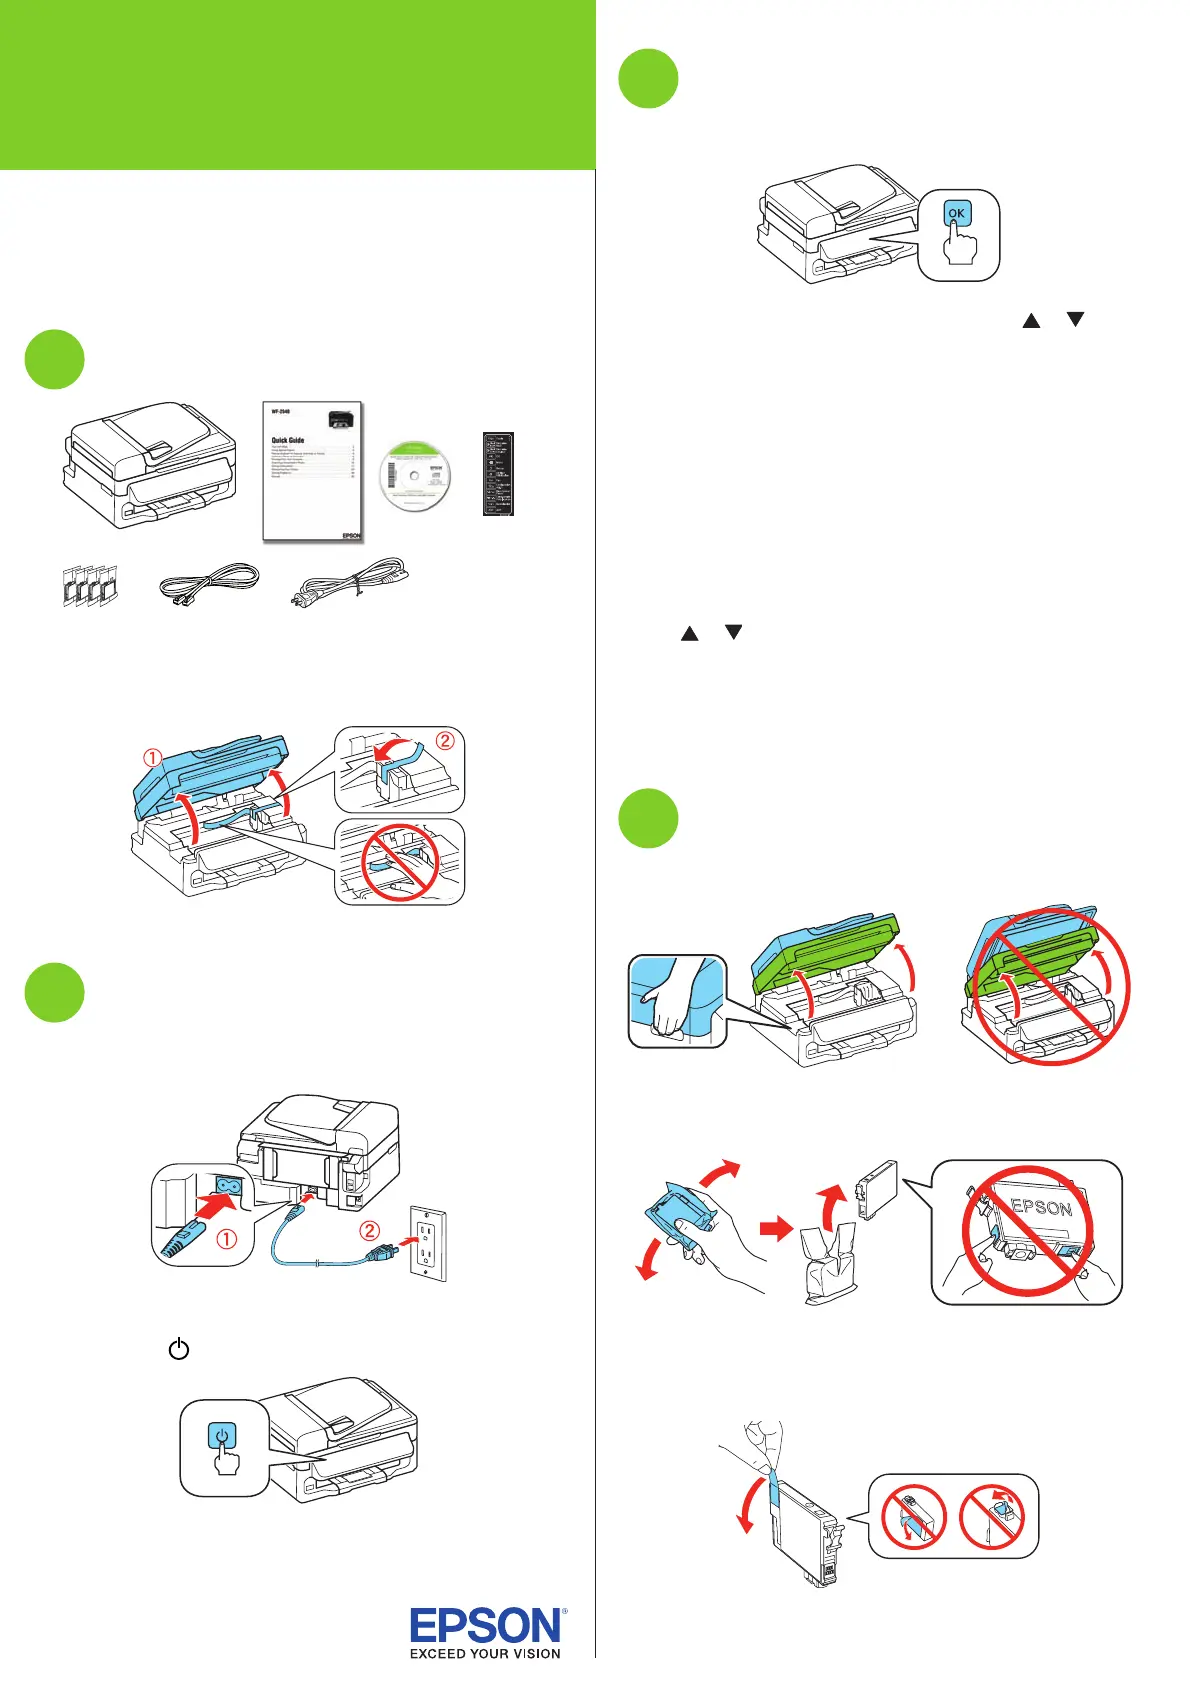
1
Unpack
French control
panel stickers
(included for
Canada only)
Caution: Do not open ink cartridge packages until you are ready to
install the ink. Cartridges are vacuum packed to maintain reliability.
Remove all protective materials, including from inside the printer.
2
Turn on
1Connect the power cord to the back of the printer and to an
electrical outlet.
Caution: Do not connect to your computer yet.
2Press the power button.
3
Select settings
1To select English as your language, press OK.
If you want to change the language, press or to
select it, then press OK.
2Select your country/region and press OK.
3Select Summer if Daylight Saving Time is in effect;
otherwise, select Winter. Press OK.
4Select the date format and press OK.
5Press the number keys to enter the date and press OK.
6Select the time format (12h or 24h) and press OK.
7Press the number keys to enter the time. Then press
or to select AM or PM, if necessary.
8 Press OK.
Note: You can change the date and time settings using the printer’s
control panel. For more information, see the online User’s Guide.
4
Install ink cartridges
1Lift up the scanner unit.
2Shake the ink cartridges gently 4 or 5 times, then unpack
them.
Caution: Don’t touch the green chip or small window on any
cartridge.
3Remove only the yellow tape from each cartridge.
Caution: Don’t remove any other seals or the cartridges may
leak.
4Insert the cartridges in the holder for each color, and
press each cartridge down until it clicks.
5Lower the scanner unit.
6Press OK to prime the ink delivery system. This takes
about 4 minutes.
Note: The cartridges included with the printer are designed
for printer set up and not for resale. After some ink is used for
priming, the rest is available for printing.
Caution: Don’t turn off the printer while it is priming or you’ll
waste ink.
Do not press the Wi-Fi Setup button unless
prompted during software installation.
5
Load paper
1Flip the feeder guard forward.
2Raise the paper support, pull out the output tray, then
raise the paper stopper.
3Slide the edge guide to the left.
*412493400*
*412493400*
WF-2540
4124934 Rev.0
1-F C
4124934 Rev.0
1-F M
4124934 Rev.0
1-F Y
4124934 Rev.0
1-F K
Produktspecifikationer
| Varumärke: | Epson |
| Kategori: | Skrivare |
| Modell: | WorkForce WF-2540 |
Behöver du hjälp?
Om du behöver hjälp med Epson WorkForce WF-2540 ställ en fråga nedan och andra användare kommer att svara dig
Skrivare Epson Manualer

9 Oktober 2025
8 Oktober 2025
8 Oktober 2025
8 Oktober 2025
8 Oktober 2025
8 Oktober 2025
8 Oktober 2025
8 Oktober 2025
8 Oktober 2025
8 Oktober 2025
Skrivare Manualer
Nyaste Skrivare Manualer
2 April 2026
22 Mars 2026
17 Mars 2026
17 Mars 2026
17 Mars 2026
17 Mars 2026
15 Mars 2026
14 Mars 2026
14 Mars 2026
14 Mars 2026