Halfords 10 Function 151632 Bruksanvisning
Halfords Cykeldator 10 Function 151632
Läs gratis den bruksanvisning för Halfords 10 Function 151632 (1 sidor) i kategorin Cykeldator. Guiden har ansetts hjälpsam av 32 personer och har ett genomsnittsbetyg på 4.9 stjärnor baserat på 5 recensioner. Har du en fråga om Halfords 10 Function 151632 eller vill du ställa frågor till andra användare av produkten? Ställ en fråga
Sida 1/1
TM: Riding Time0H00M00S-19H59M59S, 1 Second, +/- 0.05%
The TM totals the riding time from the last RESET operation.
AVG: Average Speed0.0–199.9KM/h (120.0 M/h), 0.1KM/h (M/h), +/- 0.1%
1. It is calculated from the DST divided by the TM; the average data counted is from the last
RESET to current points.
2. It displays an "Err" symbol when either the TM is over 100 hours or the DST is over
1,000 km (or miles). Reset the unit in order to restart.
MAX: Maximum Speed0.0–199.9KM/h (120.0 M/h), 0.1KM/h (M/h), +/- 1%
It shows the highest speed from the last RESET operation.
TTM: Total Riding Time0H00M–1999H59M, 1 Minute, +/- 0.05%
The TTM totals the riding time from the last ALL CLEAR operation.
ODO: Odometer0.0–19999.9Km (Miles), 0.1Km (Mile), +/- 0.1%
The ODO accumulates the total distance as long as the bike is moving. The ODO data can be
cleared by ALL CLEAR operation only.
: SCAN
1. Auto-Scanning Display Mode
Press the MODE button till the “ ” symbol is displayed. The computer will change the •
DST, , TM, AVG, MAX, TTM and ODO display modes in a loop sequence automatically
every 6 seconds.
2. Fixed Display Mode
Press the MODE button to turn off the “ ” symbol and select a desired display mode; •
the computer will stop the auto-scanning display operation and the display mode is set.
/ : Speed Pacer
It flashes the “ ” speed pacer arrow while the current speed is higher than the average speed
and the down arrow “ ” flickers conversely.
BUTTON AND OPERATIONS
AUTOMATIC START/STOP
1. The computer will automatically begin counting , ODO, DST, MAX, TTM, TM and AVG
data upon riding and stop counting data when riding is stopped.
2. The flickering symbol “ ” indicates that the computer is at START status.
4403000000_20090423_v1
2s
2s4s6s
2s4s6s
DST CLOCK TM AVG MAX TTM ODO / ODO
6s
8 FUNCTIONS: SPD, DST, ODO, CLK, AVG, MAX, TM, SCAN.
10 FUNCTIONS: SPD, DST, ODO, CLK, AVG, MAX, TM, TTM, SCAN, SPEED PACER.
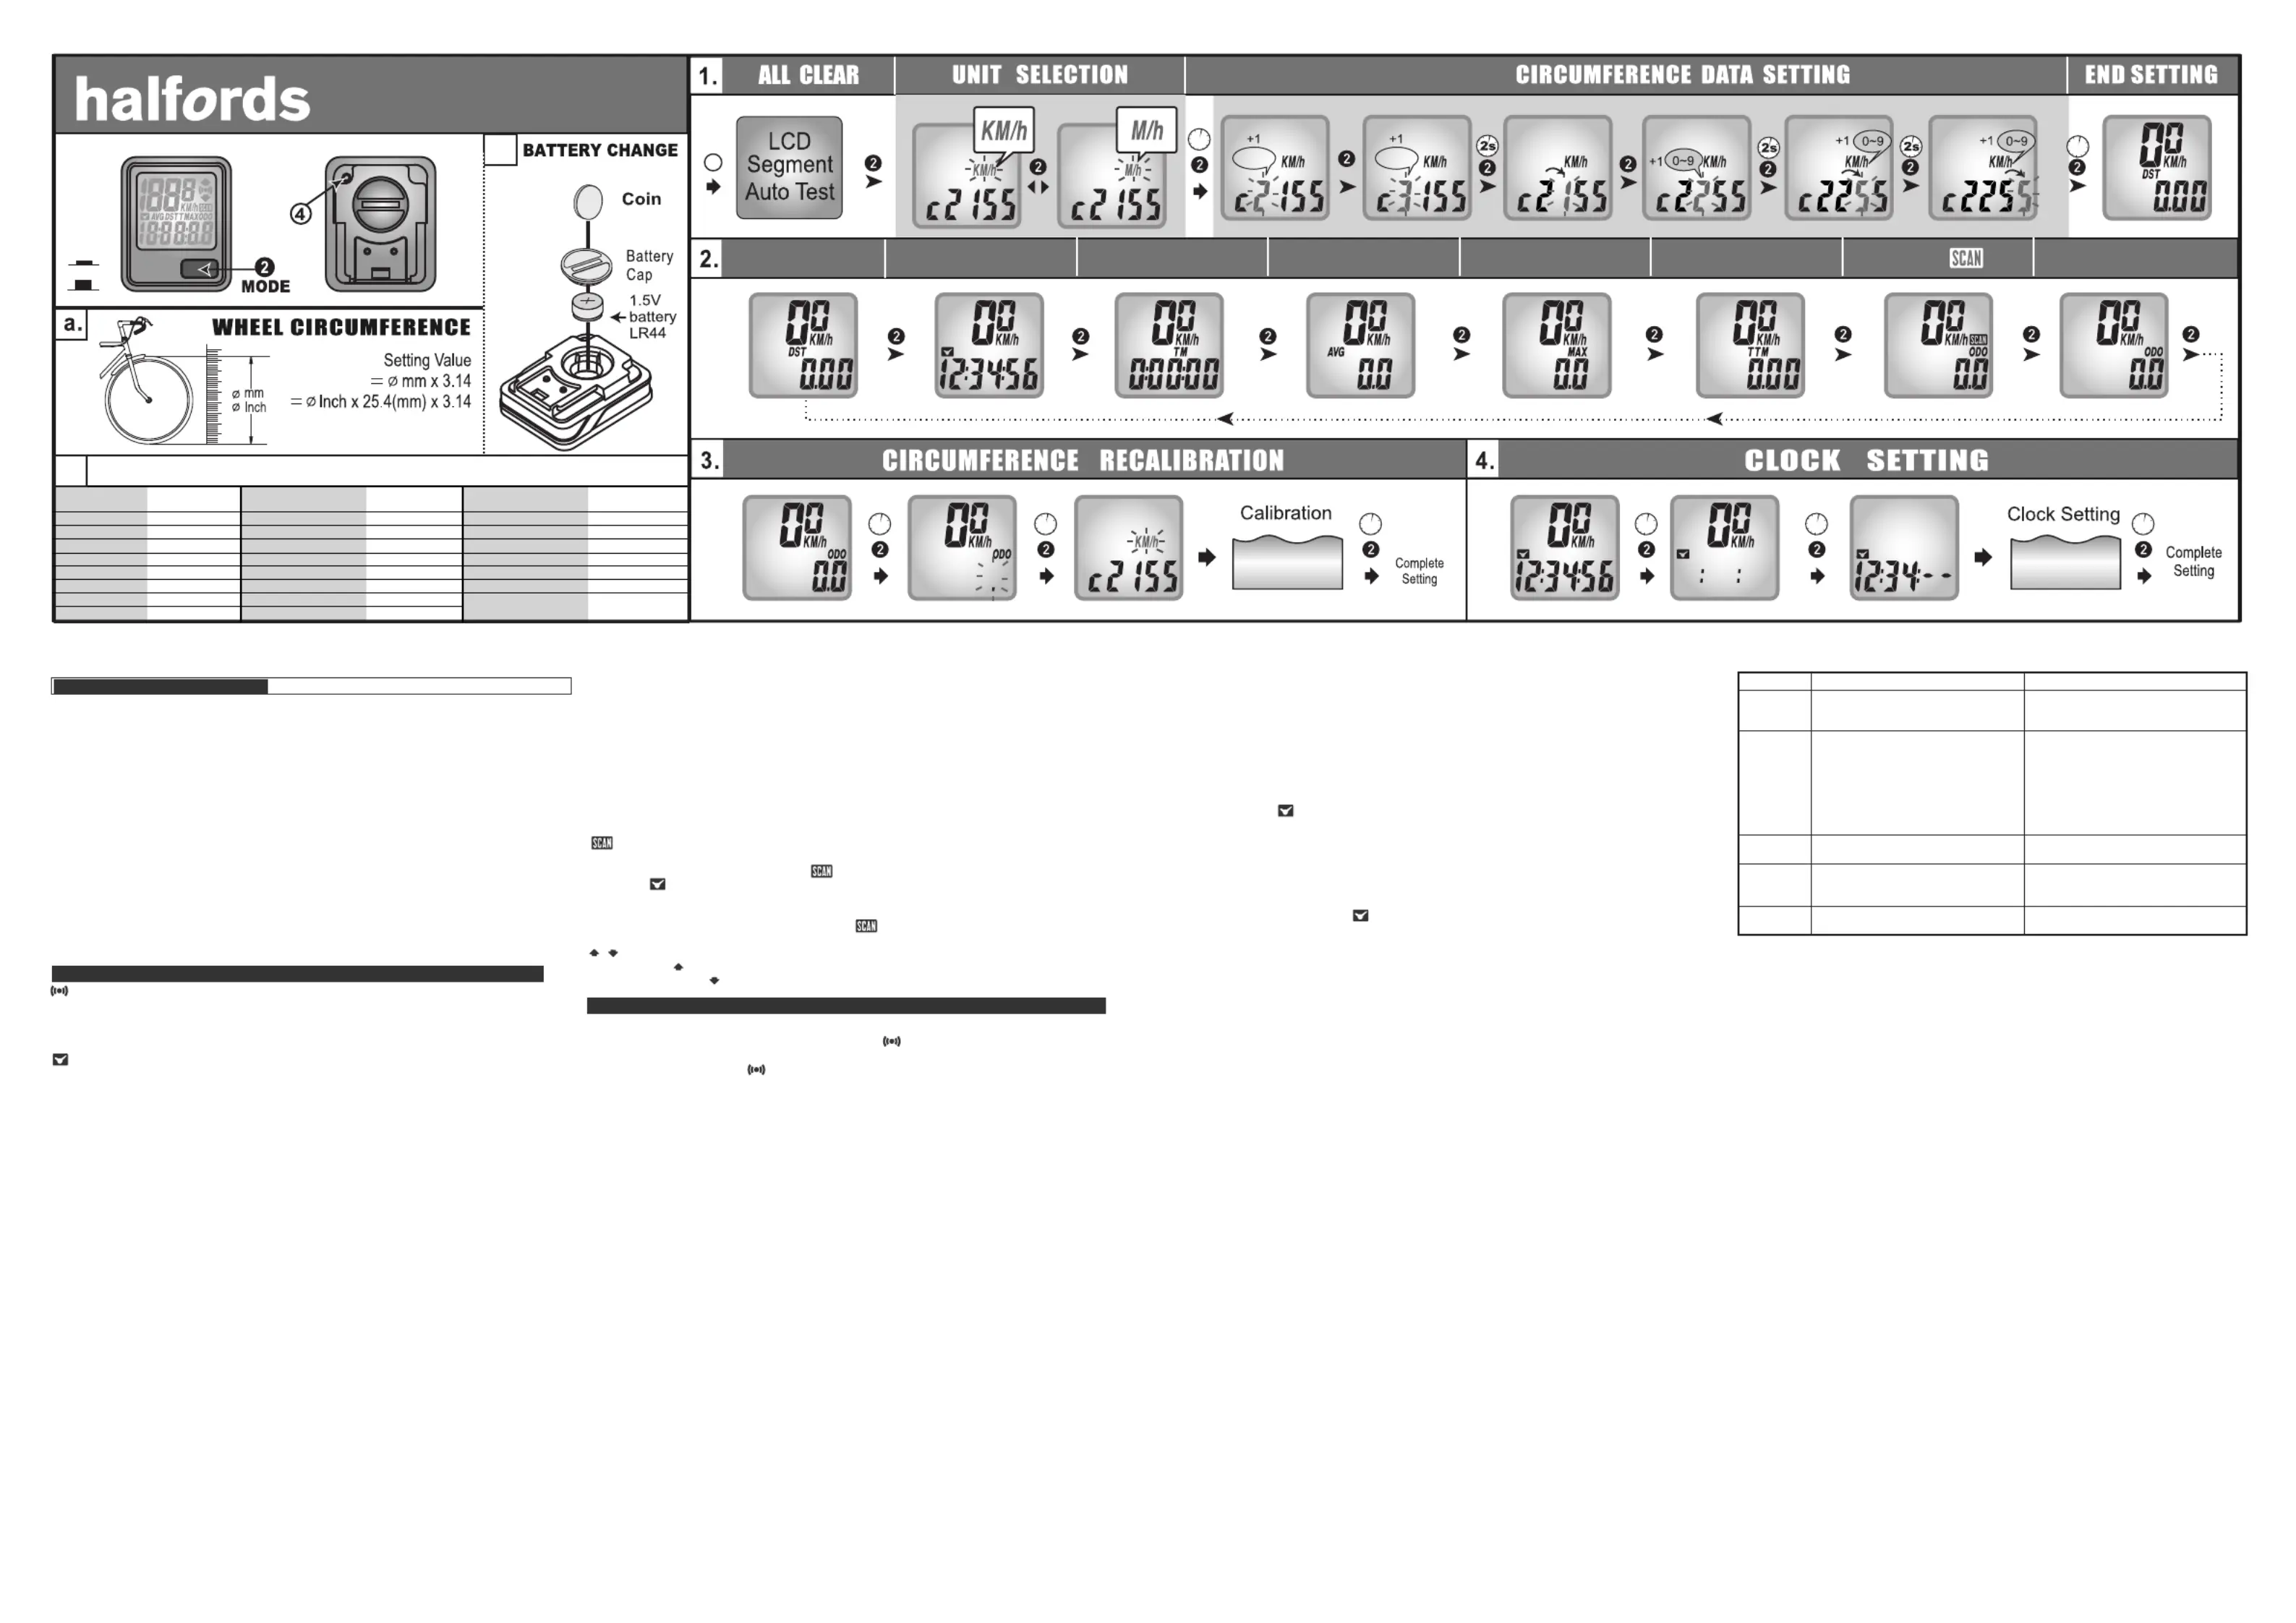
MAIN UNIT SETUP (Fig.1) English
INITIATE THE COMPUTER
1. Be sure to press the All Clear (AC) key to clear all stored data and initiate the „
computer before using it or when replacing battery. Otherwise the unit may malfunction.
2. The LCD segments will be tested automatically after the All Clear key is pressed.
3. Press the “MODE” button to stop the LCD test, then the flickering “KM/h” and •
“c2155” will be displayed.
lCALIBRATION
1. UNIT SELECTION
1). Press the “MODE” button to select “KM/h” or “M/h”(Mile/h).•
2). Hold the “MODE” button till the flickering digit is changed to the digit “2” of the •
c2155 to recognize either KM/h or M/h as desired.
2. CIRCUMFERENCE DATA SETTING
1). The default is set at 2155mm. Measure the value for your wheel () or refer to Fig. a
the quick table provided in the manual for your bicycle. ()Fig. b
2). A quick press of the “MODE” button advances the flickering digit by 1.•
3). To change the flickering digit, hold down the “MODE” button till the flickering digit •
moves to the next digit.
4). When set up is complete, hold down the "mode" button for 6 seconds until main
screen appears (fig 2).
FUNCTIONS (Fig. 2)
: Current Speed0.0–199.9KM/h (120.0 M/h), 0.1KM/h (M/h), +/- 1%
The current speed is always displayed on the 4 digits set when riding.
DST: Trip Distance0.00–999.99Km (Miles), 0.01Km (Mile), +/- 0.01%
The DST function accumulates the distance data from the last RESET operation as long
as the bicycle is being ridden.
: 12HR Clock1H00M00S-12H59M59S, 1 Second, +/- 0.05%
It displays the current time in 12HR clock.
POWER AUTO ON/OFF
To preserve battery, this computer will automatically switch off when it has not been used for about
10 minutes. The power will be turned on automatically by riding the bicycle or by pressing the button.
MODE BUTTON
•
Quickly press this button to move in a loop sequence from one basic function screen to another.
()Fig. 2
ALL CLEAR OPERATION (Initiate the Computer)
Press the ALL CLEAR (AC)
„
key to initiate the computer or use ALL CLEAR if any irregular
data appears. It will clear all stored data.
RESET OPERATION
1. Hold down the “MODE” button till the LCD digit is blank, then release it. The computer •
will RESET the DST, TM, AVG, MAX.
2. It cannot reset , TTM and ODO data.
RECALIBRATION (Fig. 3)
1. Change the LCD display to ODO screen, hold down the “MODE” button till (about 6 •
seconds) it jumps into the calibrating screen.
2. Refer to the main unit setup process to adjust the circumference.
3. Hold down the “MODE” button till (about 6 seconds) it jumps out the recalibration mode to •
store the desired data and complete recalibration.
12HR CLOCK SETTING (Fig. 4)
1. Change the LCD display to “ ” screen.
2. Press the “MODE” button till (about 6 seconds) it jumps into the clock adjusting screen to •
set the clock.
3. A quick press of the “MODE” button advances the flickering digit by 1.•
4. To change the flickering digit, hold down the “MODE” button
•
till the flickering digit moves
to the next digit.
5. Hold down the “MODE” button till (about 6 seconds) it jumps out the setting to store the •
desired data and complete clock setting.
BATTERY CHANGE (Fig. c)
1. When the brightness of the LCD display is dim, it means that the battery is nearly exhausted.
2. Replace a new LR44 (Cross reference type A76, AG13 or V13GA) battery in
the compartment on the back of the computer with the positive (+) pole toward the battery
cap.
lTROUBLE SHOOTING
Check the following before taking unit for repair.
lPRECAUTIONS
1. This computer can be used in the rain but should not be used under water.
2. Don’t leave the main unit exposed to direct sunlight when not riding the bike.
3. Don’t disassemble the main unit or it’s accessories.
4. Check relative position and gap of sensor and magnet periodically.
5. Clean the contacts of the bracket and the bottom of the main unit periodically.
6. Don’t use thinner, alcohol or benzine to clean the main unit or its accessories whenthey
become dirty.
7. Remember to pay attention to the road while riding.
PROBLEM
CHECK ITEMS SOLUTION
1. Replace the battery.
2. Be sure that the positive pole of
the battery is facing the battery cap.
1. Refer to the adjusting procedure
and complete the adjustment.
2. Wipe contacts clean.
3. Refer to (Fig. B3) and (Fig. B4) and
readjust data correctly.
4. Repair or replace wire.
5. Refer to "CALIBRATION" and enter
correct value.
Refer to the "MAIN UNIT SETUP" and
initiate the computer again.
Place main unit in the shade to return
to normal state.
No adverse effect on data.
Unit will return to normal state when
the temperature rises.
1. Is the battery dead?
2. Is there incorrect battery
installation?
1. Is it at the recalibrating or 12HR
clock setting screen?
2. Are the contacts between the
main unit and the bracket poor?
3. Are the relative positions and gap
of sensor and magnet correct?
4. Is the wire broken?
5. Is the circumference correct?
Did you leave main unit under
direct sunlight when not riding
the bike for a long time?
Is the temperature below 0°C
(32°F)?
No display
No current
Speed or
incorrect
data
Irregular
display
LCD is
black
Display is
slow
AC
4
c.
Tire Size
Circumference
Number
Tire Size
Circumference
Number
Tire Size
Circumference
Number
18 Inch1436 mm
20x1.751564
20 Inch1596
22 Inch1759
ATB 24x1.751888
24 Inch1916
24x 13/81942
ATB 26x1.401995
ATB 26x1.502030 mm
ATB 26x1.752045
26Inch (650A)2073
ATB26x2.0(650B)2099
700C TUBULAR2117
700x20C2092
700x25C2124
700x28C2136
POPULAR TIRE CIRCUMFERENCE REFERENCE TABLE
b.
27 Inch (700x32c)2155 mm
700x35C2164
700x38C2174
27.5 Inch2193
28 Inch (700B)2234
28.6 Inch2281
1~3~11~3~1
151624 Halfords 8 Function Computer
151632 Halfords 10 Function Computer
Produktspecifikationer
| Varumärke: | Halfords |
| Kategori: | Cykeldator |
| Modell: | 10 Function 151632 |
Behöver du hjälp?
Om du behöver hjälp med Halfords 10 Function 151632 ställ en fråga nedan och andra användare kommer att svara dig
Cykeldator Halfords Manualer

18 September 2024
18 September 2024
18 September 2024
Cykeldator Manualer
Nyaste Cykeldator Manualer
22 Mars 2026
14 Mars 2026
14 Mars 2026
11 Oktober 2025
10 Oktober 2025
10 Oktober 2025
10 Oktober 2025
9 Oktober 2025
26 September 2025
20 September 2025