Hudson Valley Times Square 3806-AGB Bruksanvisning
Hudson Valley
Lampa
Times Square 3806-AGB
Läs gratis den bruksanvisning för Hudson Valley Times Square 3806-AGB (2 sidor) i kategorin Lampa. Guiden har ansetts hjälpsam av 16 personer och har ett genomsnittsbetyg på 4.5 stjärnor baserat på 8.5 recensioner. Har du en fråga om Hudson Valley Times Square 3806-AGB eller vill du ställa frågor till andra användare av produkten? Ställ en fråga
Sida 1/2

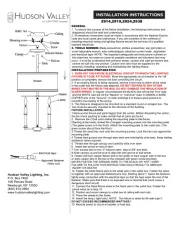
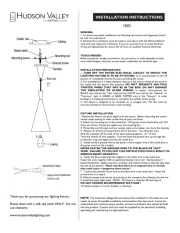
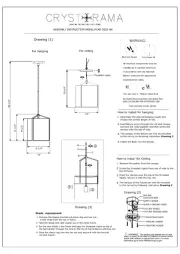
FIXTURE INSTALLATION
1. Feed the wire through the STEM (6) and twist tightly onto the FIXTURE ASSEMBLY (8). Keep adding additional
stems until you desired hanging height is met.
2. Slide in CANOPY(7) onto the STEM (6), and thread the 1/4 NIPPLE (5) onto the top end of the STEM (6)
3. Pull the wire out from the junction box, and install the MOUNTING PLATE (1) onto the junction box using the
MOUNTING SCREWS (2). This fixture is designed to be mounted on standard round or octagon junction box.
The junction box must be securely mounted to the structure of the building.
4. Trim off the excess wire to a minimum 6" beyond the STEM and strip each wire
5
8
".
5. Attach the Ground wire (Green) to the ground inside the outlet box (Generally green or bar copper wire) or the
GROUND SCREW (3) on the MOUNTING PLATE (1). NEVER CONNECT GROUND WIRE TO "HOT" WIRE!
FAILURE TO FOLLOW THIS COULD RESULT IN SERIOUS INJURY OR DEATH!
6. Connect the white fixture lead to the neutral (Generally white) wire in the outlet box. Fasten the wires together
with an approved fastener (WIRE NUT) (4). Starting 1" below the fastener, tightly wrap the connection with
electrical tape so that the connections seals the end of the fastener. MAKE SURE THERE ARE NO EXPOSED
WIRE OF STRANDS THAT COULD CAUSE A DANGEROUS SHORT CIRCUIT!
7. Connect the black fixture leads to the hot (Generally black) wire in the outlet box. Fasten the joined wires same
as previous step. NEVER REVERSE HOT AND NEUTRAL WIRES. FAILURE TO FOLLOW THIS COULD
RESULT IN SERIOUS INJURY OR DEATH!
8. Push the wires back into the junction box. Lift up the CANOPY (7) up to the ceiling, and secure it with the
HEADLESS SCREW (10) by using supplied ALLEN KEY TOOLING(9) .
9. Lift the ALABASTER (13) up onto the fixture and secure using the THUMB SCREW (11) .
10. Screw the BULB (12) into the sockets of the fixture.THIS FIXTURE IS RATED FOR 15 WATT LED LAMP. DO
NOT EXCEED THE RECOMMENDED WATTAGE!
11. Restore power to the outlet at the breaker or fuse box.
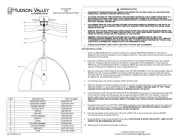
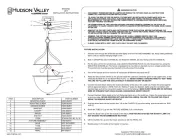
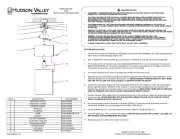
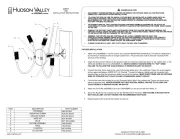
ITEM DESCRIPTION PART NUMBER
1
MOUNTING PLATE HDW-003806
2
MOUNTING SCREW HDW-003806
3
GROUND SCREW
HDW-003806
4
WIRE NUT HDW-003806
5
1/4 NIPPLE HDW-003806
6
STEM
STM-380603,06,12,18
7
CANOPY
CAS-003806
8
FIXTURE ASSEMBLY
FAS-003806
9
ALLEN KEY TOOLING HRD-003806
10
HEADLESS SCREW
CAS-003806
11
THUMB SCREW SCR-003806-T
12
LED BULB
NOT INCLUDED
13
ALABASTER
ALA-003806
TIMES SQUARE
3806
INSTALLATION INSTRUCTIONS
WARNING/CAUTION
·DISCONNECT POWER BEFORE RE-LAMPING OR WIRING THE FIXTURE. READ ALL INSTRUCTIONS
COMPLETELY BEFORE STARTING INSTALLATION.
·TO AVOID THE RISK OF FIRE OR SHOCK, FIXTURE MUST BE INSTALLED IN COMPLIANCE WITH ALL
APPLICABLE NATIONAL AND LOCAL ELECTRICAL/BUILDING CODES. THE INSTALLATION AND
MAINTENANCE OF THIS UNIT SHOULD BE COMPLETED BY A LICENSED ELECTRICIAN OR CERTIFIED
FACTORY TRAINED TECHNICIAN.
·CALIFORNIA PROP 65: THIS LIGHTING FIXTURE CONTAINS CHEMICALS KNOWN TO THE STATE OF
CALIFORNIA TO CAUSE CANCER, BIRTH DEFECTS, AND/OR OTHER REPRODUCTIVE HARM. WASH HANDS
AFTER USE.
·REMOVE THE FIXTURE, PARTS AND PARTS BAG(S) FROM THE CARTON. BEFORE DISCARDING THE
CARTON, DOUBLE CHECK TO MAKE CERTAIN THAT ALL PARTS ARE FOUND. INSPECT THE FIXTURE PRIOR
TO INSTALLATION FOR ANY DAMAGE TO THE FIXTURE.
·DIMMING: THE FIXTURE CAN BE CONTROLLED BY A WALL DIMMING DEVICE. ONLY USE
TRIAC/ELECTRONIC DIMMER. MAKE SURE THE CARTON IS MARKED FOR USE WITH LED COMPACT
FLUORESCENT-INCANDESCENT LIGHT SOURCE ONLY. THESE CAN BE PROVIDED BY YOUR LOCAL
ELECTRICAL DISTRIBUTOR, HOME CENTER, OR HARDWARE STORE.
·PLEASE CLEAN WITH A SOFT, DRY CLOTH ONLY! DO NOT USE CLEANSERS
www.hvlgroup.com
Questions? We're here to help!
Contact us at CustomerService@hvlgroup.com
1
2
3
4
6
7
8
9
11
12
13
5
10
Produktspecifikationer
| Varumärke: | Hudson Valley |
| Kategori: | Lampa |
| Modell: | Times Square 3806-AGB |
Behöver du hjälp?
Om du behöver hjälp med Hudson Valley Times Square 3806-AGB ställ en fråga nedan och andra användare kommer att svara dig
Lampa Hudson Valley Manualer
3 Juli 2025
29 Juni 2025
29 Juni 2025
28 Juni 2025
28 Juni 2025
28 Juni 2025
28 Juni 2025
Lampa Manualer
- Adviti
- Access Lighting
- Workzone
- Moen
- Nitecore
- OK
- Lume Cube
- Enttec
- Varta
- AVM
- Aladdin
- Profoto
- Caliber
- Xline
- ADB
Nyaste Lampa Manualer
23 Oktober 2025
23 Oktober 2025
23 Oktober 2025
23 Oktober 2025
23 Oktober 2025
20 Oktober 2025

19 Oktober 2025
19 Oktober 2025
19 Oktober 2025
19 Oktober 2025