IPEGA PG-SW018 Bruksanvisning
IPEGA SLR kamera PG-SW018
Läs gratis den bruksanvisning för IPEGA PG-SW018 (1 sidor) i kategorin SLR kamera. Guiden har ansetts hjälpsam av 11 personer och har ett genomsnittsbetyg på 4.0 stjärnor baserat på 6 recensioner. Har du en fråga om IPEGA PG-SW018 eller vill du ställa frågor till andra användare av produkten? Ställ en fråga
Sida 1/1
1.本手柄适合操作/P3/安卓及电脑(Win7以上系统)设备上的游戏;N·S
2.本手柄的功能按键一一对应_pro手柄的按键功能,并且支持TURBO连打功能;N·S
3.本手柄支持六轴功能,使玩家得到更好的游戏体验。
4.结构符合人体工程学,手感舒适;
因官方游戏平台软件升级或源代码变更等不可抗拒的因素
造成部分游戏无法与本产品连接操作,我公司不负任何责任。
对此我公司保留最终解释权。
产品适用说明:
(安卓标准HID模式,备注:安卓模式下,无震动功能、无六轴功能)
安卓设备连接
1.首次连接手柄到主机:打开N·S 主机,在N·S主机主界面,用手指触摸点击:手柄
→更改握法/顺序,进入到主机配对模式界面。
2.在手柄关机状态下,按B+HOME组合键2秒开启手柄并进入配对模式,手柄上的LED2灯开始快
速循环闪烁,当单个或多个LED常亮时(主机自动分配),手柄与主机配对成功,然后按A键操作。
3.已成功连接过:通过长按HOME键2秒开启手柄,手柄与主机自动连接,然后按A键进行操作。
在手柄关机状态下,同时按Y+HOME键2秒进入安卓标准游戏配对模式,手柄LED1灯快闪,当安卓
手机/安卓平板/安卓智能电视搜索到“PG-SW018”设备名时,选择连接。连接成功后,手柄LED1
灯常亮;已成功连接过,可以直接按HOME键,LED1灯慢闪,自动回连。
推荐下载游戏平台:手机扫描说明书首页二维码关注艾派格官方公众号, 按提示下载并安装游戏平台
(葡萄游戏厅),进入平台下载所需要的游戏。
P3主机连接:
图1
图3
图2
N·S主机连接:
1.工作电压:DC3.7V;
2.工作电流:<30mA;
3.静态电流: <20uA;
4.持续使用时间: >15H;
5.充电电压:DC5V;
6.充电时间:约3小时;
7.无线3.0,传输距离:≤8M;
8.电池容量:400mAh;
9.待机时间:满电放置30天;
1. 动作键包括(A/B/X/Y/L/ZL/R/ZR) 8个按键,均可手动设置TURBO功能。
2. 设置方法:长按动作键,同时再轻按TURBO键,TURBO功能开启;长按动作键,同时轻按
TURBO键,TURBO功能关闭。
3. 产品断开连接后,之前设置TURBO功能自动清除,若启用TURBO功能时,必须重新设置。
TURBO功能开启/关闭:
手柄充电/休眠/唤醒功能
1. 关机状态下充电时LED1-LED4指示灯灯同时闪烁,充满熄灭。
2. 开机连接设备时充电当前LED指示灯闪烁,充满长亮。
3. 睡眠/唤醒功能:手柄在5分钟内不使用会进入休眠状态。当需要重新使用时需按HOME键唤醒
即可回连。
4. 电池电量不足时,对应的指示灯快闪提示。
手柄充电/休眠/唤醒/关机功能:
1. 四个编程键在手柄底部。可以实现自己爱好的动作键或功能映射或编程。
2. 编程功能可实现对其中的任意一个动作按键,或组合键进行(单个编程键最多可设置12个键组合)。
3. 设置编程键:首先按住编程键(如M1),同时再按下+,指示灯1#、4#和2#、3#交替快闪后松开
按键,进入设置模式。
4. 此时按下需要复制的一个或多个常规功能键(A/B/X/Y
/L1/L2/R1/R2/L3/R3/上/下/左/右)。
5. 再次按下编程键退出,即完成设置,LED彩灯回到设置前的显示状态。
6. 清除编程键功能:同时按住编程键(如M1)和+,指示灯1#、4#和2#、3#交替快闪后松开按键,
再次按下已编程键,即清除编程键功能。
7. 编程功能具有关机保存功能,手柄休眠,关机后重开机都能保存已编程功能。
8. 四个编程键初始设置为:A/B/X/Y
编程功能:
注意事项:
产品清单
功能按键图示
蜘蛛侠无线手柄N
·
S版
产品说明书(PG-SW018)中文版
技术支持QQ群:
837350687
客服电话:
0755-2791 8998
在线时间:周一至周五9:30-17:30
ipega官方微信公众号
(关注微信号 下载游戏大厅)
十字方向键
A/B/X/Y功能键
截屏键
+
右3D及
下压R3键
左3D及下压L3键
-
L1/L2
M2
M4
M1
M3
R1/L2
Turbo键
HOME键
状态指示LED灯
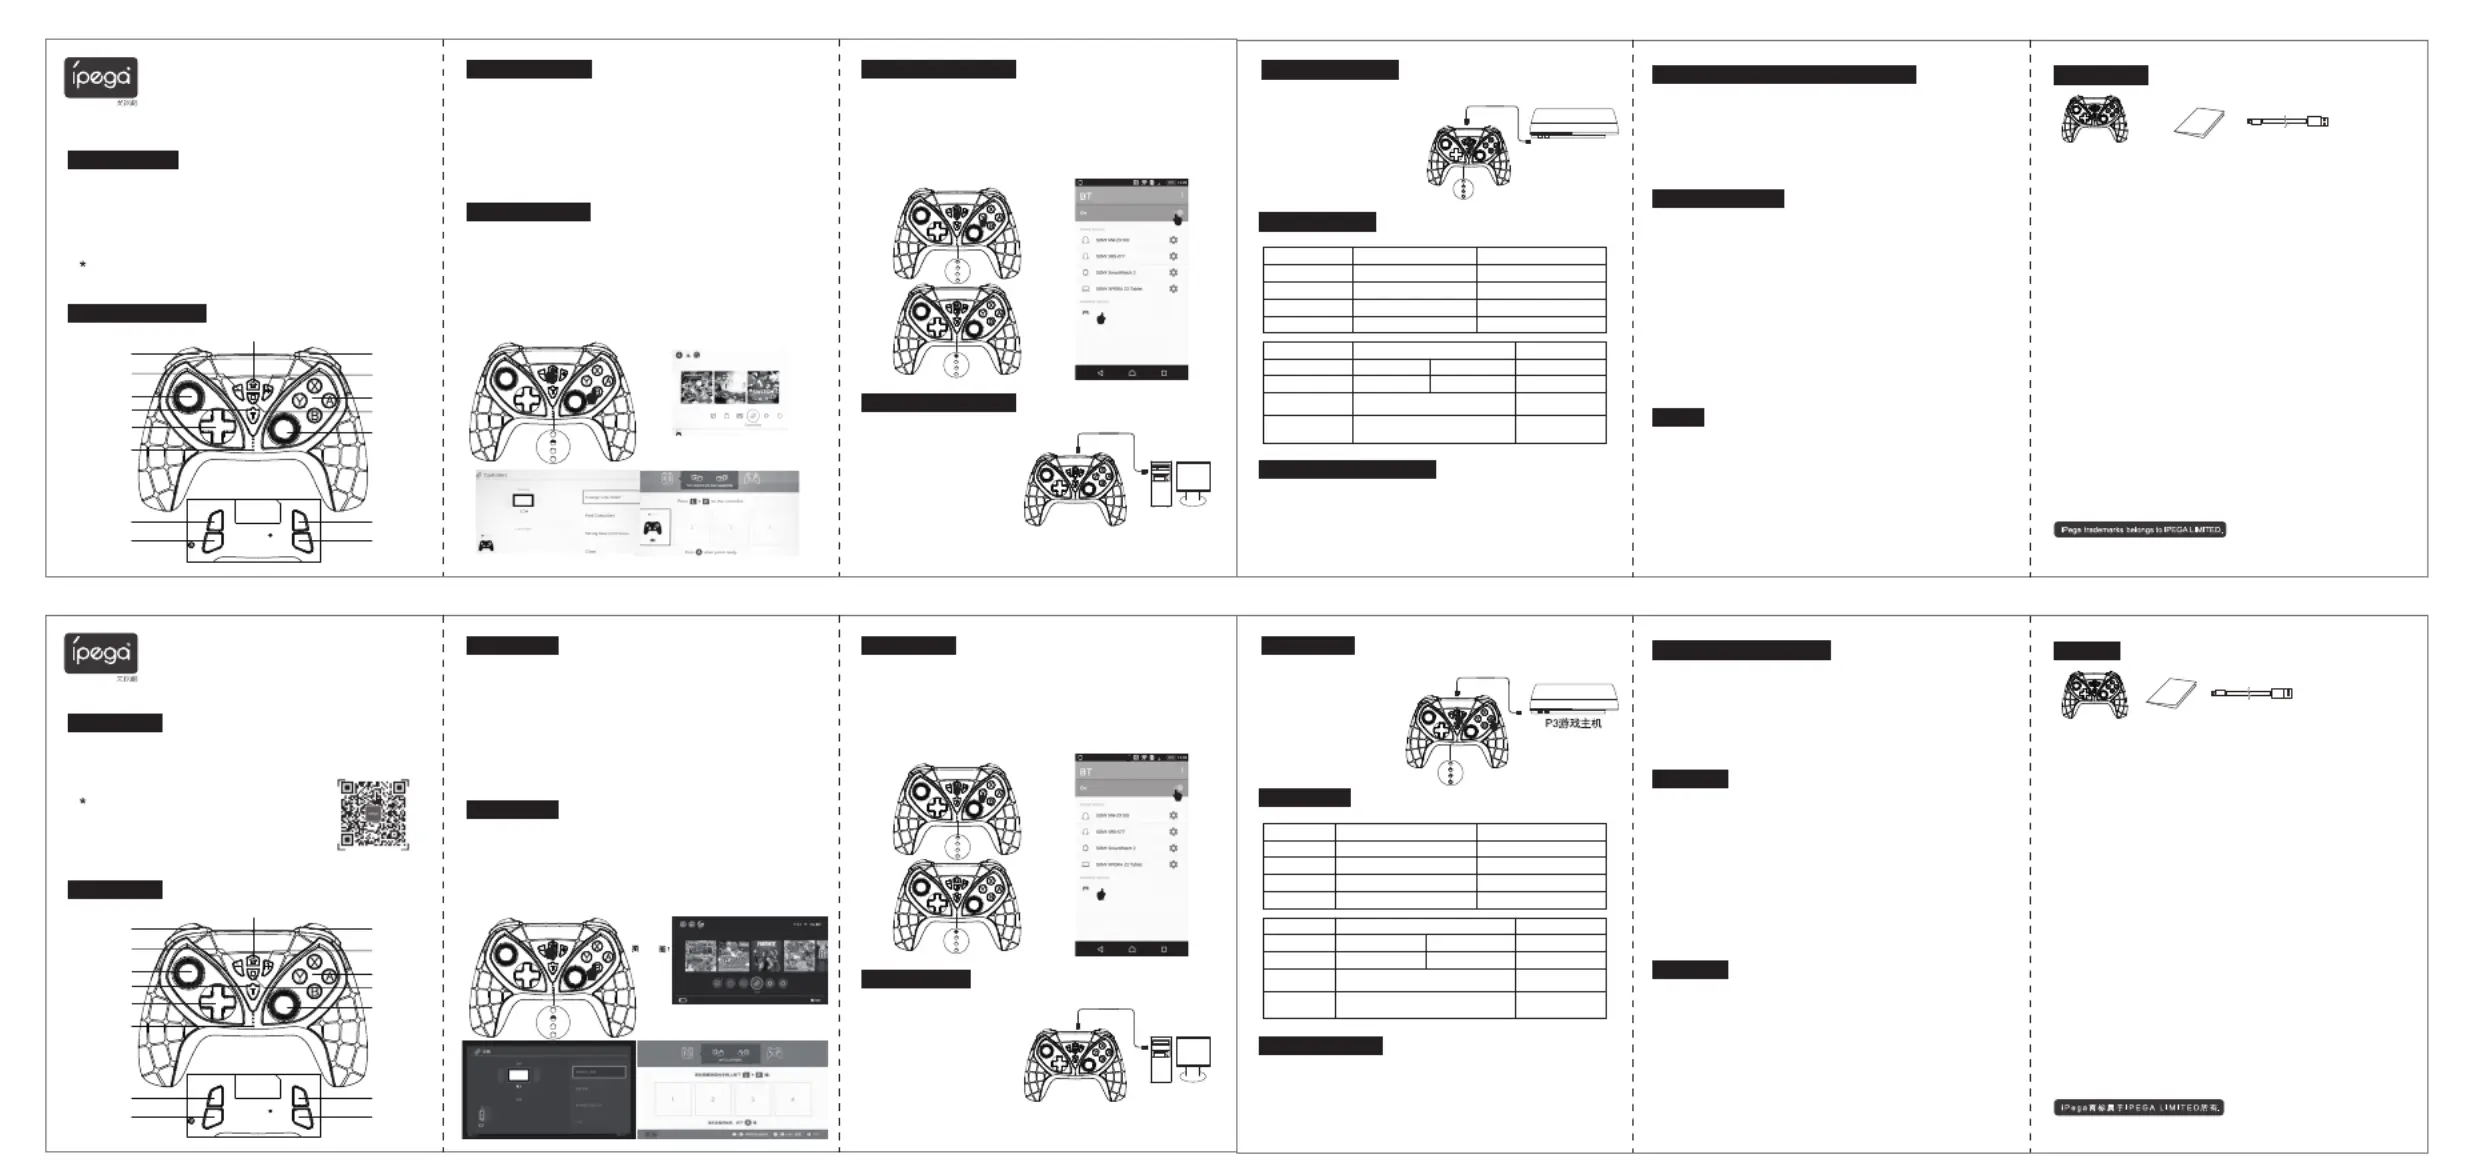
无线手柄 p1-x1 说明书 p1-x1 Type-C线 p1-x1
产品特性参数:
产品使用说明:
PG-SW018
1. 在手柄关机状态下,长A+HOME组
合键2秒开机,手柄4个LED指示灯同
时闪烁。
2. 使用一条USB数据线将手柄与P3主
机连接,按HOME键配对。
3. 配对成功后,对应的通道LED长亮
,手柄进入P3模式操作。
4. 拔掉USB线,手柄进入无线连接。
1. 在手柄关机状态下,长按L1+HOME
组合键2秒开机,手柄LED4灯快闪,用
USB数据线将手柄。
连接到PC设备,此时为PC 和 P3有线模
式,手柄LED2灯长亮。
2. 通过长按home键3秒可切换PC
Xbox360模式,此时手柄LED3灯长亮;
3. 备注:有线连接的模式下,支持振动
功能、无六轴功能。
有线连接PC设备:
1. 请不要把本产品在潮湿或高温地方存储。
2. 不要敲击、摔打、刺穿、或试图去分解本产品,以免对产品造成不必要的损害。
3.产品内置电池,请勿和垃圾一起丢弃。
4. 非专业人员误拆卸本产品,否则不在售后保修服务内。
5. 因官方软件升级或源代码变更等不可抗拒的因素造成部分游戏无法与本产品连接操作,我公
司不负任何责任。对此我公司保留最终解释权。
操作使用模式:
安卓系统
模式配对(长按3秒)
指示灯
备 注不支持震动、六轴支持震动、六轴
安卓无线模式
Y+Home
LED 1
N·S无线模式
N·S主机
B+HOME
主机自动分配
P3主机
模式配对(长按3秒)
指示灯
备 注
无线模式下进入搜索状态时需插USB数据线,
连接成功时拔掉USB线,手柄进入无线连接
支持震动、不支持六轴
P3无线模式P3有线模式
A+HomeA+Home
PC有线模式
PC电脑
L1+Home
PC P3模式:LED2
PC 360模式: LED3
主机自动分配
2
专利号:ZL201930704896.5
1.This product is suitable for operating games on N-S / P3 / Android and computer (win7 or
above systems);
2.All function buttons correspond to NS_pro gamepad button function, and support for TURBO;·
3.This product support for six axis function, bring better game experience for player.
4.Ergonomic structure, feels comfortable;
Due to the official game platform software upgrades or source code changes and other not
resist factors caused some of the game can not be played or connected with our Gamepad,
iPega company has no responsibility.iPega reserve the right of final interpretation for this.
Product Application:
(:,Android standard HID mode RemarkAndroid modeNo
vibration function, no six axis function)
Android Device Connection
1.First connection to console: Turn on NS console and open the Homepage, click the page as ·
follows: Controllers →Change grip / order, enter to console pairing mode via pressing L + R on
the controller.
2.When gamepad turn off, press B+HOME button for 2 seconds to enter the pairing mode, LED2
light start to flash rapidly When single or several LEDs are always on(Console will assign
automaticly), gamepad and console paired sduccessfully, then press A button to start operation.
3.After first connected: Press HOME button for 2 seconds to turn on gamepad, gamepad and
console will connect automaticly, then press A button to start operation.
When gamepad turn off, press Y+HOME button for 2 seconds to enter Android standard pairing
mode, LED1 light flash quickly.Search search device name“PG-SW018”on Android phone/
Android tablet/Android smart TV and choose connection, after connected successfully,LED1
light is always on; already connected success before, press HOME button directly, LED flash
slowly to display automatic reconnection.
P3 console connection:
P3 console
Pic 1
Pic 3
Pic
2
N·S Mode:
1.Working voltage:DC3.7V;
2.Working current:<30mA;
3.Static current: <20uA;
4.Continuous gameplay time: >15H;
5.Charging current:DC5V;
6.Charging time:About 3H;
7.BT3.0,Transmission distance:≤8M;
8.Battery capacity:400mAh;
9.Standby time:up to 30days once fully charged;
1.Action button include(A/B/X/Y/L/ZL/R/ZR), all can set TURBO function by manually.
2.Setting mode:Hold any action button and then press TURBO button at the same time to
start up TURBO function;repeat the operation, TURBO function is cleared.
3.When connection is cut off,the TURBO function is cleared automaticly, if need to turn on
TURBO function must to reset.
TURBO function turn on/turn off:
Gamepad charging/sleep/wake up function
1.Charging when gamepad is off, LED1-LED4 indicator flash quickly at the same time, the light
will be off after fully charged.
2.Charging when device is connecting, LED indicator light flash, LED is always on after fully charged.
3.Sleep/wake up function:if no operation within 5 minutes, the gamepad will enter sleep mode, if
to re-operate, need to press HOME button to wake up and reconnect.
4.The corresponding light will flash quickly to indicate lower battery.
Gamepad charging/sleep/wake up/turn off function:
1. Four programming buttons are on the back of gamepad button,support for action button or function
mapping or programming be setting as per each customs .
2. Programming function can realize any of action button or combination button(A single
programming buttton can reach up to the setting of 12 button combinations)
3. Setting programming button:first press programming buttion(for example M1), at the same
time press +,indicator light 1#、4# and 2#、3# Flash alternate then release the button, enter
setting mode.
4.At this time press one or more button to copy (A/B/X/Y/L1/L2/R1/R2/L3/R3/Up/down/left/right).
5.Press programming button again, then finish setting, LED light return to status before setting.
6.Clear programming function: press programming button(M1) and + at the same time, indicator
light 1#、4# and 2#、3# Flash alternate then release the button, press the appointed
programming button again can clear programming function.
7.Programming function include save function when turn off,support to save programming
function when seelp mode or turn off mode
8.Four programming buttons original setting is:A/B/X/Y
Programming function:
Notes:
Accessories List
Instruction button function
N·S Batman Wireless Gamepad
User Manual(PG-SW018)
D-pad
A/B/X/Y
function button
Screen shot
Button
+
Right 3D and
Down Press
L3 button
Left 3D and Down
Press L3 button
-
L1/L2
M2
M4
M1
M3
R1/L2
Turbo
HOME
LED indicator
Wireless gampad p1-x1 User manual p1-x1 Type-C cable x1
Electrical Parameters:
Product User Manual:
PG-SW018
1.When gamepad turn off,Hold the
combination button A+HOME for 2 seconds
to start up, LED indicator will be flashing;
2.Connect gamepad to P3 console via USB
cable then press HOME button for pairing.
3.After pairing successfully, corresponding
LED light will be always on and enter the P3
operation mode.
4.Remove USB cable to switch to wireless
connection.
1.When gamepad turn off, press
L1+HOME button for 2 seconds to turn
on, LED light flash quickly, connect
gamepad to PC device via USB cable. It
default as P3 wired mode, gamepad
LED2 light is always on.
2.Hold the HOME button for 3 seconds to
switch to PC Xbox360 mode, LED3 light
is always on;
3.Remark: wired connect mode support
vibration function, no six axis function.
PC device wired connection:
1.Do not store product in humid or high temperature places;
2.Do not knock, beat, puncture, or try to disassemble to avoid unnecessary damage to the
product;
3.Do not throw away with garbage because product has built-in battery;
4.Non-professionals disassemble this product by mistake otherwise it will not be cover by the
after-sales warranty service;
5.Our company is not responsible for the failure of some games to connect with this product
due to irresistible factors such as software upgrade or source code change of the official
game platform. Our company reserves the right of final explanation.
Operation use mode
Android system
Pairing mode
(press for 3 seconds)
Indicator light
Remark
Pairing mode
(press for 3 seconds)
Indicator light
Remark
No support vibration six axissupport vibration six axis
Android wired mode
Y+Home
LED 1
N·S wireless mode
N·S console
B+HOME
Console automatic assigned
P3 console
To enter searching status under wireless mode, insert
USB cable, after connected successfully, remove USB
cable, the gamepad will enter wireless connection
Support vibration, no
support six axis function
P3 wireless modeP3 wired mode
A+HomeA+Home
PC wired mode
PC computer
L1+Home
PC P3 mode:LED2
PC 360 mode: LED3
Console automatic assigned
Pic 1Pic 2
Patent NO.: ZL201930704896.5
Produktspecifikationer
| Varumärke: | IPEGA |
| Kategori: | SLR kamera |
| Modell: | PG-SW018 |
Behöver du hjälp?
Om du behöver hjälp med IPEGA PG-SW018 ställ en fråga nedan och andra användare kommer att svara dig
SLR kamera IPEGA Manualer

12 Oktober 2025
12 Oktober 2025
12 Oktober 2025
12 Oktober 2025
12 Oktober 2025
12 Oktober 2025
12 Oktober 2025
12 Oktober 2025
12 Oktober 2025
12 Oktober 2025
SLR kamera Manualer
Nyaste SLR kamera Manualer
18 Mars 2026
16 Mars 2026
26 September 2025
12 Augusti 2025
12 Augusti 2025
8 Augusti 2025
3 Augusti 2025
30 Juni 2025
5 Mars 2025
5 Mars 2025