Lavor Comprex NPB 14 Bruksanvisning
Lavor ej kategoriserat Comprex NPB 14
Läs gratis den bruksanvisning för Lavor Comprex NPB 14 (4 sidor) i kategorin ej kategoriserat. Guiden har ansetts hjälpsam av 15 personer och har ett genomsnittsbetyg på 4.2 stjärnor baserat på 7 recensioner. Har du en fråga om Lavor Comprex NPB 14 eller vill du ställa frågor till andra användare av produkten? Ställ en fråga
Sida 1/4
SANIX PRO 14 battery knapsack sprayer
Designed to carry out the protection treatment with water solutions of insecticides, fungicides,
herbicides and fertilizers. It is also dedicated to the application of ecological preparations based
on paran oil and plant solutions. It is recommended to use one sprayer for the selected group of
chemicals.
CAUTION !!! Do not use a chemically active agents, including acids and bases, disinfectants,
impregnation, containing solvents, cleaners and petroleum resources.
Failure to follow this instruction may result damage to the sprayer orpermanent harm to health.
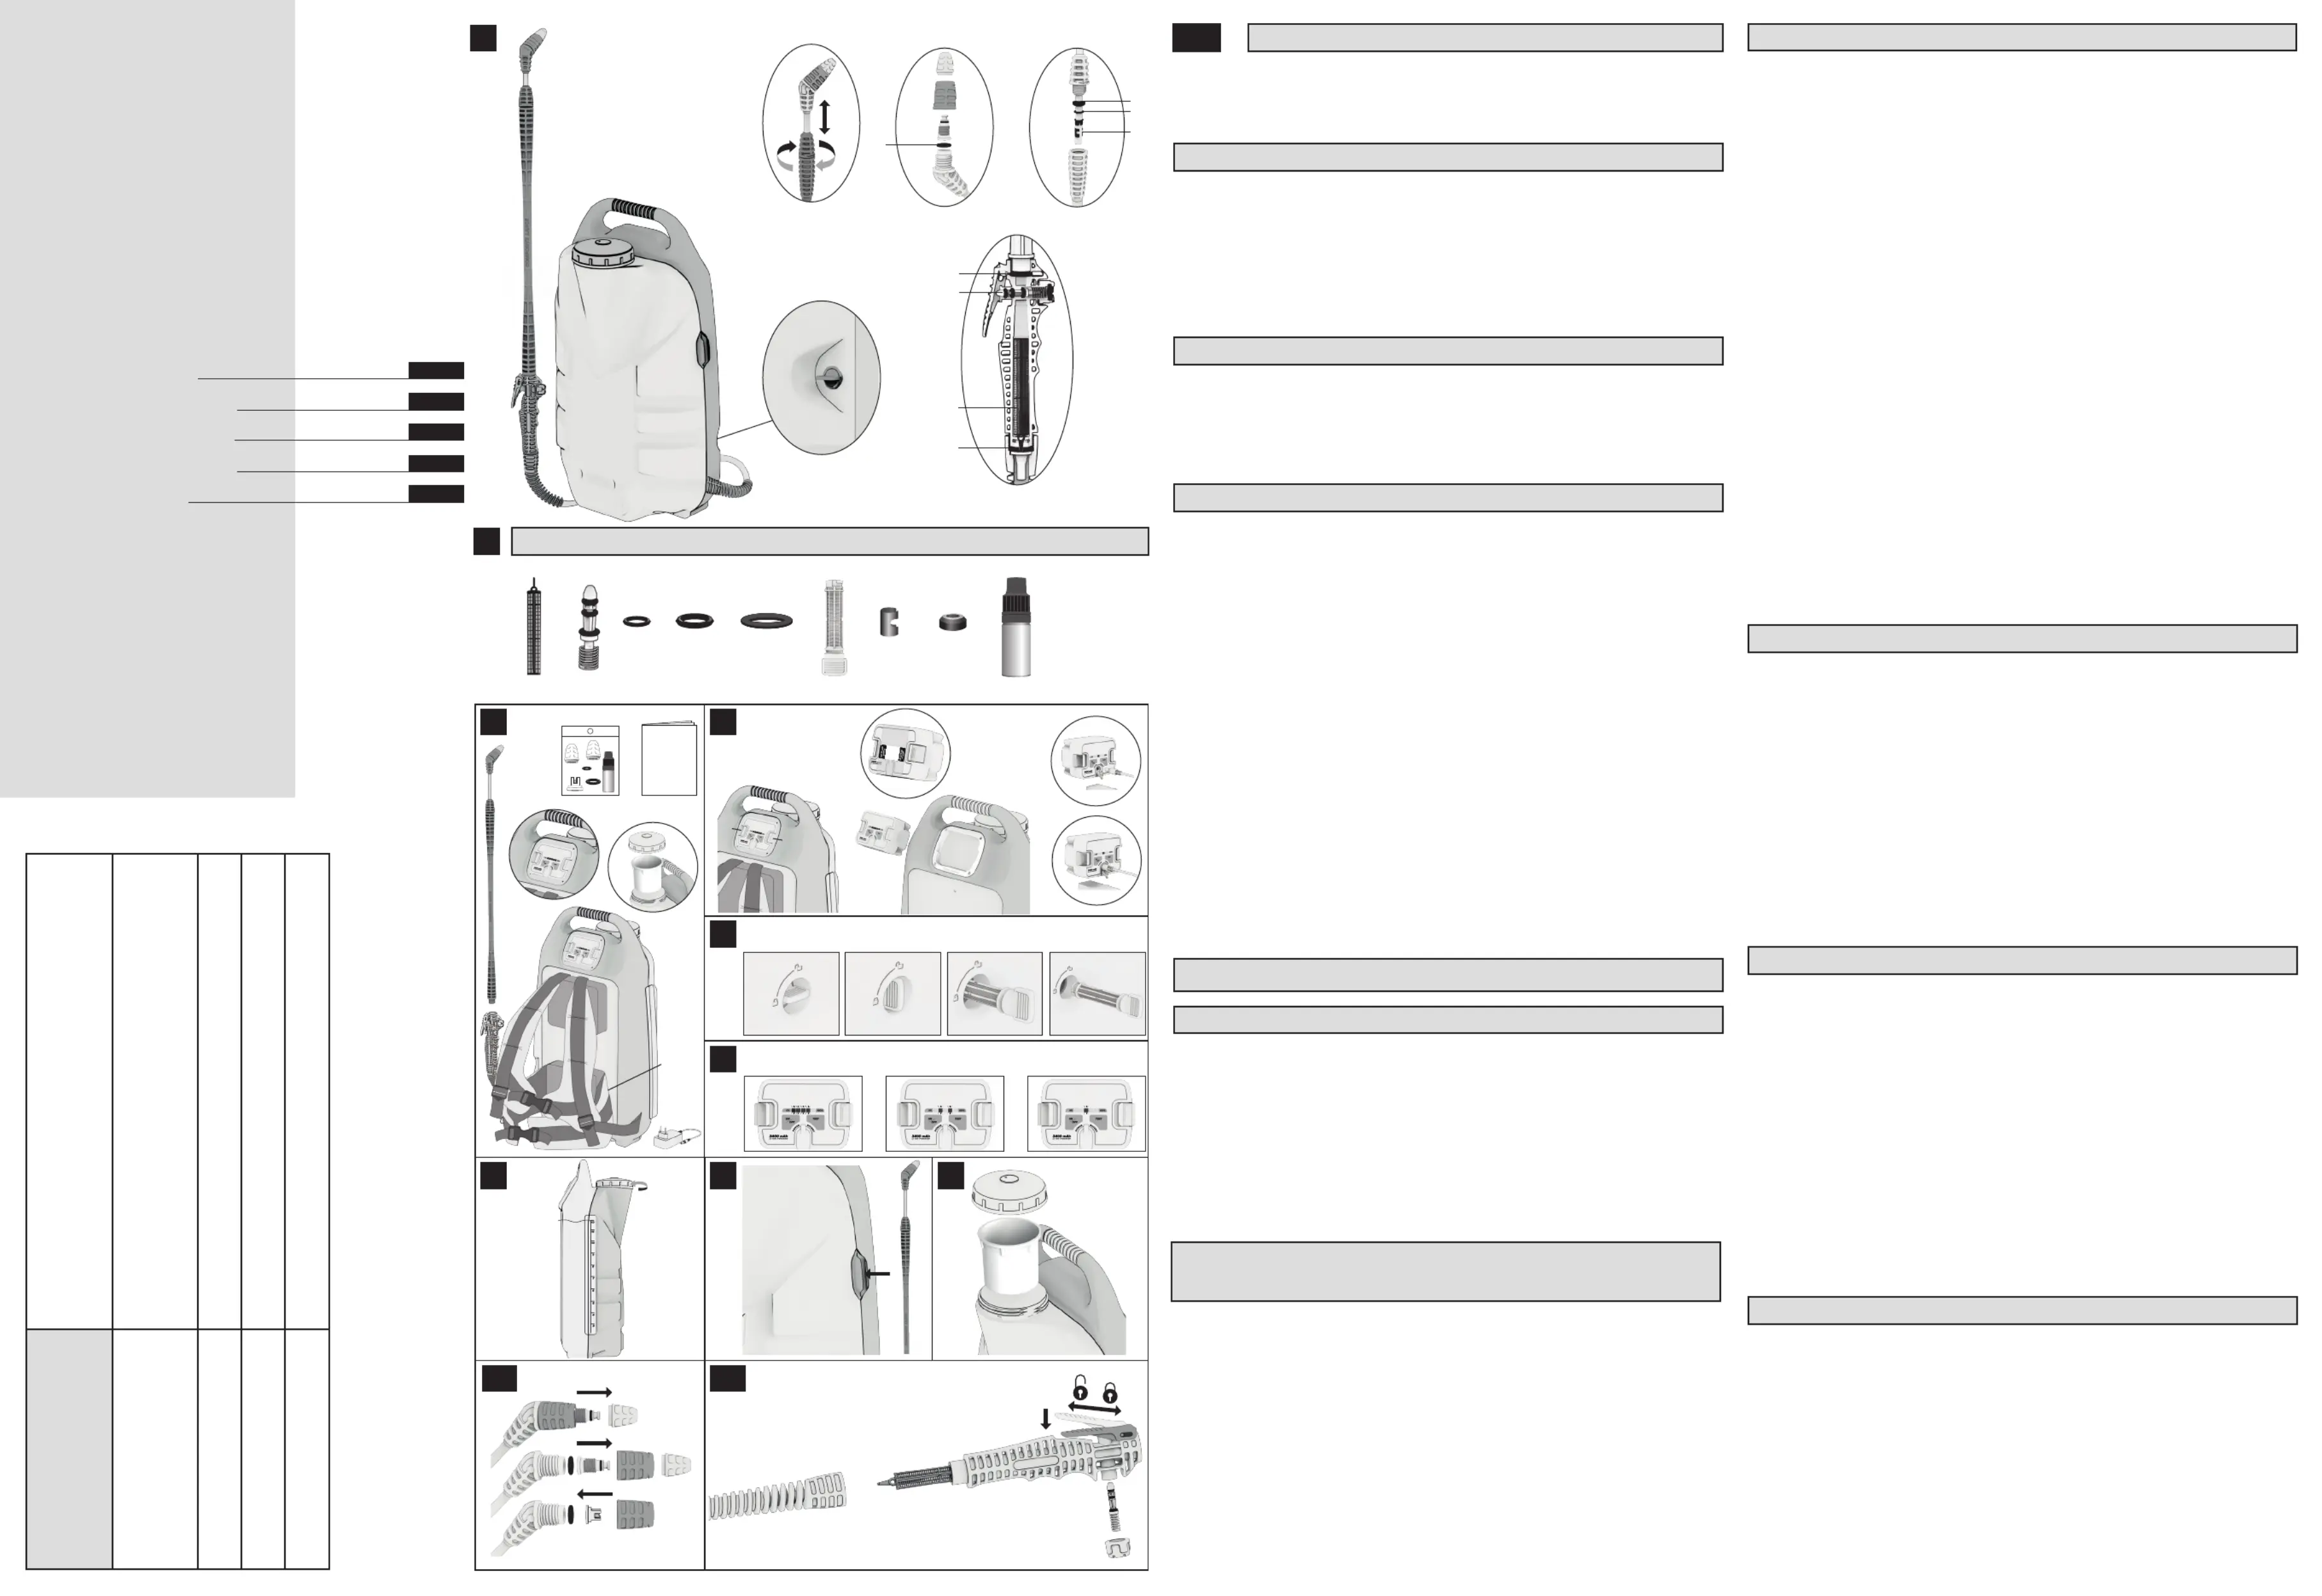
The set contained in the package is presented in : Complete sprayer with the harness, Fig. 3 a.
hose with springs and feeding valve integrated with handle, Battery pack 3,4Ah with control b.
package, Charger 12,6V; 3A for charging the package, Telescopic lance with adjustable c.d.
nozzle MR 1,5 mm, Funnel with strainer, Spare nozzles: angular nozzle MR1.0, MR2.0, fan e.f.
nozzle MF3.0, additional gaskets , and silicone grease User’s manual with Fig. 1cFig. 1dg.
awarranty card, EU DECLARATION OF CONFORMITY.
Manufacturer reserves the right to change the equipment of the sprayer.
1. Before you start working with the sprayer, read these operating instructions.
2. Before starting work, prepare sprayer and check the tightness and correct operation of the
sprayer using clean water. For this purpose, fix the lance with the feeding valve integrated with
the handle , remove the battery pack with the control panel , remove the safety foil Fig. 1Fig.4b
Fig.4bFig. 4a and insert the package so that the click sound is heard , then check the battery
charge level by pressing the TEST button . The LED indicators on the panel will light Fig.6a
up, showing the level of charging. Before pouring water, make sure that the pump filter Fig.1f
isproperly inserted and locked . Unscrew the tank nut , pour clean water and Fig. 5aFig. 7a
screw the nut. Press the button ON/OFF on the control panel , the diodes will start to flash Fig. 6a
Fig.6abcFig.11a,,, press the feeding valve button from the nozzle, air should first come out,
then water.
3. In order to start working with the sprayer: empty the tank from water, then pour in solution
prepared in advance according to the producer recommendation, don’t exceed the level indicated
on the scale , tighten the tank nut . Before putting the sprayer on the back, start Fig. 7Fig. 7a Note:
the sprayer by pressing the ON/OFF button on the control panel After putting the sprayer Fig. 6a
on the back, adjust the length of straps, then fasten the chest and waist belts ,extend the Fig. 3h
telescopic lance , and then direct the lance to the place where spray will be carried out and Fig. 1e
press the feeding valve button , start spraying. Continuous sprayer operation is possible by Fig. 11a
pressing the feeding valve button and moving it forward . After finishing work, release the Fig. 11a
feeding valve lock by moving the button backwards. and switch the control package o Fig. 11a
with the ON/OFF button . Fig. 6a
4. Nozzle replacement:
– replacement of a cone 1.5 mm (yellow) nozzle with 1.0 mm (green) nozzle. To do this, unscrew
the yellow nozzle cap and screw the green nozzle cap .Fig. 10a
– replacement of the cone nozzle with a flat-stream nozzle. To do this, unscrew the nozzle cap
Fig. 10aFig.10b, then unscrew the black nut, take out the core and O-ring , insert the flat-stream
nozzle into the black nut , then insert the O-ring and tighten.Fig. 10c
5. The battery pack 3.4Ah with the control panel is an exchangeable element available in the sales
oer.
1. The guarantee period is 24 months from the date of purchase. The warranty excludes: pump
with engine, control package with battery and charger, for which the warranty period is 12 months.
The tank is covered by a 60-month warranty.
2. Reclamation should be lodged to the seller of the sprayer.
3. CAUTION! Dirty and contaminated with chemicals sprayers, supplied as a complaint,
orsprayers with any content will not be repaired. Thoroughly empty, rinse and clean them
beforehand!
4. The claims will be accepted after showing the defected part or giving the full description of the
fault.
5. The guarantee repairs should be made using always the genuine parts.
6. Number of repairs after which the seller cannot refuse to exchange the sprayer for anew one
(in case there are still defects) is 3.
7. Operations connected with exploitation of the sprayer and described in the manual are not
treated as guarantee repairs.
8. The producer will not accept the claim if there were changes in pressure regulation or the
storing, operating, maintaining of the product were not according to the manual.
9. Mechanical damages caused by the user cannot be the subject to reclamation. The damaged
parts can be exchanged but the costs are charged.
10. The warranty does not cover damage resulting from the use of an unsuitable charger.
1. Do not store the sprayer in sunlight or in temperatures below +4°C.
2. After finishing work, thoroughly wash the sprayer using clean water and blow air through it.
Perform maintenance periodically.
After washing the sprayer and blowing the air through it, you should: unscrew the hose from the
handle, remove the filter and clean it under running water using a soft brush. Unscrew Fig. 11b
the nut from the feeding valve in the handle, take out the valve piston with a spring , clean Fig. 11c
and lubricate it with silicone grease , put it back and tighten the nut. Unscrew the nozzle nut Fig. 2i
Fig. 10a remove the nozzle and rinse it thoroughly with water, then lubricate with silicone grease
O-ring . Unlock and remove the pump filter ,,, and clean it under running Fig. 1dFig. 5a b c d
water using a soft brush, then insert and lock (a small amount of liquid may flow out after Fig. 5a
removing the filter). Unscrew the tank nut , remove the funnel with strainer and Fig. 7aFig. 9
rinse with water, then put it back in the tank and screw the nut. shows the diagram of the Fig.1
elements to be maintained or which are wasted and must be replaced by purchasing a repair kit
A044.
A044.
A044.
A044.101 (Z08x)
101 (Z08x)
101 (Z08x)
101 (Z08x)A044.101 (Z08x) .Fig. 2
3. Maintenance and repairs should only be carried out with silicone grease.
Using other lubricants will damage the sprayer.
CAUTION! All repair, replacement or maintenance operations concerning the pump unit,
battery and control package may only be carried out at authorized services. If you attempt to
repair, replace ormaintain above mentioned items, you lose your warranty.
GB
In order to charge the battery, stick the included charger into the charging socket in the control
package , and then connect it to the power supply 230V 50 Hz. It is possible to charge the Fig. 4c
battery when the package is in the sprayer, as well as independently outside the sprayer. After
connecting the charger, the diodes will start to flash, the charging cycle is in progress. . The Fig. 6
battery is fully charged when all the LED indicators are on. If the battery has a low level of charging
and only the red indicator light is on, it means that the sprayer battery needs to be charged before
starting work. Charging should be stopped only when the battery is fully charged. The sprayer
should be stored with a charged battery, what should be periodically checked by pressing the
TEST button . Prolonged storage of the sprayer with adischarged battery may damage Fig. 6a
thebattery.
WARNING! The control package can be charged only with the included charger or12.6V, 3A
charger. If you try to use the charger with other parameters, the panel may be permanently
damaged or the battery will not get charged.
In the lance handle integrated with the feeding valve is used filter R40 which has to prevent
clogging of the nozzles.
1. APPLICATION AND USE
OWNER MANUAL
2. EQUIPMENT OF THE SPRAYER
4. CHARGING THE BATTERY
3. PREPARATION AND OPERATION OF THE SPRAYER
5. WORK SAFETY REGULATIONS
6. SERVICE AND WARRANTY REPAIRS
7. STORAGE AND MAINTENANCE OF THE SPRAYER
8. GENERAL REMARKS
BATTERY KNAPSACK
SPRAYER
IRRORATRICE A ZAINO CON
SPRUZZATORE A BATTERIA
PULVERIZADOR DE BATERÍA
AKKU-SPRÜHGERÄT
PULVÉRISATEUR À DOS À
BATTERIE
1. Children, pregnant women, people taking medicines or other drugs restricting the concentration
powers or drinking alcohol are forbidden to operate the sprayer.
2. Before first spraying check the tightness and correct operation of the sprayer using clean water.
3. When working with chemicals (also during liquid preparation and destroying the packages)
itis necessary to wear protective clothing (rubber boots, gloves, a coat, acap and a mask).
4. It’s forbidden to work with chemicals on an empty stomach and eat or drink during working. It’s
forbidden to drink alcohol one day before and one day after working with chemicals.
5. It’s forbidden to pour the liquid remains to the open water reservoirs or biological sewage
treatment plants. These notes apply also to the water after cleansing the container and other parts
of the sprayer.
6. Expendable sprayer should be handed over for utilization.
6a. The used battery pack with the control panel should be given to a collection point for used
electrical and electronic equipment and batteries.
7. People working using the sprayer should strictly comply to all the recommendations on the
package of the spraying agents. In case of poisoning the doctor must be contacted.
8. It’s is forbidden to work using defective sprayer or with any leakage. Do not expose the sprayer
toimpact.
9. All the operations should be done after decompression of the sprayer.
10. Thoroughly cleanse the sprayer after each using and before servicing.
11. It’s is forbidden to use the sprayer for other purposes than stipulated in the owner manual.
12. It’s forbidden to store the sprayer filled with a liquid and under pressure.
13. It’s forbidden tospray with liquids warmer than +40°C, and with easy inflammable chemicals
orsubstances which can cause an explosion e.g. petrol, solvents.
14. Changes in the sprayer or using it not according to its allocation can result in poisoning people
or animals, polluting the environment, damaging the sprayer orserious accidents.
15. After finishing work, you should change your clothes (the protective clothes must be cleaned),
wash your hands, face, mouth and throat, and clean your nose.
16. After finishing work, rinse the sprayer using clean water.
17. The user is fully responsible for the damages caused by not complying with these
recommendations.
18. Always check the battery level before starting work.
19. It’s forbidden to point the lance of the sprayer and spray the liquid in the direction of the face.
20. The sprayer while working and storing should be secured from any unauthorized people,
especially children.
21. When using other agents, make sure that it can be used in the sprayer, and that they are not
harmful to the sprayer, people and the environment.
22. CAUTION! The sprayer’s control package is splash-proof and has a higher moisture level,
isnot resistant to flooding and frequent contact with water.
CAUTION! Removing the filter Fig. 1f will cause liquid flowing out of the tank.
e
f
b
d
c
a
USER’S MANUAL
a
g
h
i
c
d
b
c
a
b
c
a
b
d
d
a
b
2
1
34
5
6
78
b
a
c
g
h
max
10
9
11
click
click
a
c
f
g
d
d
c
h
e
f
b
e
a
REP
REP
REP
REPAIR KIT / KIT DI RIP
AIR KIT / KIT DI RIP
AIR KIT / KIT DI RIP
AIR KIT / KIT DI RIPARAZIONE / KIT DE REP
ARAZIONE / KIT DE REP
ARAZIONE / KIT DE REP
ARAZIONE / KIT DE REPARA
ARA
ARA
ARACIÓN / REP
CIÓN / REP
CIÓN / REP
CIÓN / REPARA
ARA
ARA
ARATURSA
TURSA
TURSA
TURSATZ / TROUSSE DE RÉP
TZ / TROUSSE DE RÉP
TZ / TROUSSE DE RÉP
TZ / TROUSSE DE RÉPARA
ARA
ARA
ARATION A044.
TION A044.
TION A044.
TION A044.101 (Z08x)
101 (Z08x)
101 (Z08x)
101 (Z08x)REPAIR KIT / KIT DI RIPARAZIONE / KIT DE REPARACIÓN / REPARATURSATZ / TROUSSE DE RÉPARATION A044.101 (Z08x)
SANIX
PRO 14
It is recommended to use line sprayer for one group of chemical
substances. The sprayer once used for chemicals, can not be used for other
purposes !!!
b
a
c
d
OWNER MANUAL
ISTRUZIONI PER L’USO
MANUAL DE USUARIO
BETRIEBSANLEITUNG
MODE D’EMPLOI
GB
IT
ES
DE
FR
GUARANTEE CARD CAR
GUARANTEE CARD CAR
GUARANTEE CARD CAR
GUARANTEE CARD CART
T
T
TA DI GARANZIA
A DI GARANZIA
A DI GARANZIA
A DI GARANZIA GUARANTEE CARD CARTA DI GARANZIA
T
T
T
TARJETA DE GARANTÍA GARANTIEKAR
ARJETA DE GARANTÍA GARANTIEKAR
ARJETA DE GARANTÍA GARANTIEKAR
ARJETA DE GARANTÍA GARANTIEKARTE
TE
TE
TETARJETA DE GARANTÍA GARANTIEKARTE
CARTE DE GARANTIE
CARTE DE GARANTIE
CARTE DE GARANTIE
CARTE DE GARANTIECARTE DE GARANTIE
STAMP OF THE RETAILER AND THE DATE TIMBRO DEL RIVENDITORE E DATA
SELLO DEL VENDEDOR Y FECHA STEMPEL UND DATUM DES VERKÄUFERS
CACHET DU CONCESSIONNAIRE ET DATE
DATE OF THE REPAIR DATA DELLA RIPARAZIONE
FECHA DE LA REPARACIÓN DATUM DER REPARATUR
DATE DE LA RÉPARATION
DESCRIPTION OF THE FAULT DESCRIZIONE DEL GUASTO
DESCRIPCIÓN DEL FALLO BESCHREIBUNG DES DEFEKTS
DESCRIPTION DU DÉFAUT
Produktspecifikationer
| Varumärke: | Lavor |
| Kategori: | ej kategoriserat |
| Modell: | Comprex NPB 14 |
Behöver du hjälp?
Om du behöver hjälp med Lavor Comprex NPB 14 ställ en fråga nedan och andra användare kommer att svara dig
ej kategoriserat Lavor Manualer

29 Juli 2025
28 Juli 2025
1 Juli 2025
ej kategoriserat Manualer
Nyaste ej kategoriserat Manualer
3 April 2026
3 April 2026
3 April 2026
3 April 2026
3 April 2026
3 April 2026
3 April 2026
3 April 2026
3 April 2026