Lidl CR 5 A1 Bruksanvisning

Lidl Dashcam CR 5 A1

Läs gratis den bruksanvisning för Lidl CR 5 A1 (135 sidor) i kategorin Dashcam. Guiden har ansetts hjälpsam av 11 personer och har ett genomsnittsbetyg på 3.5 stjärnor baserat på 6 recensioner. Har du en fråga om Lidl CR 5 A1 eller vill du ställa frågor till andra användare av produkten? Ställ en fråga

Sida 1/135
IAN 47583
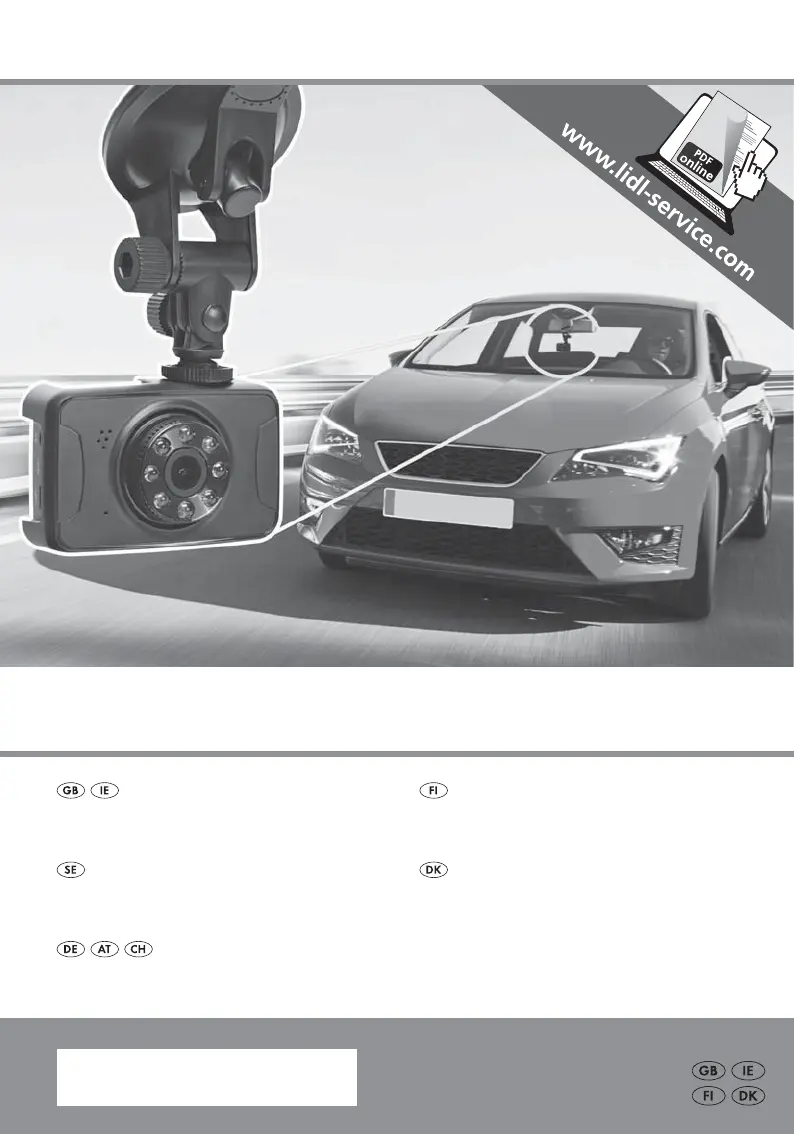
DASHBOARD CAMERA CR 5 A1
DASHBOARD CAMERA
Operating instructions
DASHCAM
Betjeningsvejledning
BILKAMERA
Bruksanvisning
KOJELAUTAKAMERA
Käyttöohje
DASHCAM
Bedienungsanleitung
GB / IE Operating instructions Page 1
FI Käyttöohje Sivu 27
SE Bruksanvisning Sidan 53
DK Betjeningsvejledning Side 79
DE / AT / CH Bedienungsanleitung Seite 105
Before reading, unfold the page containing the illustrations and familiarise yourself with all func-
tions of the device.
Käännä ennen lukemista kuvallinen sivu esiin ja tutustu seuraavaksi laitteen kaikkiin toimintoihin.
Vik ut bildsidan och ha den till hands när du läser igenom anvisningarna och gör dig bekant med
apparatens / maskinens funktioner.
Før du læser, vend siden med billeder frem og bliv bekendt med alle apparatets funktioner.
Klappen Sie vor dem Lesen die Seite mit den Abbildungen aus und machen Sie sich anschließend
mit allen Funktionen des Gerätes vertraut.
A B
C
D
E
IAN 47583
DASHB OARD C AMERA CR 5 A1
DAS HBO ARD CAMER A
Operating instructions
DAS H C AM
Betjeningsvejledning
BIL KAME R A
Bruksanvisning
KOJ EL AU T AKAME RA
Käyttöohje
DAS H C AM
Bedienungsanleitung
2CR 5 A1
GB
IE
Introduction
Information concerning these operating instructions
Congratulations on the purchase of your new device.
You have selected a high-quality product. The operating instructions are part of
this product. They contain important information on safety, usage and disposal.
Before using the product, familiarise yourself with all handling and safety guidelines.
Use the product only as described and for the range of applications specifi ed.
Please pass on all documentation incl. these operating instructions on to any
future owner(s) if you sell this product or give it away.
Copyright
This documentation is subject to copyright protection.
Any copying or reproduction, including extracts thereof, and the reproduction of
images (even in a modifi ed state), is permitted only with the written authorisation
of the manufacturer.
Intended use
This cockpit recorder is an information electronics device designed to record
digital photos and videos in motor vehicles, particularly while on the road. It is
not intended for any other use. This device is not intended for use in commercial
or industrial environments. The manufacturer accepts no responsibility for dam-
age caused by failure to observe these instructions, improper use, incompetent
repairs, making unauthorised modifi cations or for using unapproved replacement
parts. The risk shall be borne solely by the user.
Warnings used
The following warnings are used in these operating instructions:
DANGER
A warning at this hazard level indicates an imminently hazard-
ous situation.
If the hazardous situation is not avoided, it could result in death or serious
physical injury.
Follow the instructions in this warning to prevent a fatality or serious
personal injury.
3CR 5 A1
GB
IE
WARNING
A warning at this hazard level indicates a potentially hazard-
ous situation.
Failure to avoid this hazardous situation could result in physical injury.
Follow the instructions in this warning to prevent physical injury.
CAUTION
A warning at this hazard level indicates potential material
damage.
Failure to avoid this situation could result in material damage.
Follow the instructions in this warning to prevent material damage.
NOTE
A note indicates additional information that eases device handling.
Safety
In this section, you will receive important safety advice relating to device handling.
The device complies with the statutory safety regulations.
Improper use may result in personal injury and material damage.
Basic safety guidelines
To ensure safe handling of the device, follow the safety guidelines set out below:
Prior to use, check the device for visible, external damage. Do not operate an
device that has been damaged or dropped.
If the cables or connections are damaged, have them replaced by an author-
ised specialist or customer service.
All repairs must be carried out by authorised specialist companies or by the
Customer Service department. Failure to make proper repairs can put the
user at risk. Warranty entitlement will also lapse.
Defective components must always be replaced with original replacement
parts. Compliance with the safety requirements can only be guaranteed by
using these replacement parts.
Never open the device, and never carry out any repairs yourself.
Protect the device from moisture, spray and dripping water and penetration
by liquids.
4CR 5 A1
GB
IE
Never subject the device to extreme heat or humidity. This applies especially to
storage in a car. If the car is stationary for long periods and the weather is
warm and sunny, temperatures of more than 40°C can arise in the car interior
and the glove compartment. Remove electrical and electronic devices from
the vehicle.
When tting the cradle, ensure that it does not interfere with the steering,
braking or the operation of other vehicle systems (such as airbags) and does
not restrict your fi eld of view when driving.
DANGER
Do not place the car cradle in or near the expansion area of the airbag, since
the cradle could be fl ung through the vehicle interior in the event of airbag
deployment and cause serious injuries.
WARNING
The camera should not be mounted in such a way that you or other passengers
could be hit by the camera in the event of an accident. This could cause serious
injury.
People who, due to their physical, intellectual, motor or sensory capabilities,
are incapable of operating the device safely may only use the device under
the supervision or direction of a responsible person.
DANGER
Packaging materials must be kept out of the reach of children and should not
be used as playthings. Risk of suff ocation.
Do not allow children to use the device unless they are being supervised.
Children are not always able to correctly recognise potential dangers.
Do not place any objects on the device.
Do not operate the device close to open fl ames (e.g. candles).
If you notice a burning smell or smoke coming from your device, disconnect
it from the power supply immediately.
WARNING
Under no circumstances should the smoke be inhaled as this could be harmful
to your health.
Check regularly to ensure that the suction cup is securely attached to the
windscreen. This is especially important in areas where extreme outside
temperature fl uctuations occur.
All of the applicable laws in your location must be observed. The use of a
cockpit camera is banned in some countries and may constitute a criminal
off ence. The camera should not be operated while driving. Traffi c safety must
ALWAYS take priority whilst driving. Use this device only if it is not like to
lead to any hazard during driving situations.
5CR 5 A1
GB
IE
The device contains a lithium-ion battery. Therefore, the device must not be
thrown into the re. There is a risk of explosion!
Do not exert any pressure on the display. If it should break, touching the
sharp edges could cause injury.
Possible infringements of the rights of third parties
Please note the following when using the cockpit camera:
Copyright protection
In principle, everyone has the right to pictures of themselves. According to copy-
right law, pictures of people may only be published without their permission if the
aff ected person appears merely as an incidental feature in a landscape or other
location. The question as to whether a person is merely an incidental feature
must be ascertained on a case by case basis.
Protection of privacy
The privacy of others may not be infringed by any recorded images. Do not set up
the camera pointing at the garden or an entrance of a neighbouring residence,
even if these locations are easily visible from your own vehicle or from public
places. This does not a constitute a right to publish these views.
Personal determinability
Personal determinability exists when it can be established that a certain person
was at a certain location at a certain time. This identifi cation can be made by
means of an identifi er related to a specifi c person, e.g. a car number plate.
Personal determinability of persons is to be avoided.
Surveillance cameras at the workplace
Surveillance at the workplace is subject to particularly strict legislation in Germany.
Employers should not use surveillance cameras in the workplace in any cases
where this could lead to a possible infringement of legal rights.
The respective legal requirements of the country in which the camera is being used
should always be observed to avoid possible infringements of the rights of third
parties. Due to the possible violation of third party rights, it is illegal to publish
recordings featuring strangers or vehicle license plates without authorisation,
e.g. on the Internet. The recordings may only be used for providing evidence in
the event of an accident.
6CR 5 A1
GB
IE
Controls
(For illustrations see the fold-out page)
Figure A:
Locking lever
Cradle with suction cups
Knurled screws for three-dimensional locking
Figure B:
Camera lens
▲ button
▼ button
MENU button
MODE button
Microphone
USB* port
Reset opening
AV connection
Loudspeaker
Infrared LEDs
Figure C:
Operating display
Cover
Mini-HDMI connection
microSD card slot
Screen
Figure D:
Thread for the tripod mount
On/Off button
/ button to start/stop the video recording, to trigger a photo or
call up menu items
Illustration E:
USB socket for power supply via the in-car adaptor
Operating light
12/24 V car adapter
USB* to mini-USB cable
AV cable (3.5 mm jack to phono plugs)
Protective housing
Operating instructions
*USB® is a registered trademark of USB Implementers Forum, Inc.
7CR 5 A1
GB
IE
Contents of package and transport inspection
Please check the contents of the package (see fold-out page).
The following components are included in delivery:
Cockpit recorder CR 5 A1
Protective housing
Cradle with suction cups
USB* to mini-USB cable
12/24 V car adapter
AV cable (3.5 mm jack to phono plugs)
These operating instructions
*USB® is a registered trademark of USB Implementers Forum, Inc.
Remove all the parts of the device and the operating instructions from
the packaging and then check the contents for completeness and visible
damage (see fold out page).
Remove all packing material and the protective fi lm from the screen and
camera lens .
NOTE
If the consignment is incomplete or damaged due to defective packaging
or carriage, contact the Service hotline (see the Service section).
Disposal of packaging materials
The packaging protects the device from damage during carriage. The packaging
materials have been selected in accordance with environmentally congruent and
disposal-specifi c parameters and are, therefore, recyclable.
Returning the packaging to the materials cycle conserves raw materials and
reduces the amount of waste that is generated. Dispose of packaging materials
that are no longer needed in accordance with applicable local regulations.
NOTE
If possible, keep the original packaging of the device during the warranty
period, so that the device can be packed properly for returning in the event
of a warranty claim.
10 CR 5 A1
GB
IE
CAUTION
In vehicles in which the cigarette lighter also works with the ignition switched
off , the device must be disconnected from the cigarette lighter socket after
use. Otherwise, the vehicle battery may be discharged over a long period
of time, since the device also uses power when it is idle. The vehicle's
engine will no longer start.
In vehicles in which the cigarette lighter is not switched off , the recording is
not interrupted. In this case, you will need to switch o the camera manually.
Handling and operation
In this chapter you will receive important information for the handling and operation
of the device.
Switching on and off , making settings
Press the on/o button to switch on the device. The camera image is displayed
on the screen and the operating display lights up green. The device is now
in video standby mode.
To switch off the device, press and hold the on/off button for 3 seconds.
Basic settings
Setup menu
To make the basic settings for the device in the setup menu, press the MENU
button followed by the MODE button . The setup menu opens:
Default settings
Using the ▲▼ buttons / you can move the selection bar to the desired entry
and then call up this menu item with the / button . To exit the activated
menu item without making a change, press the MODE button . Below right,
the current menu board as well as the total number of menu boards is shown.
To close the menu, press the MENU button .
11CR 5 A1
GB
IE
Time & date
If you access this menu option, you can then use the ▲▼ buttons / to select
whether the recordings are to be made with or without a date stamp. Select
"Time & date stamp on" to activate ths function or "Time & date stamp off " to
deactivate it.
To set the current date, call up "Set time & date". Then use the ▲▼ buttons /
to set the current year. Press the MODE button to use the ▲▼ buttons / to
set the month. Press the MODE button to use the ▲▼ buttons to set the /
day. Press the MODE button to use the ▲▼ buttons / to set the hours of
the current time. Press the MODE button to use the ▲▼ buttons / to set
the minutes. Press the MODE button to use the ▲▼ buttons to set the /
seconds. Press the MODE button / to use the ▲▼ buttons to set the
required date format.
The options are "YY/MM/DD" for the two-digit date in the order "year/month/
day", "MM/DD/YY" for the two-digit date in the order "month/day/year" and
"DD/MM/YY" for the two-digit date in the order "day/month/year".
Confi rm your selection by pressing the / . Afterwards, the display button
will return to the list of menu items.
Auto Power O
If you access this menu option, you can the use the ▲▼ buttons / to choose
whether the device switches off automatically after "1 Min", "3 Min" or "5 Min"
of inactivity. If you select "Off ", the device will not switch off automatically.
Confi rm your selection by pressing the / . Afterwards, the display button
will return to the list of menu items.
Impact sensor
If you access this menu option, then you can use the ▲▼ buttons / to select
the sensitivity of the built-in impact sensor: "Very low", "Low", "Middle", "High" and
"Very high" are the available options. This feature automatically protects the current
video recording when it recognises an impact, which indicates an accident event,
from being overwritten during a loop recording. Confi rm your selection by pressing
the / button . Afterwards, the display will return to the list of menu items.
Beep sound
If you access this menu option, you can then use ▲▼ buttons / to select
whether the device emits an acoustic signal when pressing the device's buttons
as well as the on/off function ("On"), or not ("O "). Confi rm your selection by
pressing the / button . Afterwards, the display will return to the list of
menu items.
12 CR 5 A1
GB
IE
Auto display off
If you access this menu option, you can then use the ▲▼ buttons / to select
the period after which the display automatically switches off : "1 Min", "3 Min"
and "5 Min" are the available options. Select "Display always on" if the display
is to remain on permanently. To reactivate the display after it has been automati-
cally switched off , press one of the ▲▼ buttons / , the MODE button or
the / . button
Language
If you access this menu option, you can then use the ▲▼ buttons / to select
"English" or "Deutsch" as the language for the on-screen menus. Confi rm your
selection by pressing the . Afterwards, the display will return to / button
the list of menu items.
Display icon rotation
If you access this menu option, you can then use the ▲▼ buttons / to select
whether the display icons and the menus are to be displayed in the normal mode
("Off ") or rotated by 180° ("On"). The best selection depends on how you have
mounted the camera.
Format memory card
If you access this menu option, then you can use the ▲▼ buttons / to format
the inserted microSD card. This process will irretrievably delete all the data on the
microSD card, even data which is write protected. To format the card, use the
▲▼ buttons / / . to select "OK" and then press the button
The formatting process will begin.
Default settings
If you access this menu option, you can then reset all the settings of the device to
the factory defaults. Use the ▲▼ buttons / to select "OK" and confi rm your
selection with the / button . Afterwards, the display will return to the list
of menu items. All of the previously made settings will be reset to the factory
settings.
To close the setup menu, press the MENU button .
13CR 5 A1
GB
IE
Video standby mode
In video standby mode, the screen shows the following overview:
A – displays the remaining recording time depending on resolution and
available storage space
B current video resolution
C – symbol to indicate an inserted microSD card
D – battery charge level of the internal battery
E date display (only when the "Time & date stamp" is activated)
E time display (only when the "Time & date stamp" is activated)
G symbol for motion detection (only visible if the function is activated)
H symbol for a loop recording as well as its length in minutes (here 3 minutes)
I display for exposure correction
J symbol for video standby
K red dot ashes during recording
L – symbol for a write-protected fi le
Start / end recording
Press the ▲ button repeatedly as required to zoom into the subject. Hold
down the button for fast zoom. You can use the ▼ button in the same way to
zoom out. Press the / button to start the video recording. During the
video recording the operating display blinks green and red. Press the button
again to stop the recording.
If you press the MODE button during recording, the symbol is displayed
and the current recording will be write-protected.
NOTE
As soon as the camera is connected to the vehicle's power supply, the
recording starts. To stop the recording, press the / . button
14 CR 5 A1
GB
IE
If you now press the MENU button in video standby, the following menu opens:
Motion detection
Using the ▲▼ buttons / you can move the selection bar to the desired entry
and then call up this menu item with the / button . To exit the activated
menu item without making a change, press the MODE button . Below right, the
current menu board as well as the total number of menu boards is shown. If the
lowest menu item on a menu board is selected which leads to a further menu
board, press the ▼ button to jump to the fi rst entry on the following menu
board. To close the menu, press the MENU button .
Resolution
If you access this menu option, you can then set the the video resolution:
"1920x1080P (HD)", "1280 x 720P" and "640 x 480P" are the options avail-
able. Use the ▲▼ buttons / to select the desired resolution and confi rm
your selection with the / to return to the list of menu items. button
Exposure
If you access this menu option, you can then adjust the video exposure in three
steps upwards (from +1 to +3, brighter), or downwards (from –1 to –3, darker).
When the setting is set to "0" there is no exposure compensation. Use the ▲
buttons / to select the desired video exposure compensation and confi rm
your selection with the / to return to the list of menu items. button
Video length
If you access this menu option, you can then set the length of the loop for the
video recording: "3 Min", "5 Min", "10 Min" or "Loop recording off " are the
available options. Use the ▲▼ buttons / to select the desired value for the
loop recording and confi rm your selection with the / button to return to
the list of menu items.
Remember that the microSD card used must have a suffi cient capacity to record
the desired length of loop in the video resolution set. If you select "Loop record-
ing off " the recording ends when you reach the capacity of the microSD card.
When the end of the recording is reached, the device will start a new recording
with the length set.
If the capacity of the memory card is not suffi cient for the set duration, the record-
ing will be aborted. Reduce the length of the loop recording or use a memory
card with a greater capacity.
15CR 5 A1
GB
IE
Motion detection
If you access this menu option, you can then use the ▲▼ buttons / to activate
or deactivate this function. Confi rm your selection with the / button to
return to the list of menu items.
When this function is activated, the device will automatically stop the video
recording when no moving images are detected. If the device again detects
movements, the device will automatically begin recording again. If the function
is deactivated, the device does not stop recording if no motion is detected.
NOTE
You should only activate this function while the vehicle is parked if you want
to automatically fi lm a break-in attempt or to record the other vehicle after
a collision.
The initial recording with this function must be started manually.
Audio recording
If you access this menu option, you can then use the ▲▼ buttons / to activate
or deactivate audio recording via the built-in microphone. Confi rm your selection
with the / to return to the list of menu items. button
16 CR 5 A1
GB
IE
Photo standby
With the menu closed, press the MODE button during video standby to switch to
photo standby. The device then displays the following overview on the screen :
A – displays the remaining number of photos that can still be taken depending
on resolution and available storage space
B current photo resolution
C – symbol to indicate an inserted microSD card
D – battery charge level of the internal battery
E date display (only when the "Time & date stamp" is activated)
E time display (only when the "Time & date stamp" is activated)
G symbol for self-timer (here 5 seconds: only visible if the function is activated)
H symbol for exposure correction
I display for photo standby
J display for continuous advance function (only visible if feature is enabled)
Taking photos
Press the ▲ button repeatedly as required to zoom into the subject. Hold down
the button for fast zoom. You can use the ▼ button in the same way to zoom
out. Press the / button to take a photo.
If you now press the MENU button in photo standby, the following menu opens:
Using the ▲▼ buttons / you can move the selection bar to the desired entry
and then call up this menu item with the / button . To exit the activated
menu item without making a change, press the MODE button . Below right, the
current menu board as well as the total number of menu boards is shown. If the
lowest menu item on a menu board is selected which leads to a further menu
board, press the ▼ button to jump to the rst entry on the following menu board.
To close the menu, press the MENU button .
17CR 5 A1
GB
IE
Resolution
If you access this menu option, then you can use the ▲▼ buttons / to select
the desired resolution for your photos: "12MP (interp.*)", "7MP (interp.*)", "5MP",
"3MP", "2MP", "1.3MP" oder "0.3MP" are the available options. "MP" stands for
megapixel, e.g. the "5MP" setting creates a photo of 2592 × 1944 pixels, which
is about 5 million pixels. The larger the photos, the greater the detail. However,
the microSD card will fi ll up faster with higher resolution photos. Confi rm your
selection with the / to return to the list of menu items. button
*Interpolation = calculation method used to increase the number of pixels
Exposure
If you access this menu option, you can then adjust the photo exposure in three
steps upwards (from +1 to +3, brighter), or downwards (from –1 to –3, darker).
Use the ▲▼ buttons / to select the desired photo exposure compensation
and confi rm your selection with the / to return to the list of menu button
items.
3 photos in series
If you access this menu option, you can then use the ▲▼ buttons / to
activate or deactivate the function take a series of 3 photos in quick succession.
Confi rm your selection with the / to return to the list of menu button
items.
Self-timer
If you access this menu option, then you can use the ▲▼ buttons / to set the
self-timer function to 2, 5 or 10 seconds. The photo will then be taken after the
set delay when you press the / button . Select "direct capture" to deac-
tivate the self-timer. Confi rm your selection with the / button to return to
the list of menu items.
Playback mode
With the menu closed, press the MODE button during photo standby to switch
to playback mode. Using the ▲/▼ buttons / you can scroll through the stored
images. If you select a photo and press the / button , all stored photos
will be displayed in an endless slide show. Press the / button again to
stop the playback. If you select a video and press the , the video / button
is played back.
18 CR 5 A1
GB
IE
If you select a photo, the screen will display the following overview:
A – display of the current recording number/total number of recordings
B resolution of the currently selected photo
C – battery charge level of the internal battery
D – date/time stamp
E symbol for playback mode
F symbol for a write-protected fi le
If you now press the MENU button , the following menu opens:
Delete
Using the ▲▼ buttons / you can move the selection bar to the desired entry
and then call up this menu item with the / button . To exit the activated
menu item without making a change, press the MODE button . Below right,
the current menu board as well as the total number of menu boards is shown.
To close the menu, press the MENU button .
Delete
If you access this menu option, you can then use the ▲▼ buttons / to delete
the currently selected image ("Delete this le"), "Delete all fi les" or "Cancel".
Confi rm your selection by pressing the / button . When you confi rm the
following query with "OK", the selected delete function will be executed and the
menu closes. If, however, the screen shows "This fi le is write-protected", you must
rst deactivate the write protection as described in the section "Write protection".
19CR 5 A1
GB
IE
Write protection
If you access this menu option, you can then use the ▲▼ buttons / to select
whether to protect the currently selected fi le from deletion ("Write-protect this le"),
to remove the write protection for the selected fi le ("Unlock this fi le"), protect all
les from deletion ("Write-protect all fi les") or remove the write protection from all
les ("Unlock all fi les"). Confi rm your selection by pressing the / . button
Afterwards, the display will return to the list of menu items.
NOTE
Using this function on a large number of fi les can take several seconds.
If you select a video with the ▲/▼ buttons / will display the , the screen
following overview:
A – display of the current recording number/total number of recordings
B resolution of the currently selected video
C – length of the video
D – battery charge level of the internal battery
E function symbol for the MODE button : stop video/photo playback
E function symbol for the / button : start/stop video/photo playback
G symbol for playback mode
H symbol for a write-protected fi le
If you now press the MENU button , the following menu opens:
Delete
20 CR 5 A1
GB
IE
Using the ▲▼ buttons / you can move the selection bar to the desired entry
and then call up this menu item with the / button . To exit the activated
menu item without making a change, press the MODE button . To close the
menu, press the MENU button .
Delete
If you access this menu option, you can then use the ▲▼ buttons / to delete
the currently selected video ("Delete this  le"), "Delete all  les" or "Cancel".
Con rm your selection by pressing the / button . When you con rm the
following query with "OK", the selected delete function will be executed and the
menu closes. If, however, the screen shows "This  le is write-protected", you must
rst deactivate the write protection as described in the section "Write protection".
Write protection
If you access this menu option, you can then use the ▲▼ buttons / to select
whether to protect the currently selected le from deletion ("Write-protect this le"),
to remove the write protection for the selected  le ("Unlock this  le"), protect all
les from deletion ("Write-protect all  les") or remove the write protection from all
les ("Unlock all  les"). Con rm your selection by pressing the / . button
Afterwards, the display will return to the list of menu items.
NOTE
Using this function on a large number of  les can take several seconds.
Showing recordings on an external monitor
NOTE
The camera can transfer the video signal to an external monitor or the
video input of a television set. Please also follow the instructions of the
respective playback device.
Connect a suitable monitor to the AV connection using the supplied AV
cable . This allows you to display the live view from the camera.
Alternatively, you can also  ip the cover to one side and connect the
mini-HDMI connection on the camera to a suitable monitor using a suit-
able mini-HDMI cable (not supplied). This type of connection can only be
used to play back saved videos. The built-in display is then switched o and
only the green operating display lights up.
Start playback.
21CR 5 A1
GB
IE
Transferring recordings to a computer
Connect the mini-USB plug of the supplied USB cable to the port on
the camera and the USB plug to a free USB port of a switched-on computer. The
computer now recognises the device as "mass storage", the camera connects to
the computer and then the content of the SD/SDHC memory card appears as a
new drive on the computer. Now carry out the required  le operations.
Resetting the device
If the device does not work as described in this manual or it does not respond
to your operation, use a pointed object, e.g. a paper clip, to carefully press the
switch behind the RESET opening in the housing to restart the device.
Changing the fuse
The car adapter contains a fuse. If the device does not function, it may be
because the fuse is defective. Exchange the defective fuse for a replacement fuse
of the same type (see also chapter Technical data).
To do this, pull the car adapter out of the cigarette lighter socket.
Open the car adapter by carefully unscrewing the ribbed screw insert (C)
anticlockwise (using pliers if necessary) and removing it.
Now, take the plug tip (B) from the fuse (A), remove the fuse (A) and place
it to one side.
Now place the new fuse into the car adapter , place the plug tip (B) onto
the slightly protruding end of the fuse and screw the previously removed
screw insert (C) back in.
NOTE
If the device still does not work or the fuse blows again immediately, the
device is defective. Please then contact the Service Hotline (see chapter
Service).
22 CR 5 A1
GB
IE
Cleaning
CAUTION
Damage to the device!
To avoid irreparable damage, ensure that no moisture penetrates the
device during cleaning.
Clean the surfaces of the device with a soft, dry cloth. Use a normal commercial
detergent and water to remove stubborn residue. Ensure that no water gets
into the device.
Troubleshooting
This section contains important information on fault identi cation and recti cation.
Observe the instructions in order to avoid risks and damage.
WARNING
Observe the following safety information to avoid risks and property damage:
Repairs to electrical devices may only be carried out by specialists trained
by the manufacturer. Improper repairs can cause considerable risks to users
and damage to the device.
Fault causes and recti cation
The following table will help to identify and rectify minor faults:
Fault Possible cause Recti cation
The camera is not
working with the
built-in battery.
The battery is  at. Charge the built-in battery from a
switched-on computer connected to
the connection on the device,
or the on-board electrical system of
your vehicle.
The camera does not
work in the vehicle.
The vehicle's
battery is  at.
Charge the vehicle's battery.
The fuse in the
car adapter
is defective.
Replace the fuse (see section
Changing the fuse).
The camera does not
record properly during
the journey.
There is a
problem with the
built-in motion
sensor.
Activate the built-in motion sensor
(function "Motion detection" in the setup
menu) only while the vehicle is parked.
Increase the sensitivity of the motion
sensor.
23CR 5 A1
GB
IE
Fault Possible cause Recti cation
The device does not
respond as expected to
your operation.
There is a defect. Use a pointed object, e.g. a paper clip,
to carefully press the switch behind the
RESET opening in the housing to
restart the device.
The suction cup does not
hold  rmly.
The surface
being used is not
clean.
Clean the surface. You can also increase
the suction power by moistening the
suction cup.
NOTE
If you are unable to resolve the problem applying any of the aforemen-
tioned methods, please contact the Customer Service department.
24 CR 5 A1
GB
IE
Storage / Disposal
Storage
If you plan not to use the device for a long period, store it in a clean, dry place
away from direct sunlight. In this case you should charge the built-in battery from
time to time.
Disposal of the device
The adjacent symbol of a crossed-out wheelie bin means that this device is subject
to Directive 2012/19/EU. This directive states that this device may not be
disposed of in normal household waste at the end of its usable life, but must be
handed over to specially set-up collection locations, recycling depots or disposal
companies.
The integrated battery cannot be removed.
This disposal is free of charge for the user. Protect the environ-
ment and dispose of this device properly.
You can obtain further information from your local disposal company or the city
or local authority.
Appendix
Notes on the Declaration of Conformity
This device complies with the basic requirements and other relevant provisions
of the Electromagnetic Compatibility Directive 2004/108/EC and the RoHS
Directive 2011/65/EU.
The complete Declaration of Conformity, in its original form, is available with
the importer.

Produktspecifikationer

Varumärke: Lidl
Kategori: Dashcam
Modell: CR 5 A1
Färg på produkten: Zwart
Årlig-energiförbrukning: 62 kWu
Energieffektivitetsklass (gammal): A+
Skärm diagonal: 42 "
Upplösning: 1920 x 1080 Pixels
Original bildförhållande: 16:9
Ethernet LAN: Ja
Videolägen som stöds: 1080i, 1080p, 720p
Integrerad minneskortläsare: Ja
Kompatibla minneskort: SDXC
Ljusstyrka: - cd/m²
Antal USB 2.0-portar: 2
Antal HDMI-portar: 4
PC-ljud ingång: Ja
Kompositvideoingång: 3
Komponenter för video (YPbPr/YCbCr): 3
Antal Ethernet LAN (RJ-45)-portar: 1
Inbyggda högtalare: Ja
Genomsnittlig effekt: 10 W
Strömförbrukning (i standby): 0.15 W
Strömförbrukning (max): 87 W
Antal högtalare: 2
Hörlursutgångar: 1
Analog signalformat: PAL, PAL B, PAL G, PAL H, SECAM, SECAM B, SECAM B/G, SECAM D/K, SECAM L
HDCP: Nee
HD typ: Full HD
3D: Ja
Grafikupplösningar som stöds: 1024 x 768 (XGA), 1280 x 768 (WXGA), 1400 x 1050 (SXGA+)
VESA montering: Nee
Panelmonteringsgränssnitt: - mm
Bild-i-bild: Nee
Djup (utan bas): 52 mm
Höjd (utan bas): 604 mm
Bredd (utan bas): 997 mm
Vikt (utan bas): 14000 g
PC-ingang (D-Sub): Nee
Common Interface Plus (CI+): Nee
Digitalt signalformat: DVB-C, DVB-T
Enhetsbredd (med stativ): 997 mm
Djupenhet (med stativ): 247 mm
Enhetshöjd (med stativ): 650 mm
Vikt (med stativ): 17000 g
Digital Living Network Alliance (DLNA) certifierad: Ja
Text-TV: Ja
På/av timer: Ja
Elektronisk TV-guide: Ja
Gemensamt gränssnitt (CI): Ja
Teletekst: 1000 pagina's
Ström LED: Ja
Mått (B x D x H): 997 x 52 x 604 mm
Strömförbrukning (genomsnitt): 45 W
Fjärrkontroll ingår: Ja
Wifi: Nee
AC-ingångsspänning: 220 - 240 V
AC-ingångsfrekvens: 50 - 60 Hz
Strömförbrukning (typiskt): 87 W

Behöver du hjälp?

Om du behöver hjälp med Lidl CR 5 A1 ställ en fråga nedan och andra användare kommer att svara dig