NightStick XPP-5418GX Bruksanvisning

NightStick Ficklampa XPP-5418GX

Läs gratis den bruksanvisning för NightStick XPP-5418GX (4 sidor) i kategorin Ficklampa. Guiden har ansetts hjälpsam av 4 personer och har ett genomsnittsbetyg på 4.9 stjärnor baserat på 2.5 recensioner. Har du en fråga om NightStick XPP-5418GX eller vill du ställa frågor till andra användare av produkten? Ställ en fråga

Sida 1/4
Bayco Products, Inc. • 640 South Sanden Blvd. • Wylie, TX 75098 • 1-800-233-2155 • 1-469-326-9400 • www.nightstick.com
INS-XPP-5418GX/RX-K01-DL-24
08-27-2024
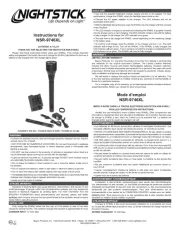
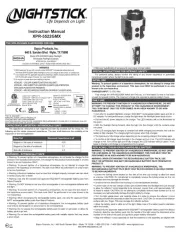
Instruction Manual
XPP-5418GX/RX-K01
Please read these instructions before using your Nightstick XPP-5418 Intrinsically
Safe Flashlight. They include important safety information and operating instructions.
THE XPP-5418GX/RX IS APPROVED FOR USE
CLASS I DIV 1 GRPS A-D T3
CLASS II & III DIV 1 GRPS E-G T135ºC
CLASS I ZONE 0 AEx ia IIC T3 Ga
Ex ia IIC T3 Ga
Ex ia op is IIC T3 Ga
Intertek ITS 13 ATEX27837X
ITS21UKEX0264X
IECEx ITS 16.0067X
-20ºC ≤ Tamb ≤ +40ºC
1.5V/Cell with three in series
Energizer E91 or EN91
2575
INTRINSICALLY SAFE
SECURITE INTRINSEQUE
II 1 G Ex ia op is IIC T3 Ga
Bayco Products, Inc. XPP-5418GX/RX
Ex ia FLASHLIGHT FOR USE IN HAZARDOUS LOCATIONS
640 S. Sanden Blvd., Wylie, TX 75098
ID 4003544
0359
22-AV4BO-0215X
Ex ia op is IIC T3 Ga
(-20ºC Tamb +40ºC)
NCC 15.0286 X
WARNINGS - INTRINSICALLY SAFE
y Warning: Use only the approved non-rechargeable batteries listed below.
y Warning: Do NOT attempt to use rechargeable AA batteries with this light.
y Warning: To prevent ignition of a hazardous atmosphere, do not open the lens bezel
in the hazardous environment. This task must ONLY be performed in an area known
to be non-hazardous.
y Warning: When exchanging batteries, use only Energizer EN91 or Energizer
E91 batteries.
y Warning: To prevent ignition of a hazardous atmosphere, the AA batteries must only
be exchanged in an area known to be non-hazardous.
y Warning: To reduce the risk of explosion, do not mix new batteries with used
batteries, or mix batteries from different manufacturers.
y Warning: Substitution of components may impair intrinsic safety.
SPECIAL INSTRUCTIONS FOR INTRINSIC SAFETY
For personal safety, always conrm the rating of any known hazardous or potentially
hazardous location where the light is to be used.
BATTERY INSTALLATION
WARNING: In order to maintain the XPP-5418’s Intrinsically Safe rating, the only
AA batteries certied for use with this light are the Energizer EN91 or Energizer
E91 batteries.
y Do not attempt to use any other brand or model of AA batteries.
y Do not attempt to use any type of rechargeable AA batteries.
Warning: To prevent ignition of a hazardous atmosphere, do not remove the lens
bezel or the reector / battery carrier in the hazardous environment. This task
must ONLY be done in an area known to be non-hazardous.
y Loosen the locking screw located on the side of the lens cap. NOTE: Do NOT
attempt to completely remove the locking screw. Doing so is not necessary and may
damage the threads. The screw simply needs to be loosened enough to allow the lens
bezel to unscrew.
y Unscrew the lens bezel from the housing in a counter-clockwise direction.
y Turn the light upside down and carefully shake the light in order to remove the
batteries. Allow the batteries to slide into your hand.
y Using 3 – AA Energizer EN91 or Energizer E91 batteries (make sure that all 3
batteries are of the same model), install the batteries in the carrier paying close
attention to the markings inside the housing for proper battery terminal polarity
alignment.
y Replace the lens bezel by screwing it onto the housing in a clockwise direction.
y Tighten locking screw. CAUTION: Do NOT over-tighten. Doing so may damage the
threads and impact the light’s Intrinsic Safety.
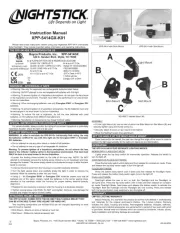
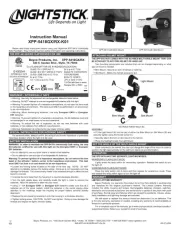
ATTACHING HELMET MOUNT
THE XPP-5418-K01 COMES WITH THE NS-HMC6 MULTI-ANGLE MOUNT THAT CAN
BE ATTACHED TO ANY FIRE HELMET OR HARD HAT.
Two mounting components are included that can be changed depending on what
type of mount is needed.
y Brim Mount - Mounts on brim of helmet or hard hat..
y Slot Mount - Slides into helmet accessory slot.
NS-HMC6 Helmet Mount Kit
ASSEMBLY
y Fit the Light Mount (A) into the slot of either the Brim Mount or Slot Mount (B) and
securely tighten using the thumb screw (C).
y Securely attach the brim or slot mount to the helmet.
y Place the ashlight inside the Light Mount
SET THE ANGLE OF THE MULTI-ANGLE MOUNT
Once mounted to the helmet, the user can change the angle of the mount in order to
position the light appropriately for the optimum clearance and illumination.
OPERATION
THE XPP-5418 HAS TWO SEPARATE LIGHTING MODES:
MOMENTARY FLASHLIGHT MODE
Lightly press the body switch for momentary operation. Release the switch to turn
the light off.
CONSTANT-ON FLASHLIGHT MODE
Press the body switch until it clicks and then release for constant-on mode. Press
and release the body switch again to turn the light off.
WARRANTY
LIMITED LIFETIME WARRANTY
Bayco Products, Inc. warrants this product to be free from defects in workmanship
and materials for the original purchaser’s lifetime. The Limited Lifetime Warranty
includes the LEDs, housing and lenses. Rechargeable batteries, chargers, switches,
electronics and included accessories are warranted for a period of two years with proof
of purchase. Normal wear and failures which are caused by accidents, misuse, abuse,
faulty installation and lightning damage are excluded.
We will repair or replace this product should we determine it to be defective. This
is the only warranty, expressed or implied, including any warranty of merchantability or
tness for a particular purpose.
For a complete copy of the warranty, go to www.baycoproducts.com/bayco-product-
support/warranties. Retain your receipt for proof of purchase.
XPP-5418 with Brim Mount XPP-5418 with Slot Mount
Bayco Products, Inc. • 640 South Sanden Blvd. • Wylie, TX 75098 • 1-800-233-2155 • 1-469-326-9400 • www.nightstick.com
INS-XPP-5418GX/RX-K01-DL-24
08-27-2024
Mode d’emploi
XPP-5418GX/RX-K01
Veuillez lire le mode d’emploi avant d’utiliser votre lampe de poche Nightstick
XPP-5418 à sécurité intrinsèque. Il inclut des renseignements importants concernant la
sécurité et le bon fonctionnement de votre lampe de poche.
LA LAMPE DE POCHE XPP-5418GX/RX A ÉTÉ APPROUVÉE POUR UTILISATION
AVERTISSEMENTS : SÉCURITÉ INTRINSÈQUE
y Avertissement : Utiliser seulement les piles non rechargeables approuvées et
énumérées ci-dessous.
y Avertissement : NE PAS essayer d’utiliser des piles rechargeables AA avec cette
lampe de poche.
y Avertissement : Pour éviter l’inammation d’atmosphère dangereuse, ne pas ouvrir
la lunette avec lentille dans un endroit dangereux. Cette tâche doit être effectuée
UNIQUEMENT dans une zone non dangereuse.
y Avertissement : Lorsque vous remplacer les piles, utiliser uniquement les piles
Energizer EN91 or Energizer E91.
y Avertissement : Pour éviter l’inammation d’atmosphère dangereuse, les piles AA
doivent être remplacées dans une zone non dangereuse.
y Avertissement : Pour réduire les risques d’explosion, ne pas mélanger les piles
neuves non rechargeables avec des piles non rechargeables utilisées, ou mélanger
les piles non rechargeables de différents fabricants.
y Avertissement : la substitution de composants peut compromettre la sécurité intrinsèque.
DIRECTIVES PARTICULIÈRES POUR UNE SÉCURITÉ INTRINSÈQUE
Pour votre propre sécurité, toujours conrmer la charge d’une zone dangereuse ou
potentiellement dangereuse quand la lampe de poche est utilisée.
INSTALLATION DES PILES
Avertissement : An de maintenir le bon fonctionnement de votre lampe XPP-5418 à
sécurité intrinsèque, les seules piles AA certiées pour l’utilisation de cette lampe
sont les piles Energizer EN91 or Energizer E91.
y NE PAS utiliser d’autres marques ou modèles de piles AA avec cette lampe.
y NE PAS utiliser n’importe quel type de piles rechargeable AA avec cette lampe.
Avertissement : Pour éviter l’inammation d’atmosphère dangereuse, ne pas
ouvrir la lunette avec lentille dans un endroit dangereux. Cette tâche doit être
effectuée UNIQUEMENT dans une zone non dangereuse.
y Desserrer la vis de verrouillage située sur le côté du capuchon de la lentille. À
NOTER : Ne PAS essayer d’enlever complètement la vis de verrouillage. Si vous
le faites vous risquez d’endommager les lets. La vis a besoin d’être simplement
desserrer pour permetrre à la lunette de la lentille d’être dévissée.
y Dévisser la lunette de la lentille du boîtier dans le sens inverse des aiguilles d’une montre.
y Tourner la lampe à l’envers et agiter soigneusement la lampe an d’enlever les piles.
Permettre aux piles de glisser dans votre main.
y Utiliser 3 piles - AA Energizer EN91 ou Energizer E91 (assurez-vous que les 3 piles
soient du même modèle), installer les piles dans le chargeur en soyant attentif aux
pôles à l’intérieur du boîtier pour un bon alignement de la polarité.
y Replacer la lunette de la lentille en la vissant au boîtier dans le sens des aiguilles
d’une montre.
y Serrer la vis de verrouillage. ATTENTION : Ne PAS trop serrer car cela pourrait
endommager les lets et la sécurité intrinsèque de la lampe.
FIXATION DU SUPPORT DE CASQUE
LA LAMPE XPP-5418-K01 EST ÉQUIPÉE DU SUPPORT À ANGLES MULTIPLES
NS-HMC6 QUI PEUT ÊTRE FIXÉ SUR N’IMPORTE QUEL CASQUE DUR OU
CASQUE DE FEU.
Deux pièces de montage sont incluses qui peuvent être changées selon le type de
support nécessaire.
y Support pour bord de casque – s’agrippe sur le bord du casque ou du casque dur.
y Support avec fente – glisse dans le dispositif de support de casque.
ASSEMBLÉE
y Placer la partie inférieure du support de la lampe (A) dans l’ouverture soit du support
pour bord de casque ou du support avec fente (B) et serrer solidement en utilisant la
vis à serrage à main (C).
y Fixer solidement le socle ou le support avec fente au casque.
y Placer la lampe de poche dans le support de la lampe.
RÉGLAGE DE L’ANGLE DU SUPPORT À ANGLES MULTIPLES
y Lorsque monté sur le casque, l’utilisateur peut changer l’angle du support an de
régler la lampe convenablement pour un éclairage et un contrôle optimaux.
FONCTIONNEMENT
LA LAMPE XPP-5418 DISPOSE DE DEUX MODES D’ÉCLAIRAGE:
LAMPE DE POCHE À ÉCLAIRAGE MOMENTANÉ
Appuyer légèrement sur le bouton interrupteur pour une mise en marche
momentanée. Relâcher le bouton interrupteur pour éteindre la lumière.
LAMPE DE POCHE À ÉCLAIRAGE CONTINU
Appuyer sur le bouton interrupteur jusqu’à ce qu’il s’enclenche puis relâcher pour
un mode d’éclairage continu. Appuyer et relâcher encore le bouton interrupteur pour
éteindre la lumière.
GARANTIE
GARANTIE À VIE LIMITÉE
Bayco Products, Inc. garantit que ce produit est exempt de défauts de matériaux
et de fabrication à l’acheteur original durant toute sa vie. La garantie à vie limitée inclut
les DEL, les boîtiers et les lentilles. Les batteries rechargeables, les chargeurs, les
interrupteurs, les électroniques et les accessoires compris sont garantis pour une
période de deux ans avec une preuve d’achat. L’usure normal et les défaillances qui
sont causés par des accidents, une mauvaise utilisation, un abus, une installation
défectueuse et un système d’éclairage endommagé sont exclus.
Ce produit sera réparé ou remplacé si nous déterminons qu’il est défectueux. Ceci
est la seule garantie explicite ou implicite, y compris toute garantie de qualité marchande
ou d’adéquation à un usage particulier.
Pour une copie détaillée de la garantie, vous rendre sur le site www.baycoproducts.
com/bayco-product-support/warranties. Gardez ce reçu comme preuve d’achat.
Manual de Instrucciones
XPP-5418GX/RX-K01
Por favor, lea estas instrucciones antes de usar su Nightstick XPP-5418 Flashlight
intrínsicamente segura. Estas incluyen importante información de seguridad e
instrucciones de manejo.
LA XPP-5418GX/RX ESTÁ APROBADA PARA SU USO
ADVERTENCIAS - INTRÍNSICAMENTE SEGURA
y Advertencia: Utilice únicamente las baterías no recargables aprobadas que se
enumeran a continuación.
y Advertencia: No intente utilizar baterías AA recargables con esta luz.
y Advertencia: Para evitar la ignición de una atmósfera peligrosa, no abra el
compartimiento de la batería en un ambiente peligroso. Esta tarea sólo debe realizarse
en un área considerada no peligrosa.
y Advertencia: Al cambiar las pilas, utilice sólo pilas Energizer EN91 or Energizer E91.
y Advertencia: Para evitar la ignición de una atmósfera peligrosa, las pilas AA sólo
deben cambiarse en un área considerada no peligrosa.
y Advertencia: Para reducir el riesgo de explosión, no mezcle pilas nuevas no
recargables con baterías no recargables usadas, y no mezcle pilas no recargables
de diferentes fabricantes.
y Advertencia: La sustitución de componentes puede afectar la seguridad intrínseca.
INSTRUCCIONES ESPECIALES PARA LA SEGURIDAD INTRÍNSECA
Por su seguridad personal, siempre conrme la calicación de cualquier ubicación
peligrosa o potencialmente peligrosa conocida donde la luz se va a utilizar.
INSTALACIÓN DE LAS PILAS
ADVERTENCIA: A n de mantener la clasicación de seguridad intrínseca del
XPP-5418, las únicas pilas AA certicadas para su uso son las pilas Energizer
EN91 or Energizer E91.
y No intente utilizar cualquier otra marca o modelo de pilas AA con esta luz.
y No intente utilizar ningún tipo de pilas AA recargables con esta luz.
Advertencia: Para evitar la ignición de una atmósfera peligrosa, no retire el bisel
del lente del reector / ni del portador de batería en un ambiente peligroso. Esta
tarea sólo debe hacerse en un área considerada no peligrosa.
y Aoje el tornillo de jación situado en el lado de la tapa del lente. NOTA: NO intente
quitar completamente el tornillo de jación. El hacerlo no es necesario y puede dañar
las roscas. El tornillo simplemente necesita ser aojado lo suciente para permitir que
el bisel del lente se desenrosque.
y Desenrosque el bisel del lente de la carcasa en sentido contrario a las agujas del reloj.
y Coloque la luz boca abajo y sacúdala cuidadosamente para extraer las pilas.
Permita que las pilas se deslicen en su mano.
y Utilice 3 pilas doble AA Energizer EN91 o Energizer E91 (asegúrese de que las
3 pilas sean del mismo modelo), instale las pilas en el portador, prestando mucha
atención a las marcas en el interior de la carcasa para que la polaridad del terminal de
las pilas sean las correctas.
y Reemplace el bisel del lente atornillándolo en la carcasa en el sentido de las agujas del reloj.
y Apriete el tornillo de jación. PRECAUCIÓN: NO apriete demasiado. Hacerlo puede
dañar las roscas y afectar la seguridad intrínseca de la luz.
INSTALACIÓN DEL MONTAJE DEL CASCO
EL XPP-5418-K01 VIENE CON EL MONTAJE MULTI- ÁNGULO NS-HMC6 QUE
PUEDE SER INSTALADO A CUALQUIER CASCO DE INCENDIO O CASCO DURO.
Se incluyen dos componentes de montaje que se pueden cambiar dependiendo del
tipo de montaje que se necesite.


Produktspecifikationer

Varumärke: NightStick
Kategori: Ficklampa
Modell: XPP-5418GX

Behöver du hjälp?

Om du behöver hjälp med NightStick XPP-5418GX ställ en fråga nedan och andra användare kommer att svara dig