Nitecore MH11 Bruksanvisning
Läs gratis den bruksanvisning för Nitecore MH11 (3 sidor) i kategorin Ficklampa. Guiden har ansetts hjälpsam av 22 personer och har ett genomsnittsbetyg på 4.4 stjärnor baserat på 4 recensioner. Har du en fråga om Nitecore MH11 eller vill du ställa frågor till andra användare av produkten? Ställ en fråga
Sida 1/3
(English) MH11(Deutsch) MH11
(Francais)
MH11Features
Specications
Accessories
Battery Options
Technical Data
Battery Installation
Operating Instructions
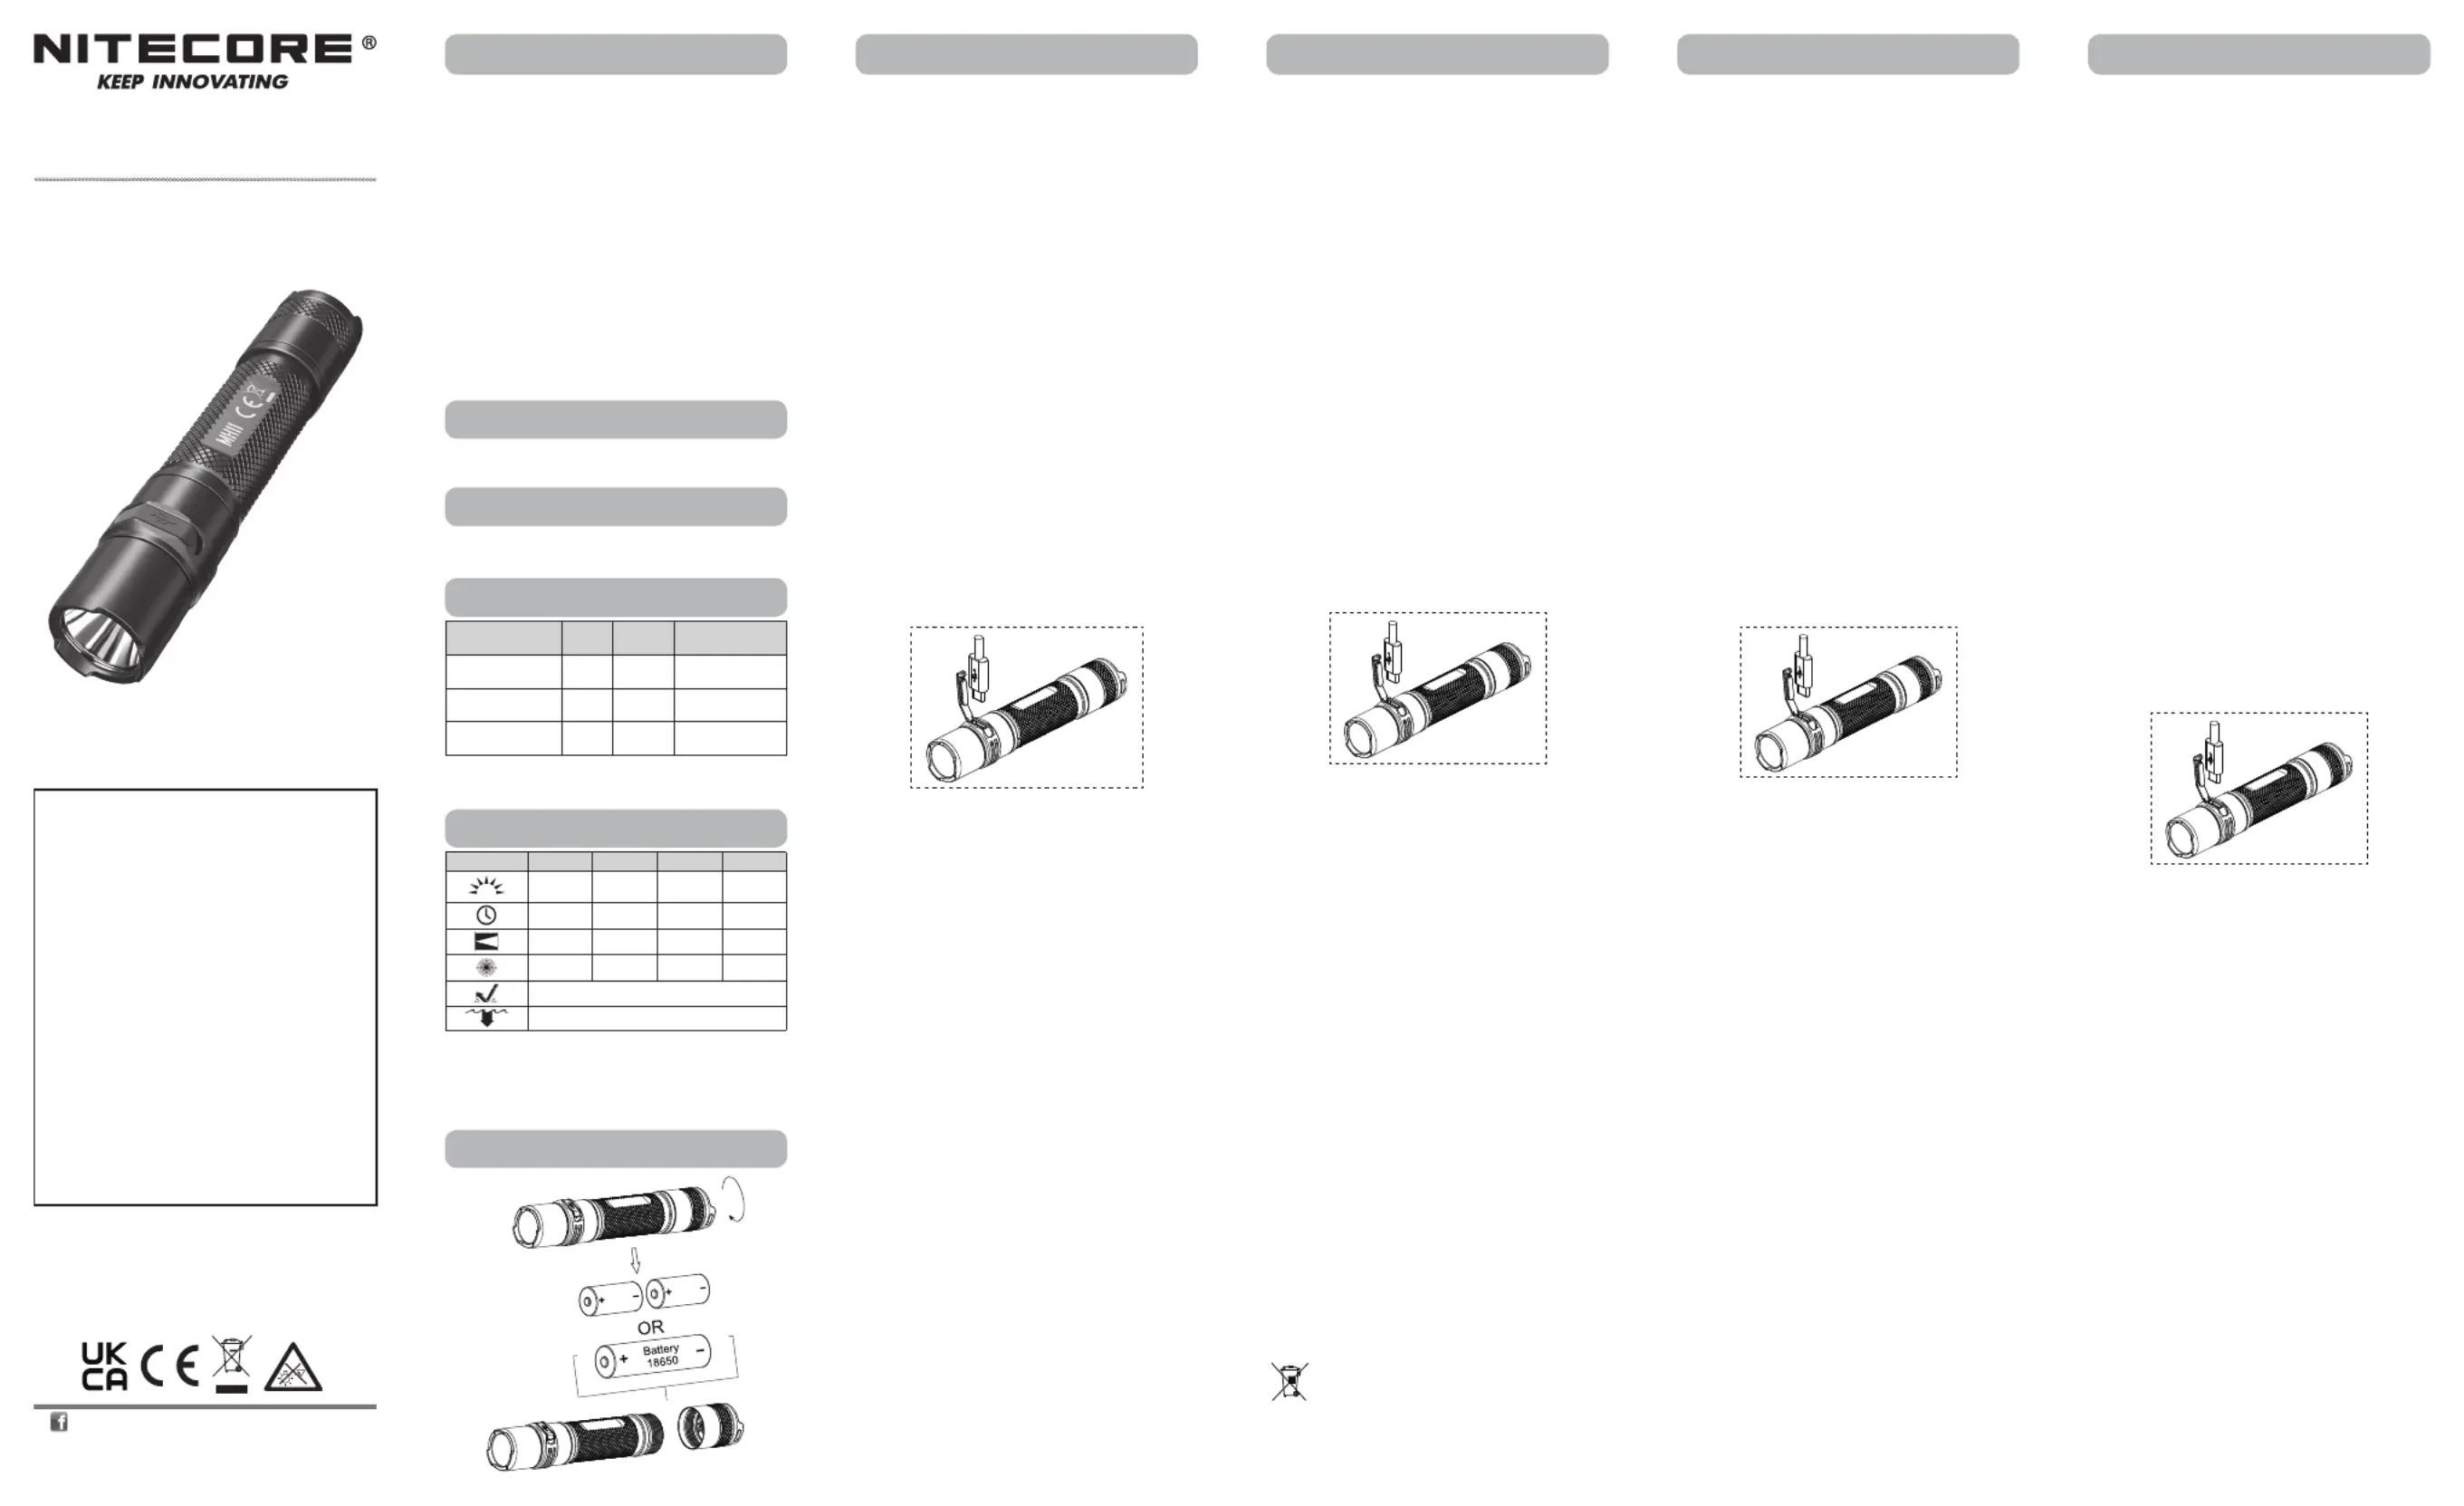
Battery Installation
Insert the battery(s) as illustrated and screw to tighten the tail
cap.
Warnings:
1. Ensure the battery(s) is/are inserted with the positive end
towards the head. The product will not work if the battery(s)
is/are incorrectly inserted.
2. CAUTION! Possible dangerous radiation! Don't look into the
light! May be dangerous for your eyes.
3. When the power level is low, please stop using the product
and replace or recharge the battery to prevent damage to the
battery.
4. When the product is kept in a backpack or left unused for
prolonged time, please remove all batteries to prevent
accidental activation or battery leakage.
Charging Function
The MH11 is equipped with an intelligent charging system. As
illustrated, after inserting the battery and tightening the tail
cap, use the USB cable to connect an external power supply (e.g.
a USB adapter or other USB charging devices) to the charging
port to begin the charging process.
•During the charging process, the blue power indicator will
ash slowly to inform the user.
•When the battery is fully charged, the MH11 will cease
the charging process and the power indicator will become
constantly turned on to inform the user.
•When the light is on, connecting to a power source will
automatically turn the light o. The light will return to its
previous status when it is disconnected from the power
source.
•It is recommended to press the Tail Switch before the
charging process to increase the charging power. In this way,
the charging time for an 18650 Li-ion battery (2,600mAh) is
approx. 2 hours 15 minutes. (Charged via the 5V/2A adapter)
On / O
On: When the light is o, press the Tail Switch until a click
sound is heard to turn it on.
O: When the light is on, press the Tail Switch until a click
sound is heard to turn it o.
Brightness Levels
When the light is on, half press the Tail Switch to cycle through
the following brightness levels: LOW – MID – HIGH – TURBO.
(The MH11 has memory function. When reactivated, the
ashlight will automatically access the previous memorized
brightness level.)
Power Indication
When the light is on and the power level is close to 50%, the
power indicator will ash every 2 seconds to inform the user.
When the light is on and the power is close to depleted, the
power indicator will ash quickly and continuously to inform the
user. The batteries should be replaced when the output appears
to be dim or the ashlight becomes unresponsive due to low
power.
ATR (Advanced Temperature
Regulation)
The integrated ATR technology regulates the output of
the MH11 according to the working condition and ambient
environment to maintain the optimal performance.
Maintenance
Every 6 months, threads should be wiped with a clean cloth
followed by a thin coating of silicon-based lubricant.
Bedienungsanleitung
Legen Sie die Akkus/die Batterien ein - wie dargestellt - und
ziehen Sie die Heckkappe fest.
WARNUNG:
1. Legen Sie die Batterien mit dem positiven (+) Ende in
Richtung des Lampenkopfes ein. Die MH11 wird mit falsch
eingelegten Batterien nicht funktionieren.
2. ACHTUNG! Möglicherweise gefährliche optische Strahlung!
Bei Betrieb nicht direkt in das Licht blicken. Dies kann für die
Augen gefährlich sein.
3.
Wenn die Leistung zu gering ist, stellen Sie bitte die Benutzung
des Produkts ein und tauschen Sie die Batterie aus oder laden
Sie sie den Akku auf, um Schäden an der Batterie zu vermeiden.
4. Wenn das Produkt in einem Rucksack aufbewahrt oder
längere Zeit nicht benutzt wird, entfernen Sie bitte alle
Batterien/Akkus, um eine versehentliche Aktivierung oder ein
Auslaufen der Batterie/der Akkus zu vermeiden.
Ladefunktion
Die MH11 ist mit einem intelligenten Ladesystem ausgestattet.
Legen Sie die Akkus/die Batterien ein - wie dargestellt - und
ziehen Sie die Heckkappe fest. Verbinden Sie eine externe
Stromversorgung (z.B. einen USB-Adapter oder andere USB-
Ladegeräte) mittels des USB-Kabels mit dem Ladeanschluss, um
den Ladevorgang zu starten.
•Während des Ladevorgangs blinkt die LED langsam.
•Wenn der Akku vollständig aufgeladen ist, beendet die MH11
den Ladevorgang und die LED leuchtet stetig.
•Wenn die Lampe eingeschaltet ist, schaltet sie sich beim
Anschließen an eine Stromquelle automatisch aus. Die Lampe
kehrt in ihren vorherigen Zustand zurück, wenn sie von der
Stromquelle getrennt wird.
•
Es wird empfohlen, den Heckschalter vor dem Ladevorgang
zu drücken, um die Ladeleistung zu erhöhen. Auf diese Weise
beträgt die Ladezeit für einen 18650 Li-Ionen-Akku (2600mAh)
ca. 2 Stunden 15 Minuten. (Aufgeladen mit einem 5V/2A-Adapter.)
Ein-/Ausschalten
Einschalten: Wenn das Licht ausgeschaltet ist, drücken Sie auf
den Heck-Schalter, bis ein Klickgeräusch zu hören ist.
Ausschalten: Wenn das Licht ausgeschaltet ist, drücken Sie
erneut auf den Heck-Schalter, bis ein Klickgeräusch zu hören ist.
Helligkeitsstufen
Wenn das Licht eingeschaltet ist, drücken Sie den Heckschalter
wiederholt nur halb durch, um durch die folgenden
Helligkeitsstufen zu schalten: "LOW" - "MID" - "HIGH" -
„TURBO“. Lassen Sie den Schalter los, um die gewünschte
Helligkeitsstufe zu wählen. (Die MH11 hat eine Speicherfunktion.
Wird sie erneut eingeschaltet, wird automatisch die zuvor
gespeicherte Helligkeitsstufe aktiviert.)
Leistungsanzeige
Wenn das Licht an ist und die Leistung fast 50 % beträgt, blinkt die
Leistungsanzeige alle 2 Sekunden. Wenn das Licht eingeschaltet
ist und der Strom fast aufgebraucht ist, blinkt die Leistungsanzeige
schnell und kontinuierlich. Die Akkus sollten ausgetauscht werden,
wenn die Leistung schwach erscheint oder die Taschenlampe
aufgrund der geringen Leistung nicht mehr reagiert.
ATR (erweiterte Temperaturregulierung)
Die integrierte ATR-Technologie reguliert die Leistung der MH11,
je nach Arbeits- und Umgebungsbedingung, um die optimale
Leistung zu erhalten.
Wartung
Alle 6 Monate sollte das Gewinde mit einem sauberen Tuch
abgewischt und anschließend mit einer dünnen Schicht
Silikonfett geschmiert werden.
Allgemeine Hinweise
Altbatterien gehören nicht in den Hausmüll. Sie können gebrauchte
Batterien unentgeltlich an unser Versandlager zurückgeben. Als
Verbraucher sind Sie zur Rückgabe von Altbatterien gesetzlich verpichtet.
Entsorgung von Elektro- und Elektronikgeräten
Die durchgestrichene Mülltonne bedeutet, dass Sie
gesetzlich verpichtet sind, diese Geräte einer vom
unsortierten Siedlungsabfall getrennten Erfassung
zuzuführen. Die Entsorgung über die Restmülltonne
oder die gelbe Tonne ist untersagt. Enthalten die
Produkte Batterien oder Akkus, die nicht fest verbaut
sind, müssen diese vor der Entsorgung entnommen
und getrennt als Batterie entsorgt werden.
Instructions
Installation des batteries
Insérez la batterie comme sur l’illustration et serrer le capuchon.
Avertissements :
1. Assurez-vous que la batterie soit correctement insérée. Pole
positif vers la tête de lampe. Le produit ne fonctionnera pas si
la batterie est mal insérée.
2. Attention : Forte luminosité ! Evitez le contact direct avec les
yeux.
3. Quand la batterie est faible, arrêter d’utiliser le produit,
remplacer ou recharger la batterie pour éviter de
l’endommager.
4. Retirer les batteries si la lampe reste inutilisée pendant une
longue période pour éviter toute activation accidentelle ou
fuite de batteries.
Charge
La lampe MH11 est équipée d’un circuit de charge intelligent.
Comme illustré, après avoir inséré la batterie et serré le
capuchon, utiliser le câble USB pour connecter une source
d'alimentation externe (par exemple, un adaptateur USB ou
d'autres périphériques de chargement USB) au port de charge
pour commencer le processus de charge.
• Pendant la charge, l’indicateur va clignoter lentement pour
informer l’utilisateur.
• Quand la batterie est chargée, la charge s’arrête et l’indicateur
reste xe pour informer l’utilisateur.
• Quand la lampe fonctionne, lorsque vous essayez de la
recharger, elle s’éteint automatiquement et reviendra au
niveau precedent quand elle sera déconnectée de la source
de charge.
•Il est recommandé d'appuyer sur l'interrupteur arrière avant
le processus de charge pour augmenter la puissance de
charge. De cette façon, le temps de charge d'une batterie Li-
ion 18650(2.600mAh) est d’environ 2h15min. (charge avec
adaptateur 5V/2A)
On / O
Pour allumer : Pressez l’interrupteur ON/OFF
Pour éteindre : Pressez une nouvelle fois l’interrupteur ON/OFF
pour éteindre.
Niveaux de luminosité
Lorsque la lampe est allumée, maintenez enfoncé l’interrupteur
pour naviguer entre les niveaux de luminosité suivants : LOW –
MID – HIGH-Turbo. Relâcher une fois le niveau souhaité obtenu.
(Cet lampe a une fonction mémoire. Lorsqu'elle est réactivée,
la lampe accède automatiquement au niveau de luminosité
mémorisé précédent.)
Indicateur de puissance
Lorsque la lampe est allumée et que le niveau de puissance est
proche de 50%, l’interrupteur clignote toutes les 2 secondes
pour informer l'utilisateur. Lorsque la lumière est allumée et
que l'alimentation est presque épuisée, l’interrupteur clignote
rapidement et en continu pour informer l'utilisateur. Les piles
/batteries doivent être remplacées ou rechargées lorsque la
sortie semble faible ou que la lampe ne répond plus en raison
d'une faible puissance.
Technologie ATR
Le système avancé de régulation de la température (ATR)
permet à la lampe d’ajuster de façon dynamique son niveau
d’éclairage en fonction de sa température. Cela permet d’éviter
toute surchaue de la lampe et d’augmenter sa durée de vie.
Maintenance
Tous les six mois, le letage doit être essuyé avec un chion
propre et recouvert d’un lubriant à base de silicone.
Warranty Service
All NITECORE
®
products are warranted for quality.
Any DOA / defective product can be exchanged for a
replacement through a local distributor/dealer within 15
days of purchase. After that, all defective / malfunctioning
NITECORE
®
products can be repaired free of charge
within 60 months from the date of purchase. Beyond 60
months, a limited warranty applies, covering the cost of
labor and maintenance, but not the cost of accessories or
replacement parts.
The warranty will be nullied if
1. the product(s) is/are broken down, reconstructed and/
or modied by unauthorized parties;
2. the product(s) is/are damaged due to improper use;
(e.g. reversed polarity installation)
3. the product(s) is/are damaged due to battery leakage.
For the latest information on NITECORE
®
products and
services, please contact a local NITECORE
®
distributor or
send an email to [email protected]
※
All images, text and statements specied herein this
user manual are for reference purpose only. Should any
discrepancy occur between this manual and information
specied on www.nitecore.com, Sysmax Innovations
Co., Ltd. reserves the rights to interpret and amend the
content of this document at any time without prior notice.
•
Utilizes a CREE XP-L2 V6 LED with a max output of 1,000 lumens
•Max peak beam intensity of 9,150cd and max throw of 190
meters
•An optical system combined with crystal coating and “Precision
Digital Optics Technology” (PDOT)
• Highly ecient constant current circuit provides a stable
output of up to 250 hours
•NITECORE 18650 Li-ion battery included (NL1826 2,600mAh)
•Intelligent Li-ion battery charging circuit with a USB-C port
•The tail switch controls 4 brightness levels
•A power indicator on the side indicates the remaining battery
power
•Incorporated Advanced Temperature Regulation (ATR) module
(Patent No. ZL201510534543.6)
•Optical lenses with double-sided scratch resistant coating
•Constructed from aero grade aluminum alloy
• HA III military grade hard-anodized nish
•Waterproof and dustproof rating in accordance with IP68 (2
meters submersible)
•Impact resistant to 1 meter
•Tail stand capability
Length: 128.3mm (5.05") Head Diameter: 24mm (0.94")
Tail Diameter: 24mm (0.94") Weight: 60.5g (2.13oz)
NITECORE 18650 Rechargeable Li-ion Battery (NL1826 2,600mAh),
Clip, Lanyard, Holster, USB-C Charging Cable, Spare O-ring
Type
Nominal
Voltage
Compatibility
18650 Rechargeable
Li-ion Battery
186503.6V/3.7VY (Recommended)
Primary Lithium
Battery*
CR1233VY (Compatible)
Rechargeable Li-ion
Battery*
RCR1233.6V/3.7VY (Compatible)
Note: DO NOT attempt to use the MH11 to charge CR123/
RCR123 batteries.
FL1 STANDARD
TURBOHIGHMIDLOW
1,000
Lumens
230
Lumens
50
Lumens
3
Lumens
2h 15min4h 15min20h 45min250h
190m91m40m10m
9,150cd2,100cd415cd26cd
1m (Impact Resistance)
IP68, 2m (Waterproof and Submersible)
Note: The stated data is measured in accordance with the
international ashlight testing standards ANSI/PLATO FL 1-2019,
using 1 x 18650 Li-ion battery (2,600mAh) under laboratory
conditions. The data may vary in real world use due to dierent
battery usage or environmental conditions.
Battery
CR123A
Battery
CR123A
SYSMAX Innovations Co., Ltd.
TEL:+86-20-83862000
FAX:+86-20-83882723
E-mail:[email protected]om
Web:www.nitecore.com
Address:
Unit6355,5/F
,No.1021GaopuRoad,
TianheDistrict,Guangzhou,510653,Guangdong,China
Please nd us on facebook : NITECORE Flashlight
Thanks for purchasing NITECORE!
Made in China
MH11051122
(Русский) MH11
Инструкция по эксплуатации
Установка аккумулятора
Вставьте аккумулятор(ы) так, как показано на иллюстрации,
и закрутите, чтобы закрепить заднюю крышку.
Меры предосторожности:
1. Убедитесь, что аккумулятор(ы) вставлен(ы)
положительным концом к головной части. Устройство
не будет работать, если аккумулятор(ы) вставлен(ы)
неправильно.
2. ВНИМАНИЕ! Возможно опасное излучение! Не смотрите на
свет! Может быть опасно для глаз.
3. При низком уровне заряда, пожалуйста, прекратите
использование устройства и замените или перезарядите
аккумулятор, чтобы предотвратить повреждение
аккумулятора.
4. Если устройство хранится в рюкзаке или не используется
в течение длительного времени, пожалуйста, извлеките
аккумуляторы, чтобы предотвратить случайное включение
или протечку аккумулятора.
Функция зарядки
MH11 оснащен системой интеллектуальной зарядки. Как
показано на иллюстрации, после вставки аккумулятора и
закрепления задней крышки, используйте USB-кабель для
присоединения внешнего источника питания (например,
USB-адаптера или другого USB-устройства для зарядки) к
порту для начала зарядки.
• Во время зарядки голубой индикатор мощности
начнёт медленно мигать, информируя таким образом
пользователя.
• Когда аккумулятор полностью зарядится, MH11
прекратит процесс зарядки и индикатор мощности начнет
беспрерывно гореть, сообщая об этом пользователю.
• При подключении к источнику питания свет фонаря
автоматически выключится, если тот горел. Фонарь
вернется в тот же режим работы при отключении от
источника питания.
• Рекомендуется нажать на задний переключатель перед
началом зарядки, чтобы увеличить её мощность. Таким
образом, время зарядки для литий-ионного аккумулятора
18650 (2,600 мАч) составит приблизительно 2 часа 15
минут (при использовании адаптера 5В/2А)
Вкл/Выкл
При выключенном фонаре зажмите и удерживайте задний
переключатель до тех пор, пока не услышите звук щелчка,
который будет означать включение устройства.
При включённом фонаре зажмите и удерживайте задний
переключатель до тех пор, пока не услышите звук щелчка,
который будет означать выключение устройства.
Уровни яркости
При включённом фонаре наполовину зажмите задний
переключатель для переключения между следующими
уровнями яркости: НИЗКИЙ - СРЕДНИЙ - ВЫСОКИЙ - ТУРБО.
(MH11 обладает функцией запоминания. При повторном его
включении, он автоматически переключается на последний
выбранный уровень яркости).
Определение мощности
При включённом фонаре и уровне заряда около 50%
индикатор питания начнет мигать каждые 2 секунды,
информируя таким образом пользователя. При включённом
фонаре и сверхнизком уровне заряда индикатор питания
начнет быстро и непрерывно мигать, информируя таким
образом пользователя. Аккумуляторы необходимо заменить
в том случае, если свет стал тусклым или фонарь перестал
отвечать на команды вследствие низкого заряда.
ATR (Продвинутая Терморегуляция)
Встроенная система продвинутой терморегуляции (ATR)
оптимизирует подачу света MH11 в соответствии с
условиями работы фонаря и окружающей среды, чтобы
поддерживать его оптимальную работу.
Обслуживание
Каждые 6 месяцев уплотнительные кольца следует
протирать чистой тканью, а затем наносить тонкий слой
смазки на основе силикона.
MH11
• Ultra Compact and Lightweight
• Patented ATR Technology
• Innovative Power Indicator
USB-C Rechargeable
Ultra Compact Flashlight
Produktspecifikationer
| Varumärke: | Nitecore |
| Kategori: | Ficklampa |
| Modell: | MH11 |
Behöver du hjälp?
Om du behöver hjälp med Nitecore MH11 ställ en fråga nedan och andra användare kommer att svara dig
Ficklampa Nitecore Manualer

25 Mars 2026
23 Mars 2026
12 Mars 2026
11 Mars 2026
7 Oktober 2025
7 Oktober 2025
6 Oktober 2025
18 Juni 2025
16 Juni 2025
16 Juni 2025
Ficklampa Manualer
Nyaste Ficklampa Manualer
1 April 2026
30 Mars 2026
28 Mars 2026
28 Mars 2026
27 Mars 2026
26 Mars 2026
25 Mars 2026
24 Mars 2026
13 Mars 2026
3 Mars 2026