Panduit CD-525 Bruksanvisning
Panduit ej kategoriserat CD-525
Läs gratis den bruksanvisning för Panduit CD-525 (2 sidor) i kategorin ej kategoriserat. Guiden har ansetts hjälpsam av 7 personer och har ett genomsnittsbetyg på 4.7 stjärnor baserat på 2 recensioner. Har du en fråga om Panduit CD-525 eller vill du ställa frågor till andra användare av produkten? Ställ en fråga
Sida 1/2
Page: 1 of 2
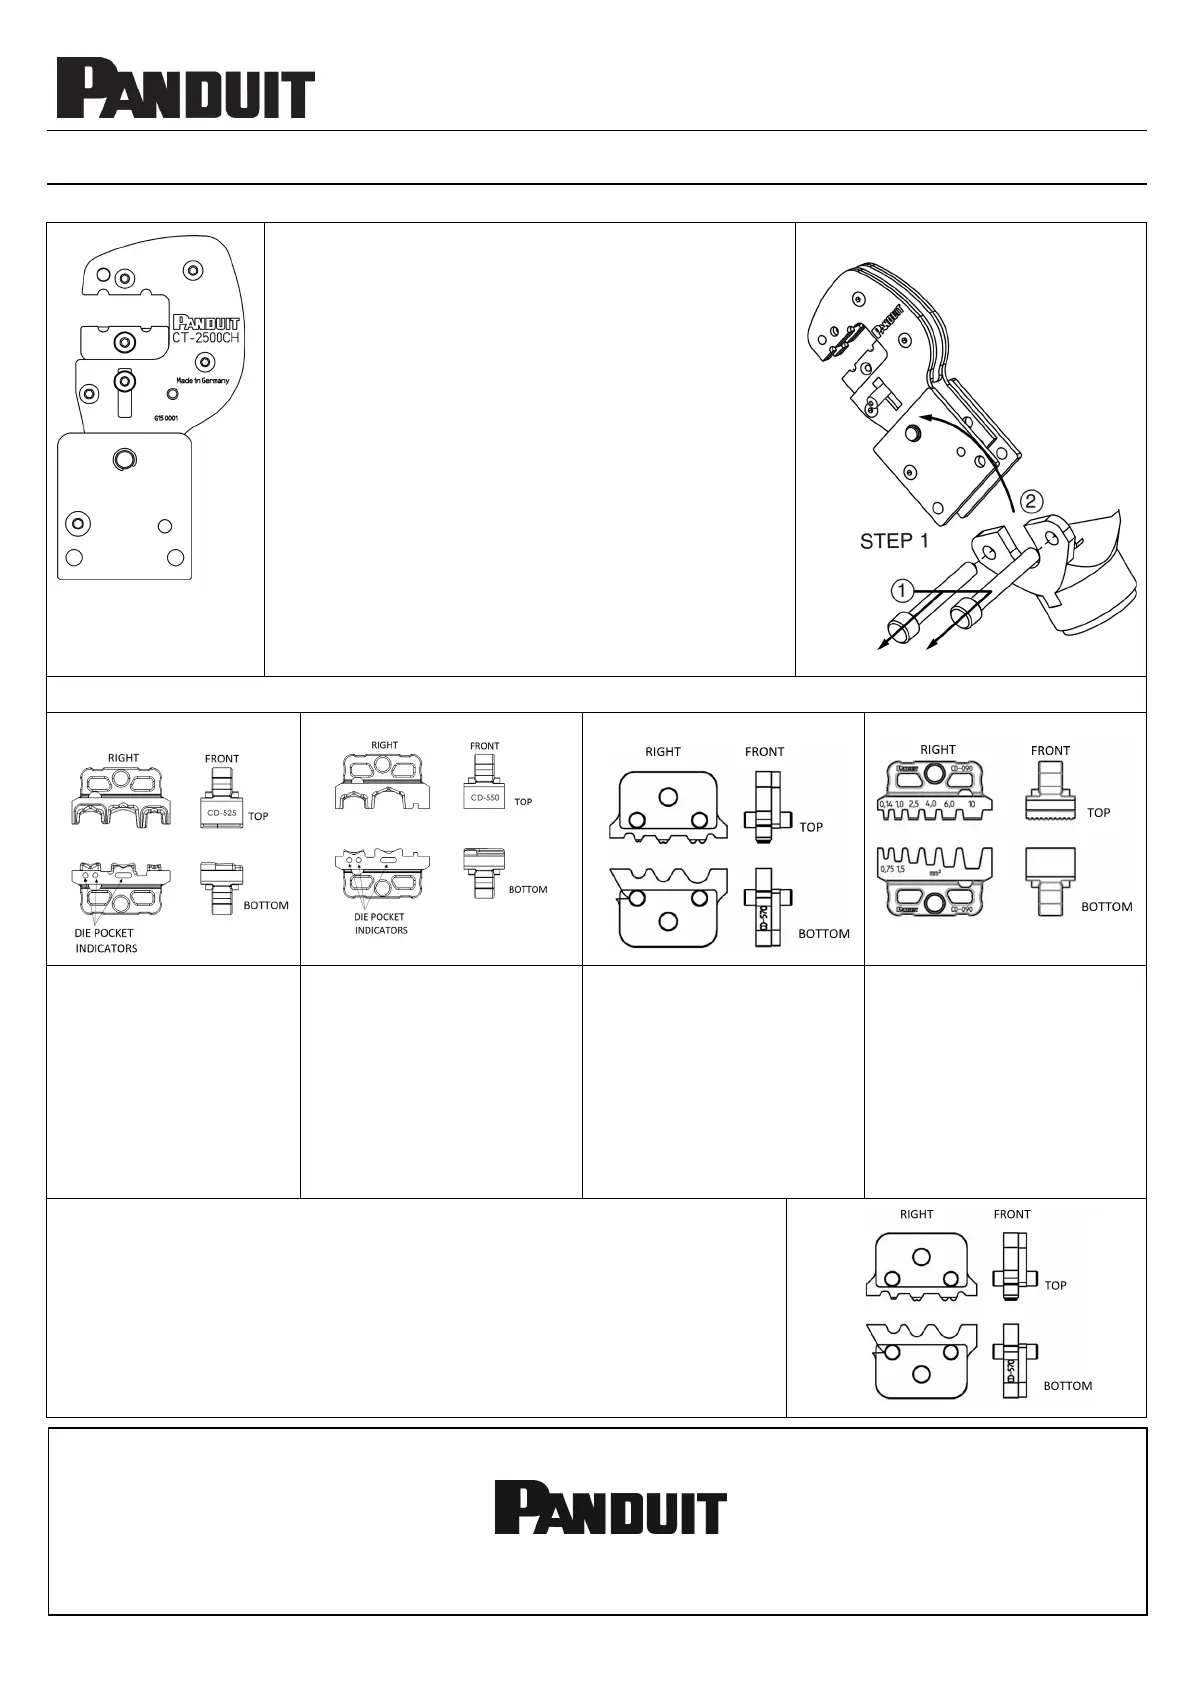
CT-2500CH, CT-2300, UP14ZLW Tools;
CD-525, CD-550, CD-570 and CD-090 Dies
PA25711A01
Rev. 0611-23
CRIMPING HEADand CRIMP DIE INSERTINSTALLATION INSTRUCTIONS
© Panduit Corp. 2023
CT-2500CH
(shown without
Crimp Die Inserts)
CRIMPING HEAD REMOVAL / INSTALLATION
•Pull out the pins and remove crimp head for
mounting different crimping die inserts into the
crimp head. Once die inserts have been installed,
reinsert the crimp head and lock the head with
the locating pins (see Step 1) paying attention
that the pins are locked securely before starting.
•The crimping cycle is terminated when the dies
are completely closed and the maximum crimping
force is reached, which is indicated by the auto
retraction of the piston.
•Follow the instructions for installing crimp die
inserts below. The directional callouts indicate die
position for correct die orientation.
Refer to CT-2500, CT-2500/E (PA25346A01);
CT-2500/L or CT-2500/LE (PA28113A01) Operation
Manual for complete tooland crimping head
instructions.
NOTE: DIE MOUNTING ORIENTATION IS SAME FOR CT-2500CH, CT-2300 and UP14ZLW TOOLS.
CD-525
CD-550
CD-570
CD-090
Crimping Die for
installing the following
Panduitproducts:
#26 – #22AWG insulated
terminals and splices,
#22 – #10 AWG fully insulated
disconnects, insulated parallel
splices; and specific #22 – #14
AWG barrel insulated
disconnects.
Crimping Die for installing
the following Panduit
products:
#22 – #10 AWG insulated
terminals and splices;and
specific insulated disconnects.
Crimping Die for installing
most of the following Panduit
products:
#22 – #10 AWG and 0,5 – 6,0 mm
2
non-insulated terminals,
disconnects; and specific non-
insulated splices.
Orient part seam on bottom half of
dieopposite of indentor.
Crimping Die with square
profile for installing the
following Panduitproducts:
#26 – #10 AWG insulated and
non-insulated single wire ferrules;
and #22 - #12 AWG insulatedtwin
ferrules.
CRIMPING DIE INSERT INSTALLATION
Step 1: Align Crimp Die halves as shown.
•Crimp tabs should be centered on crimp pockets
•Color dot die halves should nest together when properly aligned. Crimp die
part numbers should beon top and in front (as shown above).
NOTE:CD-570 crimp die part number should be on bottom and in front
(as shown in view to theright).[Continued on Page 2]
E-mail:
techsupport@panduit.com
EU Website:
www.panduit.com/emea
EU Email:
emeatoolservicecenter
@panduit.com
www.panduit.com
Technical Support:
1-800-777-3300
Panduit Europe
EMEA Service Center
Almelo, Netherlands
Tel: +31-546-580-452
Fax: +31-546-580-441
Produktspecifikationer
| Varumärke: | Panduit |
| Kategori: | ej kategoriserat |
| Modell: | CD-525 |
| Material: | Stål |
| Modell: | Crimpverktyg |
| Antal per förpackning: | 1 styck |
| Hållbarhetscertifiering: | RoHS |
Behöver du hjälp?
Om du behöver hjälp med Panduit CD-525 ställ en fråga nedan och andra användare kommer att svara dig
ej kategoriserat Panduit Manualer

2 April 2026
24 Mars 2026
23 Mars 2026
22 Mars 2026
20 Mars 2026
19 Mars 2026
19 Mars 2026
9 Mars 2026
8 Mars 2026
7 Mars 2026
ej kategoriserat Manualer
Nyaste ej kategoriserat Manualer
3 April 2026
3 April 2026
3 April 2026
3 April 2026
3 April 2026
3 April 2026
3 April 2026
3 April 2026
3 April 2026