Parat Paralux PX2 Bruksanvisning
Läs gratis den bruksanvisning för Parat Paralux PX2 (2 sidor) i kategorin Ficklampa. Guiden har ansetts hjälpsam av 30 personer och har ett genomsnittsbetyg på 4.9 stjärnor baserat på 9 recensioner. Har du en fråga om Parat Paralux PX2 eller vill du ställa frågor till andra användare av produkten? Ställ en fråga
Sida 1/2
De batterijen vervangen:
Houd bij het uitdraaien van de lampkop de lamp altijd uit de buurt van lichaam/ogen/andere
personen. Lampkop van de behuizing afdraaien. Lege batterijen verwijderen. 2 AAA-batterijen
in serie plaatsen volgens de tekening. De lampkop op de behuizing zetten en dichtdraaien. Om
onbedoeld inschakelen van de lamp te voorkomen, wordt aanbevolen om de lampkop twee
omdraaiingen los te zetten.
Opgelet: in de veiligheidslamp mogen enkel de volgende batterijtypes worden gebruikt
omdat alleen deze batterijtypes een ATEX- of IECEx-certicering hebben.
2 x Duracell Plus, LR03/AAA, 1,5 V. 2 x Energiter Mini Stilo Classic E 92 Alkaline AAA/LR03,
1,5 V. 2 x Energizer Ultra AAA/LR03, 1,5 V. 2 x Varta Consumer Longlife Extra 4103 Alkaline
A/LR03, 1,5 V. 2x , Varta Hi Energy 4903 Alkaline AAA/LR03, 1,5 V. 2 x Energizer Industrial
AAA/LR03, 1,5 V. 2 x Duracell Plus Power MN2400 AAA/LR03, 1,5 V.
Waarschuwingen voor de batterijen:
Batterijen kunnen gassen/corrosieve oplossingen uitstoten, daarom altijd: batterijen altijd
controleren op schade, lekkage en corrosie, wanneer de lamp langere tijd niet in gebruik is de
batterijen verwijderen, instructies van de fabrikant van de batterijen volgen.
In-/uitschakelen:
Drukknop aan het uiteinde van de lam gebruiken. De lampkop dient hiervoor vast dichtge-
schroefd te zijn.
O-ring:
Controleer de o-ring op beschadigingen elke keer de lamp wordt gebruikt. Houd de o-ring
schoon, gebruik geen gereedschappen om de o-ring te vervangen.
Veiligheidsinstructies:
De lamp mag niet geopend worden in explosiegevaarlijke/explosieve zonen. Het max. omge-
vingstemperatuurbereik bedraagt -20°C tot +40°C. De lamp dient beschermd te worden tegen
langdurig, direct zonlicht. De lamp alleen in uitgeschakelde toestand op zijn lampkop zetten.
Uitsluitend originele onderdelen van de fabrikant gebruiken.
Het apparaat voldoet aan de voorschrien van de punten 1.2.7 en 1.0.6 van de essentiële veilig-
heids- en gezondheidseisen, bijlage II van de ATEX-richtlijn 2014/34/EU.
Indien het apparaat blootgesteld zou kunnen worden aan overmatige, externe belastingen zoals
trillingen, hitte of schokken, moeten passende beschermende maatregelen worden getroen.
Vervangen van de gehele reector-/lampeenheid:
Lampkop opendraaien, reector-/lampeenheid verwijderen en vervangen door een nieuwe.
Lampkop dichtdraaien en vastdraaien.
Belangrijke afvalverwijderingsinformatie voor batterijen en accu’s:
Volgens de richtlijn 2006/66/EG (in Duitsland: batterijwet – BattG) is iedere consument wettelijk
verplicht om alle gebruikte batterijen of accu’s in te leveren. De verwijdering ervan via huishou-
delijk afval is verboden. Oude batterijen en accu’s kunnen gratis worden afgegeven bij openbare
inzamelpunten van de gemeenten en overal waar batterijen en accu’s van het betreende type
worden verkocht. U kunt de door ons geleverde batterijen ook na gebruik (franco) naar onder-
staand adres sturen. U levert daarmee ook een belangrijke bijdrage aan de milieubescherming!
Klachten/retourzendingen uitsluitend aan:
PARAT GmbH + Co. KG
Schonenbach Strase 1, Tor 11, DE 94089 Neureichenau / Duitsland
Te allen tijde onder voorbehoud van wijzigingen in artikelen en technische specicaties, alsmede
onjuiste informatie of tikfouten.
Cambio de baterías:
Al desenroscar el cabezal, mantener la linterna siempre alejada del cuerpo, los ojos y otras personas.
Desenroscar el cabezal del cuerpo de la linterna. Retirar las baterías descargadas. Colocar 2 baterías
AAA en serie, de acuerdo con el dibujo. Colocar el cabezal en el cuerpo de la linterna y enroscarlo.
Para evitar que la linterna se encienda de manera accidental, se recomienda desenroscar el cabezal de
la linterna dándole dos vueltas.
Atención: La lámpara de seguridad sólo debe hacerse funcionar con los siguientes tipos de pilas,
pues sólo éstos tienen el certicado ATEX o IECEx.
2 x Duracell Plus, LR03/AAA, cada una de 1,5 V. 2 x Energiter Mini Stilo Classic E 92 Alkaline AAA/
LR03, cada una de 1,5 V. 2 x Energizer Ultra AAA/LR03, cada una de 1,5 V. 2 x Varta Consumer Long-
life Extra 4103 Alkaline A/LR03, cada una de 1,5 V. 2x, Varta Hi Energy 4903 Alkaline AAA/LR03,
cada una de 1,5 V. 2 x Energizer Industrial AAA/LR03, cada una de 1,5 V. 2 x Duracell Plus Power
MN2400 AAA/LR03, cada una de 1,5 V.
Advertencias acerca de las baterías:
De las baterías se pueden ltrar gases o soluciones cáusticas. Por ello, emplear siempre exclusivamente
baterías del mismo tipo, de la misma marca y de la misma antigüedad. Antes de cada uso, vericar las
baterías para comprobar que no presentan daños, fugas ni corrosión. Sacar las baterías si la linterna no
se va a utilizar por un periodo de tiempo prolongado. Respetar las instrucciones del fabricante de las
baterías.
Encendido y apagado:
Accionar el pulsador situado en el extremo de la linterna. Para ello, es necesario que el cabezal de la
linterna este bien enroscado.
Junta tórica
Antes de cada puesta en servicio de la linterna, vericar que junta tórica se encuentre en perfecto
estado.
Mantener limpia la junta tórica; no emplear herramientas para cambiarla.
Indicaciones para su seguridad:
La linterna no se debe abrir en zonas donde haya peligro de explosión. El rango máx. de temperaturas
ambiente es de -20 °C a + 40 °C. Proteger la linterna contra la radiación solar prolongada y directa.
Colocar la linterna apoyada en su cabezal únicamente si está apagada. Emplear exclusivamente piezas
originales del fabricante. Este aparato cumple las especicaciones de los apartados 1.2.7 y 1.0.6 de los
Requisitos básicos de salud y seguridad, Anexo II, de la Directiva ATEX 2014/34/EU. Si el aparato
puede quedar expuesto a esfuerzos exteriores excesivos, como, por ejemplo, vibraciones, calor o
impactos, se deberán prever medidas de protección adecuadas.
Información importante a la hora de desechar pilas y acumuladores:
Todos los consumidores están obligados por ley, según lo establecido en la Directiva 2006/66/CE del
Parlamento Europeo y del Consejo (en Alemania: Ley sobre pilas / BattG) a devolver todas las pilas y
acumuladores usados y desgastados. Está prohibido eliminar pilas y acumuladores junto con los resi-
duos domésticos. Las pilas y los acumuladores usados pueden desecharse gratuitamente en los puntos
de recogida municipales de Alemania y en todos aquellos lugares donde se vendan pilas y acumulado-
res de dicho tipo (tenga en cuenta que en otros países pueden existir normas diferentes).
También es posible enviar las pilas suministradas por nosotros tras su uso a la dirección indicada más
abajo (a portes debidos).
¡Con ello, usted contribuirá de forma signicativa a proteger el medio ambiente!
Reclamaciones / Devoluciones exclusivamente a:
PARAT GmbH + Co. KG
Schönenbach Strasse 1, Tor 11, DE 94089 Neureichenau /
Queda reservado el derecho a realizar modicaciones en los artículos por motivos técnicos sin previo
aviso. No se asumirá ninguna responsabilidad por datos incorrectos o errores tipográcos.
Sostituzione delle batterie:
Quando si svita la testa della torcia tenere sempre lontana la torcia dalla testa, dagli occhi e da
altre persone. Svitare la testa della torcia dal corpo, rimuovere le batterie scariche. Introdurre
2 batterie AAA in serie come mostrato nel disegno. Applicare la testa della torcia sul corpo e
avvitarla per chiudere. Per evitare un‘accensione accidentale della torcia, si consiglia di allentare
la testa della torcia di due giri.
Avvertenza: la luce d‘emergenza funziona solo con batterie dei seguenti tipi, poiché solo-
questi tipi di batterie sono certicati ATEX e IECEx.
2 x Duracell Plus, LR03/AAA, 1,5 V ciascuna. 2 x Energiter Mini Stilo Classic E 92 Alkaline
AAA/LR03, 1,5 V ciascuna. 2 x Energizer Ultra AAA/LR03, 1,5 V ciascuna. 2 x Varta Consumer
Longlife Extra 4103 Alkaline A/LR03,1,5 V ciascuna. 2 x Varta Hi Energy 4903 Alkaline AAA/
LR03, 1,5 V ciascuna. 2 x Energizer Industrial AAA/LR03, 1,5 V ciascuna. 2 x Duracell Plus
Power MN2400 AAA/LR03, 1,5 V ciascuna.
Avvertenze per le batterie:
Dalle batterie possono fuoriuscire gas/soluzioni corrosive, per cui: utilizzare sempre batterie
dello stesso tipo, della stessa marca e della stessa età, prima dell‘uso vericare ogni volta che
le batterie non presentino danneggiamenti, perdite o corrosione, estrarre le batterie in caso di
mancato utilizzo prolungato della torcia, seguire le avvertenze dei produttori delle batterie.
Accensione e spegnimento:
Azionare l‘interruttore a pressione sull‘estremità della torcia. A tale scopo la testa della torcia
deve essere avvitata saldamente.
O-ring:
Prima dell‘uso della torcia vericare ogni volta che gli O-ring non siano danneggiati. Tenere
puliti gli O-ring, non utilizzare utensili per la sostituzione degli O-ring.
Avvertenze di sicurezza:
La torcia non deve essere aperta in zone a rischio di esplosione / deagranti. L‘escursione ter-
mica massima della temperatura ambiente e compresa tra -20°C e +40°C. La torcia deve essere
protetta dall‘esposizione prolungata alla radiazione solare diretta. Appoggiare la testa della torcia
su una supercie soltanto quando la torcia e spenta. Utilizzare esclusivamente ricambi originali
della casa produttrice. Il dispositivo e conforme ai requisiti di cui ai paragra 1.2.7 e 1.0.6 dei
Requisiti essenziali in materia di sicurezza e di salute, allegato II della Direttiva ATEX 2014/34/
EU. Se il dispositivo può essere esposto a sollecitazioni esterne eccessive, come per esempio
vibrazioni, calore o urti e necessario prevedere idonee misure di protezione.
Avvertenze importanti per il corretto smaltimento delle batterie e degli accumulatori:
Ai sensi della Direttiva 2006/66/CE (in Germania: „Batteriegesetz – BattG“, legge tedesca sulle
batterie) ogni consumatore e legalmente tenuto a restituire le batterie e gli accumulatori usati o
esausti. Ne e vietato lo smaltimento con i riuti domestici. In Germania, le batterie e gli accu-
mulatori esausti si possono conferire gratuitamente presso i centri di raccolta comunali nonché
presso i luoghi dove sono in vendita le tipologie di batteria o accumulatore in questione (attenzi-
one: le normative di altri paesi potrebbero prevedere modalità diverse di smaltimento).
Inoltre, avete la possibilità di inviare le batterie da noi fornite all´indirizzo sotto indicato dopo
l´uso (spese a carico del destinatario). Il vostro e un contributo importante alla tutela dell´am-
biente!
Inviare eventuali reclami e resi esclusivamente a:
PARAT GmbH + Co. KG
Schönenbach Straße 1, Tor 11, DE 94089 Neureichenau
Con riserva di modiche tecniche e dell’articolo in qualsiasi momento e salvo indicazioni errate
o errori di scrittura.
Beim Abdrehen des Leuchtenkopfes die Leuchte immer vom Körper/Augen/anderen Personen
entfernt halten. Leuchtenkopf vom Gehäuse abdrehen. Leere batterien entnehmen. 2 x AAA
Batterien in Serie gemäß Zeichnung einsetzen. Den Leuchtenkopf auf das Gehäuse setzen und
zudrehen. Um ein versehentliches Einschalten der Leuchte zu verhindern, empehlt es sich den
Lampenkopf um zwei Umdrehungen zu lösen.
Achtung: Die Sicherheitslampe darf nur mit den folgenden Batterietypen betrieben werden, da
nur diese Batterietypen eine ATEX- bzw. IECEx-Zertizierung haben.
2 x Duracell Plus, LR03/AAA, je 1,5 V. 2 x Energiter Mini Stilo Classic E 92 Alkaline AAA/LR03,
je 1,5 V. 2 x Energizer Ultra AAA/LR03, je 1,5 V. 2 x Varta Consumer Longlife Extra 4103 Alkaline
AAA/LR03, je 1,5 V. 2 x Varta Hi Energy 4903 Alkaline AAA/LR03, je 1,5 V.
2 x Energizer Industrial AAA/LR03, je 1,5 V. 2 x Duracell Plus Power MN2400 AAA/LR03, je 1,5 V.
Warnhinweise zu Batterien:
Aus Batterien können Gase/ätzende Lösungen austreten, daher immer: ausschließlich Batterien auf
Beschädigung, Leck und Korrosion prüfen, Batterien bei längerer Nicht-Nutzung der Leuchte her-
ausnehmen, Anweisungen der Batteriehersteller folgen.
Ein-Ausschalten:
Druckschalter am Leuchtenende betätigen. Der Leuchtenkopf muss hierzu fest aufgeschraubt sein.
O-Ring:
Vor jeder Inbetriebnahme der Leuchte O-Ring auf Beschädigung prüfen. O-Ring sauber halten,
zum Wechseln des O-Rings keine Werkzeuge verwenden.
Sicherheitshinweise:
Die Leuchte darf nicht in explosionsgefährdeten/fähigen Zonen geönet werden. Der max. Umge-
bungstemperaturbereich beträgt -20°C bis + 40°C. Die Leuchgte ist vor länger, direkter Sonnenein-
strahlung zu schützen. Die Leuchte nur in ausgeschaltetem Zustand auf den Leuchtenkopf stellen.
Ausschließlich Originalteile des Herstellers verwenden.
Das Gerät erfüllt die Anforderungen der Absätze 1.2.7 und 1.0.6 der Grundlegenden Gesundheits-
und Sicherheitsanforderungen, Anhang II der ATEX Richtlinie 2014/34/EU.
Wenn das Gerät übermäßigen äußeren Belastungen wie zum Beispiel Vibrationen, Hitze oder
Schlageinwirkungen ausgesetzt sein könnte, müssen geeignete Schutzmaßnahmen vorgesehen wer-
den.
Auswechseln des gesamten Reektors/Leuchtmitteleinheit:
Leuchtenkopf aufdrehen, Reektor/Leuchtmitteileinheit herausnehmen und gegen neue austau-
schen. Leuchtenkopf zudrehen und festziehen.
Wichtiger Entsorgungshinweis zu Batterien und Akkus:
Jeder Verbraucher ist nach der Richtlinie 2006/66/EG (in Deutschland: Batteriegesetz – BattG)
gesetzlich zur Rückgabe aller ge- und verbrauchten Batterien bzw. Akkus verpichtet. Eine Ent-
sorgung über den Hausmüll ist verboten. Alte Batterien und Akkus können unentgeltlich bei den
öentlichen Sammelstellen der Gemeinden und überall dort abgegeben werden, wo Batterien und
Akkus der betreenden Art verkau werden. Sie können die von uns gelieferten Batterien auch
nach Gebrauch an die u.a. Adresse (frei haus) senden. Sie leisten damit einen wesentlichen Beitrag
zum Umweltschutz!
Reklamationen/Rücksendungen ausschließlich an:
PARAT GmbH + Co. KG
Schönenbach Straße 1, Tor 11, DE 94089 Neureichenau / Deutschland
Artikel- und technische Änderungen sowie irrtümliche Angaben oder Schreibfehler jederzeit
vorbehalten.
Wechseln der Batterien:
Bedienungsanleitung und wichtige Hinweise / Operating instructions and important notes /
Mode d‘emploi et avis importants / Instrucciones de empleo e indicaciones importantes / Istruzi-
oni per l‘uso e avvertenze importanti / Instrukcja obsługi i ważne wskazówki / Käyttöohje ja
tärkeitä huomautuksia / Gebruiksaanwijzing en belangrijke opmerkingen
• Reektor mit Leuchtmittel LED weiß
• Reector with white LED
• Réecteur avec lampe LED blanche
• Reector con LEDblanco
• Riettore con lampadina LED dicolor bianco
• Reektor z białymi diodamiLED jako źródło światła
• Reector met LED-lamp wit
PX2PX2PX2
Leuchtmittel / Bulbs / Ampoules / Fuentes de luz / Lampadina / Źródła światła / Valaiseva osa
Technische Daten / Technical data / Caractéristiques techniques / Datos técnicos / Dati tecnici /
Dane techniczne / Tekniset tiedot / Technische gegevens
~ 20 g
~ 30 lm
~ 35 m x ø 3 - 5 m
~ 8 h
PC (Polycarbonate)
LED weiß / Xenon
White LED / Xenon
LED blanche / Xénon
LED blanco / Xenón
LED bianco / Xeno
Biała dioda LED / Ksenon
Led wit / Xenon
LED weiß / white / blanche /
blanco / bianco / biała /
valkoinen
2 x Alkaline AAA/Micro/LR03,
je 1,5 V / 1,5 V each / 1,5 V chac.
/ cada una de 1,5 V / 1,5 V cias-
cuna /po 1,5 V kazda / je 1,5 V
Material / Material / Matériau / Material / Materiale / Materiał / Materiaali
Einsetzbare Leuchtmittel / Bulbs which can be used / Ampoules intégrables / Fuentes de luz
utilizables / Lampadine utilizzabili / Stosowane źródła światła / Polttimot, joita voidaan käyttää /
Lampen die gebruikt kunnen worden
Wymiana baterii:
Podczas wykręcania głowicy lampy należy ją zawsze trzymać z dala od ciała / oczu / innych
osób. Odkręcić głowicę latarki od obudowy. Wyjąć zużyte baterie. Włożyć szeregowo 2 baterie
AAA, wg rysunku. Założyć głowicę latarki na obudowę i dokręcić. Aby zapobiec niezamierzone-
mu włączeniu latarki zaleca się poluzować głowicę o dwa obroty.
Uwaga: Dla lampy bezpieczeństwa proszę stosować tylko następujące typy baterii,
ponieważ jedynie te typy baterii posiadają certykację ATEX lub też IECEx.
2 x Duracell Plus, LR03/AAA, 1,5 V. 2 x Energiter Mini Stilo Classic E 92 Alkaline AAA/LR03,
1,5 V. 2 x Energizer Ultra AAA/LR03, 1,5 V. 2 x Varta Consumer Longlife Extra 4103 Alkaline
A/LR03, 1,5 V. 2x , Varta Hi Energy 4903 Alkaline AAA/LR03, 1,5 V. 2 x Energizer Industrial
AAA/LR03, 1,5 V. 2 x Duracell Plus Power MN2400 AAA/LR03, 1,5 V.
Wskazówki dot. baterii:
Z baterii mogą się ulatniać gazy / wydobywać żrące substancje, dlatego należy zawsze: używać
wyłącznie baterii tego samego typu, producenta, z tej samej serii/daty produkcji. Przed każdym
użyciem sprawdzić baterie pod kątem uszkodzeń, wycieków, śladów korozji. W przypadku
dłuższej przerwy w używaniu lampy baterie należy wyjąć, przestrzegać wskazówek producenta
baterii.
Włączanie / wyłączanie:
Nacisnąć przełącznik na końcu latarki. Głowica lampy musi być mocno dokręcona.
Pierścień uszczelniający:
Przed każdym uruchomieniem lampy sprawdzić, czy pierścień uszczelniający nie jest uszkodzo-
ny. Pierścień uszczelniający powinien być zawsze czysty, do wymiany pierścienia uszczelniające-
go nie należy stosować żadnych narzędzi.
Wskazówki bezpieczeństwa:
Latarki nie wolno otwierać w środowisku zagrożonym wybuchem / wybuchowym. Maksymalne
temperatury graniczne otoczenia wynoszą od -20°C do +40°C. Latarkę należy chronić przed
dłuższą ekspozycją na promieniowanie słoneczne. Tylko wyłączoną latarkę wolno stawiać na
głowicy lampy. Stosować wyłącznie oryginalne części zamienne. Urządzenie spełnia wymagania
ustępów 1.2.7 i 1.0.6 podstawowych przepisów bezpieczeństwa i ochrony zdrowia, Dodatek II
do dyrektywy ATEX 2014/34/EU. Jeśli urządzenie może być narażone na nadmierne zewnętrzne
obciążenia, takie jak wibracje, wysoka temperatura lub uderzenia, należy przewidzieć odpowied-
nie środki ochronne.
Ważna wskazówka odnośnie usuwania baterii i akumulatorów:
Baterie i akumulatory zwierają silnie trujące środki! Zgodnie z wymogami Dyrektywy 2006/66/
WE (w sprawie baterii i akumulatorów oraz zużytych baterii i akumulatorów) każdy konsument
zobowiązany jest ustawowo do zwrotu wszystkich używanych i zużytych baterii i akumulatorów.
Usuwanie do odpadów komunalnych jest zabronione. Zużyte baterie i akumulatory zwracać
można nieodpłatnie w publicznych miejscach zbiórki organizowanych przez urzędy miast i
gmin oraz we wszystkich placówkach zajmujących się dystrybucją danego rodzaju baterii i aku-
mulatorów oraz sprzętu elektronicznego. Wprowadzone przez nas do obrotu baterie przesyłać
też można po ich zużyciu na podany poniżej adres (prosimy uwzględnić, iż w innych krajach
postępowanie może być odmienne od podanego tutaj). Stanowi to istotny wkład Państwa do
ochrony środowiska!
Reklamacje / zwroty należy kierować wyłącznie do:
PARAT GmbH + Co. KG, Schönenbach Straße 1, Tor 11, DE 94089 Neureichenau
Zastrzegamy sobie zmiany wyrobu oraz zmiany techniczne, a także możliwość błędnych danych
lub błędów drukarskich.
Changement des piles:
Lors du dévissage de la tête de lampe, tenir celle-ci à l’écart du corps/des yeux/d’autres personnes.
Dévisser la tête de lampe du boîtier. Retirer les piles usées. Insérer 2 piles AAA en série, conformé-
ment au dessin. Placer la tête de lampe sur le boîtier et la serrer. Pour éviter toute mise en marche
accidentelle, nous conseillons de desserrer la tête de lampe de deux tours.
Attention: cette lampe de sécurité ne peut être utilisée qu’avec les types de piles suivants car
seules ces piles sont homologuées ATEX / IECEx.
2 x Duracell Plus, LR03/AAA, 1,5 V chacune. 2 x Energiter Mini Stilo Classic E 92 Alkaline AAA/
LR03, 1,5 V chacune. 2 x Energizer Ultra AAA/LR03, 1,5 V chacune. 2 x Varta Consumer Longlife
Extra 4103 Alkaline A/LR03, 1,5 V chacune. 2x , Varta Hi Energy 4903 Alkaline AAA/LR03, 1,5
V chacune. 2 x Energizer Industrial AAA/LR03, 1,5 V chacune. 2 x Duracell Plus Power MN2400
AAA/LR03, 1,5 V chacune.
Avertissement relatif aux piles:
Des gaz/solutions acides peuvent s‘échapper des piles. Avant d‘utiliser les piles, contrôler le
bon état, l’absence de détérioration, de fuites et de traces de corrosion. Si les piles ne sont pas
utilisées pour une période prolongée, il faut les retirer de la lampe. Respecter les indications
du fabricant.
Mise en service / Arret:
Actionner le bouton à l‘extrémité de la lampe. La tête de lampe doit être correctement vissée.
Joint torique:
Avant toute mise en service de la lampe, contrôler le bon état du joint torique. Le joint torique doit
être propre. Le changement sans outils est obligatoire.
Remarques relatives à la sécurité:
La lampe ne doit pas être ouverte dans des atmosphères potentiellement explosives/explosives.
La plage de température ambiante autorisée va de -20 °C a +40°C. Protéger la lampe contre l’ex-
position prolongée au soleil. Ne pas poser la lampe sur la tête sans qu’elle soit à l’état éteint. Seules
les pièces d‘origine du fabricant sont autorisées. Cet appareil répond aux critères imposés par les
paragraphes 1.2.7 et 1.0.6 des Règles fondamentales relatives à la santé et à la sécurité, Annexe II de
la directive ATEX 2014/34/EU. Lorsque l’appareil risque d’être soumis à des sollicitations externes
dépassant les charges normales (p. ex. vibrations, chaleur, chocs), il faut prévoir des mesures de
protection appropriées.
Remplacement de l‘ensemble réecteur/unité ampoule:
Desserrer la tête la lampe. Retirer le réecteur/unité ampoule. Remplacer l‘ensemble. Fermer la
tête de la lampe. Attention: sur les versions à ampoule Xenon, il y a la possibilité de ne changer que
l‘ampoule.
Conseils importants pour l’élimination des piles et des accumulateurs:
En vertu de la directive 2006/66/CE (en Allemagne: loi sur le traitement des piles) le consomma-
teur est tenu de ramener toutes les piles et accumulateurs usagés. Il y a interdiction de les éliminer
avec les ordures ménagères. En Allemagne, toutes les piles et accumulateurs peuvent être remis
gratuitement aux points de collecte publics de la commune ainsi qu’à tous les points de vente de ce
type de piles et d’accumulateurs (Veuillez noter que cette procédure peut diérer d’un pays a un
autre). Vous pouvez également réexpédier les piles livrées par nos soins à nos frais après usage à
l’adresse du bas. Vous contribuerez ainsi à la protection de l’environnement!
Réclamations / Renvois seulement à
PARAT GmbH + Co. KG
Schönebach Straße , Tor 11, DE 94089 Neureichenau / Allemagne
Sous réserve de modications sans préavis du produit, caractéristiques techniques, fautes de frappe
et informations fournies par erreur.
Changing the batteries:
When unscrewing the lamp head, always keep the lamp away from your body, eyes and other
persons. Unscrew the lamp head from the housing. Remove the at batteries. Insert two AAA
batteries in series as shown in the drawing. Position the lamp head on the lamp and screw it into
place. To prevent on the lamp unintentionally switching on, unscrewing the lamp head by one or
two turns is recommended.
Warning: e safety light must be operated only with batteries of the following types as
only these battery types are covered by the ATEX and IECEx certications.
2 x Duracell Plus, LR03/AAA, each 1,5 V. 2 x Energiter Mini Stilo Classic E 92 Alkaline AAA/
LR03, each 1,5 V. 2 x Energizer Ultra AAA/LR03, each 1,5 V. 2 x Varta Consumer Longlife Extra
4103 Alkaline A/LR03, each 1,5 V. 2 x Varta Hi Energy 4903 Alkaline AAA/LR03, each 1,5 V. 2 x
Energizer Industrial AAA/LR03, each 1,5 V, 2 x Duracell Plus Power MN2400 AAA/LR03, each
1,5 V.
Battery warnings:
Gases or corrosive substances may escape from batteries. You must always therefore only use
batteries of the same type, make and age, check batteries for damage, leakage and corrosion be-
fore use, take the batteries out if the lamp is not to be used for some time, follow the instructions
of the battery manufacturers.
Switching on and o:
Press the push button on the end of the lamp. Before the lamp is switched on, the lamp head
must be screwed rmly in place.
O-ring:
Before switching the lamp on, always check the O-ring to make sure it is not damaged. Keep the
O-ring clean; when replacing the O-ring, do not use any tools.
Safety Information:
Do not open the lamp in areas with (potentially) explosive atmospheres. e lamp must only be
operated in the temperature range -20°C to +40°C. Do not expose the lamp to prolonged, direct
sunlight. Do not stand the lamp on its head unless it is switched o. Only use original spare
parts supplied by the manufacturer. e equipment is designed to satisfy the requirements of the
Clauses 1.2.7 and 1.0.6 of the Essential Health and Safety Requirements Annex II of the ATEX
Directive 2014/34/EU. Where the equipment may be exposed to excessive external stresses e.g.
vibration, heat or impacts, suitable precautions must be taken.
Replacement of entire reector/bulb unit:
Unscrew the lamp head and take out the reector/bulb unit. Install a new unit, and rmly screw
on the lamp head.
Important information on how to discard batteries and accumulators:
According to Directive 2006/66/EC (German Batteries Act—BattG), all users are obligated by
law to return used and/or empty batteries or accumulators. Batteries and accumulators must
not be disposed of with household waste. In Germany, old batteries can be handed over free of
charge at the local municipal collection points or returned to any shop that sells batteries of the
same type (please note that other countries may have diering practices). If you have purchased
any batteries from us, you may also return them to us aer use by sending them to the address
stated below (free post). is is important to help protect our environment!
Send all complaints or returns to:
PARAT GmbH + Co. KG
Schönenbach Straße 1, Tor 11, DE 94089 Neureichenau / Germany
Subject to change at any time. Errors and omissions reserved.
Zertizierungen ATEX Zone 1 / ATEX zone 1 certications / Certications zone 1 ATEX / Ho-
mologaciones ATEX zona 1 / Certicazioni ATEX zona 1 / Certykaty ATEX strefa 1 / Serti-
ointi ATEX-vyöhyke 1 / Certicaten ATEX-zone
9600151-3
Cd (Cadmium)Hg (Quecksilber)Pb (Blei)
www.lighting.parat.dewww.lighting.parat.dewww.lighting.parat.de
DEUGBFRAESPITAPOLNL
0158
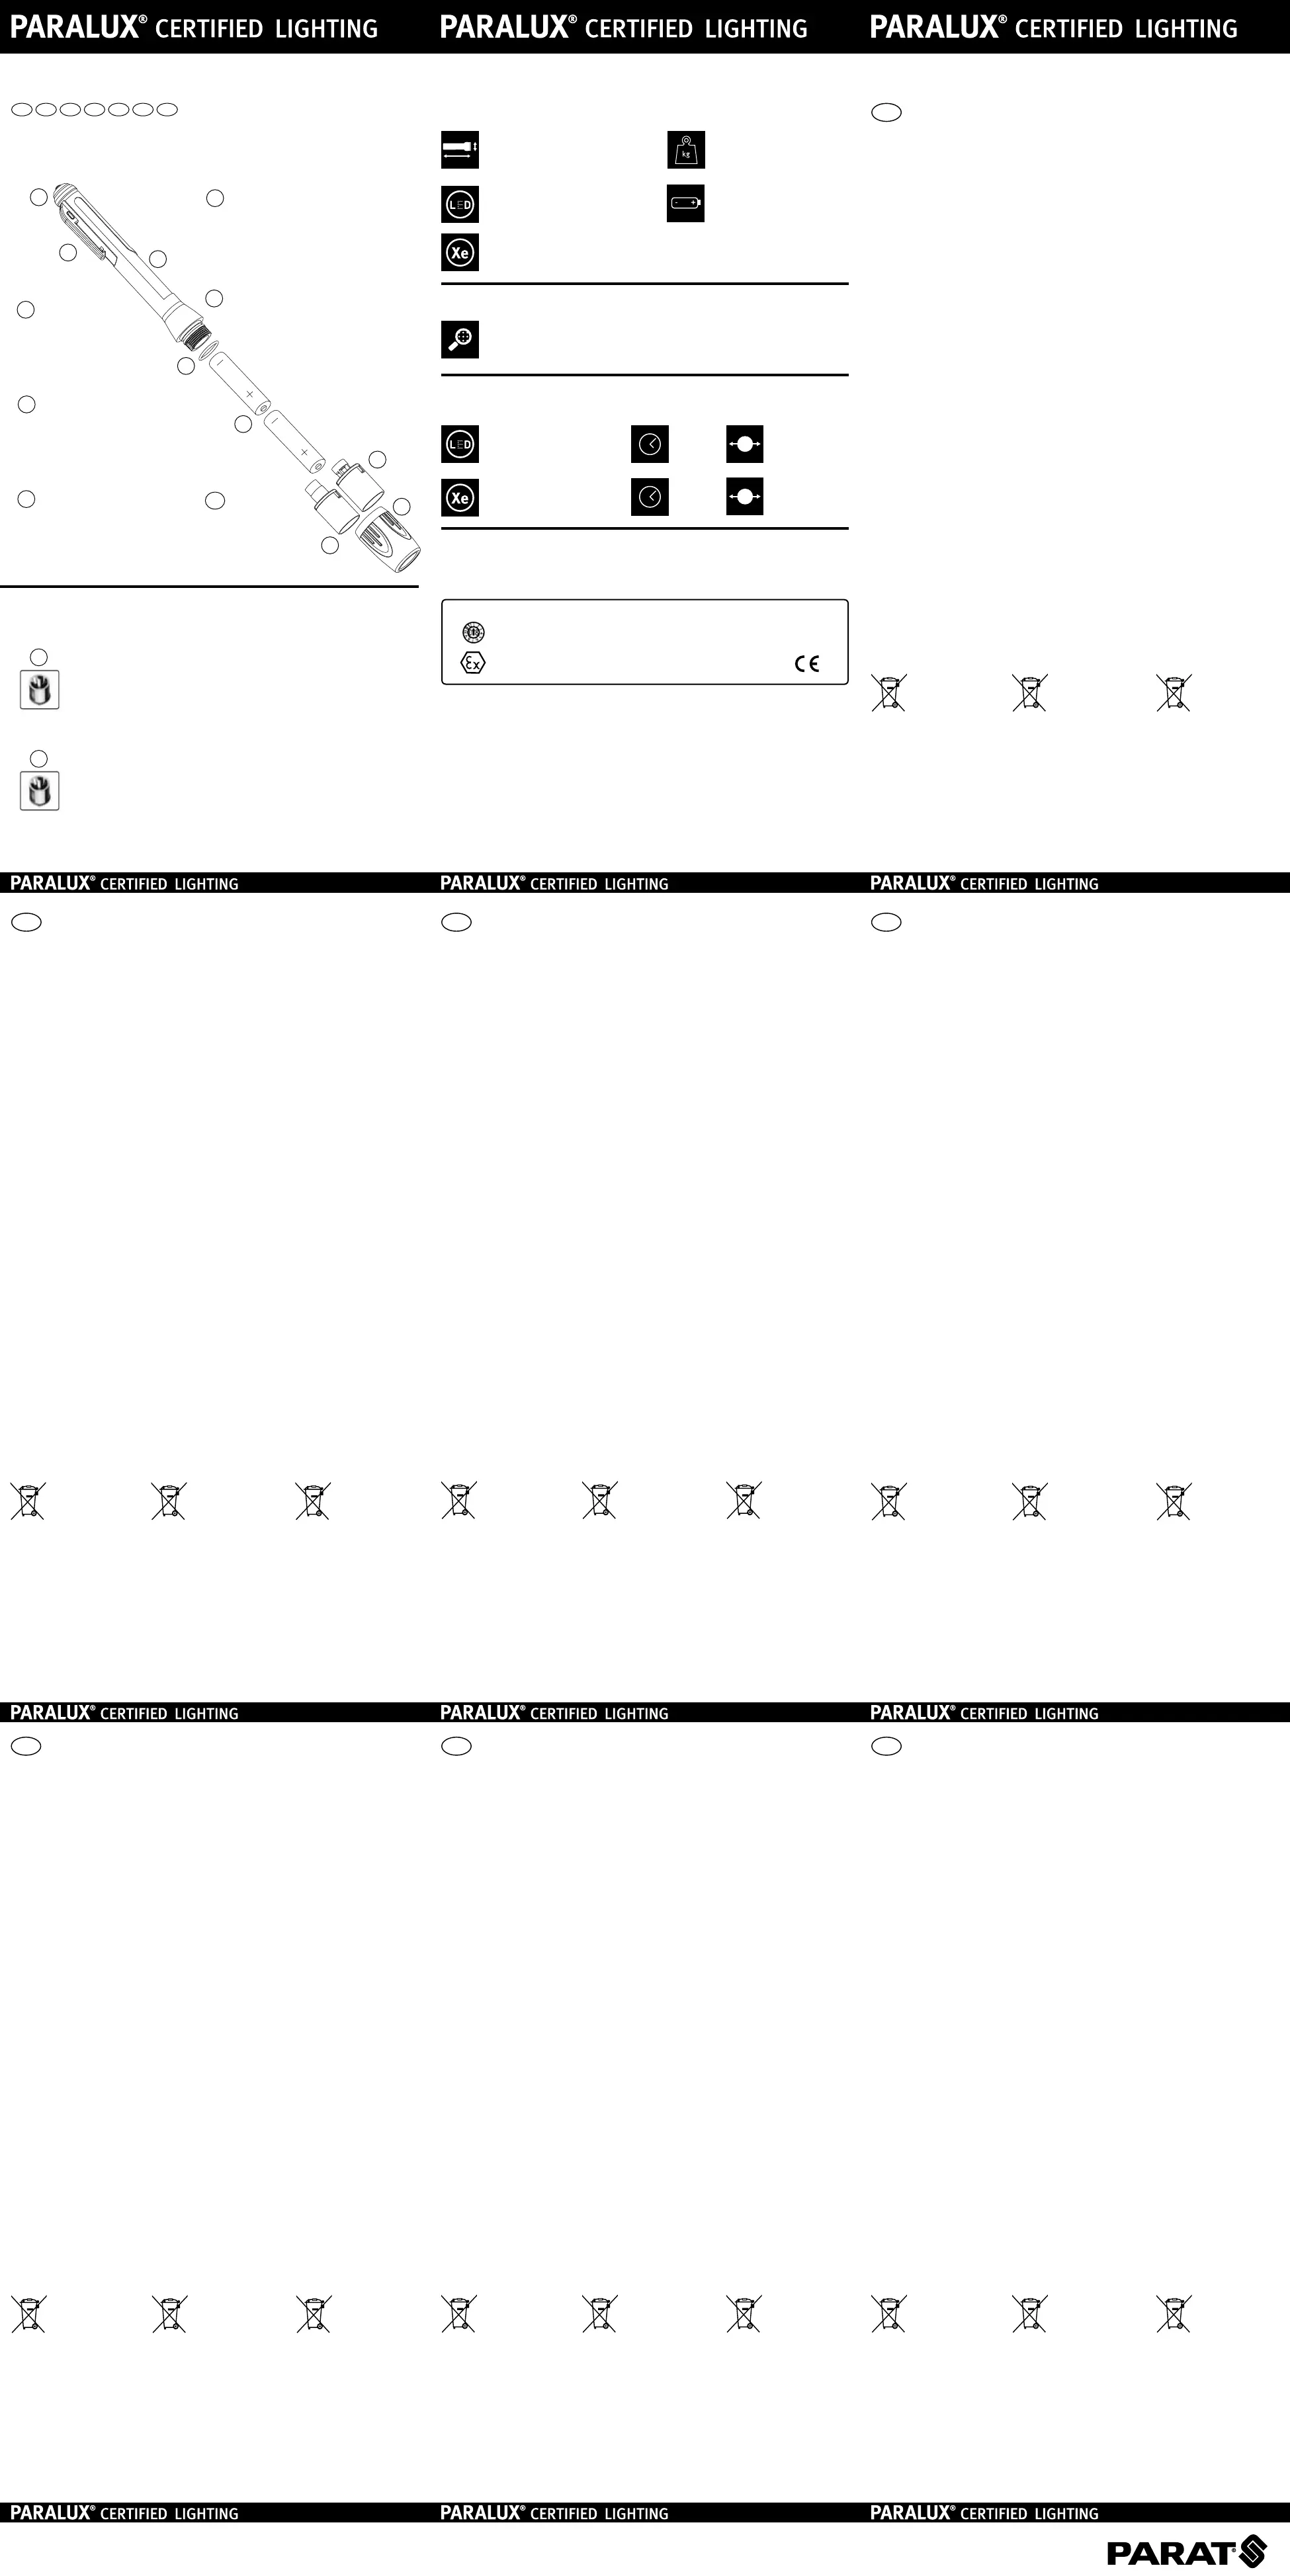
• O-Ring
• O-Ring
• Joint torque
• Junta tóorica
• O-Ring
• Pierścień uszczelniający
• O-Rengas
• O-ring
4
• Druckschalter
• Push button
• Interrupteur de pression
• Pulsador
• Interruttore a pressione
• Przełącznik
• Painonappi
• Drukknop
1
• 2x Alkaline LR03,
je 1,5V / 1.5 V each / 1,5 V
chac. / cada una de 1,5 V /
1,5 V ciascuna / po 1,5 V
każda / jokainen 1,5 V / elk
1,5 V
5
• Cliphalterung
• Clipholder
• Fixation clip
• Clip de sujeción
• Supporto a clip
• Uchwyt zatrzaskowy
• Klinnitysklipsi
• Cliphouder
2
• PX2 Gehäuse
• PX2 housing
• Boîtier PX2
• Cuerpo de la PX2
• Corpo PX2
• Obudowa PX2
• PX 2-runko
• PX2 behuizing
3
• Lampenkopf
• Bezel
• Tête de lampe
• Cabezal de la linterna
• lesta della torcia
• Głowica lampy
• Valaisinpää
• Lampkop
6
www.lighting.parat.dewww.lighting.parat.dewww.lighting.parat.de
PARAT GmbH + Co. KG
Schönenbach Straße 1 · D-94089 Neureichenau
www.lighting-parat.de · www.parat.eu
Cd (cadmium)Hg (mercury)Pb (lead)
Cd (cadmium)Hg (mercure)Pb (plomb)
Cd (Cadmio)Hg m(ercurio)Pb (Plomo)
Cd (cadmio)Hg (mercurio)Pb (piombo)
Cd (kadm)Hg (rtęć)Pb (ołów)
DEU
GBFRAESP
ITAPOLNL
Cd (Cadmium)Hg (kwik)Pb (lood)
1
2
3
4
5
6
PARAT GMBH + CO. KG, 94089 NEUREICHENAU, GERMANY
PX2 PC – PARALUX CERTIFIED LIGHTING
WARNING ! DO NOT OPEN IN HAZARDOUS AREA I CHECK INSTRUCTIONS BEFORE
USE !
II 2G Ex ib IIB T4 Gb (LED 125)
II 2G Ex ib e IIB T4 Gb (XENON 124)
BVS 12 ATEX E 060 X IECEx BVS 12.0044X
RoHS
7
8
• Reektor mit Leuchtmittel Xenon
• Reector with xenon bu
• Réecteur avec ampoule xénon
• Reector con bombilla de xenón
• Riettorcon lampadina allo xeno
• Reektor z żarówką ksenonowąjako źródłem światła
• Reector met lichtbron Xenon
7
8
X
~ 10 lm
~ 20 m x ø 3 - 5 m
~ 2 h
Xenon / Xenon / Xénon /
Xenón / Xeno / Ksenon
X
124
125
~ 143 x 19 mm
Produktspecifikationer
| Varumärke: | Parat |
| Kategori: | Ficklampa |
| Modell: | Paralux PX2 |
Behöver du hjälp?
Om du behöver hjälp med Parat Paralux PX2 ställ en fråga nedan och andra användare kommer att svara dig
Ficklampa Parat Manualer

18 September 2024
18 September 2024
18 September 2024
18 September 2024
Ficklampa Manualer
Nyaste Ficklampa Manualer
1 April 2026
30 Mars 2026
28 Mars 2026
28 Mars 2026
27 Mars 2026
26 Mars 2026
25 Mars 2026
25 Mars 2026
24 Mars 2026
23 Mars 2026