Phottix Odin Lite Bruksanvisning
Phottix Fjärrutlösare Odin Lite
Läs gratis den bruksanvisning för Phottix Odin Lite (2 sidor) i kategorin Fjärrutlösare. Guiden har ansetts hjälpsam av 29 personer och har ett genomsnittsbetyg på 4.4 stjärnor baserat på 4 recensioner. Har du en fråga om Phottix Odin Lite eller vill du ställa frågor till andra användare av produkten? Ställ en fråga
Sida 1/2
1
En
INSTRUCTION MANUAL
Odin Lite Flash Trigger
INSTRUCTION MANUAL
En
Cn
Trad
21
En
INSTRUCTION MANUAL
Thank you for purchasing a Phottix product
Before using the Odin Lite Flash Trigger please read these instructions carefully.
and provides a link between Phottix's TTL and Manual families of products.
The Phottix Odin Lite is an all-in-one manual trigger, giving users the ability to
control compatible Phottix products from any camera system.
(refer to website for details).
Note: The Odin Lite is designed to control manual power levels only. It does not
Sync.
Content
Parts…...........................................................................…...2
Before Using…................................................................…...2
Display .................................................................................3
Functions and Operations.....................................................3
Menu Functions ....................................................................4
Technical Specifications ........................................................5
Warning ................................................................................5
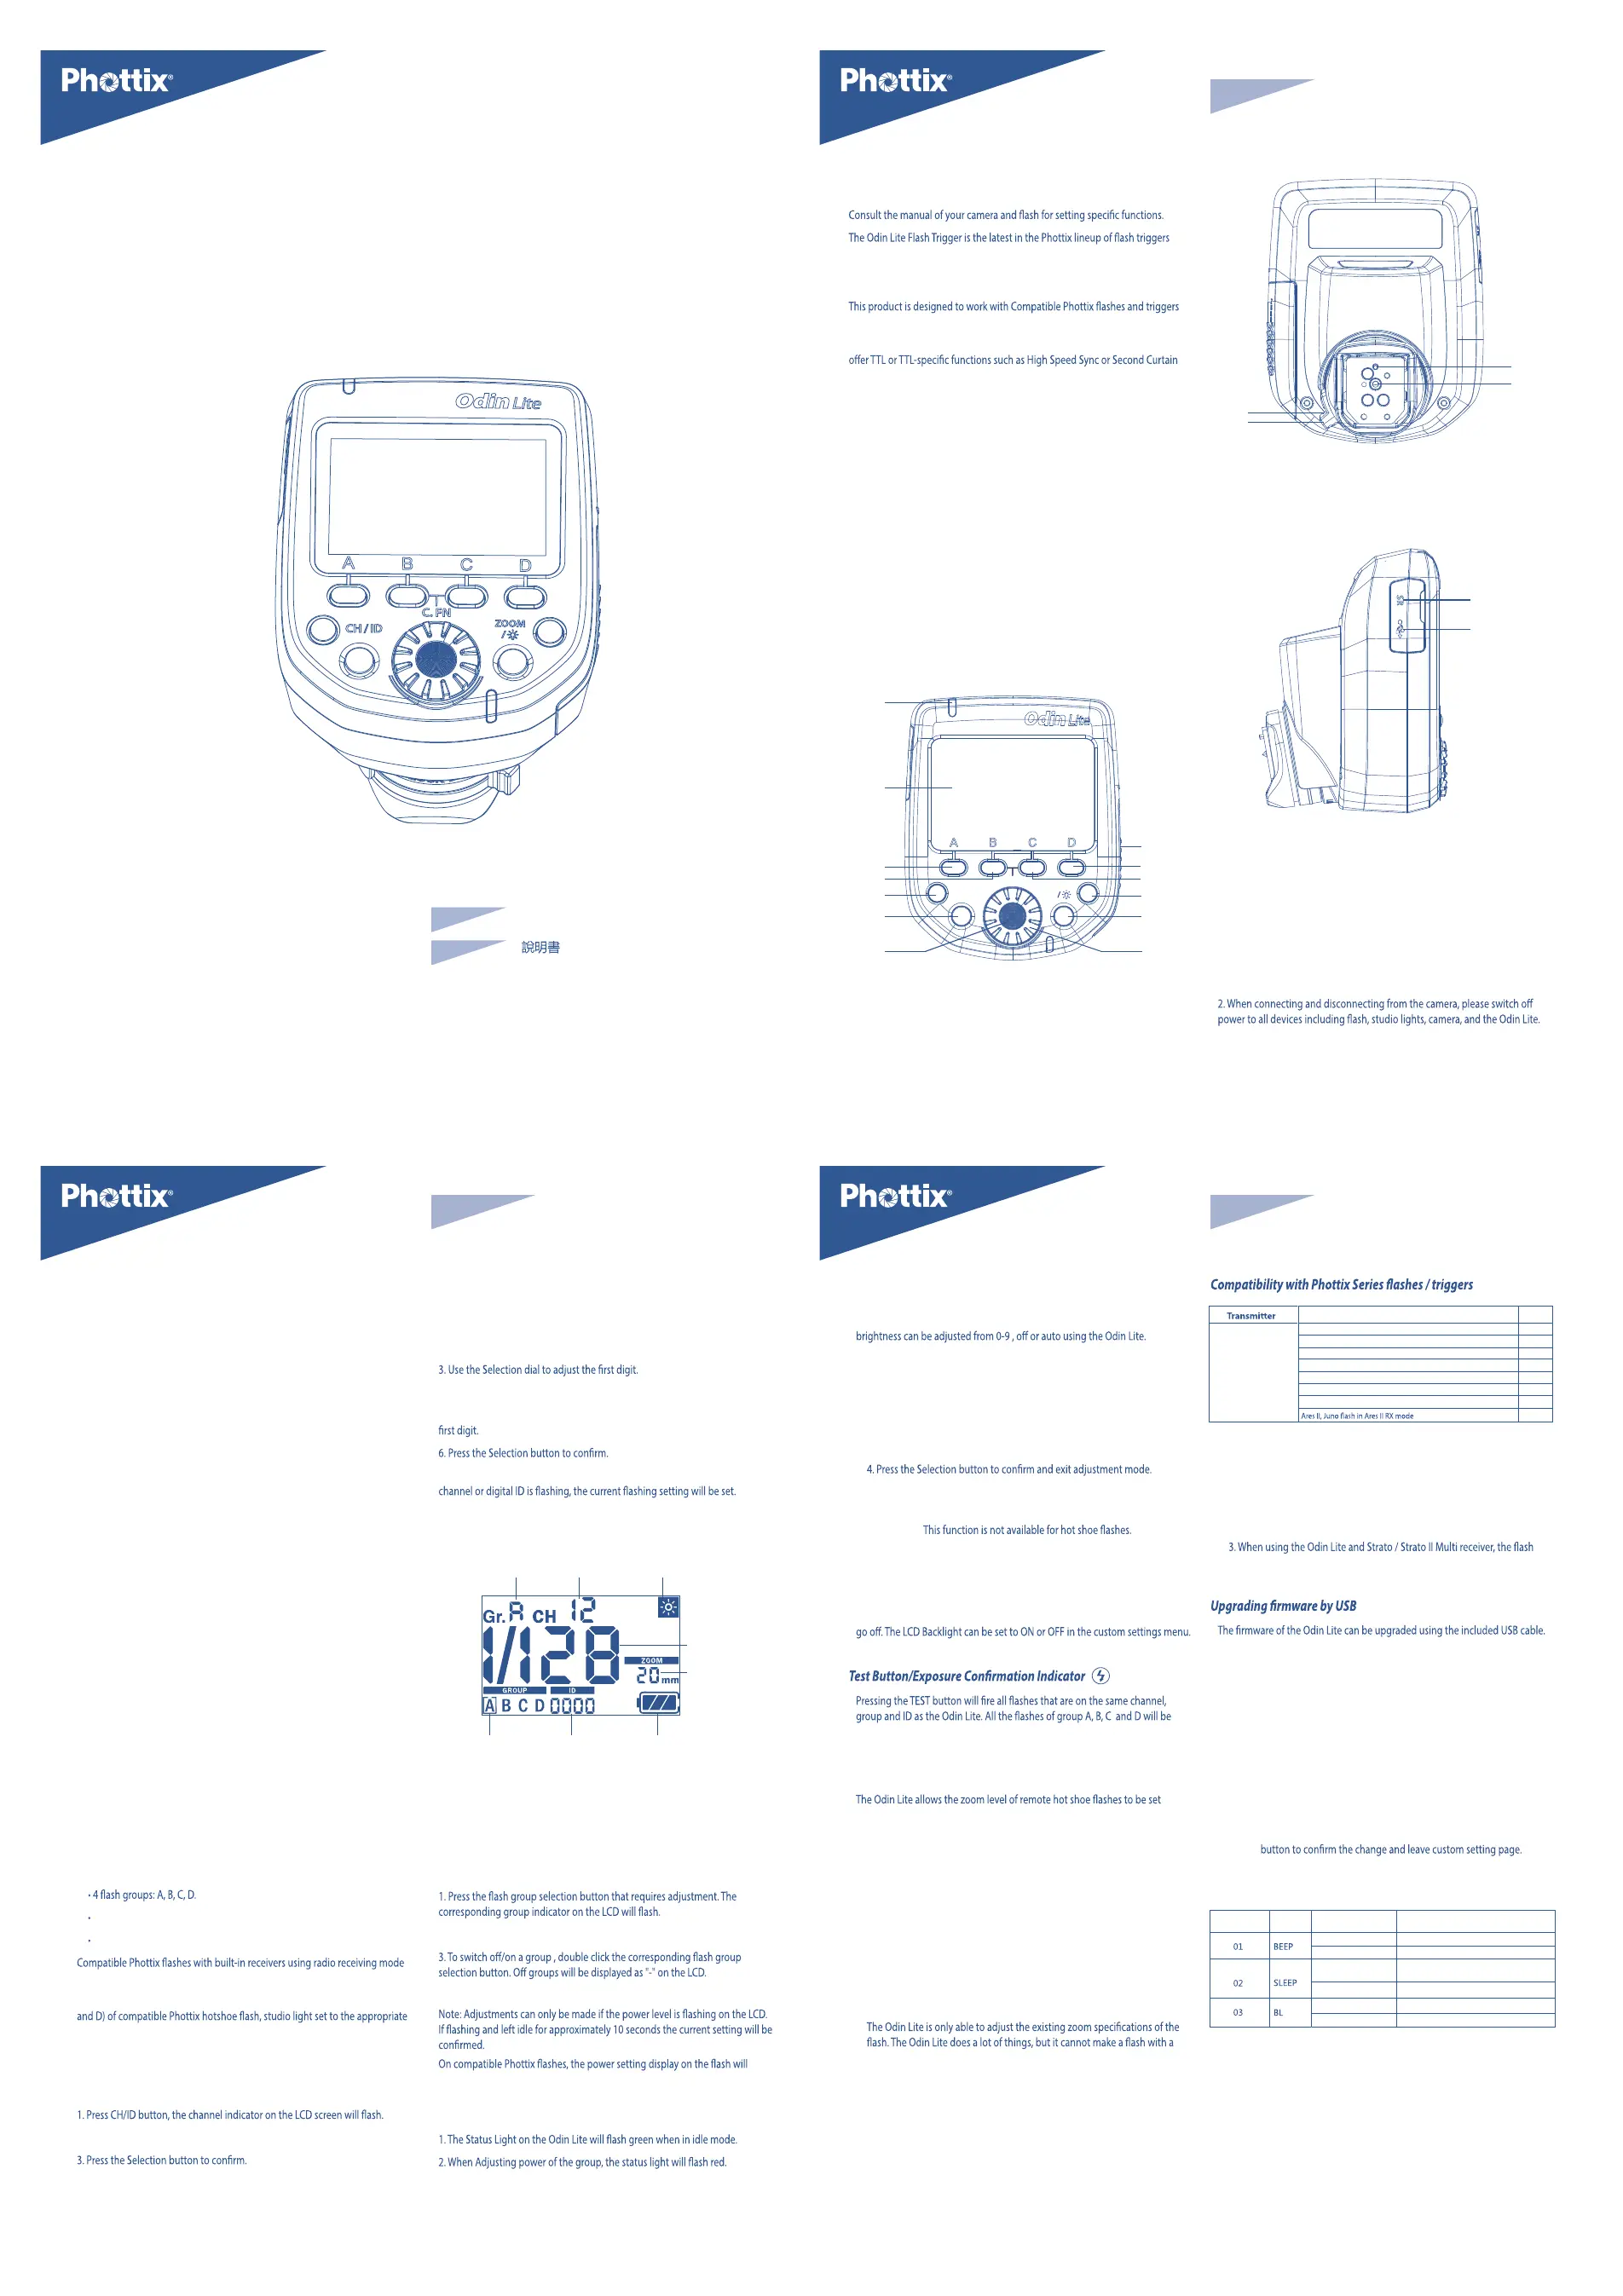
Parts
CH/ID
ZOOM
C.FN
1
2
3
6
5
7
118
12
13
910
4
1. Status light
2. LCD Panel
3. Group A selection button
4. Group B selection button
5. Group C selection button
6. Group D selection button
7. Channel/ ID button
14
15
16
17
14. Locking lever
15. Lock release button
16. Contact
17. Locking pin
18
19
18. USB port
19. 2.5mm Input port
Before Using
Please Note:
1. Use the foot locking mechanisms to ensure a secure connection between
Odin Lite and the camera hot shoe.
3. The Odin Lite is designed to work with compatible Phottix products using
Phottix's Odin Z OS. Phottix products not using the Odin Z OS will not function
properly with the Odin Lite.
8. Flash test button
9. Selection button
10. Selection dial
11. Power button
12. Zoom/ Modelling light button
13. Battery compartment latch
3
En
INSTRUCTION MANUAL
Inserting batteries
1. Press the battery compartment cover and slide it to the left to open it.
2. Insert the batteries following the markings in the battery compartment
3. Close the Battery compartment cover and push back into the locked position
Please Note
The Odin Lite circuitry is designed to be used with either Alkaline, Ni-CD or
Ni-MH rechargeable batteries. Do not use Lithium AA batteries.
Turning the Odin Lite ON/OFF
Turn ON: Press and hold the power button until the LCD Screen powers on and
displays the default screen.
Turn OFF: Press and hold the power button until the LCD Screen goes blank.
Connecting the Odin Lite to the Camera Hot Shoe
1. Turn OFF the camera and Odin Lite.
2. Slide the Odin Lite into the camera’s hot shoe mount.
3. Slide the Locking Lever to the right until a ’click’ is heard, making sure the
Odin Lite is locked in position.
4. Turn ON the camera and Odin Lite.
Disconnecting the Odin Lite from the Camera Hot Shoe
1. Turn OFF the camera and Odin Lite
2. Lock release: Press and hold the Lock Release Button on the Locking Lever,
and slide the Locking Lever to the left.
3. Slide the Odin Lite from the camera hot shoe.
Flash Groups, Channels and ID setting
The Phottix Odin Lite System has:
32 transmission channels; (Default at Channel 32).
Digital ID Setting with 0000-9999 settings available.
can be assigned to a group, a channel and Digital ID.
The Odin Lite can adjust the Power Levels and Zoom for each group (A, B, C,
receiver mode which are set to the same channel, and have the same Digital ID
setting. (Unless the group is set to OFF on the Odin Lite).
Setting the Channel
2. Turn the Selection dial to set the channel.
Setting the Digital ID number
1. Press the CH/ID Button Twice to enter the Digital ID Adjustment screen.
(Press once if already on the Channel Adjustment screen).
2. Turn the Selection dial.
4. Press the CH/ID button to advance to the next digit.
5. Repeat until a four digit code is set, Press CH/ID button twice to return to the
Please note: If the Odin Lite is left idle for 10 seconds when Group, power,
Display
GroupChannel
Flash power
Zoom
Battery indicatorDigital IDSelected group
Modeling light indicator
Functions and Operations
Odin Lite Modes
The Odin lite is designed for use with manual mode of compatible Phottix
products. Power levels and zoom can be adjusted within 4 groups (A, B, C, D) .
Adjusting Power Levels
2. Turn the Selection dial to adjust the power level for the selected group.
4. After setting, press the Selection button on the to exit adjustment mode.
change according to the setting on the Odin Lite.
Status Light function
3. When taking photos, the Status Light will turn solid red.
4
En
INSTRUCTION MANUAL
Modeling Light Adjustment
The Modeling Light Adjustment feature is designed to work with the modeling
light on the Phottix Indra Studio Light series. The Indra Modeling Light
1. Press Zoom/modeling light button twice to enter Modeling Light
Adjustment Mode (The Odin Lite will Display DL(Dim Light)).
2. Press the Flash Group Selection Button the group to be adjusted.
3. Turn the Selection dial to adjust the brightness level of the modeling light
of the group. Repeat the operation to adjust other groups. Modeling light
brightness can be set for each group.
5. The Odin Lite will select the current setting after 10 seconds if the
modeling light adjustments are not made.
Please Note:
LCD backlight
Pressing any button on the Odin Lite will turn on the LCD Backlight. It will stay
ON for approximately 10 seconds. If no buttons are pressed, the Backlight will
(
)
triggered simultaneously at the power level selected on the Odin Lite
Adjusting flash zoom
manually.
1. Press the Zoom Button and enter to the Flash Zoom Adjustment Screen.
2. Press Flash Group Button for the group to be adjusted.
3. Turn the Selection dial to adjust the zoom to manual value (20-200).
4. Repeat to adjust the zoom setting for each group.
5. Press Selection button to exit.
Please note:
There is no auto zoom feature. Flash zoom must be adjusted manually, it will
not change as lens focal distance is changed, such as when using a zoom
lens.
maximum zoom of 135mm zoom to 200mm.
The Odin Lite will return to main menu if left idle on in the zoom adjustment
screen for 10 seconds.
This function is not available for studio light such as the Indra series.
Phottix Strato Receiver
Phottix Strato II Multi Receiver
Phottix Mitros+ Transceiver Flash Odin II RX mode (Odin Z OS)
Phottix Indra500 TTL Studio Light Odin II RX mode(Odin Z OS)
Phottix Indra360 TTL Studio Light Odin II RX mode(Odin Z OS)
Phottix Indra500 TTL Studio Light Ares II Mode
Phottix Indra360 TTL Studio Light Ares II Mode
M Control
No
No
Yes
Yes
Yes
No
No
No
Receiver
Odin Lite
Note:
1. The channel and group of Indra, Mitros+, Juno should match that set on
the Odin Lite.
2. The Strato Receiver can be triggered by the Odin Lite on the same
channel. Group settings cannot be used.
mounted on the remote receiver needs to be set in Manual mode.
Any upgrades and full instructions will be announced on the Phottix Blog
(journal.phottix.com).
Custom Functions Menu
The Odin Lite features 3 custom functions. To access:
1. Press the hold the group selection button B and C together for 2 seconds to
enter the custom functions interface.
2. Press Group button C to toggle forward through custom settings, press
Group B button toggle in reverse order.
3. Turn Selection dial to change the custom function setting, and press
Selection
Menu Specifications
ON
OFF
30m or 60m
OFF
1-7
OFF
Turn ON touch tone beep
Turn OFF touch tone beep
Odin Lite enters idle mode automatically
after 30/60 minutes
Odin Lite will not enter idle mode
Select backlight brightness
Turn OFF LCD backlight
Menu Function
Number
FunctionNumber of SettingsSetup instructions
Produktspecifikationer
| Varumärke: | Phottix |
| Kategori: | Fjärrutlösare |
| Modell: | Odin Lite |
Behöver du hjälp?
Om du behöver hjälp med Phottix Odin Lite ställ en fråga nedan och andra användare kommer att svara dig
Fjärrutlösare Phottix Manualer

10 Oktober 2025
10 Oktober 2025
14 Augusti 2024
Fjärrutlösare Manualer
Nyaste Fjärrutlösare Manualer
20 Oktober 2025
16 Oktober 2025
12 Oktober 2025
23 September 2025
17 September 2025
24 Augusti 2025
23 Augusti 2025
23 Augusti 2025
21 Augusti 2025
3 April 2025