Russound WALTX-2 Bruksanvisning
Russound Kontroller WALTX-2
Läs gratis den bruksanvisning för Russound WALTX-2 (12 sidor) i kategorin Kontroller. Guiden har ansetts hjälpsam av 34 personer och har ett genomsnittsbetyg på 5.0 stjärnor baserat på 6 recensioner. Har du en fråga om Russound WALTX-2 eller vill du ställa frågor till andra användare av produkten? Ställ en fråga
Sida 1/12
1 Forbes Rd. Newmarket, NH 03857, USA
Telephone 603.659.5170 • Fax 603.659.5388
e-mail: [email protected]
Come visit us at: www.russound.com
012345678910111213141516
0-1X1X2X2X4X4X4X4X8X8X8X8X8X8X8X8X
11X2X2X4X4X4X4X8X8X8X8X8X8X8X8X
22X4X4X4X4X8X8X8X8X8X8X8X8X
34X4X4X8X8X8X8X8X8X8X8X
44X8X8X8X8X8X8X8X8X
58X8X8X8X8X8X8X
68X8X8X8X8X
78X8X8X
88X
Impedance Matching For 4 Ohm Amplifiers
4 Ohm Pairs
8 Ohm Pairs
012345678
0-1X2X4X4X8X8X8X8X
12X4X4X8X8X8X8X
24X8X8X8X8X
38X8X8X
48X
Impedance Matching For 8 Ohm Amplifiers
8 Ohm Pairs
4 Ohm Pairs
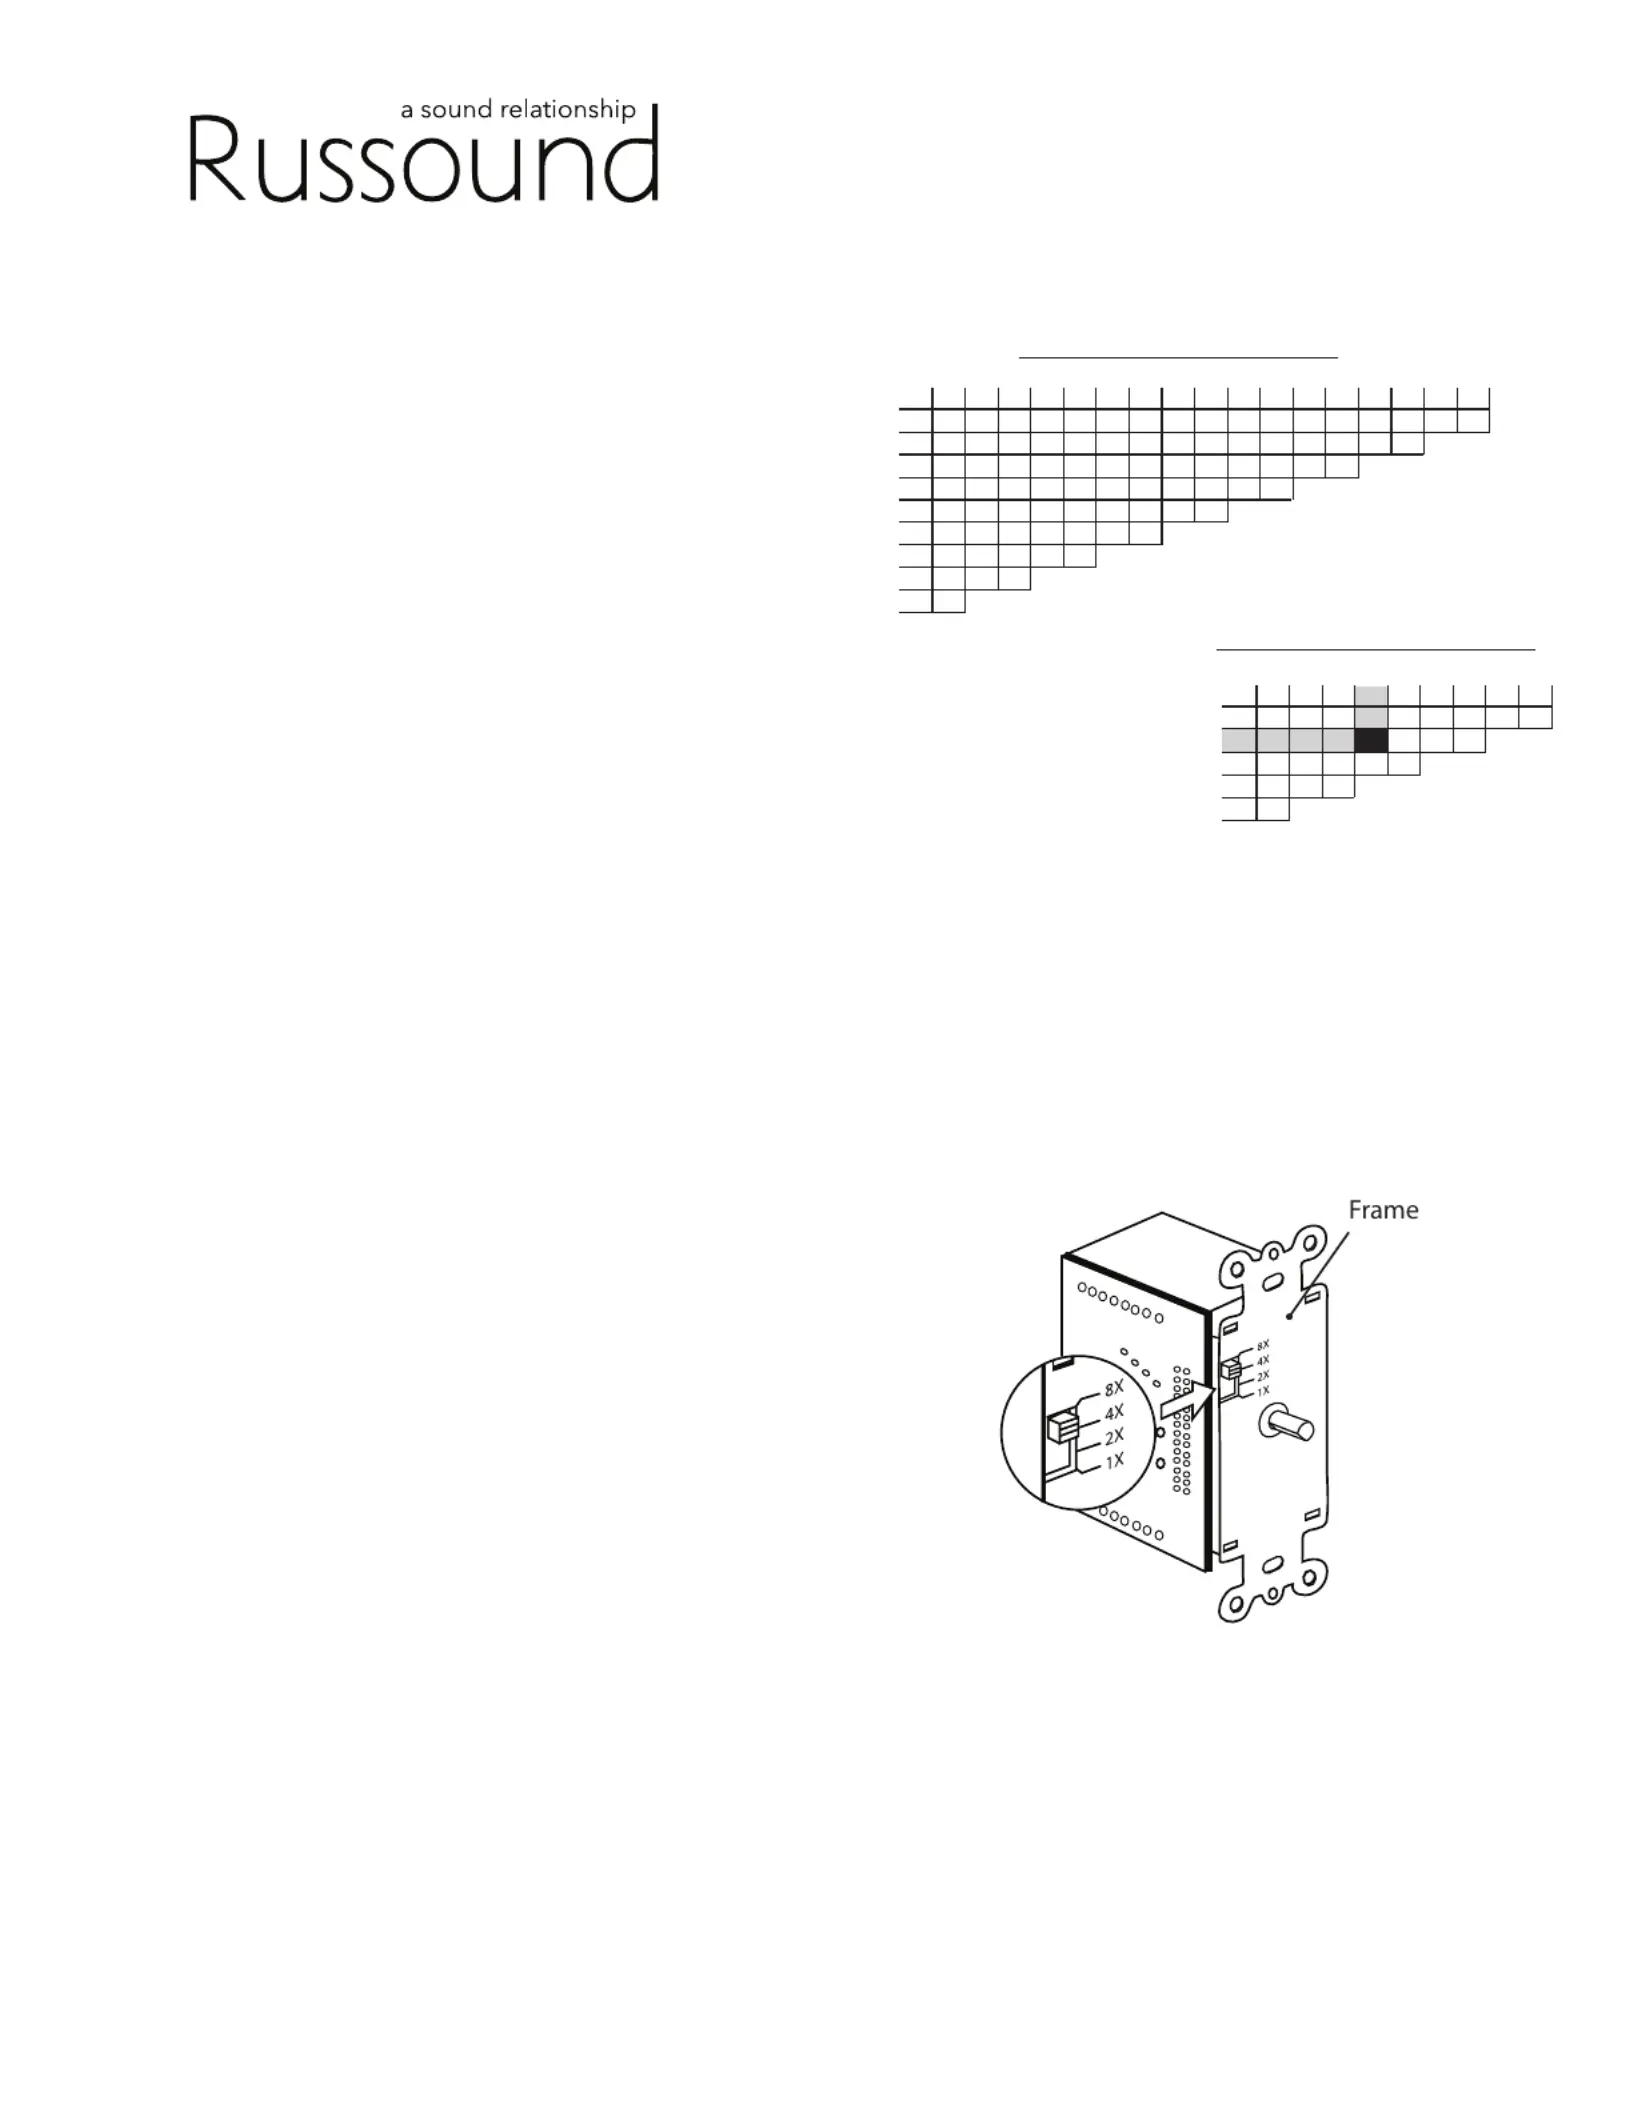
Example: The table to
the right shows an 8-ohm
minimum impedance
amplier with 1 pair of 4-ohm
speakers and 3 pairs of 8-ohm
speakers. The chart indicates
the impedance switch should
be set at 8X.
Figure 1 Impedance Matching Charts for Ultramatch
TM
Considerations
1. Make sure that your amplier has adequate wattage for the number
of speakers. Watts per channel divided by the number of pairs
should equal or exceed the individual speaker’s minimum wattage
requirements.
2. You must use impedance matching volume control for each pair of
speakers.
3. Every impedance switch must be set on the same setting
throughout the system.
4. A minimum speaker load of 4-ohms can be connected to the output
of each volume control.
Once the impedance setting has been determined, set the
impedance switch to the appropriate positions, either 2X, 4X, or
8X, as shown in the diagram below.
WALTx-2 - Weatherproof Volume Control
Instruction Manual:
Product Overview
The WALTx-2 Weatherproof Volume Control is designed to provide volume
control for outdoor or wet locations and can be mounted on an exterior
wall or hard, at surface, as well as directly on a section of 3/4” PVC
conduit. The WALTx-2 provides superior protection against moisture from
rain, splash or sauna.
The WALTx-2 connects between the speaker outputs of an amplier or
receiver and a pair of speakers. The 1X setting allows the volume control
to be used as a standard control. The 2X, 4X, and 8X settings allow it to
be used when more than one pair of speakers is connected to the same
amplier.
The impedance matching of the WALTx-2 volume control provides a
method of matching the minimum output impedance of the amplier
or receiver, in addition to adjusting volume. It eliminates the need for a
speaker selector or impedance matching equipment. The WALTx-2 adjusts
volume level by attenuating the amplier signal output of the WALTx-2 to
the speakers.
All Russound Volume Controls are manufactured using a high-quality
autoformer design which provides long life, excellent frequency response,
no heat build-up, and maximum power transfer from the amplier to the
speakers.
All Russound WALTx-2 volume controls conform to UL Standard 1492 First
Edition, and for Canada Certied to CSA Standard 22.2 No. 1-M94. This
certication assures that your WALTx volume control has been designed
and tested for safety.
Determining the Proper Impedance Switch Settings
The impedance switch must be set in a position that correctly multiplies
the impedance of the system to a level that is equal to or greater than
the impedance of the amplier. The impedance switch settings can be
determined using the following simple steps:
1. Determine the amplier’s minimum impedance. The amplier’s
minimum impedance is usually found following Wattage and
Frequency Response in the amplier’s specication page of the
manual. It may also be listed on the back panel of the amplier near
the speaker terminals. Impedance is measured in ohms.
2. From Fig. 1, identify the correct impedance-matching chart
according to your amplier’s minimum impedance. There are two
impedance matching charts, one for 8-ohm ampliers and one for
4-ohm ampliers. Choose the chart that describes your amplier. If
your amplier is 6-ohm stable, use the 8 ohm chart.
3. Determine the impedance for each pair of speakers connected to
the amplier by referring to its manual.
4. Determine the total number of 4-ohm pairs of speakers. (Rows on
charts)
5. Determine the total number of 8-ohm pairs of speakers. (Columns
on charts)
6. Follow the appropriate row and column to determine the
impedance switch setting.
Produktspecifikationer
| Varumärke: | Russound |
| Kategori: | Kontroller |
| Modell: | WALTX-2 |
Behöver du hjälp?
Om du behöver hjälp med Russound WALTX-2 ställ en fråga nedan och andra användare kommer att svara dig
Kontroller Russound Manualer

21 September 2024
12 September 2024
Kontroller Manualer
Nyaste Kontroller Manualer
2 April 2026
1 April 2026
28 Mars 2026
15 Mars 2026
14 Mars 2026
1 Mars 2026
19 Februari 2026
6 Februari 2026