Smartwares RM380 Bruksanvisning
Smartwares Gasdetektor RM380
Läs gratis den bruksanvisning för Smartwares RM380 (2 sidor) i kategorin Gasdetektor. Guiden har ansetts hjälpsam av 20 personer och har ett genomsnittsbetyg på 4.6 stjärnor baserat på 4 recensioner. Har du en fråga om Smartwares RM380 eller vill du ställa frågor till andra användare av produkten? Ställ en fråga
Sida 1/2
ENDE
BATTERY POWERED CARBON MONOXIDE ALARMTo keep your alarm in a good working order, please follow these simple steps:
Thank you for purchasing the carbon monoxide alarm. Please take a few minutes to 1.Verify the alarm TEST/ALARM LED lights operation by pushing the TEST/ALARM
thoroughly read the user’s guide and familiarize yourself and your family with its operation. button once a week.
And save for future reference.2.Remove the unit from mounting bracket and clean the alarm cover and vents with a
soft brush attachment once a month to remove dust and dirt.
INSTALLATION INSTRUCTIONS3.Never use detergents or other solvents to clean the unit.
WARNING:The alarm should be installed by a competent person4.Avoid spraying air fresheners, hair spray, or other aerosols near the alarm.
Installation Location.5.Do not paint the unit. Paint will seal the vents and interfere with the sensor's ability
When choosing your installation locations, make sure you can hear the alarm from all to detect carbon monoxide. Never attempt to disassemble the unit or clean inside.
sleeping areas. If you install only one carbon monoxide alarm in your home, install the This action will void your warranty.
alarm near bedrooms, not in the basement or furnace room. 6.As soon as possible, place the alarm back in its proper location to assure continuous
protection from carbon monoxide poisoning.
CAUTION:This alarm must be mounted on a ceiling or wall.7.When household cleaning supplies or similar contaminants are used, the area should
Mounting stepbe ventilated.
Please refer to sketch map: page NOTE:
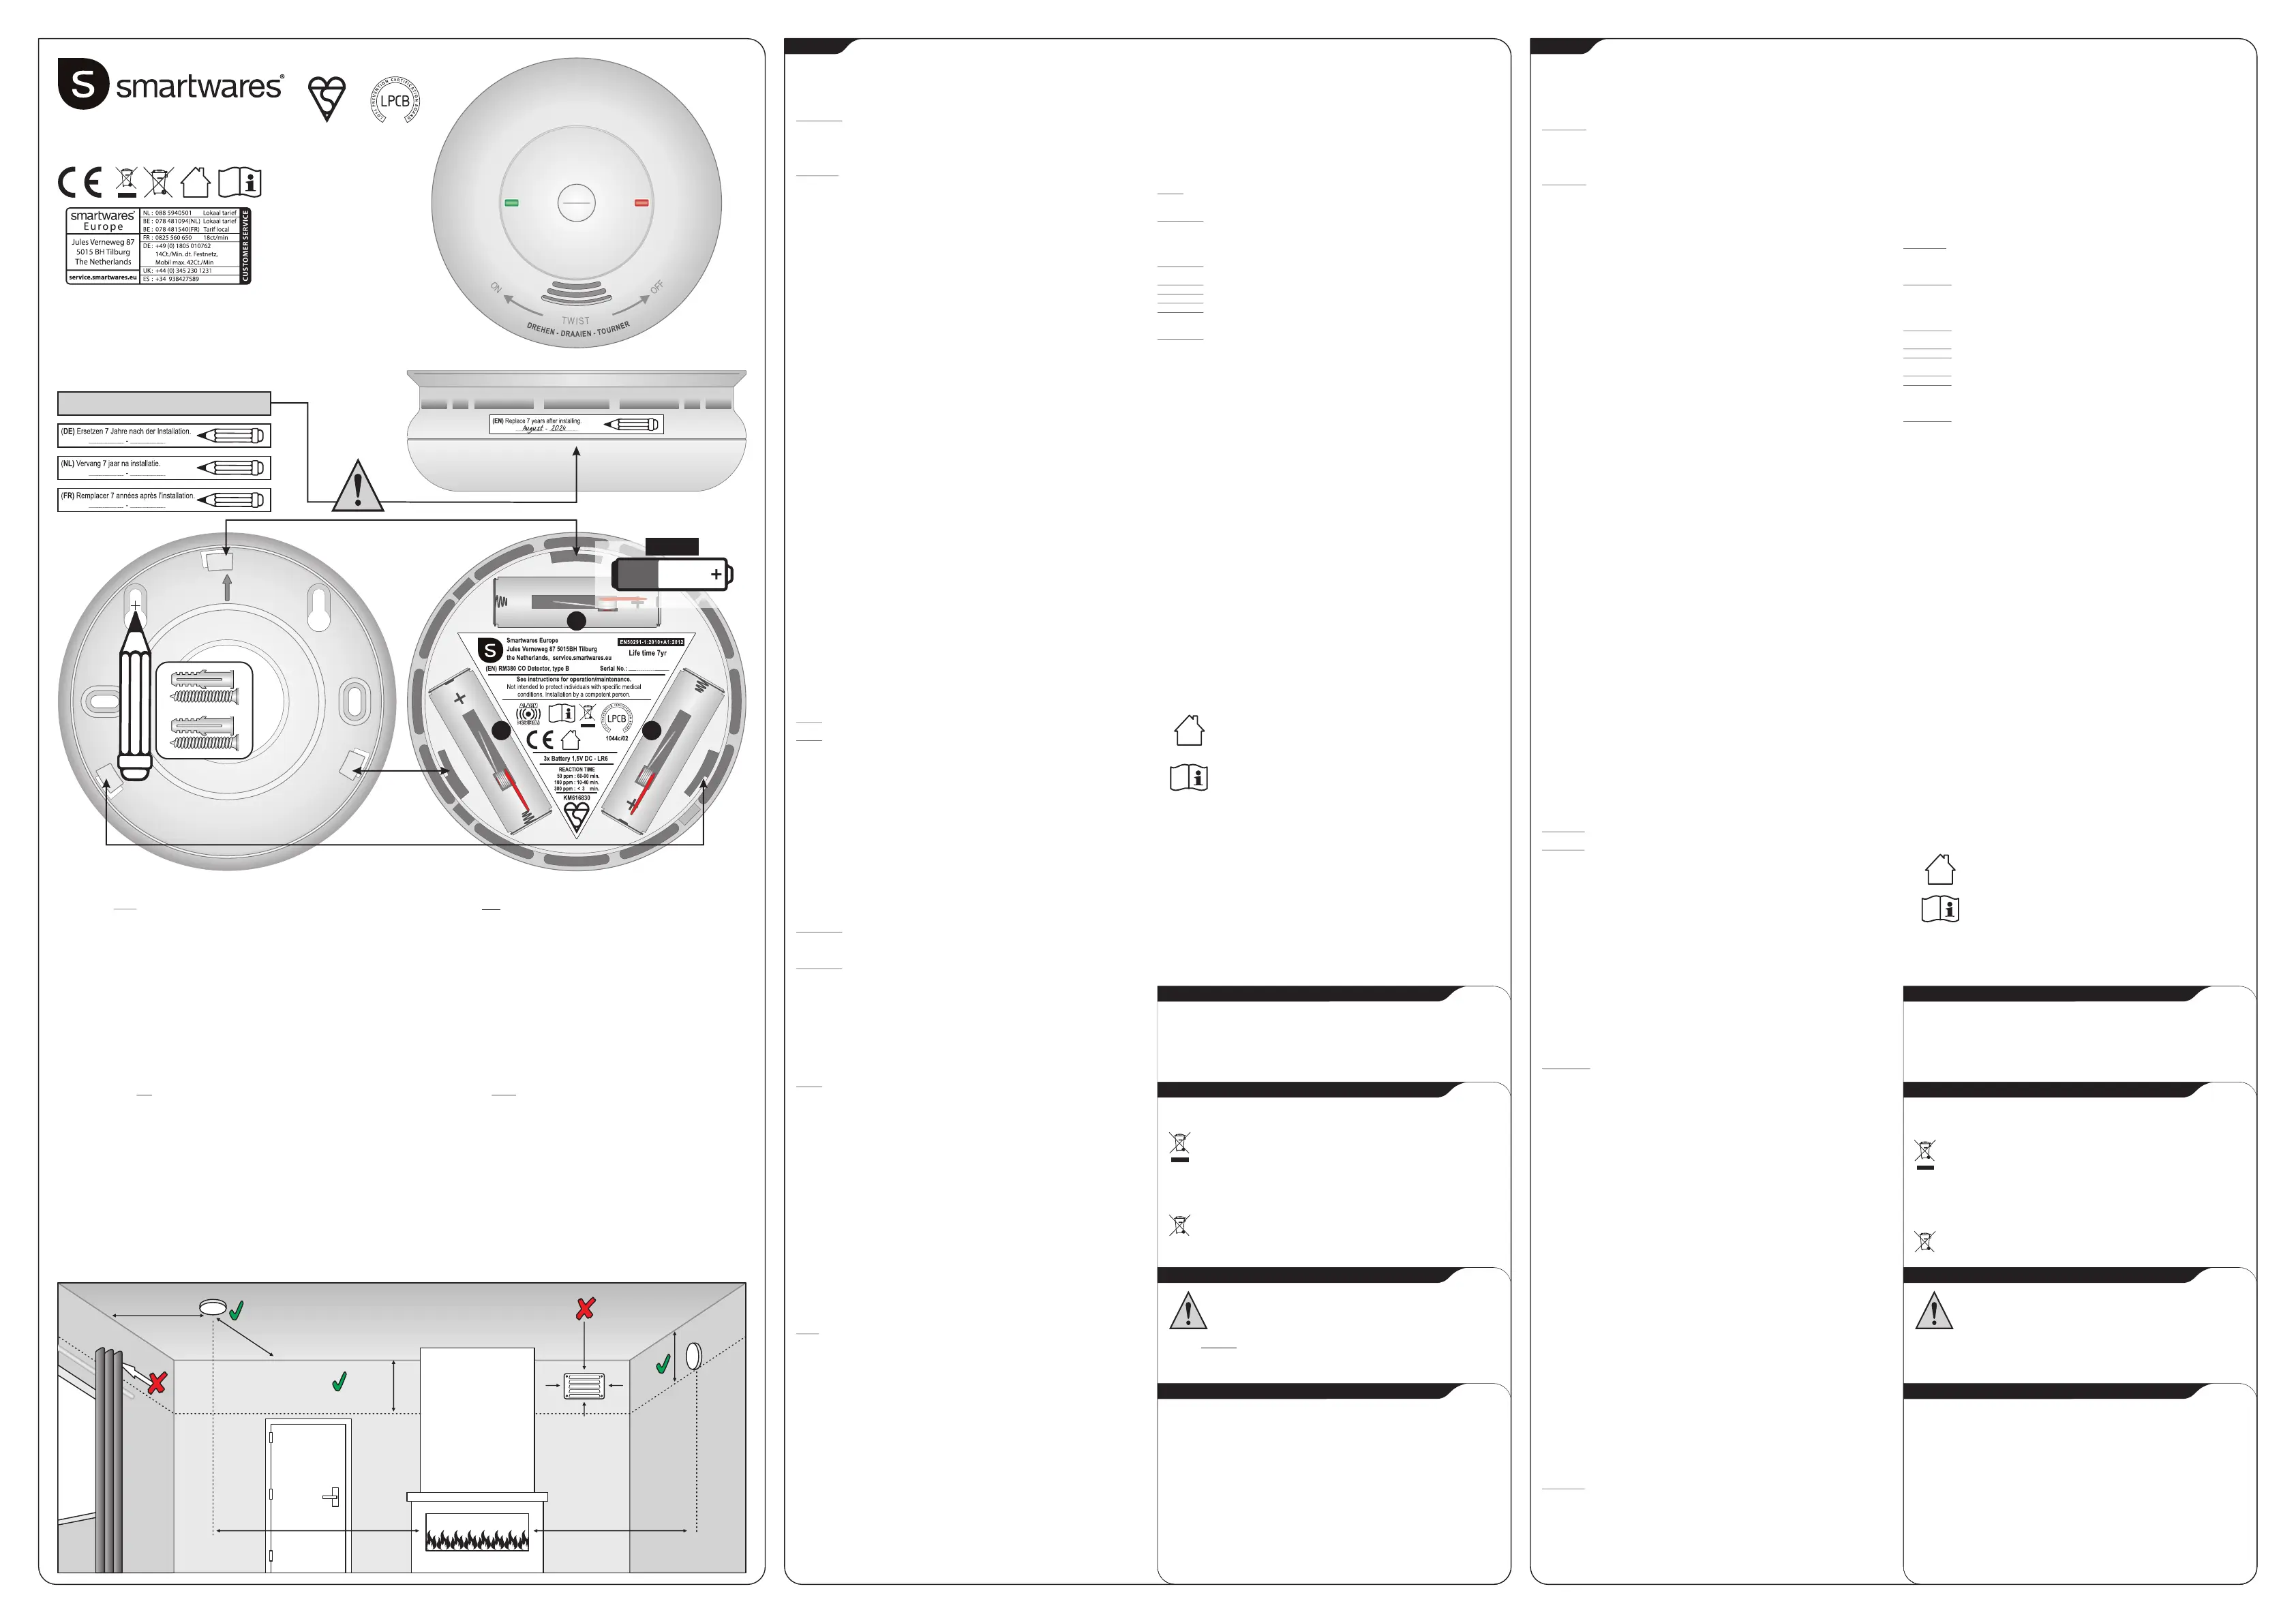
1.Mark the proper location on the wall, according to the two holes of the bracket of alarm.Reinstall immediately after cleaning and then test unit using the TEST/ALARM button.
2.Drill two 5.0mm holes in the ceiling or wall, then insert two plastic plugs into the holes.
3.Attach the bracket to the plastic plugs and fix tightly the screws into the plastic plugs.WARNING:The following substances can affect the sensor and cause false readings:
4.As you install the battery on the unit, maybe it will sound for several minutes, then stop Methane, propane, isobutene, isopropanol, ethylene, benzene, toluene, ethyl
and enter normal operation mode. If it always sounds, please call our agent.acetate, hydrogen sulfide, sulfur dioxides, alcohol based products, paints,
5.Fit the alarm on the bracket and pull it down until matching well on the bracket.thinner, solvents, adhesives hair sprays, after shaves ,perfumes and some
6.After installing or replacing the battery, reinstall your alarm. Test your alarm by using the cleaning agents.
test button and check that the green LED flashing about every 38 seconds after WARNING: Your CO alarm will not be operational and will not monitor for CO levels
preheating 2 minutes.without the battery.
WARNING:It is danger that the alarm is tampered with unduly
RECOMMENDED INSTALLATION LOCATIONSWARNING:The alarm cannot prevent the chronic effects of exposure to CO
The following suggestions are intended to help you with the placement and installation of WARNING: The alarm does not protect individuals from a specific risk
your alarm.WARNING: This apparatus is designed to protect individuals from the acute effects of
1.Place out of the reach for children. Under no circumstance should children be allowed to carbon monoxide exposure. It will not fully safeguard individuals with
handle the alarm.specific medical conditions. if in doubt consult a medical practitioner.
2.Install in a bedroom or hallway located close to the sleeping area. Take special care to WARNING: Installation of apparatus should not be used as s substitute for installation,
verify the alarm can be heard in sleeping areas.use and maintenance of fuel burning appliances including appropriate
3.It is recommended that a alarm be installed on each level of a multilevel home.ventilation and exhaust system.
4.Locate at least 1-3 meters away from all fuel burning appliances.
5. Placing at eye level allows for optimum monitoring of the red and green indicator lights.CARBON MONOXIDE OVERVIEW
6.Insure that all vents of the unit are unobstructed.Carbon monoxide cannot be seen, smelt or tasted but can be fatal. The build up of carbon
7. Do not install in dead air spaces such as peaks of vaulted ceilings or gabled roofs.monoxide in the blood is called the carboxyhemoglobin level and interferes with the body’s
8.Do not install in turbulent air from ceiling fans.ability to supply itself with oxygen. Depending on the concentration of carbon monoxide, it
9.Do not place near fresh air vents or close to doors and windows that open to the outside.can kill in minutes. The most common sources of carbon monoxide are malfunctioning gas
10.Keep the alarm away from excessively dusty, dirty, or greasy areas such as kitchens, appliance used for heating and cooking ,vehicles running in an attached garage, blocked
garages and furnace rooms. Dust, grease and household chemicals can affect the sensor.chimneys or flues, portable fuel burning heaters, fireplaces, fuel powered tools and operating
11.Keep out of damp and humid areas such as the bath room. a grill in an enclosed space. Indications of carbon monoxide poisoning include symptoms
Avoid spraying aerosols near the alarm.similar to the flu, but with no fever. Other symptoms include dizziness, fatigue, weakness,
12.Do not install in areas where the temperature is below 0°C or hotter than 40°C.headache, nausea, vomiting, sleepiness and confusion. Everyone is susceptible to the danger
13.Do not place behind curtains or furniture. Carbon monoxide must be able to reach the of carbon monoxide, but experts agree that unborn babies, small children, pregnant women,
sensor for the unit to accurately detect carbon monoxide.senior citizens and people with heart or respiratory problems are at the highest risk for
serious injury or death, each year a qualified technician should inspect and clean your heating
LED INDICATOR LIGHTsystem, vents, chimney, and flues. The following symptoms are related to CARBON
Power up Preheat Indication:the red TEST/ALARM LED will flash one time per 6 seconds MONOXIDE POISONING and should be discussed with ALL members of the household:
and continue 2 minutes when the alarm is powered up. The CO not will be detected during
preheat.1. Slight Symptom
Normal Indication: If the alarm is running normally, green Power LED will flash one time *Slight headache, nausea, vomiting, fatigue (often described as "Flu-like" symptoms).
about per 38 seconds.2. Medium Symptom
ALARM Indication:If a dangerous level of carbon monoxide is detected, the alarm will *Severe throbbing headache, drowsiness, fast heat rate.
sound 4 times and with a corresponding red TEST/ALARM LED will flash 4 times per 5 3. Serious Symptom
seconds, until carbon monoxide is eliminated. *Unconsciousness, cardio respiratory, failure, death.
Battery fault Indication: If battery failure or low battery is detected, the alarm will chirp
one time and with a corresponding yellow Fault LED flashing one time about per 30 seconds. The above levels of exposure relate to healthy adults. Levels differ for those at high risk.
Sensor fault Indication:If the sensor of alarm is faulty, the alarm will chirp two times and Exposure to high levels of carbon monoxide can be fatal or cause permanent damage and
with a corresponding yellow Fault LED flashing two times about per 30 seconds. disabilities. Many cases of reported carbon monoxide poisoning indicate that while victims
End life Indication: If the alarm chirp once every 30 seconds, with a corresponding green are aware they are not well, they become so disoriented they are unable to save themselves
status and red alarm led flashing, that indicates end of CO alarm life. You need to immediately by either exiting the building, or calling for assistance. Also, young children and household
replace the CO alarm. pets may be the first effected. Familiarization with the effects of each level is important.
TEST/RESET BUTTON*This product is not designed for use in a recreational vehicle or mobile home.
The TEST/RESET button is used to test the unit’s electronics and to hush the unit during *The alarm should be installed by a competent person. This apparatus is
alarm.designed to protect individuals from the acute effects of carbon monoxide
exposure. It will not fully safeguard individuals with specific medical
Test the unitconditions. If in doubt consult a medical practitioner.
To test, press the TEST/RESET button, if the alarm is normal, you will hear unit sound 4 times
and with a corresponding red TEST/ALARM LED flash 4 times. If the alarm is fault, the LED of
the alarm will indicate the fault status. Reference the “LED Indicator Light”.
NOTE:Test the unit weekly! If at any time your unit does not perform as described, :For indoor use only.
please replace it immediately.
NOTE:After the TEST/RESET button is pressed, the alarm sounds and the red
TEST/ALARM LED flashes. This does not indicate that carbon monoxide is present.
Hush the alarm:Read the manual before use, and keep it in a safe
If the alarm is sounding, pressing the TEST/RESET button will stop the alarm for about 5 place for future use and for product maintenance.
minutes. But, during 5 minutes, if the co concentration is more than 200 ppm, it will alarm
immediately.
BATTERY INSTALLATION/REPLACEMENT
One “chirp” pre about 30 seconds is an indication that the battery is low, you must replace the
battery; please see “Battery specifications”. To install or replace the battery in unit, please
perform the following steps:
1Turn the alarm body counterclockwise and take out alarm body;
2. Make the power input connector connected to the new battery (see picture 4);
3. The green Power LED will flash one time every 38 seconds after preheating 2 minutes;
4.Fit alarm body on bracket and turn the alarm body clockwise;
5.Test alarm using TEST/ALARM button. The horn pattern is BI 0.1s - pause 0.1s - BI 0.1s -
pause 0.1s - BI 0.1s - pause 0.1s - BI 0.1s - pause 0.1s, with a corresponding red
TEST/ALARM LED flashing. If it has no this action, indicating the alarm is bad or the
installing operation is wrong, and you should contact us for gaining the correct method of
disposal.
WARNING!Use only the batteries specified. Use different batteries may have detrimental
effects on the alarm.
WHAT TO DO IF THE ALARM SOUNDS
WARNING!Action of this device indicates the presence of dangerous levels of carbon
monoxide! Carbon monoxide can be fatal! If the alarm sounds:
1.Operate the test/hush button.
2.Shut down furnaces and gas supply.
3.Immediately move to fresh air-outdoor or by an open door/window. Do a head count
to check that all persons are accounted for. Do not reenter the premises nor move
away from the open door/window until the emergency services responders arrive, the
premises have been aired out, and your alarm remains its normal condition.
4.After following steps 1-3, if your alarm reactivates within a 24 hour period, repeat
steps 1-3 and call a qualified appliance technician to investigate for sources of carbon
monoxide from fuel burning equipment and appliances and inspect for proper
operation of this equipment, if problems are identified during this inspection, please
have the equipment serviced immediately.
NOTE:Any combustion equipment not inspected by the technician and consult the
manufacturer’s instructions or contact the manufacturer directly for more information
about carbon monoxide safety and this equipment. Make sure that motor vehicles are
not or have not been operating in an attached garage or adjacent to the residence.
SPECIFICATION
POWER:DC 4,5V - 3x 1,5V (LR6 - Lifetime 3 year)
STANDBY CURRENT:<20µA
ALARM CURRENT:<45mA
OPERATION AMBIENT CONDITION:0 ~ 40°C (storage:
:25~85%R.H. (storage
SENSOR TYPE:Electrochemical
APPARATUS LIFE:7 Years
BATTERY SPECIFICATIONS
Goldenpower GL6RA (LR6) - GP GN15A (LR6) operates lifetime 3 year.
ALARM VOLUME
≥85dB at 100cm @3.2±0.5KHz pulsing alarm (The alarm sound pattern: BI 0.1 s - pause
0.1s - BI 0.1s - pause 0.1s - BI 0.1s - pause 0.1s - BI 0.1 pause 5s, with a corresponding
red LED flash, repeat this alarm pattern)
ALARM CONDITIONS (ppm = parts per million/ 1:1000.000)
50ppm-60-90 minutes
100ppm-10-40 minutes
300ppm-Less than 3 minutes
Note:This carbon monoxide alarm is designed to detect carbon monoxide gas from
any source of combustion. It is not designed to detect any other gases.
GENERAL MAINTENANCE
-20°~50°C ± 2°C)
: 0%~70% RH)
BENUTZERHANDBUCH KOHLENMONOXIDMELDERLAUFENDE INSTANDHALTUNG
Danke, dass Sie den Kohlenmonoxidmelder gekauft haben. Bitte nehmen Sie sich die Zeit, Bitte befolgen Sie diese einfachen Schritte, um Ihren Melder in gutem Betriebszustand zu
das Benutzerhandbuch gründlich durchzulesen und sich und Ihre Familie mit dem Gerät halten:
vertraut zu machen. Bitte bewahren Sie das Handbuch auf, um später darin nachschlagen zu 1.Überzeugen Sie sich, dass die TEST/ALARM-LEDs funktionieren, indem Sie einmal pro
können.Woche die TEST/ALARM-Taste drücken.
2.Nehmen Sie das Gerät einmal im Monat vom Montagerahmen, um die Alarmabdeckung
INSTALLATIONund - öffnungen mit einer weichen Bürste zu reinigen, um Staub und Schmutz zu
ACHTUNG:Der Melder sollte von einer fachkundigen Person installiert werdenentfernen.
Montageort3.Verwenden Sie niemals Reinigungs- oder andere Lösungsmittel, um das Gerät zu
Wählen Sie den Montageort so, dass Sie den Alarm an allen Schlafplätzen hören können. reinigen.
Wenn Sie nur einen Kohlenmonoxid-melder in Ihrem Haus installieren, dann montieren 4.Vermeiden Sie es, in der Nähe des Melders Luftauffrischer, Haarspray oder anderes zu
Sie ihn in der Nähe der Schlafzimmer, nicht im Keller oder Heizungsraum.versprühen.
5.Streichen Sie das Gerät nicht an. Durch die Farbe werden die Öffnungen verklebt und
ACHTUNG:Dieser Melder muss an einer Zimmerdecke oder Wand montiert werden.die Fähigkeit des Sensors, Kohlenmonoxid zu erfassen, wird gestört. Versuchen Sie
Montageanleitung niemals, das Gerät auseinanderzubauen oder innen zu reinigen. Dadurch wird Ihre
Bitte ziehen Sie Abbildungen zu RateGarantie ungültig.
1.Markieren Sie mit Hilfe der zwei Löcher im Montagerahmen des Melders die richtige 6.Hängen Sie den Melder so bald wie möglich wieder zurück an seinen Ort, um den
Position an der Wand.Schutz vor Kohlenmonoxid weiterhin zu gewährleisten.
2.Bohren Sie zwei 5,0mm Löcher in die Decke oder Wand und stecken Sie zwei 7.Nach Gebrauch von Haushaltsreinigern oder anderen Schadstoffen sollte der Raum
Kunststoffdübel in die Löcher. gelüftet werden.
3.Halten Sie den Rahmen an die Dübel und drehen Sie die Schrauben fest in HINWEIS:
die Dübel hinein.Nach dem Reinigung sofort wieder installieren und dann das Gerät mit der TEST/ALARM-
4.Es könnte sein, dass das Gerät nach dem Einlegen der Batterie mehrere Minuten lang Taste prüfen.
einen Alarmton aussendet, danach stoppt und in den normalen Betriebsmodus
schaltet. Falls der Alarm nicht aufhört, rufen Sie bitte unseren Vertreter an. WARNUNG: Folgende Substanzen können den Sensor beeinträchtigen und zu falschen
5.Befestigen Sie den Melder am Montagerahmen und ziehen Sie ihn nach unten, Messungen führen: Methan, Propan, Isobutan, Isopropanol, Ethylen, Benzol,
bis er richtig sitzt. Toluol, Ethylazetat, Schwefelwasserstoff, Schwefeldioxid, Produkte auf
6.Nach dem ersten Einlegen bzw. Austausch der Batterie muss der Melder neu Alkoholbasis, Farbe, Verdünner, Lösungsmittel, Klebstoffe, Haarsprays,
installiert werden. Prüfen Sie den Melder mit der Prüftaste und überprüfen Sie, ob die Aftershaves, Parfum und einige Reinigungsmittel.
grüne LED nach einerVorheizzeit von 2 Minuten etwa alle 38 Sekunden blinkt.WARNUNG:Ohne Batterie funktioniert Ihr Kohlenmonoxidmelder nicht und kann den
Kohlenmonoxidgehalt nicht messen.
EMPFOHLENE ORTE FÜR DIE INSTALLATIONWARNUNG: Es ist gefährlich, den Melder zu manipulieren.
Folgende Vorschläge sollen Ihnen bei der Auswahl des Montageortes und der Installation WARNUNG: Der Melder kann die chronischen Effekte einer Belastung durch
Ihres Melders helfen.Kohlenmonoxid nicht verhindern.
1.Außerhalb der Reichweite von Kindern montieren. Kinder sollten auf keinen Fall WARNUNG: Dieser Melder schützt Einzelne nicht vor einem spezifischen Risiko.
Zugang zum Melder haben.WARNUNG: Dieses Gerät ist dazu gemacht, um Einzelne vor den akuten Effekten der
2.Montieren Sie ihn in einem Schlafzimmer oder Flur in der Nähe des Schlafbereiches. Belastung durch Kohlenmonoxid zu schützen. Personen mit bestimmten
Vergewissern Sie sich, dass derAlarm in den Schlafbereichen gehört werden kann. Krankheiten werden vielleicht nicht aus-reichend geschützt; wenden Sie sich
3.Bei einem mehrstöckigen Haus ist es empfehlenswert, auf jeder Etage einen Melder im Zweifelsfall an einen Arzt.
zu montieren. WARNUNG: Dieses Gerät sollte nicht als Ersatz für die Installation, die Verwendung und
4.Mindestens 1-3m entfernt von Geräten mit Rauchentwicklung montieren.Wartung einer geeigneten Be- und Entlüftungsanlage für die
5.Wenn Sie das Gerät auf Augenhöhe montieren, können Sie die roten und grünen Brennstoffanlage verwendet werden.
Kontrollleuchten optimal sehen.
6.Passen Sie auf, dass alle Öffnungen am Gerät frei sind. INFORMATIONEN ZU KOHLENMONOXID
7.Nicht in Totlufträumen montieren, wie in der Spitze von Gewölbedecken oder Giebeln.Kohlenmonoxid kann nicht gesehen, gerochen oder geschmeckt werden, aber es kann tödlich
8.Nicht im Luftwirbel von Deckengebläsen montieren.sein. Die Anreicherung von Kohlenmonoxid im Blut wird Carboxihämoglobin-Level genannt
9.Nicht in der Nähe von Frischlufteinlässen oder nahe an Türen und Fenstern, die nach und stört die Fähigkeit des Körpers, sich mit Sauerstoff zu versorgen. Je nach Konzentration
draußen führen, montieren. des Kohlenmonoxids kann es in Minutenschnelle tödlich sein. Die häufigsten Kohlenmonoxid-
10.Halten Sie das Gerät fern von sehr staubigen, schmutzigen oder fettigen Bereichen, quellen sind defekte Gasgeräte zum Heizen und Kochen, Fahrzeuge, die mit laufendem Motor
wie Küchen, Werkstätten und Heizräumen. Staub, Fett und Haushaltschemikalien in einer Garage stehen, blockierte Kamine oder Rauchabzüge, tragbare, brennstoff-
können den Sensor beeinträchtigen.betriebene Heizgeräte, offene Feuerstellen, treibstoffbetriebene Werkzeuge und Grillen in
11.Nicht in dunstigen und feuchten Bereichen, wie Badezimmern, montieren. Vermeiden geschlossenen Räumen. Anzeichen einer Kohlenmonoxidvergiftung ähneln den Symptomen
Sie es, in der Nähe des Melders mit Spraydosen zu sprühen.einer Grippe, aber ohne Fieber. Zu weiteren Symptomen gehören Schwindel, Müdigkeit,
12.Nicht in Bereichen montieren, wo die Temperatur unter 0°C oder über 40°C beträgt.Schwäche, Kopfschmerzen, Übelkeit, Erbrechen, Schläfrigkeit und Verwirrung. Jeder ist
13.Nicht hinter Vorhängen oder Möbeln montieren. Kohlenmonoxid muss den Sensor durch Kohlenmonoxid gefährdet, jedoch sind sich die Experten einig, dass ungeborene
ungehindert erreichen können, damit das Gerät ordentlich funktionieren kann. Babys, kleine Kinder, schwangere Frauen, Senioren und Menschen mit Herz- oder
Atemproblemen das größte Risiko für ernste Verletzungen oder Todesfälle haben; lassen Sie
LED-KONTROLLLEUCHTEIhr Heizungs-system, Ventile, Kamine und Abzüge jedes Jahr von einem qualifizierten
Kontrollleuchte Einschalten, Vorheizen: die rote TEST/ALARM-LED blinkt 2 Minuten Techniker inspizieren und reinigen.
lang alle 6 Sekunden wenn der Melder eingeschaltet wird. Während des Vorheizens kann
kein Kohlenmonoxid erfasst werden.Folgende Symptome stehen mit KOHLENMONOXID-VERGIFTUNG in Verbindung und
Kontrollleuchte Normalzustand: Während des normalen Betriebs blinkt die grüne sollten ALLEN Mitbewohnern bekannt sein:
Power-LED etwa alle 38 Sekunden einmal.1. Leichte Symptome
Kontrollleuchte ALARM: Wenn eine gefährliche Menge an Kohlenmonoxid erfasst wird, *Leichte Kopfschmerzen, Übelkeit, Erbrechen, Müdigkeit (oft als "grippeähnliche
ertönt der Alarm 4 Mal und die rote TEST/ALARM-LED blinkt entsprechend 4 Mal in 5 Symptome" beschrieben).
Sekunden, bis das Kohlenmonoxid entfernt wurde.2. Mittlere Symptome
Kontrollleuchte Batteriefehler: Bei einem Batteriefehler oder wenn die Batterie *Starke, pochende Kopfschmerzen, Benommenheit, schneller Herzschlag.
schwach ist, zirpt der Alarm einmal und eine gelbe Fehler-LED blinkt entsprechend einmal 3. Ernste Symptome
alle 30 Sekunden.*Bewusstlosigkeit, Herz- und Lungenversagen, Tod.
Kontrollleuchte Sensorfehler: Wenn der Sensor des Melders fehlerhaft ist, zirpt der
Alarm zweimal und eine entsprechende gelbe Fehler LED blinkt zweimal in etwa 30 Obenstehende Belastungswerte gelten für gesunde Erwachsene. Die Werte sind anders für
Sekunden.Personen mit hohem Risiko. Die Belastung durch hohe Kohlenmonoxidwerte kann tödlich sein
Kontrollleuchte Ende der Lebensdauer: Wenn der Alarm Chirp einmal alle 30 oder dauerhafte Schäden und Behinderungen verursachen. In vielen Fällen von
Sekunden mit einer entsprechenden grünen Status und rote Alarm-LED blinkt, das gibt Kohlenmonoxidvergiftung hat es sich gezeigt, dass die Opfer merken, dass es ihnen nicht gut
das Ende der CO-Alarm Leben. Sie müssen die CO-Alarm sofort zu ersetzen.geht, dass sie jedoch so orientierungslos werden, dass sie sich nicht retten können, indem sie
entweder das Gebäude verlassen oder Hilfe anfordern. Kleine Kinder und Haustiere könnten
TEST/RESETzuerst betroffen sein. Es ist wichtig, sich mit den verschiedenen Arten von Symptomen
Die TEST/RESET-Taste wird verwendet, um die Elektronik des Gerätes zu testen und das vertraut zu machen.
Gerät im Alarmfall stumm zu schalten.
Das Gerät testen*Dieses Produkt ist nicht für den Einsatz in einem Wohnmobil oder einem
Drücken Sie zum Prüfen die TEST/RESET-Taste; wenn das Gerät normal funktioniert, Wohnwagen konzipiert.
hören Sie es 4 Mal und Sie sehen die TEST/ALARM-LED entsprechend 4 Mal blinken. Falls *Der Alarm sollte von einer sachkundigen Person installiert werden. Dieses
der Alarm fehlerhaft ist, zeigt die LED dies an. Mehr dazu lesen Sie unter "LED-Gerät wurde entwickelt, um Menschen vor den akuten Wirkungen von
Kontrollleuchte". Kohlenmonoxid-Belastungen zu schützen. Es wird nicht Personen mit
HINWEIS:Testen Sie das Gerät jede Woche! Wenn Ihr Gerät zu irgendeinem Zeitpunkt bestimmten medizinischen Einschränkungen in vollem Umfang absichern. Im
nicht so funktioniert wie beschrieben, ersetzen Sie es bitte sofort. Zweifelsfall konsultieren Sie bitte direkt einen Arzt.
HINWEIS:Wenn die TEST/RESET-Taste gedrückt wird, ertönt der Alarm und die rote
TEST/ALARM-LED blinkt. Dies bedeutet nicht, dass Kohlenmonoxid vorhanden
ist. :Nur für den Hausgebrauch
Den Alarm stumm schalten
Wenn der Alarm ertönt und Sie die TEST/RESET-Taste drücken, stoppt der Alarm etwa 5
Minuten lang. Wenn die Kohlenmonoxidkonzentration während der 5 Minuten höher als 200
ppm ist, geht der Alarm sofort wieder an.:Lesen Sie das Handbuch vor der Verwendung und
bewahren Sie es an einem sicher Ort für zukünftige
EINLEGEN/AUSTAUSCH DER BATTERIEVerwendung und zur Produktwartung auf.
Ein "Zirpen" alle 30 Sekunden ist ein Zeichen, dass die Batterie schwach ist und ausgetauscht
werden muss, siehe "Batteriespezifikation". Bitte führen Sie folgende Schritte durch, um eine
Batterie einzulegen bzw. auszutauschen:
1.Drehen Sie den Hauptteil des Melders gegen den Uhrzeigersinn und
nehmen Sie ihn ab.
2.Schließen Sie die neue Batterie an den Anschluss für die Leistungsaufnahme an
(s. Abb. 4).
3.Nach dem zwei minütigen Vorheizen blinkt die grüne Power-LED einmal
alle 38 Sekunden.
4.Setzen Sie den Hauptteil des Melders auf den Rahmen und drehen
Sie ihn im Uhrzeigersinn.
5.Prüfen Sie den Melder mit der TEST/ALARM-Taste. Das Alarmmuster ist BI 0,1Sek -
Pause 0,1 Sek - BI 0,1 Sek - Pause 0,1 Sek - BI 0,1 Sek - Pause 0,1 Sek - BI 0,1 Sek -
Pause 0,1 Sek, wobei die rote TEST/ALARM-LED entsprechend blinkt. Falls dies nicht so
ist, bedeutet das, dass der Melder fehlerhaft ist oder falsch installiert wurde.
WARNUNG!Verwenden Sie nur die angegebenen Batterien. Die Verwendung anderer
Batterien kann eine schädliche Wirkung auf den Melder haben.
VERHALTEN IM ALARMFALL
WARNUNG! -Der Alarm dieses Gerätes bedeutet, dass gefährliche Mengen an
Kohlenmonoxid vorhanden sind! Kohlenmonoxid kann tödlich sein! Wenn der Alarm
ertönt:
1.Betätigen Sie die Prüf-/Stummtaste.
2.Schalten Sie Heizofen und Gaszufuhr aus.
3.Gehen Sie sofort an die frische Luft, entweder nach draußen oder an ein offenes
Fenster. Zählen Sie die anwesenden Personen um zu überprüfen, ob alle in Sicherheit
sind. Betreten Sie das Gebäude nicht mehr, bzw. bewegen Sie sich nicht vom offenen
Fenster/der offenen Tür weg bis der Notdienst da ist, das Gebäude gelüftet wurde und
der Melder keinen Alarm mehr gibt.
4.Wenn Sie Schritte 1-3 durchgeführt haben und Ihr Alarm innerhalb von 24 Stunden
wieder losgeht, wiederholen Sie Schritte 1-3 und lassen Sie Fachleute die
Brennstoffanlagen und geräte auf Kohlenmonoxidquellen untersuchen und den
richtigen Betrieb dieser Geräte sicherstellen; falls dabei Probleme gefunden werden,
lassen Sie diese bitte sofort beheben. Bei Verbrennungsanlagen, die nicht vom
Techniker inspiziert wurden, lesen Sie sich bitte die Bedienungsanleitung durch oder
wenden Sie sich direkt an den Hersteller, um mehr über den Kohlenmonoxidschutz bei
diesem Gerät herauszufinden. Stellen Sie sicher, dass Motorfahrzeuge nicht in einer
angrenzenden Garage oder neben dem Wohnhaus betrieben werden oder wurden.
TECHNISCHE DATEN
STROMVERSORGUNG:DC 4,5V - 3x 1,5V (LR6 - Lebensdauer 3 Jahr)
RUHESTROM:<20µA
ALARMSTROM:<40mA
UMGEBUNGSBEDINGUNGEN BETRIEB:0 ~ 40°C (lagerung: -20°~50°C ± 2°C)
:25~85%R.H. (lagerung: 0%~70% RH)
SENSORTYP:Elektrochemisch
LEBENSDAUER:7 Jahre
BATTERIE-SPEZIFIKATIONEN
Goldenpower GL6RA (LR6) - GP GN15A (LR6) Lebenszeit 3 Jahr.
ALARMLAUTSTÄRKE
≥85dB bei 100cm bei 3,2±0,5 KHz pulsierender Alarmton (Das Alarmmuster: BI 0,1 Sek –
Pause 0,1Sek – BI 0,1Sek – Pause 0,1Sek – BI 0,1Sek –Pause 0,1Sek – BI 0,1Sek –
Pause 5Sek, mit einer entsprechend blinkenden roten LED, Alarmmuster wird wiederholt)
ALARMBEDINGUNGEN (ppm = Teile je Million / 1: 1000.000)
50ppm-60-90 Minuten Reaktionszeit
100ppm-10-40 Minuten Reaktionszeit
300ppm-Weniger als 3 Minuten Reaktionszeit
HINWEIS:Dieser Kohlenmonoxidmelder ist dazu ausgelegt, Kohlenmonoxidgas aus
einer beliebigen Verbrennungsquelle zu erfassen. Er kann keine anderen Gase erfassen.
This product has factory warranty according to EU regulations. Guarantee lasts for the number
of years shown on the packaging, starting from the date of purchase. Keep the receipt - proof
of purchase is required in order to rely on guarantee. In the case of problems, please contact
with the store where you purchased the product. For further product information call to our
Hotline or visit our website: service.smartwares.eu
Dieses Produkt hat eine Werksgarantie nach der EU-Richtlinien. Die Garantie entnehmen Sie auf
der Verpackung. Diese gilt ab dem Datum des Kaufs (Kaufbeleg ist zwingend erforderlich).
Bewahren Sie die Quittung – Kaufbeleg gut auf. Im Falle von Problemen, wenden Sie sich bitte an
den Markt, wo Sie das Produkt gekauft haben. Für weitere Produktinformationen kontaktieren Sie
unsere Hotline oder besuchen Sie unsere Website: service.smartwares.eu
EN PRODUCT GUARANTEEDE PRODUKTGARANTIE
DISPOSALENTSORGUNG
Correct Disposal of This Product (Waste Electrical & Electronic Equipment) (Applicable
in the European Union and other European countries with separate collection systems)
This marking shown on the product or its literature, indicates that it should not be
disposed with other household wastes at the end of its working life. To prevent possible
harm to the environment or human health from uncontrolled waste disposal, please
separate this from other types of wastes and recycle it responsibly to promote the
sustainable reuse of material resources.Household users should contact either the retailer where
they purchased this product, or their local government office, for details of where and how they can
take this item for environmentally safe recycling. Business users should contact their supplier and
check the terms and conditions of the purchase contract. This product should not be mixed with
other commercial wastes for disposal.
* Always throw empty batteries to the battery recycling bin.
* If the battery is built-in inside the product, open the product and
remove the battery.
Korrekte Entsorgung dieses Produkts (Elektromüll) (Anzuwenden in den Ländern der
Europäischen Union und anderen euroäischen Ländern mit einem separaten
Sammelsystem)
Die Kennzeichnung auf dem Produkt bzw. auf der dazugehörigen Literatur gibt an, dass
es nach seiner Lebensdauer nicht zusammen mit dem normalen Haushaltsmüll entsorgt
werden darf. Entsorgen Sie dieses Gerät bitte getrennt von anderen Abfällen, um der
Umwelt bzw. Der menschlichen Gesundheit nicht durch unkontrollierte Müllbeseitigung zu
schaden. Recyceln Sie das Gerät, um die nachhaltige Wiederverwertung von stofflichen
Ressourcen zu fördern.Private Nutzer sollten den Händler, bei dem das Produkt gekauft wurde,
oder die zuständigen Behörden kontaktieren, um in Erfahrung zu bringen, wie sie das Gerät auf
umweltfreundliche Weise recyceln können.Gewerbliche Nutzer sollten sich an Ihren Lieferanten
wenden und die Bedingungen des Verkaufsvertrags konsultieren. Dieses Produkt darf nicht
zusammen mit anderem Gewerbemüll entsorgt werden.
*Werfen Sie leere Batterien immer in die Batterie-Recycling Behälter.
*Wenn die Batterie ist eingebaut in das Gerät, öffnen Sie das Gerät um
den Batterie zu entfernen.
MAINTENANCEWARTUNG
The devices are maintenance-free, so never open them. The guarantee
becomes void when you open the appliance.Only clean the outside of the devices with
a soft, dry cloth or a brush. Prior to cleaning, remove the devices from all voltage
sources. Do not use any carboxylic cleaning agents or petrol, alcohol or similar. These
attack the surfaces of the devices. Besides, the vapors are hazardous to your health
and explosive. Do not use any sharp edged tools, screw drivers, metal brushes or similar for
cleaning. Warning:Protect the battery against fire, too much heat and sunshine
Die Geräte sind wartungsfrei, also öffnen Sie sie bitte nicht. Garantie verfällt, wenn
Sie die Geräte öffnen. Reinigen Sie die Geräte außen mit einem weichen und
trockenen Tuch oder einer Bürste. Vor dem Reinigen ziehen Sie bitte alle Strom
zuführungen ab. Verwenden Sie keine Reinigungsmittel, die Carbonsäure, Benzin,
Alkohol oder ähnliches enthalten. Diese Mittel greifen die Oberfläche der Geräte an
und die Ausdünstungen sind gesundheitsschädlich und explosiv. Verwenden Sie keine
scharfkantigen Werkzeuge, Schraubenzieher, Drahtbürsten oder ähnliches, um die Geräte zu
reinigen. Warnung: Schützt den Batterie vor Feuer, zu viel Wärme und Sonnensche.
*Make sure that all electric connections and connection cables meet the pertaining regulations
and are in conformity with the operating instructions.
*Do not overload electrical outlets or extension cords, fire or electric shocks can be the result
*Please contact an expert in case you have any doubts about the mode of operation, the
safety or connecting the appliances.
*Keep all parts away from young children’s reach
*Do not store this item on wet, very cold or warm places, this can damage the electronic
circuit boards.
*Avoid dropping or shocks, this can damage the electronic boards
*Never replace damaged power cables yourself! In such a case, remove them from the net
and take the devices to a workshop.
*Repairs or opening of this item may only be performed by an authorised workshop.
*Wireless systems are subject to interference from cordless phones, microwaves, and other
wireless devices operating in the 2.4GHz range. Keep the system AT LEAST 10 ft away from
the devices during installation and operation.
* Keep batteries out of the reach of children. Batteries not swallow. If a cell or battery is
swallowed, call a physician immediately.
*Reinigen mittels eines trockenen sauberen Tuches oder einer Bürste. Verwenden Sie
keine Scheuer- oder Lösungsmittel. Vermeiden Sie ein Feuchtwerden aller
elektrischen Teile.
* Bewahren Sie alle Teile außerhalb der Reichweite von Kindern.
* Vermeiden Sie einen nassen, kalten oder warmen Umgebung; dies kann die
elektronischen Schaltkreise beschädigen.
* Vermeiden Sie Fallenlassen oder Erschütterungen ausgesetzt, kann dies die
elektronischen Schaltkreise beschädigen.
* Reparaturen oder Öffnung von diesem Artikel darf nur von einer zugelassenen
Werkstatt durchgeführt werden.
* Wireless-Systeme können Störungen durch schnurlose Telefone, Mikrowellen und
andere drahtlose Geräte, die im 2,4-GHz-Bereich liegen. Halten Sie das System
mindestens 3 m entfernt von den Geräten während der Installation und Bedienung.
* Halten Sie die Batterien außerhalb der Reichweite von Kindern. Batterien nicht schlucken.
Wenn eine Zelle oder Batterie verschluckt, sofort einen Arzt rufen.
SAFETYALLGEMEINE SICHERHEIT
Conform with EN50291-1:2010+A1:2012
RM380
KM6168301044c/02
EN Carbon monoxide detector / Manual
DECLARATION OF PERFORMANCE - DoP
service.smartwares.eu/dop and follow the instructions.
DE Kohlenmonoxid Melder / Gebrauchsanweisung
LEISTUNGSERKLÄRUNG - DoP
service.smartwares.eu/dop und folgen Sie den Anweisungen.
1
2
3
AA
3x 1,5V
STATUS
T
O
P
A
N
I
N
O
T
D
ALARM
TEST
RESET
er -
K
l
d
o
e
o
m
l
m
d
o
i
x
n
o
o
n
x
i
o
d
e
m
n
d
e
e
l
t
h
e
o
c
t
K
o
-
r
r
-
o
D
t
c
é
e
t
t
e
e
c
d
t
e
e
u
d
r
i
d
x
e
o
n
m
o
o
m
n
o
n
x
o
y
b
d
r
a
e
C
d
-
e
0
c
8
a
3
r
b
M
o
R
n
e
N
I
E
T
V
E
G
R
I
N
V
I
Z
E
U
N
H
-
E
N
B
E
-
P
N
A
E
S
L
P
A
E
M
I
N
T
D
H
R
C
I
E
N
ENAdvice mounting location monoxide detectors
In a room WITH a gas appliance (potential source)
Ceiling mounting
* On a horizontal distance of between 1 and 3 m from the CO-source.
* Centrally in the space.
* At least 30 centimeters away from surrounding walls.
* Do not mount next to air inlets or air outlets or other objects on the ceiling.
Wall
* Mounting between 15 and 80 centimeters from the ceiling, but higher than the
top of existing doors and windows.
* On a horizontal distance of between 1 and 3 m from the CO-source.
* Do not mount next air inlets or air outlets.
*Do not mount behind objects such as curtains and cabinets.
More information mounting locations: service.smartwares.eu
DE Hinweise Montageort Monoxiddetektoren
FR Détecteurs de monoxyde de position
In einem Raum MIT einem Gasgerät (potentielle Quelle)
Dans une pièce AVEC un appareil à gaz (source potentielle)
Decke Montage
Position plafond
* In einem horizontalen Abstand zwischen 1 und 3 m von der CO-Quelle.
* Sur une distance horizontale entre 1 et 3 m de la source de CO.
* Zentral im Raum.
* Centralement dans l'espace.
* Mindestens 30 Zentimeter von den umliegenden Wänden entfernt.
* À au moins 30 centimètres des murs environnants.
* Nicht neben Lufteinlässen oder Luftauslässen oder anderen Gegenständen an
* Ne pas monter à côté d'entrées d'air ou de sorties d'air ou d'autres
der Decke montieren.
objets sur le plafond.
Mauer Montage
Position mur
* Montage zwischen 15 und 80 Zentimeter von der Decke, aber höher als die
* Montage entre 15 et 80 centimètres du plafond, mais plus élevé que le haut
Oberseite der vorhandenen Türen und Fenster.
des portes et fenêtres existantes.
* In einem horizontalen Abstand zwischen 1 und 3 m von der CO-Quelle.
* Sur une distance horizontale entre 1 et 3 m de la source de CO.
* Installieren Sie das Gerät nicht neben Lufteinlässe oder Luftauslässe.
* Ne pas monter les entrées d'air ou les sorties d'air suivantes.
* Montieren Sie das Gerät nicht hinter Gardinen und Schränke.
* Ne pas monter derrière des objets tels que des rideaux et des armoires.
Plus d'informations emplacements de montage: service.smartwares.eu
NLAdvies montage locatie koolmonoxidemelders
In een ruimte MET een gastoestel (mogelijke CO-bron)
Plafondmontage
* Op een horizontale afstand tussen 1 en 3 meter van de CO-bron.
* Centraal in de ruimte.
* Op minimaal 30 centimeter van omliggende muren.
* Niet monteren naast luchtinlaten of luchtuitlaten of andere objecten.
mountingMuurmontage
* Montage tussen 15 en 80 centimeter van het plafond, maar wel hoger dan de
bovenzijde van aanwezige deuren en ramen.
* Op een horizontale afstand tussen 1 en 3 meter van de CO-bron.
* Niet monteren naast luchtinlaten of luchtuitlaten.
* Niet monteren achter objecten zoals gordijnen en kasten.
Meer info montage locaties: service.smartwares.eu
Mehr Informationen Montagestellen: service.smartwares.eu
NL Koolmonoxide detector / Gebruiksaanwijzing
VERKLARING VAN PRESTATIES - DoP
service.smartwares.eu/dop en volg de aanwijzingen.
FR Détecteur de monoxyde de carbone / Mode d’emploi
DECLARATION DE PERFORMANCE - DoP
service.smartwares.eu/dop et suivez les instructions.
POTENTIAL SOURCE
POTENTIELLE QUELLE
MOGELIJKE BRON
SOURCE POTENTIELLE
>30 cm
15-80 cm
15-80 cm
1-3 m1-3 m
>30 cm
ALWAYS ABOVE DOORS/WINDOWS
IMMER OBEN TÜREN / FENSTER
ALTIJD BOVEN DEUREN / RAMEN
TOUJOURS AU-DESSUS DES PORTES / FENÊTRES
Produktspecifikationer
| Varumärke: | Smartwares |
| Kategori: | Gasdetektor |
| Modell: | RM380 |
| Typ av operation: | Draaiknop |
| Färg på produkten: | Zilver |
| Höjd: | 38 mm |
| Snäll: | Ventilator elektrisch verwarmingstoestel |
| Diameter: | 107 mm |
| Indikator ljus: | Ja |
| Justerbar termostat: | Ja |
| Certifiering: | CE, GS, Green Dot, WEEE |
| Hållbarhetscertifikat: | RoHS |
| Överhettningsskydd: | Ja |
| Detektortyp: | Kolmonoxiddetektor |
| AC-ingångsspänning: | 230 V |
| AC-ingångsfrekvens: | 50 Hz |
| Pausfunktion: | Ja |
| Värmekraft: | 2200 W |
| Placeringsalternativ: | Floor, Table |
| Värmeeffekt (min): | - W |
| Batteriets livslängd: | 3 År |
| Produktens livslängd: | 7 År |
| Antal batterier: | 3 |
| Produktens färg: | Vit |
| Monteringssats: | Ja |
| Temperatur vid drift: | 0 - 40 ° C |
| Intervall för relativ operativ luftfuktighet: | 25 - 85 % |
| Material, hölje: | ABS |
| Anslutningsteknologi: | Trådlös |
| Batterier medföljer: | Ja |
| Strömkälla: | Batteri |
| Bästa användningsområden: | Home, Office |
| Kompatibla batteristorlekar: | 6LR61 |
| Lätt larm: | Ja |
Behöver du hjälp?
Om du behöver hjälp med Smartwares RM380 ställ en fråga nedan och andra användare kommer att svara dig
Gasdetektor Smartwares Manualer

16 Augusti 2024
7 Augusti 2024
4 Augusti 2024
3 Augusti 2024
2 Augusti 2024
Gasdetektor Manualer
Nyaste Gasdetektor Manualer
1 April 2025
27 Mars 2025
29 December 2024
28 December 2024
22 December 2024
16 December 2024
12 December 2024
25 Oktober 2024
22 Oktober 2024
26 September 2024