Trevi ME 3106 Bruksanvisning
Trevi
Väderstation
ME 3106
Läs gratis den bruksanvisning för Trevi ME 3106 (8 sidor) i kategorin Väderstation. Guiden har ansetts hjälpsam av 19 personer och har ett genomsnittsbetyg på 4.5 stjärnor baserat på 10 recensioner. Har du en fråga om Trevi ME 3106 eller vill du ställa frågor till andra användare av produkten? Ställ en fråga
Sida 1/8

ME 3106
.1
.4
.2
.7 .8 .9 .10 .12.11
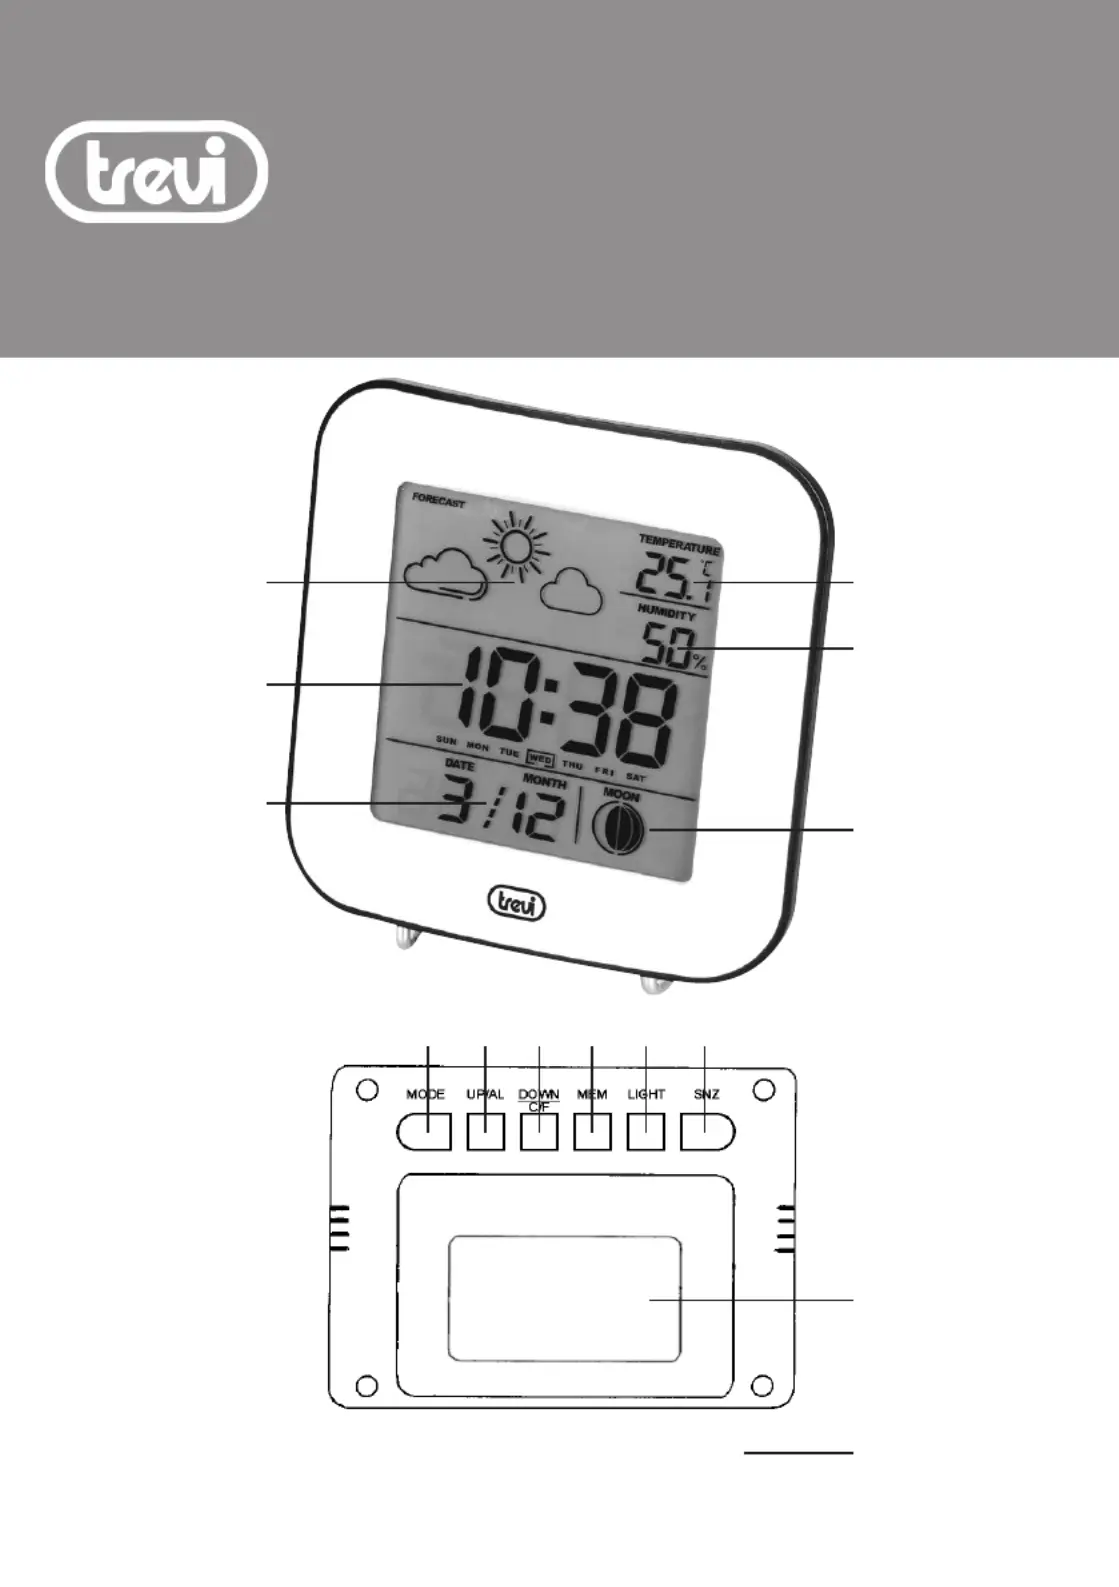
SVEGLIA / METEOSTATION
Manuale d’uso
ALARM CLOCK / METEO STATION
Istruction manual
RÉVEIL / STATION MÉTÉO
Manual d’emploi
WECKER / WETTERSTATION
Anleitungsheft
DESPERTADOR ESTACIÓN METEO
Manual de instrucciones para el uso y la conexion
10:38
.3
.5
6
.13
.14

2
ME 3106
AVVERTENZE E NOTE D’USO
- Nessunasorgentediammanuda,qualicandeleaccese,
dovrebbe essere posta sull’apparecchio.
- L’apparecchio non deve essere esposto a stillicidio o a spruzzi
d’acquaenessunoggettopienodiliquido,qualivasi,deve
essere posto sull’apparecchio.
- Istruire al corretto utilizzo bambini e persone con scarse
conoscenze del prodotto.
- Conservare il presente manuale per futuri riferimenti.
DESCRIZIONE COMANDI
1. Icone simboli metereologici
2. Temperatura
3. Orologio
4. Umidità interna
5. Datario
6. Fase lunare
7. TastoMODE,impostazionedatarioeorologio/visualizzazione
orario e allarme
8. TastoUP/AL,tastosu/attivazioneallarme
9. TastoDOWN/C/F,tastogiù/cambiotemperatura°C/°F
10.TastoMEM,visualizzazionevalorimassimieminimirilevatidi
temperatura e umidità
11. TastoLIGHT,attivazioneretroilluminazione
12.TastoSNZ,disattivazionetemporaneaallarme
13. Vano batterie 2xAAA (non incluse)
14. Simbolo allarme
ALIMENTAZIONE
Aprire il vano batterie (13) posto sul retro dell’apparecchio ed
inserire due pile formato “AAA” rispettando le polarità indicate.
REGOLAZIONE DELL’OROLOGIO
1. Tenere premuto il tasto MODE (7) per avviare la regolazione
dell’orologio.
2. Impostarelavisualizzazionedell’orarioin12/24oretramitei
tasti UP (8) o DOWN (9).
3. PremereiltastoMODE(7),suldisplaycominceràalampeggiare
l’ora.
4. Impostare l’ora tramite i tasti UP (8) o DOWN (9).
5. PremereiltastoMODE(7),suldisplaycomincerannoalam-
peggiare i minuti.
6. Impostare i minuti tramite i tasti UP (8) o DOWN (9).
7. PremereiltastoMODE(7),suldisplaycominceràalampeggiare
l’anno.
8. Impostare l’anno tramite i tasti UP (8) o DOWN (9).
9. PremereiltastoMODE(7),suldisplaycominceràalampeggiare
il mese.
10. Impostare il mese tramite i tasti UP (8) o DOWN (9).
11.PremereiltastoMODE(7),suldisplaycominceràalampeggiare
il giorno.
12. Impostare il giorno tramite i tasti UP (8) o DOWN (9).
13. Premere il tasto MODE (7) per confermare e terminare la
regolazione dell’orologio.
REGOLAZIONE E ATTIVAZIONE ALLARME
1. PremereiltastoMODE(7)peraccedereallafunzioneallarme,
riconoscibile dalla comparsa del simbolo della campana sulla
destra del display
(14).
2. Tenere premuto il tasto MODE (7) per avviare la regolazione
dell’allarme.
3. Impostare l’ora tramite i tasti UP (8) o DOWN (9).
4. PremereiltastoMODE(7),suldisplaycomincerannoalam-
peggiare i minuti.
5. Impostare i minuti tramite i tasti UP (8) o DOWN (9).
6. Premere il tasto MODE (7) per confermare e terminare la
regolazione dell’allarme.
7. Automaticamente si attiverà l’allarme e verrà visualizzato
l’orologio.
8. All’ora stabilita l’allarme si attiverà. Per disattivare tempora-
neamentel’allarme,premereiltastoSNZ(12).L’allarme si
riattiverà automaticamente dopo 5 minuti.
9. Perdisattivarel’allarmeoccorrepremereiltastoUP/AL(8)
noallascomparsadelsimbolodell’allarme
(14).
PREVISIONI METEREOLOGICHE
Il barometro digitale rileva automaticamente le variazioni di
pressione atmosferica visualizzando di conseguenza il simbolo
diprevisionemetereologica(1).Taleprevisioneriguardale12/24
ore successive.
Peresempio:seilbarometrorilevaun’altapressione,suldisplay
appariràilsimbolodelsole,maesternamentepotrebbepiovere.
Note:
I simboli di previsione metereologica possono non riettere le attuali con-
dizioni del tempo. Essi si riferiscono esclusivamente a condizioni future.
Le previsioni possono non essere sicure al 100% a causa di vari fattori.
Il costruttore non è responsabile di eventuali danni o situazioni causati da
una previsione errata.
TEMPERATURA E UMIDITÀ
Ilvaloreditemperaturasitrovainaltoadestradeldisplay,mentre
il valore dell’umidità è indicato sotto la temperatura.
I valori si aggiornano automaticamente ogni 30 secondi.
1. PremereiltastoC/F(9)perselezionarel’unitàdimisuradella
temperaturain°Co°F.
2. Premere ripetutamente il tasto MEM (10) per visualizzare i
valori massimi e minini rilevati di temperatura e umidità.
3. Portarsi sul valore massimo o minimo e tenere premuto il tasto
MEM (10) per resettare il valore massimo o minino rilevati di
temperatura e umidità.
FASE LUNARE
Vienemostratoilciclolunareinquattrofasi(6).
DATI TECNICI
Stazione meteo: ............ da-9.9°Ca+60°C
Umidità interna: da 10% a 99% RH (umidità relativa) ............
............................... +/-5%
Avanzamento unitario: .. 0,1°Cperlatemperatura
............................... 1% per l’umidità
Orologio: Quarzo .......................
Alimentazione: 2xAAA ..............
Italiano

3
ME 3106
English
NOTES ON USE
- The apparatus shall not be exposed to dripping or splashing
water.Noobjectslledwithliquid,suchasvases,shouldbe
placed on the unit.
- Nonakedamesources,suchaslightedcandles,shouldbe
placed on.
- Instruct the proper use children and people with little knowledge
of the product.
FUNCTIONS DESCRIPTION
1. Weather symbols icons
2. Temperature
3. Clock
4. Indoor humidity
5. Date
6. Moon phase
7. KeyMODE,settingthedateandclock/viewclockandalarm
8. KeyUP/AL,upkey/alarmactivation
9. KeyDOWN/C/F,downkey/changetemperature°C/°F
10.KeyMEM,viewmaximumandminimumvaluesrecordedfor
temperature and humidity
11. KeyLIGHT,turnonbacklight
12.KeySNZ,temporarydeactivationofthealarm
13. Battery compartment 2xAAA (not included)
14. Alarm symbol
POWER SUPPLY
Open the battery compartment (13) on the rear of the appliance and
insert two “AAA” size batteries respecting the polarities.
SETTING THE CLOCK
1. Press and hold the MODE key (7) to start the clock setting.
2. Set thetimedisplay 12/24hours in byusing theUP(8) or
DOWN (9) key.
3. PresstheMODEkey(7),thehourwillashonthedisplay.
4. Set the hour using the UP (8) or DOWN (9) keys.
5. PresstheMODEkey(7),theminuteswillashonthedisplay.
6. Set the minutes using the UP (8) or DOWN (9) keys.
7. PresstheMODEkey(7),theyearwillashonthedisplay.
8. Set the year using the UP (8) or DOWN (9) keys.
9. PresstheMODEkey(7),themonthwillashonthedisplay.
10. Set the month using the UP (8) or DOWN (9) keys.
11. PresstheMODEkey(7),thedaywillashonthedisplay.
12. Set the day using the UP (8) or DOWN (9) keys.
13.PresstheMODEkey(7)toconrmandnishtheclocksetting.
SETTING AND ACTIVATING ALARM
1. PresstheMODEkey(7)toaccessthealarmfunction,reco-
gnisable by the Bell symbol appears on the right of the display
(14).
2. Press and hold the MODE key (7) to start the alarm setting.
3. Set the hour using the UP (8) or DOWN (9) keys.
4. PresstheMODEkey(7),theminuteswillashonthedisplay.
5. Set the minutes using the UP (8) or DOWN (9) keys.
6. PresstheMODEkey(7)toconrmandnishthealarmsetting.
7. The alarm will be activated automatically and will display the
clock.
8. At the setted hour the alarm will be activated. To temporarily turn
off the alarm press the SNZ key (12). The alarm will reactivate
automatically after 5 minutes.
9. Toturnoffthealarm,presstheUP/ALkey(8)untilthedemise
of the alarm symbol
(14).
WEATHER FORECASTS
The digital barometer detects changes in barometric pressure and
shows the weather forecast symbol (1). This weather forecast refers
tothenext12/24hours.
Forexample:Ifthebarometerdetectsahighpressure,thedisplay
willshowthesymboloftheSun,butexternallyitmightrain.
Note:
The weather forecast symbols may not reect the current conditions of the
time. They refer only to future conditions.
The weather forecast may not be 100% secure due to various factors.
The manufacturer is not liable for any damages or situations caused by a
wrong weather forecast.
TEMPERATURE AND HUMIDITY
The temperature value is located in the upper right corner of the
display,whilethehumidityvalueisshownbelowthetemperature.
The values are automatically updated every 30 seconds.
1. Pressthe C/Fkey(9)to selecttheunit ofmeasurementof
temperaturein°Cor°F.
2. Press the MEM key (10) continuously to display the minimum
and maximum values observed for temperature and humidity.
3. Bring on the maximum or minimum value and press and hold
the MEM key (10) to reset the maximum or minimum value
recorded of temperature and humidity.
MOON PHASE
Shows the lunar cycle in four phases (6).
TECHNICAL DATA
Weather station: ........... from-9.9°Cto+60°C
Indoor humidity: from 10% to 99% RH (relative humidity) ............
Unit: .............................. 0,1°Cforthetemperature
............................... 1% for the humidity
Watch: Quartz ..........................
Power Supply: 2xAAA ..............
Produktspecifikationer
Varumärke: | Trevi |
Kategori: | Väderstation |
Modell: | ME 3106 |
Inbyggd display: | Ja |
Bredd: | 110 mm |
Djup: | 47 mm |
Höjd: | 120 mm |
Larmfunktion: | Ja |
Klockfunktion: | Ja |
Mätfunktioner: | Indoor hygrometer, Indoor thermometer |
Väderprognos: | Ja |
Batterityp: | AAA |
Antal batterier (mottagare): | 2 |
Månfas: | Ja |
Bakgrundsbelyst skärm: | Ja |
Produktens färg: | Vit |
Strömkälla: | Batteri |
Temperatur mätenheter: | F, °C |
Mätfunktioner trenddisplay: | Hygrometer, Thermometer |
Väderstationsiakttagelserna extremum uppgifter: | Hygrometer, Thermometer |
Behöver du hjälp?
Om du behöver hjälp med Trevi ME 3106 ställ en fråga nedan och andra användare kommer att svara dig
Väderstation Trevi Manualer
2 September 2024
28 Augusti 2024
24 Augusti 2024
21 Augusti 2024
21 Augusti 2024
20 Augusti 2024
19 Augusti 2024
19 Augusti 2024
19 Augusti 2024
6 Augusti 2024
Väderstation Manualer
- ClimeMET
- Goddess
- Adler
- GlobalTronics
- Jacob Jensen
- Bearware
- Konig
- Nasa
- Beurer
- Prestigio
- Clatronic
- Camry
- Elgato
- Daewoo
- Baldr
Nyaste Väderstation Manualer
2 April 2025
27 Mars 2025
27 Mars 2025
5 Mars 2025
27 Februari 2025
15 Februari 2025
5 Februari 2025
27 Januari 2025
27 Januari 2025
12 Januari 2025