Trevi ME 3140 Bruksanvisning
Trevi
Väderstation
ME 3140
Läs gratis den bruksanvisning för Trevi ME 3140 (12 sidor) i kategorin Väderstation. Guiden har ansetts hjälpsam av 9 personer och har ett genomsnittsbetyg på 4.7 stjärnor baserat på 5 recensioner. Har du en fråga om Trevi ME 3140 eller vill du ställa frågor till andra användare av produkten? Ställ en fråga
Sida 1/12

SVEGLIA / MESVEGLIA / ME
SVEGLIA / ME
TEOSTTEOST
TEOSTTEOST
TEOST
AA
AA
A
TIONTION
TIONTION
TION
Manuale d’uso
ALARM CLALARM CL
ALARM CLALARM CL
ALARM CL
OCK / MEOCK / ME
OCK / MEOCK / ME
OCK / ME
TEO STTEO ST
TEO STTEO ST
TEO ST
AA
AA
A
TIONTION
TIONTION
TION
Istruction manual
RÉRÉ
RÉRÉ
RÉ
VEIL / STVEIL / ST
VEIL / STVEIL / ST
VEIL / ST
AA
AA
A
TION MÉTION MÉ
TION MÉTION MÉ
TION MÉ
TÉOTÉO
TÉOTÉO
TÉO
Manual d’emploi
WECKER / WECKER /
WECKER / WECKER /
WECKER /
WEWE
WEWE
WE
TT
TT
T
TERSTTERST
TERSTTERST
TERST
AA
AA
A
TIONTION
TIONTION
TION
Anleitungsheft
ME 3140ME 3140
ME 3140ME 3140
ME 3140
Guida d’uso
User guide
DESPERDESPER
DESPERDESPER
DESPER
TT
TT
T
ADAD
ADAD
AD
OR ESTOR EST
OR ESTOR EST
OR EST
AA
AA
A
CIÓN MECIÓN ME
CIÓN MECIÓN ME
CIÓN ME
TEOTEO
TEOTEO
TEO
Manual de instrucciones para el uso y la conexion
DESPERDESPER
DESPERDESPER
DESPER
TT
TT
T
ADAD
ADAD
AD
OR ESTOR EST
OR ESTOR EST
OR EST
AA
AA
A
ÇÇ
ÇÇ
Ç
ÃÃ
ÃÃ
Ã
O MEO ME
O MEO ME
O ME
TEOTEO
TEOTEO
TEO
Manual de uso e ligação
ÎÕÐÍÇÔ¹ÑÉ / ÌÅÔÅÙÑÏËÏÃÉʼ
ÓÔÁÈ̼
Åã÷åéñßäéï ÷ñÞóçò êáé óýíäåóçò

ME 3140ME 3140
ME 3140ME 3140
ME 3140
22
22
2
1. Tasto UNIT, visualizzazione gradi °C / °F, unità di
misurazione della pressione in mb / inHg
2. Tasto +, regolazione ora/minuti e datario
3. Tasto SET, impostazione datario / orologio
4. Tasto -, regolazione ora/minuti e datario
5. RESET, reimposta le funzioni predefinite
6. Vano batterie
7. Allarme, datario
8. Formato orario 24hr / 12hr
9. Orologio
10. Icona barometro
11. Simboli metereologici
12. Selettore ALM OFF, ALM ON, SNOOZE
13. Stato della pressione
14. Istogramma della pressione
15. Temperatura °C / °F
16. Tasto retroilluminazione, SNOOZE
INSERIMENTINSERIMENT
INSERIMENT
O BAO BA
O BAO BA
O BA
TT
TT
T
TERIETERIE
TERIETERIE
TERIE
Aprire il vano batterie (6) posto sul retro dell’apparec-
chio ed inserire due pile formato “AA” rispettando le
polarità indicate.
REGOLAZIONE MREGOLAZIONE M
REGOLAZIONE M
ANUANU
ANUANU
ANU
ALE DELLALE DELL
ALE DELLALE DELL
ALE DELL
’’
’’
’
OROLOROL
OROLOROL
OROL
OGIO/OGIO/
OGIO/OGIO/
OGIO/
DD
DD
D
AA
AA
A
TT
TT
T
ARIOARIO
ARIOARIO
ARIO
1. Premere il tasto SET (3), sul display l’anno
incomincia a lampeggiare.
2. Impostare l’anno tramite i tasti +(2) o -(4).
3. Premere il tasto SET (3), sul display il giorno e il
mese incominciano a lampeggiare.
4. Impostare il giorno e mese tramite i tasti +(2) o -(4).
5. Premere il tasto SET (3), sul display l’ora e i minuti
incominciano a lampeggiare.
6. Impostare l’ora tramite i tasti +(2) o -(4).
7. Premere il tasto SET (3), sul display la scritta 24Hr
incomicia a lampeggiare.
8. Impostare il tipo di visualizzazione dell’ora 12 o 24
HR tramite i tasti +(2) o -(4).
9. Premere nuovamente il tasto SET (3) per
confermare.
ITIT
ITIT
IT
ALIANOALIANO
ALIANOALIANO
ALIANO
1.
2.
3.
4.
5.
6.
7.
8.
9.
10.
11.
12.
13.
14.
15.
16.
REGOLAZIONE ALLARMEREGOLAZIONE ALLARME
REGOLAZIONE ALLARME
1. Portare il selettore (12) in posizione ALM ON, sul
display appare il simbolo dell’allarme.
2. Impostare l’ora e i minuti tramite i tasti +(2) o -(4).
FUNZIONE SNOOZE/LIGHTFUNZIONE SNOOZE/LIGHT
FUNZIONE SNOOZE/LIGHT
1. Portare il selettore (12) in posizione SNOOZE, sul
display assieme al simbolo dell’allarme comparirà
l’icona Zz.
2. Ad allarme attivato facendo pressione sulla scritta
SNOOZE /LIGHT potete disattivare momentane
amente l'allarme mentre sta suonando.
- Dopo 5 minuti l'allarme riprenderà suonare.
DISADISA
DISADISA
DISA
TT
TT
T
TIVTIV
TIVTIV
TIV
AZIONE ALLARMEAZIONE ALLARME
AZIONE ALLARME
Per spegnere definitivamente l'allarme portare il
selettore (12) sulla posizione ALM OFF.
TENDENZA DI PRESSIONE BAROMETRICATENDENZA DI PRESSIONE BAROMETRICA
TENDENZA DI PRESSIONE BAROMETRICA
Nell’angolo superiore sinistro del display si nota l’icona
FORECAST , questa indica la tendenza di pressione relati-
va all’ora appena trascorsa.
1. Se la freccia tende verso il basso significa che il
clima sta peggiorando.
2. Se la freccia tende verso l’alto significa che il clima
é in fase di miglioramento.
3. Se compare solamente la scritta FORECAST
significa che il clima é stabile.
UNITUNIT
UNITUNIT
UNIT
AA
AA
A
’’
’’
’
DI MISUR DI MISUR
DI MISUR DI MISUR
DI MISUR
A DELLA PRESSIONEA DELLA PRESSIONE
A DELLA PRESSIONE
Per selezionare l’unità di misura della pressione
atmosferica tra mb/hPa o inHg, premere il tasto UNIT (1).
SELEZIONE GRSELEZIONE GR
SELEZIONE GR
ADI CELSIUS - FADI CELSIUS - F
ADI CELSIUS - F
AHRENHEITAHRENHEIT
AHRENHEITAHRENHEIT
AHRENHEIT
Premere il tasto UNIT (1) per visualizzare la temperatura
in gradi Celsius °C (scala europea) o in gradi Fahrenheit
°F(scala inglese e americana).
ISTOGRAMMA DELLA PRESSIONEISTOGRAMMA DELLA PRESSIONE
ISTOGRAMMA DELLA PRESSIONE
Questa stazione meteo crea un grafico dell’andamento
della pressione atmosferica in funzione del tempo (11).
Sul grafico si trova a sinistra la scala in formato “inHg” che
varia da +0,12 a -0,12. A destra si trova la scala in formato
hPa che varia da +4 a -4. Queste scale lavorano in funzio-
ne del tempo che varia da 0 a -12Hr.
PREPRE
PREPRE
PRE
VISIONI MEVISIONI ME
VISIONI ME
TEREOLTEREOL
TEREOLTEREOL
TEREOL
OGICHEOGICHE
OGICHEOGICHE
OGICHE
Il barometro digitale rileva automaticamente le varia-
zioni di pressione atmosferica visualizzando di conse-
guenza il simbolo di previsione metereologica (11).
Tale previsione riguarda le 12/24 ore successive.
DESCRIZIONI DESCRIZIONI
DESCRIZIONI
TECNICHETECNICHE
TECNICHETECNICHE
TECNICHE
Alimentazione:.... 2 batterie stilo formato “AA”
Stazione meteo: .. da 0°C a +50°C (32°F a 122°F)
Dimensioni: ........... 133x75x40mm

ME 3140ME 3140
ME 3140ME 3140
ME 3140
33
33
3
ENGLISHENGLISH
ENGLISHENGLISH
ENGLISH
1.
2.
3.
4.
5.
6.
7.
8.
9.
10.
11.
12.
13.
14.
15.
16.
FeaturesFeatures
FeaturesFeatures
Features
• Clock with snooze alarm in hour and minute display.
• Calendar display.
• Indoor temperature in °C / °F unit.
• 12 or 24 hour format.
• Weather forecast with animation.
• Barometer pressure reading in mb or inHg unit.
• Barometer pressure history bar chart.
• Time accuracy : average within 60 seconds per month.
• Operating temperature from 0°C to 50°C (32°F to 122°F).
• Temperature measuring range from -9.9°C to 50°C
(14.2°F to 122°F).
• Temperature resolution 0.1°C (0.1°F).
Battery InstallationBattery Installation
Battery Installation
• Open the battery door.
• Insert 2 pcs AA size battery in correct polarity (+)
and (-) as indicated.
• Close the battery door.
Warning : Do not mix old and new batteries.Warning : Do not mix old and new batteries.
Warning : Do not mix old and new batteries.
Do not mix alkaline, standard ( carbon-zinc ) orDo not mix alkaline, standard ( carbon-zinc ) or
Do not mix alkaline, standard ( carbon-zinc ) or
rechargeable ( nickel cadmium ) batteries.rechargeable ( nickel cadmium ) batteries.
rechargeable ( nickel cadmium ) batteries.
TT
TT
T
o So S
o So S
o S
et the Cet the C
et the Cet the C
et the C
alendaralendar
alendaralendar
alendar
1. Press SET button enter calendar set mode.
2. Press + or – button sequentially to set year.
3. Hold down either + or – button to change the year
at high speed.
4. Press SET button to confirm year set and go to date set.
5. Press + or – button sequentially to set date.
6. Hold down either + or – button to change the date
at high speed.
TT
TT
T
o So S
o So S
o S
et the et the
et the et the
et the
TT
TT
T
imeime
imeime
ime
1. Press SET button after calendar set mode.
2. Press + or – button sequentially to set time by
minutes increment.
3. Hold down either + or – button to change the time
at high speed.
TT
TT
T
o So S
o So S
o S
et the Hour Fet the Hour F
et the Hour F
oror
oror
or
mama
mama
ma
tt
tt
t
1. Press SET button after desired time set and go to
hour format set mode.
2. Press + or - button to switch between 12 hr and 24
hr time display format.
3. Press SET button to confirm and quit the set mode.
USING ALARMUSING ALARM
USING ALARM
TT
TT
T
o So S
o So S
o S
et Alaret Alar
et Alaret Alar
et Alar
m m
m m
m
TT
TT
T
imeime
imeime
ime
1. Press + or – button sequentially to set the alarm
time, the alarm time will appear on LCD display.
2. Hold down either + or – button to change the
alarm time at high speed.
TT
TT
T
o Ao A
o Ao A
o A
cc
cc
c
tivtiv
tivtiv
tiv
e Alare Alar
e Alare Alar
e Alar
m Fm F
m Fm F
m F
uncunc
uncunc
unc
tiontion
tiontion
tion
1. Slide the ALARM switch to ON position, the sign
will appear. The alarm function is activated.
2. When the alarm sounds, press the Snooze/Light
button. The alarm will sound at the same time of
the next day.
3. To deactivate the alarm function, slide the ALARM
switch to OFF position.
TT
TT
T
o Ao A
o Ao A
o A
cc
cc
c
tivtiv
tivtiv
tiv
e the Snooe the Snoo
e the Snoo
zz
zz
z
e Alare Alar
e Alare Alar
e Alar
mm
mm
m
1. Slide the alarm to “SNOOZE”position, the sign
and Zz will appear on the time display. The snooze
function is activated.
2. When the alarm sound, press the SNOOZE / LIGHT
button. The alarm will sound again in
approximately 5 minutes.
3. To deactivate the snooze alarm, slide the ALARM
switch to OFF position.
Weather Forecast and BarometerWeather Forecast and Barometer
Weather Forecast and Barometer
The Weather forecast is measured by the pressure sensor
built inside the unit. Below weather forecast icons will
appear depends on coming weather conidition.
Note: Once reset the base unit, the weather dataNote: Once reset the base unit, the weather data
Note: Once reset the base unit, the weather data
can be obtained after 24 hours.can be obtained after 24 hours.
can be obtained after 24 hours.
BarometerBarometer
BarometerBarometer
Barometer
This model includes a barometer that measures the
atmospheric pressure in numeric scale. User can track
the reading and trend of the barometric pressure. The
barometer reflects changes in barometric pressure with
the an arrow icon. If the barometric pressure is on the
rise. If the arrow points up , the barometric pressure
is going down , the arrow will point downward.
Pressure RecordPressure Record
Pressure Record
• Graphical bar chart shows the pressure history
during the past 12 hours. 0 means the
current pressure and -12 means the pressure at
12 hours before (Pic 1).
Display UnitDisplay Unit
Display Unit
• Press the UNIT button to choose the mb(milibar) and
°C temperature or inHg and °F temperature readout.
Using the BacklightUsing the Backlight
Using the Backlight
• LCD display supports with backlight for dark
viewing. Press the “SNOOZE/LIGHT” button and
backlight will on for 3 seconds.
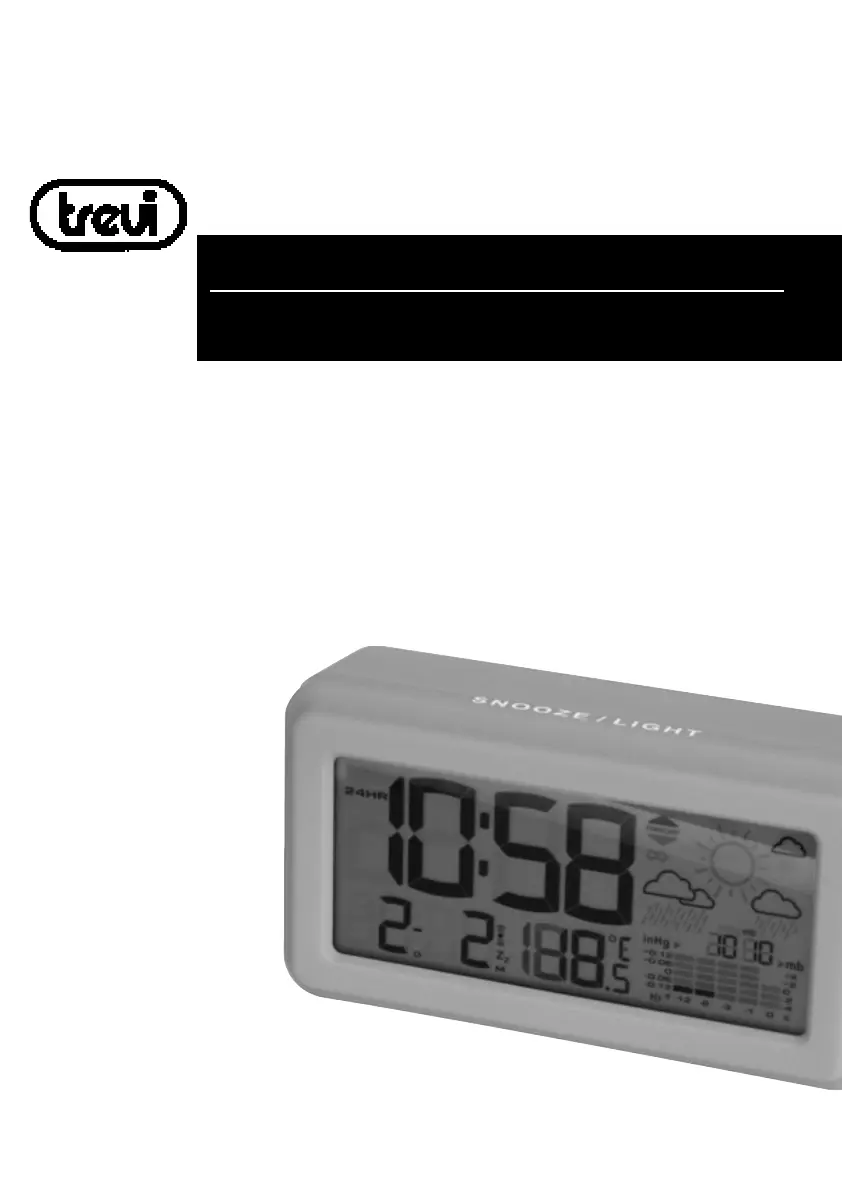
Produktspecifikationer
Varumärke: | Trevi |
Kategori: | Väderstation |
Modell: | ME 3140 |
Inbyggd display: | Ja |
Vikt: | 244 g |
Bredd: | 133 mm |
Djup: | 40 mm |
Höjd: | 75 mm |
Strömförsörjning: | DC 7 - 20V |
Upplösning: | 1.3MP |
Processormodel: | ARTPEC-A |
Maximal upplösning: | 1280 x 1024 Pixels |
Typ av strömkälla: | Power over Ethernet (PoE) |
Minimal belysning: | 1 Lux |
Video rörelsedetektering: | Ja |
Larmfunktion: | Ja |
Mikrofon, linjeingång: | Ja |
Brännvidd: | 3 - 8 mm |
Optisk sensorstorlek: | 1/3 " |
Bildsensortyp: | CMOS |
Kamerans slutartid: | 1/15000 - 1/4 s |
Inbyggd mikrofon: | Ja |
Internminne: | 64 MB |
Anslutningar: | 1x RJ-45 |
Max 30 bilder per sekund: | 8/20, 12/30 fps |
Nätverksprotokoll som stöds: | IPv4/v6, HTTP, HTTPS, QoS Layer 3 DiffServ, FTP, SMTP, Bonjour, UPnP, SNMPv1/v2c/v3 (MIB-II), DNS, DynDNS, NTP, RTSP, RTP, TCP, UDP, IGMP, RTCP, ICMP, DHCP, ARP, SOCKS |
Klockfunktion: | Ja |
Progressiv skanning: | Ja |
Flashminne: | 8 MB |
Power over Ethernet (PoE): | Ja |
Mått (B x D x H): | 44 x 88 x 172 mm |
Mätfunktioner: | Indoor barometer, Indoor thermometer |
Strömförbrukning (typiskt): | 5 W |
Drifttemperatur (TT): | 0 - 45 °C |
Relativ luftfuktighet i drift (VV): | 20 - 80 procent |
Batterityp: | AA |
Linsens betraktningsvinkel, horisontell: | 37 ° |
Antal batterier (mottagare): | 2 |
Audio detectie: | Ja |
Produktens färg: | Vit |
Temperatur mätenheter: | F, °C |
Mätfunktioner trenddisplay: | Termometer |
Väderstationsiakttagelserna extremum uppgifter: | Termometer |
Behöver du hjälp?
Om du behöver hjälp med Trevi ME 3140 ställ en fråga nedan och andra användare kommer att svara dig
Väderstation Trevi Manualer
2 September 2024
28 Augusti 2024
24 Augusti 2024
21 Augusti 2024
21 Augusti 2024
20 Augusti 2024
19 Augusti 2024
19 Augusti 2024
19 Augusti 2024
6 Augusti 2024
Väderstation Manualer
- Prestigio
- AcuRite
- Fluke
- Perel
- EQ3
- Durabase
- Baldr
- Orion
- Waldbeck
- Brandson
- Alecto
- Day
- Eurochron
- Nor-tec
- Marathon
Nyaste Väderstation Manualer
2 April 2025
27 Mars 2025
27 Mars 2025
5 Mars 2025
27 Februari 2025
15 Februari 2025
5 Februari 2025
27 Januari 2025
27 Januari 2025
12 Januari 2025