Trevi OM 3340D Bruksanvisning
Trevi Klockradio OM 3340D
Läs gratis den bruksanvisning för Trevi OM 3340D (8 sidor) i kategorin Klockradio. Guiden har ansetts hjälpsam av 11 personer och har ett genomsnittsbetyg på 4.5 stjärnor baserat på 6 recensioner. Har du en fråga om Trevi OM 3340D eller vill du ställa frågor till andra användare av produkten? Ställ en fråga
Sida 1/8
1
OM 3340 D
DIGITAL WALL CLOCK
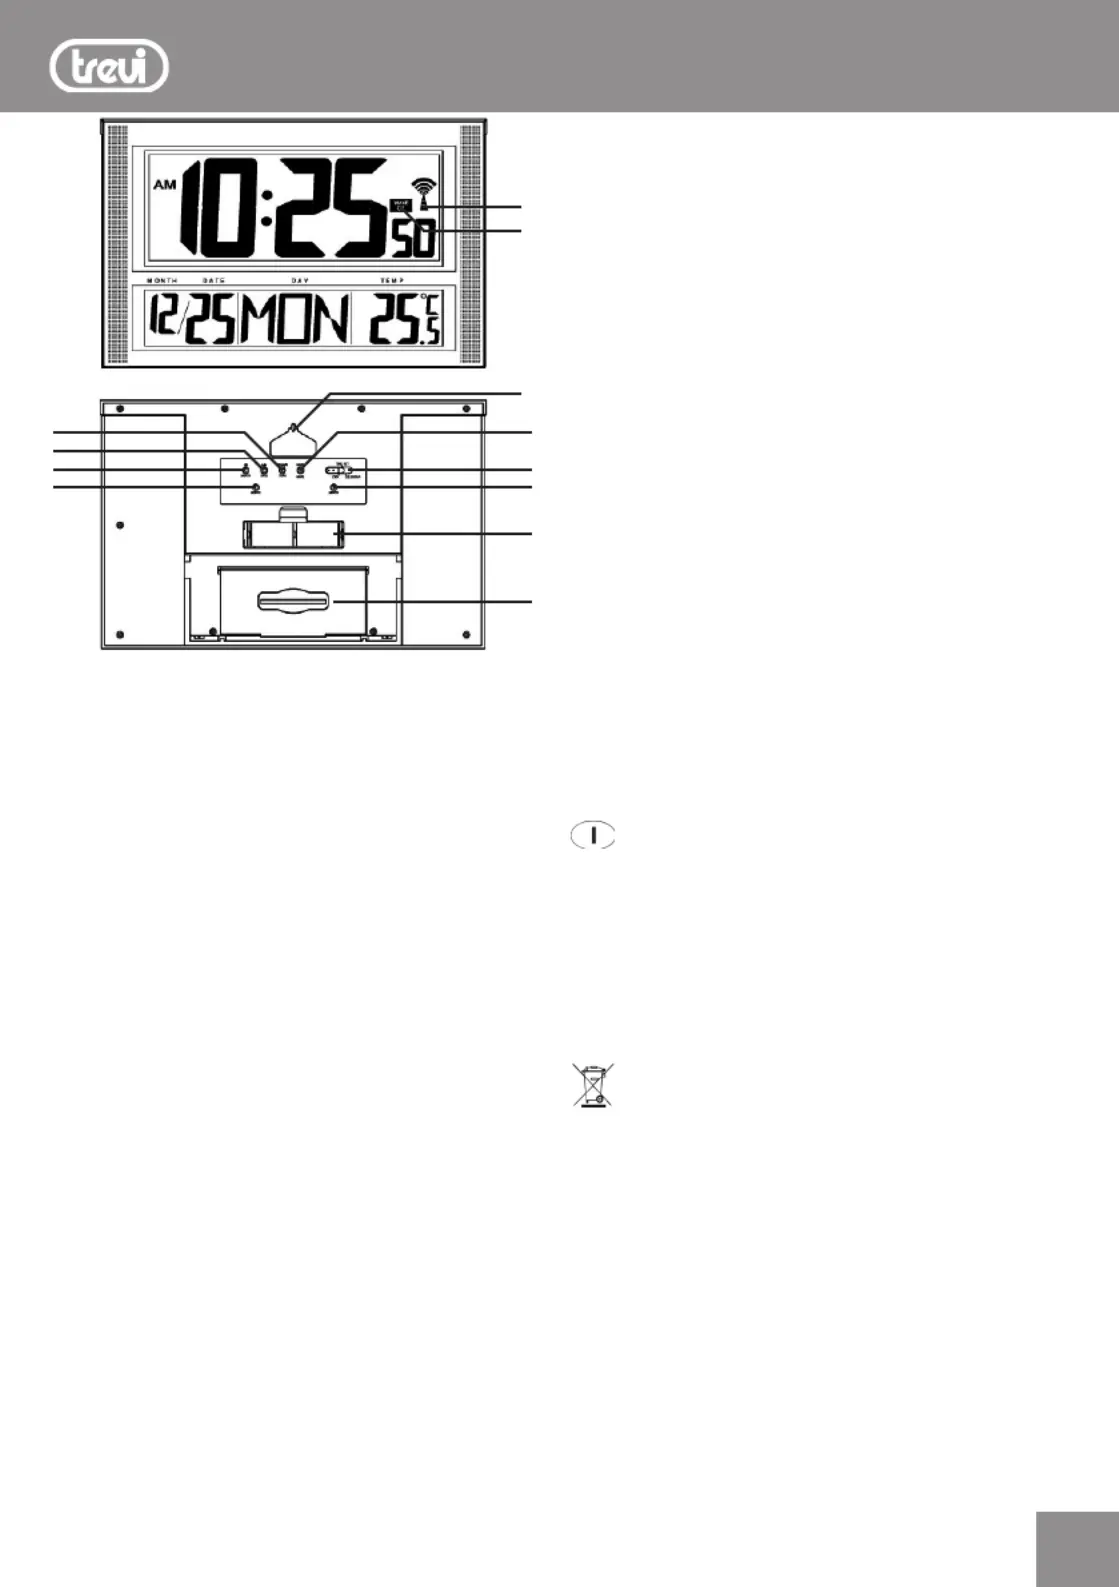
1. Tasto HR / MONTH
2. Tasto MIN / DATE
3. Tasto 12/24HR / YEAR
4. Tasto °C / °F
5. Selettore LOCK / TIME SET / CALENDAR
6. Tasto RESET, ripristino delle condizioni iniziali
7. Tasto WAVE, avvio ricezione radio controllo
8. Vano batterie
9. Piedistallo
10.Foroperafssioneamuro
11. Indicazione WAVE OK, aggancio segnale radio controllo
12.Simboloradiocontrollo
ALIMENTAZIONE
1.Aprireilvanobatterie(8)postosulretro.
2.Inserire3batterieformato“C”rispettandolepolaritàindicate.
Nota: Rimuovere le batterie se non utilizzate l’apparecchio per un lungo
periodo di tempo. Sostituire le batterie quando i numeri del display
diventano meno leggibili.
VISUALIZZAZIONE ORARIO TRAMITE RADIO
CONTROLLO
Questoapparecchioèdotatodiunricevitoreingradodiricevereil
segnaleorariodelPhysikalischTechnischeBundesanstaltBraun-
schweig(Germaniacentrale)ricevibileinunraggiodi1500Km.
All’inserimentodellebatteriesiattiveràautomaticamentelaricezio-
nedelsegnale,ilsimbolodelradiocontrollo(12)lampeggeràed
entro24oreverràvisualizzatoilsegnaleorariodelradiocontrollo
el’indicazioneWAVEOK(11)suldisplay.
Nelcasosiabbialanecessitàdiriavviarelaricezionedelsegnale,
premereiltastoWAVE(7).
REGOLAZIONE MANUALE DELL’OROLOGIO
1.PortareilselettoreLOCK/TIMESET/CALENDAR(5)sulla
posizione TIME SET.
2.PremereiltastoHR(1)perimpostarel’ora.
3.PremereiltastoMIN(2)perimpostareiminuti.
4.Premereiltasto12/24HR(3)perimpostarelavisualizzazione
nelformato12o24ore.
5.PortareilselettoreLOCK/TIMESET/CALENDAR(5)sulla
posizione LOCK.
REGOLAZIONE MANUALE DEL CALENDARIO
1.PortareilselettoreLOCK/TIMESET/CALENDAR(5)sulla
posizione CALENDAR.
2.PremereiltastoMONTH(1)perimpostareilmese.
3.PremereiltastoDATE(2)perimpostareilgiorno.
4.PremereiltastoYEAR(3)perimpostarel’anno.
5.PortareilselettoreLOCK/TIMESET/CALENDAR(5)sulla
posizione LOCK.
SELEZIONE GRADI CELSIUS - FAHRENHEIT
1.Premereripetutamenteiltasto°C/°F(4)pervisualizzarela
temperaturaingradiCelsius(°C)oFahrenheit(°F).
INSTALLAZIONE A MURO
Questoorologioèprogettatoperessereappesoamuro(10).
Perottenerelamassimaleggibilitàdeldisplayappendetelo
almenoa2metridialtezzainmododaformareunangolodi
circa70°conl’occhio.
CARATTERISTICHE TECNICHE
Alimentazione:3batterieformato“C” ...................
Dimensioni:420x270x45mm........................
GARANZIA
1.L’apparecchioègarantitoper24mesidalladatadifabbricazione
indicatasull’etichettaapplicatasulprodotto.
2.Lagaranziasiapplicasoloadapparecchi,nonmanomessi,
riparatidacentriassistenzaTREVI,essacomprendela
riparazionedeicomponentiperdifettidifabbricazionecon
l’esclusionedietichette,manopoleepartiasportabili.
3. TREVI non risponde di danni diretti o indiretti a cose o/e persone
causatidall’usoosospensioned’usodell’apparecchio.
Avvertenze per il corretto smaltimento del prodotto.
Ilsimboloriportatosull’apparecchiaturaindicacheilriutodeve
essereoggettodi“raccoltaseparata”pertantoilprodottonon
deveesseresmaltitoinsiemeairiutiurbani.
L’utentedovràconsegnareilprodottopressogliappositi“centri
diraccoltadifferenziata”predispostidalleamministrazioni
comunali,oppureconsegnarloalrivenditorecontroacquistodi
unnuovoprodotto.
Laraccoltadifferenziatadelriutoelesuccessiveoperazionidi
trattamento,recuperoesmaltimentofavorisconolaproduzione
diapparecchiatureconmaterialiriciclatielimitanoglieffetti
negativisull’ambienteesullasalutecausatidaunagestione
impropriadelriuto.
Losmaltimentoabusivodelprodottocomportal’applicazionedi
sanzioniamministrative.
ITALIANO
1.
.9
2.
3.
6.
.8
.7
.5
.4
.10
.11
.12
Produktspecifikationer
| Varumärke: | Trevi |
| Kategori: | Klockradio |
| Modell: | OM 3340D |
| Färg på produkten: | Wit |
| Sladdlängd: | 1.5 m |
| På / Av knapp: | Ja |
| FM-radio: | Ja |
| Kabelfärg: | Wit |
| Termometer: | Ja |
| Capaciteit: | 3680 W |
| Mått (B x D x H): | 370 x 55 x 40 mm |
| AC-ingångsspänning: | 240 V |
| AC-ingångsfrekvens: | 50 Hz |
| Batterityp: | AAA |
| Antal AC-utgångar: | 5 AC-uitgang(en) |
| Ström (max.): | 16 A |
| Antal batterier: | 2 |
| Produktens färg: | Svart |
| Skärmtyp: | LCD |
| Kalender: | Ja |
| Produktstorlek (BxDxH): | 420 x 30 x 270 mm |
| Displaytyp: | LCD |
| Strömkälla: | Batteri |
| Typ av radio: | Klockradio |
Behöver du hjälp?
Om du behöver hjälp med Trevi OM 3340D ställ en fråga nedan och andra användare kommer att svara dig
Klockradio Trevi Manualer

24 Augusti 2025
23 Augusti 2025
23 Augusti 2025
23 Augusti 2025
23 Augusti 2025
23 Augusti 2025
23 Augusti 2025
22 September 2024
16 September 2024
16 September 2024
Klockradio Manualer
Nyaste Klockradio Manualer
22 Mars 2026
29 Januari 2026
29 Januari 2026
18 Oktober 2025
17 Oktober 2025
16 Oktober 2025
11 Oktober 2025
10 Oktober 2025
10 Oktober 2025
6 Oktober 2025