Trevi SLD 3019 Bruksanvisning
Trevi Klockradio SLD 3019
Läs gratis den bruksanvisning för Trevi SLD 3019 (8 sidor) i kategorin Klockradio. Guiden har ansetts hjälpsam av 58 personer och har ett genomsnittsbetyg på 4.4 stjärnor baserat på 9 recensioner. Har du en fråga om Trevi SLD 3019 eller vill du ställa frågor till andra användare av produkten? Ställ en fråga
Sida 1/8
SLD 3019
DIGITAL ALARM CLOCK
ARRESTO ALLARME/SNOOZE
Una volta impostato l’allarme, questo suonerà in base all’orario impostato.
-Premere un qualsiasi tasto per arrestare l’allarme.
Se è stato attivato anche lo snooze, l’allarme suonerà ripetutamente in base
alll’intervallo impostato fino alla sua disattivazione.
DISATTIVAZIONE ALLARME/SNOOZE
1.Premere il tasto MODE fino a visualizzare l’allarme (icona “” sul display).
2.Premere il tasto UP (6) per la disattivazione dell’allarme/snooze.
SELEZIONE FORMATO ORARIO 12/24 H
1.Premere il tasto MODE fino a visualizzare l’orario (icona “” sul display).
2.Premere in sequenza il tasto UP (6) per visualizzare il formato orario tra 12
o 24 ore.
SELEZIONE GRADI CELSIUS - FAHRENHEIT
1.Premere il tasto MODE fino a visualizzare l’orario (icona “” sul display).
2.Premere in sequenza il tasto DOWN (7) per visualizzare la temperatura in
gradi Celsius °C (scala europea) o in gradi Fahrenheit °F (scala inglese e
americana).
FUNZIONE TIMER
Premere il tasto TIMER (2) per attivare la funzione conto alla rovescia.
1.Premere il tasto SET (3), sul display l’ora incomincia a lampeggiare.
-Impostare l’ora tramite i tasti UP (6) o DOWN (7).
2.Premere il tasto SET (3), sul display i minuti incominciano a lampeggiare.
-Impostare i minuti tramite i tasti UP (6) o DOWN (7).
3.Premere il tasto SET (3), sul display i secondi incominciano a lampeggiare.
-Impostare i secondi tramite i tasti UP (6) o DOWN (7).
4.Premere nuovamente il tasto SET (3) perconfermare.
5.Premere il tasto TIMER (2) per avviare il conto alla rovescia. Al termine
verrà riprodotto un segnale acustico.
6.Premere un tasto qualsiasi per arrestare il seganle acustico.
7.Premere il tasto MODE (1) per tornare alla visualizzazione dell’orario.
FUNZIONE MELODIA
1.Premere il tasto TIME (4) ripetutamente per selezionare l’intervallo di
durata della melodia. E’ possibile scegliere tra 10, 20, 30, 40, 50 o 60 minuti.
2.Premere il tasto SOUND (7) ripetutamente per selezionare la melodia
desiderata. E’ possibile scegliere tra: Animali da cortile, Foresta, Cascata
d’acqua, Uccelli tropicali, Oceano e Medley di tutte le melodie.
-Al termine dell’intervallo precedentemente impostato la melodia s’inter-
romperà automaticamente.
Alimentazione:...................................3 batterie formato “AAA”
Dimensioni:...................................105 x 105 x 95 mm
TREVI persegue una politica di continua ricerca e sviluppo. Pertanto i prodotti
possono presentare caratteristiche diverse da quelle descritte.
Avvertenze per il corretto smaltimento del prodotto.
Il simbolo riportato sull'apparecchiatura indica che il rifiuto deve essere oggetto
di "raccolta separata" pertanto il prodotto non deve essere smaltito insieme ai
rifiuti urbani.
L'utente dovrà consegnare il prodotto presso gli appositi "centri di raccolta dif-
ferenziata" predisposti dalle amministrazioni comunali, oppure consegnarlo al ri-
venditore contro acquisto di un nuovo prodotto.
La raccolta differenziata del rifiuto e le successive operazioni di trattamento,
recupero e smaltimento favoriscono la produzione di apparecchiature con mate-
riali riciclati e limitano gli effetti negativi sull'ambiente e sulla salute causati da una
gestione impropria del rifiuto.
Lo smaltimento abusivo del prodotto comporta l'applicazione di sanzioni ammi-
nistrative.
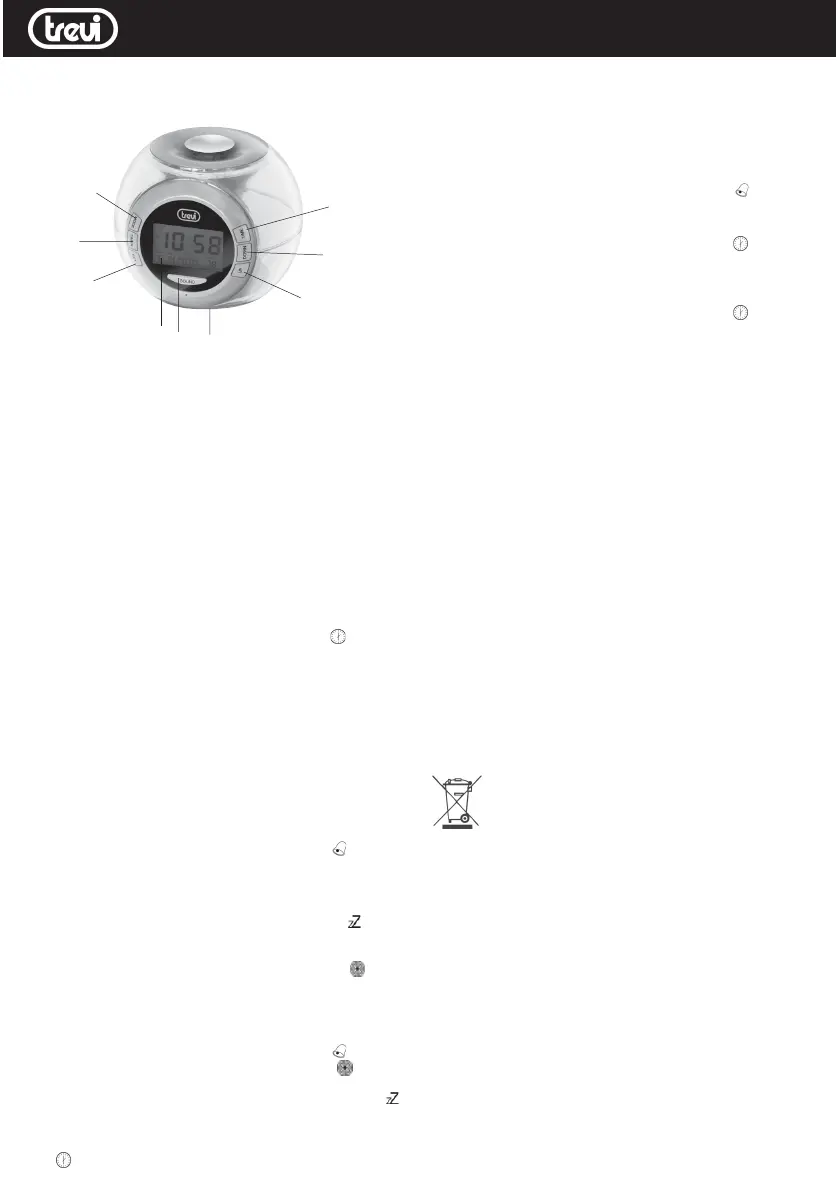
1.Tasto MODE, selezione modalità orario o allarme
2.Tasto TIMER, funzione conto alla rovescia
3.Tasto SET, regolazioni impostazioni
4.Tasto TIME, regolazione lunghezza della melodia
5.Tasto DOWN, regolazione ora/minuti, visualizzazione gradi °C o °F
6.Tasto UP, regolazione ora/minuti, visualizzazione orario 12h/24h, attivazione/
disattivazione allarme/snooze
7.Tasto SOUND, anteprima della melodia
8.Vano batterie
9.Display alfanumerico multicolore
ALIMENTAZIONE
Inserite 3 batterie formato “AAA” nel vano (8) posizionato in fondo all’apprecchio
rispettando le polarità indicate. Rimuovere le batterie se non utilizzate l'apparec-
chio per un lungo periodo di tempo. Sostituire le batterie quando i numeri del
display (9) diventano meno leggibili.
REGOLAZIONE OROLOGIO
1.Premere il tasto MODE fino a visualizzare l’orario (icona “” sul display).
2.Premere il tasto UP (6), per visualizzare l’orario nel formato 12h/24h.
3.Premere il tasto SET (3), sul display l’ora incomincia a lampeggiare.
-Impostare l’ora tramite i tasti UP (6) o DOWN (7).
4.Premere il tasto SET (3), sul display i minuti incominciano a lampeggiare.
-Impostare i minuti tramite i tasti UP (6) o DOWN (7).
5.Premere il tasto SET (3), sul display l’anno incomincia a lampeggiare.
-Impostare l’anno tramite i tasti UP (6) o DOWN (7).
6.Premere il tasto SET (3), sul display il mese incomincia a lampeggiare.
-Impostare il mese tramite i tasti UP (6) o DOWN (7).
7.Premere il tasto SET (3), sul display il giorno incomincia a lampeggiare.
-Impostare il giorno tramite i tasti UP (6) o DOWN (7).
8.Premere nuovamente il tasto SET (3) perconfermare.
IMPOSTAZIONE ALLARME / SNOOZE / MELODIA
1.Premere il tasto MODE fino a visualizzare l’allarme (icona “” sul display).
2.Premere il tasto SET (3), sul display l’ora incomincia a lampeggiare.
-Impostare l’ora tramite i tasti UP (6) o DOWN (7).
3.Premere il tasto SET (3), sul display i minuti incominciano a lampeggiare.
-Impostare i minuti tramite i tasti UP (6) o DOWN (7).
4.Premere il tasto SET (3), sul display compare l’icona snooze “”.
-Impostare il tempo di snooze tramite i tasti UP (6) o DOWN (7) tra 1 e 60
minuti.
5.Premere il tasto SET (3), sul display compare l’icona allarme “”.
-Impostare una delle 6 melodie tramite i tasti UP (6) o DOWN (7).
6.Premere il tasto SET (3) per confermare e tornare alla visualizzazione
dell’allarme.
ATTIVAZIONE ALLARME/SNOOZE
1.Premere il tasto MODE fino a visualizzare l’allarme (icona “” sul display).
2.Premere una volta il tasto UP (6) per attivare l’allarme “”. L’allarme
suonerà in base all’ora e ai minuti impostati precedentemente.
3.Premere una seconda volta il tasto UP (6) per attivare lo snooze “”.
L’allarme suonerà ripetutamente in base all’intervallo impostato preceden-
temente.
4.Premere il tasto MODE per tornare alla visualizzazione dell’orario (icona
“” sul display).
Italiano
DESCRIZIONE COMANDI
.1
.2
.3
.4
.5
.7
.6
.8
.9
Produktspecifikationer
| Varumärke: | Trevi |
| Kategori: | Klockradio |
| Modell: | SLD 3019 |
| Bakgrundsbelysning: | Ja |
| Termometer: | Ja |
| Batterityp: | AAA |
| Antal batterier: | 3 |
| Produktens färg: | Rosa |
| Snooze funktion: | Ja |
| Skärmtyp: | Digital |
| Kalender: | Ja |
| Produktstorlek (BxDxH): | 105 x 95 x 105 mm |
Behöver du hjälp?
Om du behöver hjälp med Trevi SLD 3019 ställ en fråga nedan och andra användare kommer att svara dig
Klockradio Trevi Manualer

24 Augusti 2025
23 Augusti 2025
23 Augusti 2025
23 Augusti 2025
23 Augusti 2025
23 Augusti 2025
23 Augusti 2025
22 September 2024
16 September 2024
16 September 2024
Klockradio Manualer
Nyaste Klockradio Manualer
22 Mars 2026
29 Januari 2026
29 Januari 2026
18 Oktober 2025
17 Oktober 2025
16 Oktober 2025
11 Oktober 2025
10 Oktober 2025
10 Oktober 2025
6 Oktober 2025