Zmodo ZS-2004-1TB Bruksanvisning
Zmodo
övervakningskamera
ZS-2004-1TB
Läs gratis den bruksanvisning för Zmodo ZS-2004-1TB (8 sidor) i kategorin övervakningskamera. Guiden har ansetts hjälpsam av 3 personer och har ett genomsnittsbetyg på 4.7 stjärnor baserat på 2 recensioner. Har du en fråga om Zmodo ZS-2004-1TB eller vill du ställa frågor till andra användare av produkten? Ställ en fråga
Sida 1/8

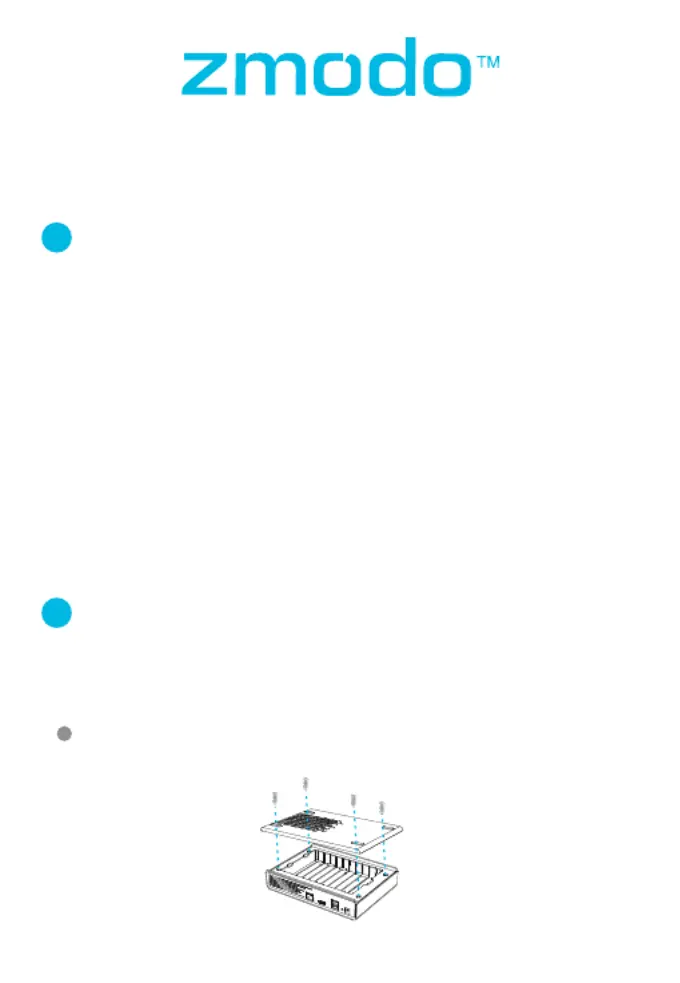
Make sure that your NVR is powered off and unplugged from the power
source. Using a screwdriver, remove the four screws located on the
bottom panel as shown below.
2
Hard Drive Disk Installation
If your system does not include a pre-installed hard drive (HDD), you can
purchase your own and follow the steps below for installation. Make sure
that you purchase a 3.5" HDD optimized for always-on read/write
surveillance, e.g. HDD.low-powered WD10PURX
1
1
Getting to know your Business Security
System
The Zmodo Business Security System provides a full-featured monitoring
solution to cover your entire business space. The business system includes an
NVR for local storage, HD cameras with cloud storage options, and sPoE
Repeaters to connect the cameras. The sPoE repeater allows you to run one
cable from your router to power on multiple cameras in each zone of your
business. It will also allow for longer cable runs from your NVR.
Network Requirements:
720p cameras: Requires at least 1mbps upload when live viewing or 2mbps
upload when using the Cloud Service for each camera.
1080p cameras: Requires at least 2mbps upload when live viewing or 4mbps
upload when using the Cloud Service for each camera.
In order to optimize bandwidth and the number of ports on your WiFi router,
you may use a network switch, however your sPoE Repeater(s) and NVR must
be connected to the same network.
Smart Business Security System
Quick Start Guide
1

Replace the cover, and fasten the screws into the corresponding holes using
a screwdriver.
3
Your NVR may have encountered an error. Try restarting the NVR. If the
problem still persists, please contact Zmodo Support.
There is no hard drive, or there is a malfunction with your hard drive.
The NVR is recording video to the hard drive.
The NVR is powered on and no IP cameras have been detected.
NVR Status Indicator will let you know the
status of your NVR. Please refer to the chart
for specific details.
Blinking blue
Solid green
Solid red
Blinking red
NVR Status Indicator
2
Slide your HDD until the SATA ports on the NVR and the corresponding ports
on the HDD are properly connected, and the HDD is secure.
2
IP cameras and a hard drive have been detected by the NVR.
Solid blue
Peel the cover from the four rubber pads
(provided) to expose the adhesive backing.
Press firmly onto the bottom panel to cover
the four screws.
4

3
3
Connecting your system
1
Find a suitable location for your NVR and sPoE Repeater(s) and plug them into
nearby power outlets.
2
Connect the NVR and the sPoE Repeater to an open ethernet port on your
WiFi router or network switch (not included). The sPoE Repeater(s) and NVR
must be connected to the same network. You may use the provided ethernet
cables.
3
Connect the wired cameras to the ports on the sPoE Repeater using the
provided simplified Power over Ethernet (sPoE) cables. This cable will provide
both video and power to your cameras. Please connect all cameras and
make sure that they work before performing permanent installation.
4
(Optional) You can connect an external monitor to view your NVR locally. Use
the HDMI port (cable not included) to connect your NVR to a local display, and
connect a USB mouse to control it.
Note: There will be no password when you first use your NVR locally. However, we strongly
recommend that you set a password after you configure your NVR. Set a password by going
to the Main Menu > General Settings > Account Settings.
Safety Requirements
Place your NVR and sPoE Repeater in a well-ventilated area.
Do not place any objects on top of your NVR or sPoE Repeater.
Try to keep your NVR and sPoE Repeater in a cool operating temperature.
Do move or shake the NVR while operating, or else the hard drive will be NOT
damaged.
Use a surge protector to protect the NVR and the sPoE Repeater from shortages.
Use only the provided power adapters with your products.
If water or any liquid comes into contact with the NVR and the sPoE Repeater,
unplug it immediately and contact Zmodo support.
Camera
Power Supply
HDM I
Displ ay
NVR
Wireless Router
sPoE Repeater
Connection Diagram
Produktspecifikationer
Varumärke: | Zmodo |
Kategori: | övervakningskamera |
Modell: | ZS-2004-1TB |
Behöver du hjälp?
Om du behöver hjälp med Zmodo ZS-2004-1TB ställ en fråga nedan och andra användare kommer att svara dig
övervakningskamera Zmodo Manualer
4 Augusti 2025
4 Augusti 2025
4 Augusti 2025
4 Augusti 2025
4 Augusti 2025
3 Augusti 2025
3 Augusti 2025
3 Augusti 2025
3 Augusti 2025
3 Augusti 2025
övervakningskamera Manualer
- VideoComm
- Switel
- Ferguson
- Tenda
- Zebra
- Setti+
- Videotec
- Ikan
- Raymarine
- Bosch
- Qoltec
- Dorr
- SMC
- INSTAR
- Arenti
Nyaste övervakningskamera Manualer
4 Augusti 2025
4 Augusti 2025
4 Augusti 2025
4 Augusti 2025
4 Augusti 2025
4 Augusti 2025
4 Augusti 2025
4 Augusti 2025
4 Augusti 2025
4 Augusti 2025