Axxess AXAC-CH6 Bruksanvisning
Axxess ej kategoriserat AXAC-CH6
Läs gratis den bruksanvisning för Axxess AXAC-CH6 (16 sidor) i kategorin ej kategoriserat. Guiden har ansetts hjälpsam av 38 personer och har ett genomsnittsbetyg på 4.7 stjärnor baserat på 8 recensioner. Har du en fråga om Axxess AXAC-CH6 eller vill du ställa frågor till andra användare av produkten? Ställ en fråga
Sida 1/16
AXAC-CH6
INSTALLATION INSTRUCTIONS
AxxessInterfaces.com © COPYRIGHT 2025 METRA ELECTRONICS CORPORATION REV. 7/2/25 INSTAXAC-CH6
ATTENTION: With the key out of the ignition,
disconnect the negative battery terminal before
installing this product. Ensure that all installation
connections, especially the air bag indicator lights,
are plugged in before reconnecting the battery or
cycling the ignition to test this product.
NOTE:
Refer also to the instructions included with
the aftermarket accessory before installing this device.
INTERFACE FEATURES
TOOLS REQUIRED
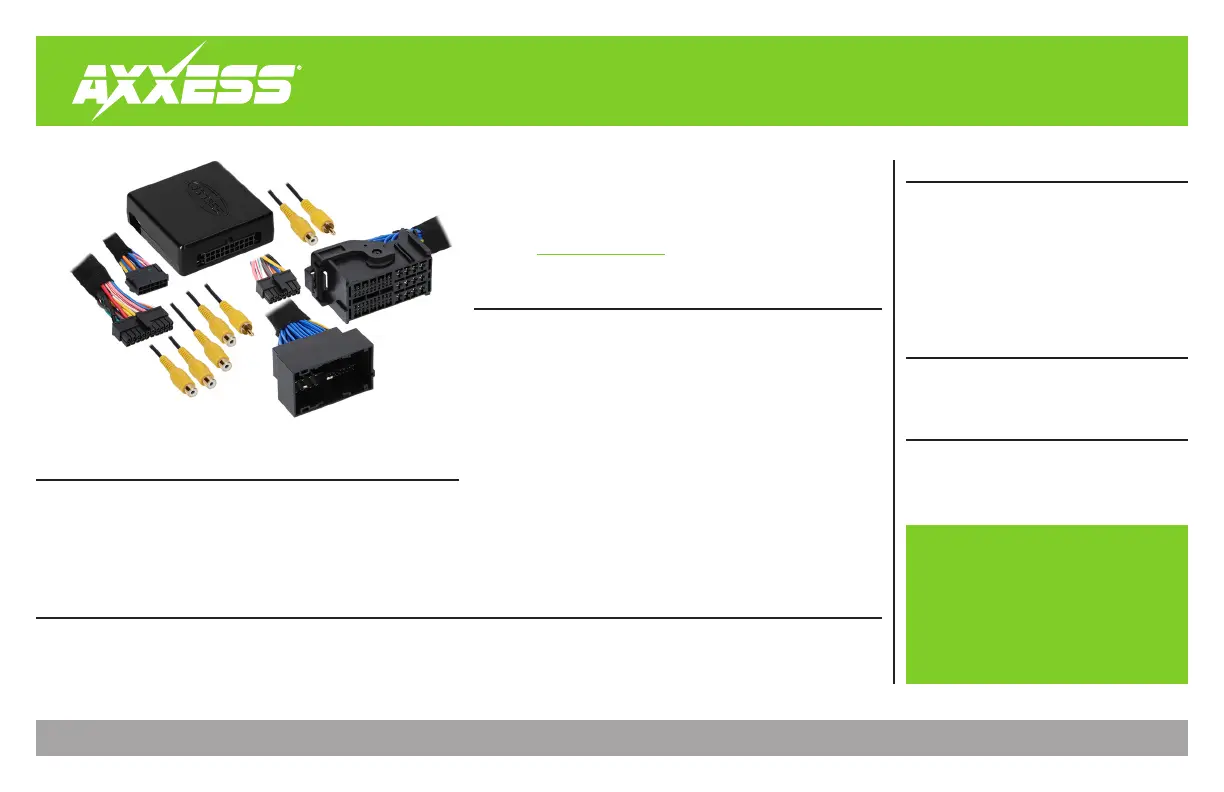
INTERFACE COMPONENTS
REQUIRED ITEMS
TABLE OF CONTENTS
Introduction ...........................................................2
Configuration .....................................................2-4
Connections ............................................................5
Installation .............................................................6
Programming .........................................................6
Rebooting the U-Connect Radio ..........................7
• Add multiple CAN-activated cameras with 4 camera inputs
• Includes AXAC camera interface and vehicle-specific harness
• Programmable 12-volt 5-amp switched output (configured through
the Axxess Updater program)
• Reverse signal trigger generated via CAN bus communication of the
vehicle
• T
urn signal trigger generated via CAN bus communication of the vehicle
• 4 programmable camera control wires (configured through the
Axxess Updater program)
• Can also be manually controlled and used with an aftermarket radio
• VSS (Vehicle Speed Sense) input and output
• Retains factory backup camera
• Micro “B” USB updatable
• Crimping tool and connectors, or solder gun,
solder, & heat shrink • Tape • Wire cutter • Zip
ties
• AXAC-CH6 interface
• AXAC-CH6 interface harness
• AXAC-CH6 vehicle harness
Update Cable: AXUSB-MCBL (sold separately)
Axxess Updater Program
Camera Data Interface w/Pre-Wired
Harness
Fits Select Jeep/Ram Models 2014-2020
APPLICATIONS
Jeep
Compass (with 5" U-Connect radio) .........................2017.5-2020
Renegade .......................................................................2015-2018
Ram
Promaster (with 5" U-Connect radio) ......................... 2014-2019
Promaster City (with 5" U-Connect radio) .................. 2015-2017
Visit AxxessInterfaces.com for more detailed information
about the product and up-to-date vehicle specific applications
Produktspecifikationer
| Varumärke: | Axxess |
| Kategori: | ej kategoriserat |
| Modell: | AXAC-CH6 |
Behöver du hjälp?
Om du behöver hjälp med Axxess AXAC-CH6 ställ en fråga nedan och andra användare kommer att svara dig
ej kategoriserat Axxess Manualer

4 Mars 2026
9 Oktober 2025
8 Oktober 2025
8 Oktober 2025
8 Oktober 2025
8 Oktober 2025
8 Oktober 2025
8 Oktober 2025
8 Oktober 2025
8 Oktober 2025
ej kategoriserat Manualer
Nyaste ej kategoriserat Manualer
3 April 2026
3 April 2026
3 April 2026
3 April 2026
3 April 2026
3 April 2026
3 April 2026
3 April 2026
3 April 2026