Axxess AXAMP-FD1 Bruksanvisning
Axxess ej kategoriserat AXAMP-FD1
Läs gratis den bruksanvisning för Axxess AXAMP-FD1 (4 sidor) i kategorin ej kategoriserat. Guiden har ansetts hjälpsam av 28 personer och har ett genomsnittsbetyg på 4.3 stjärnor baserat på 8 recensioner. Har du en fråga om Axxess AXAMP-FD1 eller vill du ställa frågor till andra användare av produkten? Ställ en fråga
Sida 1/4
AXAMP-FD1
INSTALLATION INSTRUCTIONS
AxxessInterfaces.com © COPYRIGHT 2024 METRA ELECTRONICS CORPORATION REV. 12/20/24 INSTAXAMP-FD1
INTERFACE FEATURES
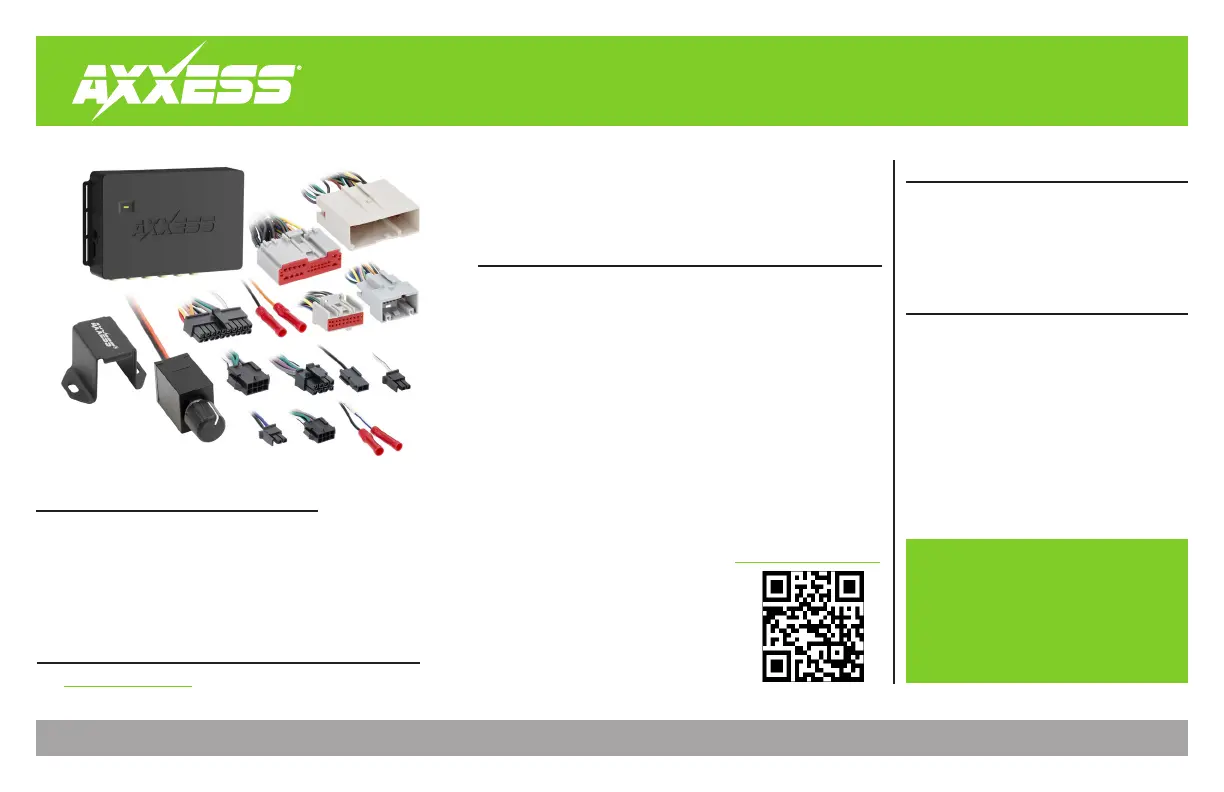
INTERFACE COMPONENTS
TABLE OF CONTENTS
Installation & Installation Options ........................2
Adding Amp/Amps to a Factory System .............3
Troubleshooting: LED Feedback ...........................4
Amplifier Integration Interface
Fits Ford Select Models
2006-2014
• Designed for both amplified and non-amplified models
• Provides 6 channels of 5-volt RMS audio
• Channels 5 & 6 are non-fading full range output
• Includes plug-n-play harnessing
• Simple behind the radio installation
• Dual colored LED feedback
• Input power handling 50 Watts per channel
• Amp on turn-on output is rated at 250mA
• SPDIF out is 2 channel (Fronts)
• AXAMP-FD1 Amplifier integration interface
• AXAMP-FD1 interface harness
• AXAMP-FD1 vehicle T-harness
• Bass knob
APPLICATIONS
Visit Axxessinterfaces.com for current application list
www.MetraOnline.com
MetraOnline.com may be used to assist with
dash assembly instructions. Simply enter
your Year, Make, Model vehicle into the
vehicle fit guide and look for the Dash Kit
Installation Instructions.
TOOLS & INSTALLATION ACCESSORIES REQUIRED
• Crimping tool and connectors, or solder gun,
solder, and heat shrink
• Tape
• Wire cutter
• Zip ties
• Multimeter
ATTENTION: With the key out of the ignition, disconnect
the negative battery terminal before installing this
product. Ensure that all installation connections,
especially the air bag indicator lights, are plugged in
before reconnecting the battery or cycling the ignition
to test this product.
NOTE: Refer also to the instructions included with the
aftermarket accessory before installing this device.
Produktspecifikationer
| Varumärke: | Axxess |
| Kategori: | ej kategoriserat |
| Modell: | AXAMP-FD1 |
Behöver du hjälp?
Om du behöver hjälp med Axxess AXAMP-FD1 ställ en fråga nedan och andra användare kommer att svara dig
ej kategoriserat Axxess Manualer

4 Mars 2026
9 Oktober 2025
8 Oktober 2025
8 Oktober 2025
8 Oktober 2025
8 Oktober 2025
8 Oktober 2025
8 Oktober 2025
8 Oktober 2025
8 Oktober 2025
ej kategoriserat Manualer
Nyaste ej kategoriserat Manualer
3 April 2026
3 April 2026
3 April 2026
3 April 2026
3 April 2026
3 April 2026
3 April 2026
3 April 2026
3 April 2026