Bobrick B-878 Bruksanvisning
Läs gratis den bruksanvisning för Bobrick B-878 (4 sidor) i kategorin tvålpump. Guiden har ansetts hjälpsam av 21 personer och har ett genomsnittsbetyg på 4.1 stjärnor baserat på 3 recensioner. Har du en fråga om Bobrick B-878 eller vill du ställa frågor till andra användare av produkten? Ställ en fråga
Sida 1/4
1-1/4"
32mm
1-1/2"
38mm
1/4"
6mm
Activation
Area
Portion
Control
Knob
Automatic System
Flush Button
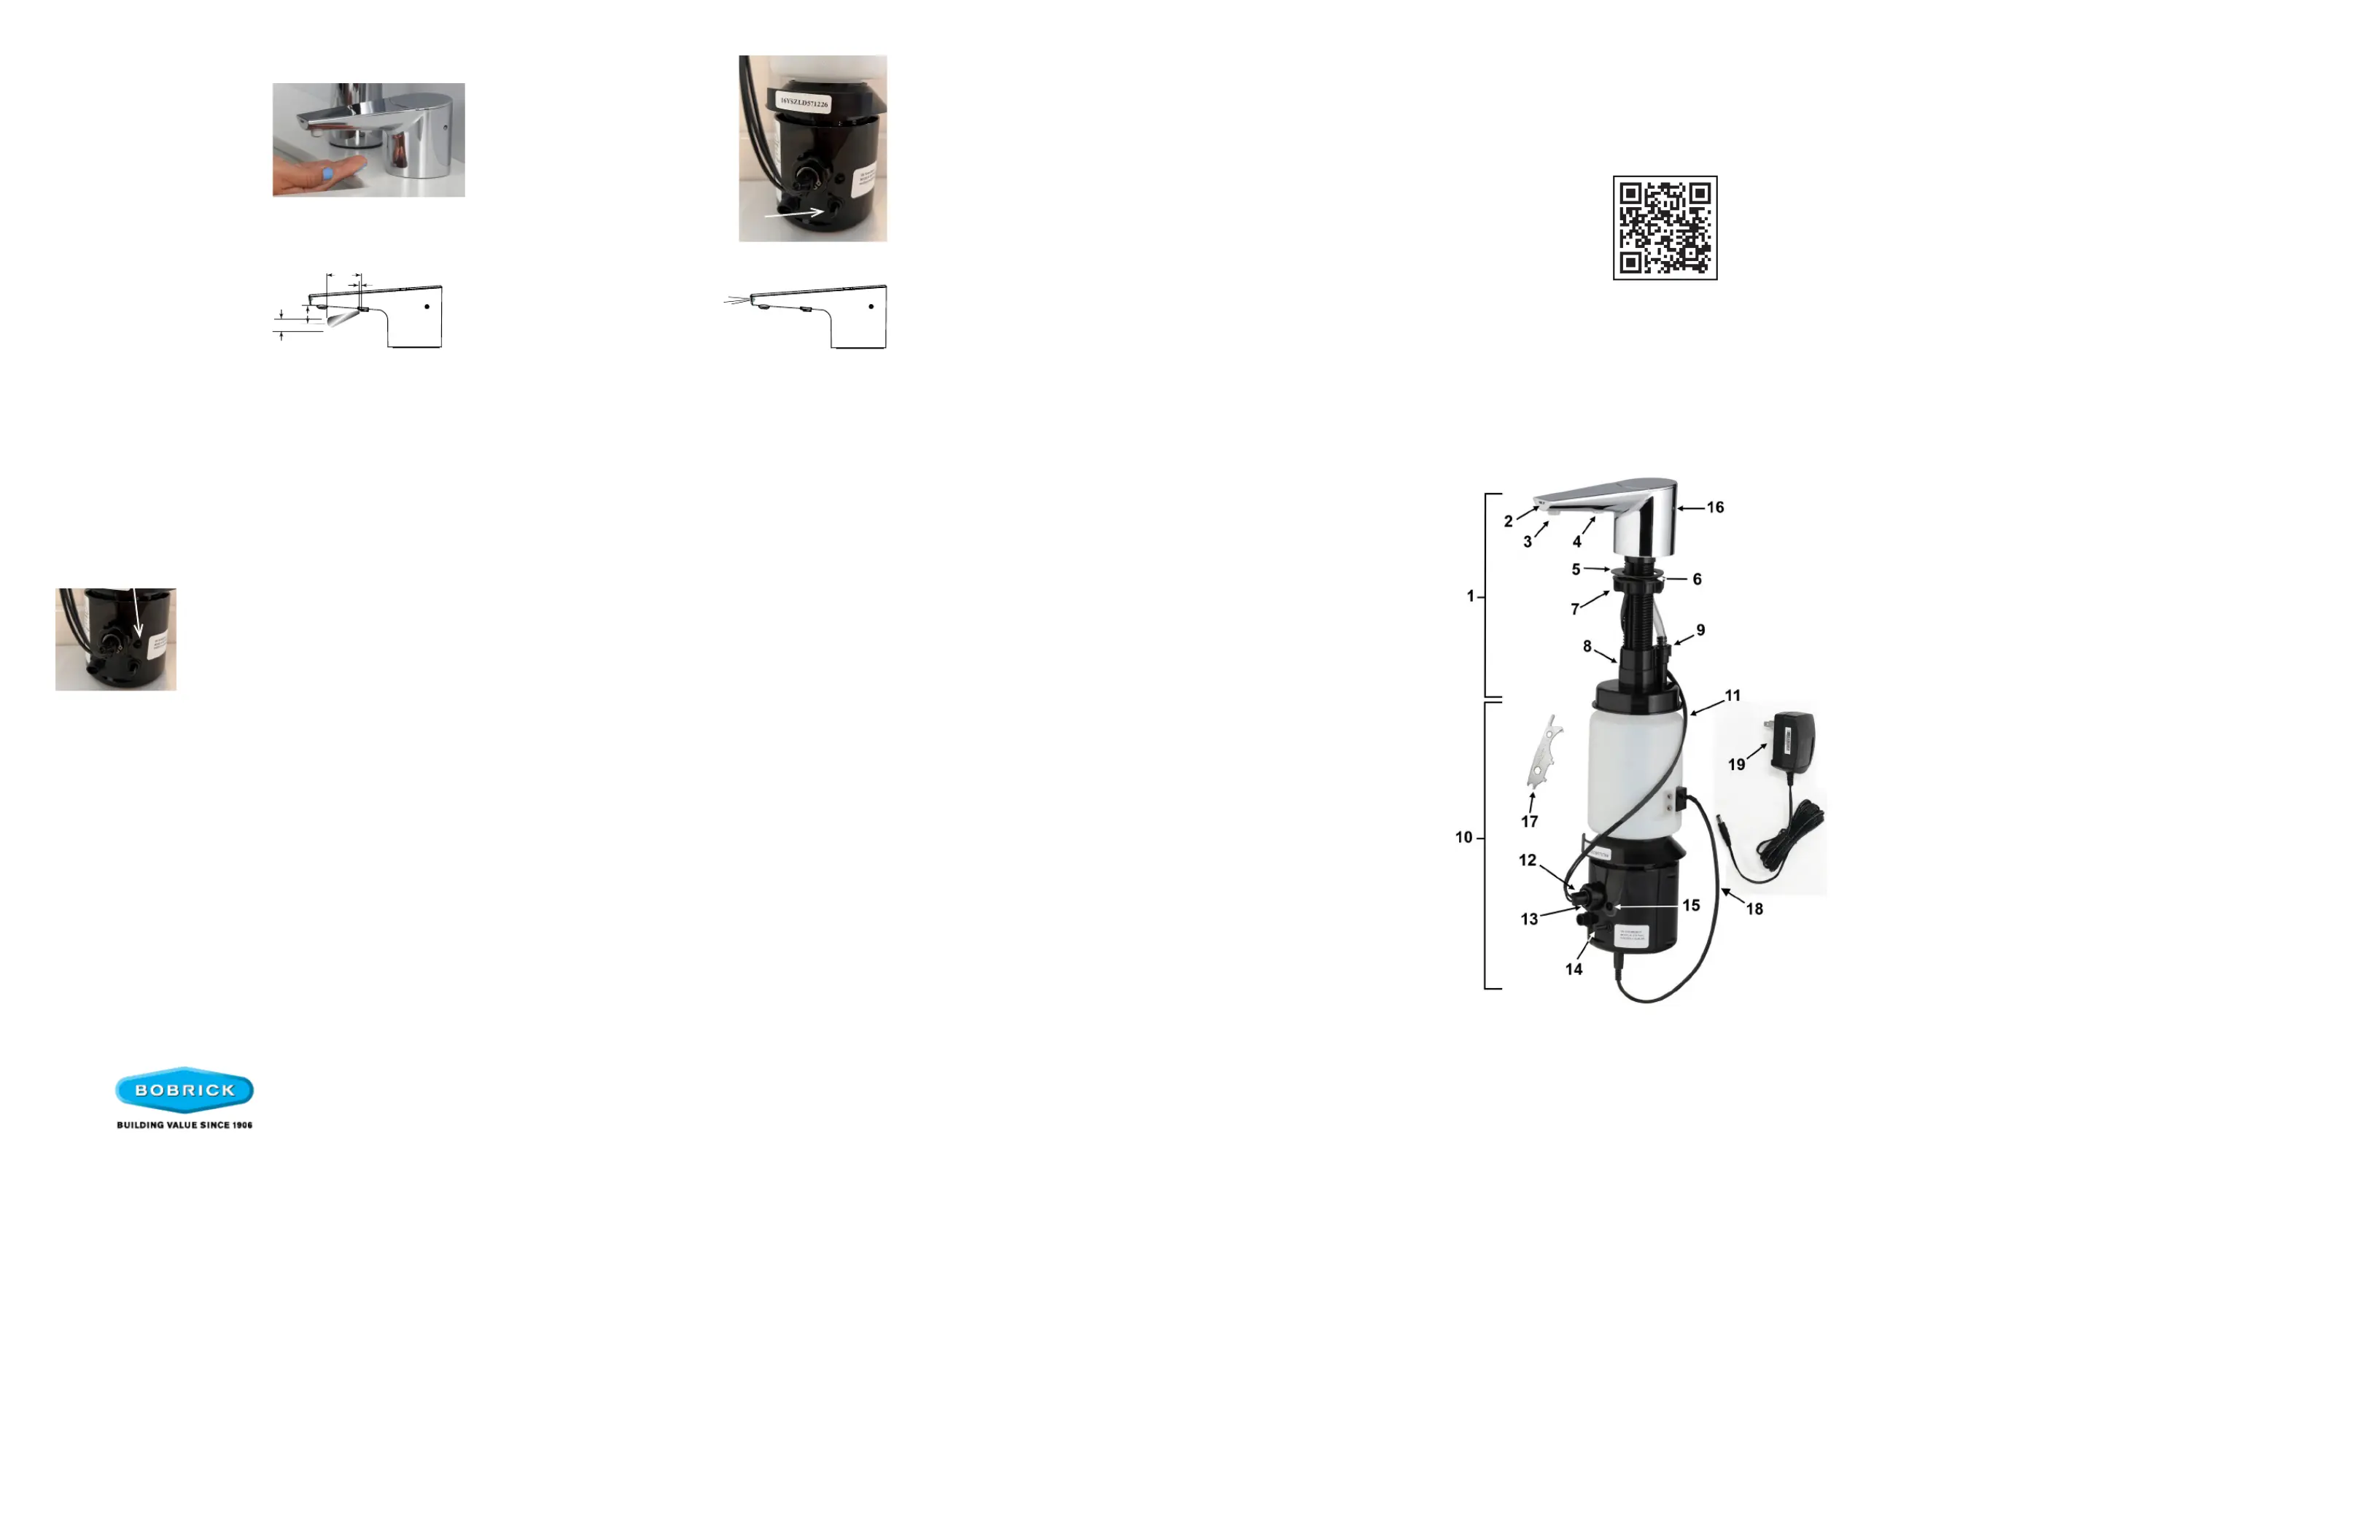
Designer Series Automatic, Counter-Mounted Soap Dispenser
INSTRUCTIONS FOR INSTALLATION, OPERATION & MAINTENANCE
BOBRICK MODELS B-878, B-875, B-872 LIQUID SOAP DISPENSER
Unit Diagram:
Item Description
1 Top Assembly with Spout, Door and Stem
2 LED Light Pipe
3 Liquid Nozzle Tip
4 Fiber Optic Insert with Sensor Lenses
5 Rubber Counter Gasket
6 Wave Washer
7 Mounting Nut
8 Stem Mounting Nut
9 Duckbill Housing
10 Bottom Housing Assembly (includes Soap Bottle)
11 (3) Fiber Optic Cables for Sensor and LED Light Pipe
12 Fiber Optic Connector Tip Assembly
13 Fiber Optic Nut
14 Portion Control Knob
15 Automatic System Flush Button
16 Key Hole
17 BobKey
18 Low Soap Level Sensor
19 A/C Adapter Kit with U.S. Plug.
For outlets not compatible with U.S. plugs, order
Part No. 3974-58.
© 2024 by Bobrick Washroom Equipment, Inc.
Form No. 878-91 8-1-24
Clearances and Mounting Requirements:
•1-3/8" (35mm) diameter mounting hole required.
•Minimum 18-1/2" (470mm) vertical clearance needed below the counter.
•5" (127mm) diameter clearance needed below the mounting hole to
accommodate bottle and bottom housing.
•Minimum 2-1/4" (57mm) diameter clearance needed for Mounting nut directly
below the counter to clear sink rim.
•Recommend drilling mounting hole 6" to 8" (152 to 203mm) from the wall,
and 2-1/2" to 3" (64 to 76mm) from sink rim.
Routine Cleaning and Maintenance:
Using a damp cloth, wipe the chrome-plated exterior of the dispenser daily. Periodically (about 3 to 6 months), it is
recommended to ush the system with lukewarm water for cleaning and maintenance.
1. When minimal amount of soap is left in the bottle, ll dispenser with lukewarm water from top
to dilute soap.
2. Press the Automatic System Flush Button to ush the system.
3. Once unit is ushed, press the Automatic System Flush Button again to stop dispensing.
4. Fill unit with fresh soap and dispense as usual.
For Retrot:
1. Remove existing dispenser(s).
2. Clean area.
3. Ensure hole is 1-3/8" (35mm) diameter.
4. If necessary, enlarge opening using appropriate hole saw. For granite/marble counters, recommend using a diamond
hole saw (consult with stone and granite specialist). If needed, mounting hole should be oset to clear the sink rim. The Mounting
Nut requires 2-1/4" (57mm) diameter clearance directly below the counter.
To Operate:
Troubleshooting:
1. Soap dispenser does not dispense soap, but you can hear motor running. The green LED lights up when hands are
under spout.
a. Press the Automatic System Flush Button until soap comes out.
b. Press the Automatic System Flush Button again to turn it o.
2. Soap dispenser does not dispense soap and you cannot hear motor running. The green LED does not light up when
hands are under spout.
a. Be sure power is supplied to unit.
b. Make sure Fiber Optic Nut is tight on Fiber Optic Port.
Warranty:
SureFlo Automatic Liquid Soap Dispenser is warranted to be free from defects in workmanship and material under normal
usage from the date of purchase for a period of 3 years.
For New Installation:
•Refer to mounting template for drilling locations.
1. Prime Unit –After lling
dispenser, plug in power
to start prime. If unit is
plugged in prior to lling
dispenser, place hand
under spout within sensor
location to start prime.
2. Standard Dispense –
Place hand under spout
within the sensor location
for approximately 1/2
second to dispense
controlled amount of
liquid hand soap.
3. Adjusting amount of soap
dispensed – Depending on
viscosity of liquid soap used,
unit may dispense between
0.4 ml to 3 ml of soap. To
reduce output of liquid soap,
rotate Portion Control Knob
counter-clockwise. To
increase the output of liquid
soap, turn the knob clockwise.
4. LED Light Indicators –
When unit is in standby mode
and contains soap, LED will
have no light. When activated
for dispense, solid green LED
will light. If red light is ashing,
remove hand to allow unit to
reset. Hand must be removed
for a second activation. LED
will ash blue when unit is low
on soap.
In the United States: BOBRICK WASHROOM EQUIPMENT, INC.
New York: 200 Commerce Drive, Clifton Park, NY 12065-1350 • Tel: (518) 877-7444 • Fax: (518)-877-5029
Los Angeles: 6901 Tujunga Ave, North Hollywood, CA 91605-6213 • Tel: (818) 982-9600 • Fax: (818)-503-9287
or email [email protected]
In Canada: BOBRICK WASHROOM EQUIPMENT COMPANY
45 Rolark Drive, Scarborough, Ontario M1R 3B1 • : Tel: (877) 423-6555 • Fax: (877) 423-8555Eastern Canada
•: Tel: (877) 423-6444 • Fax: (877) 423-8444 or email [email protected]Western Canada
Scan For SureFlo Installation and
Maintenance Instructions.
1
4
Produktspecifikationer
| Varumärke: | Bobrick |
| Kategori: | tvålpump |
| Modell: | B-878 |
Behöver du hjälp?
Om du behöver hjälp med Bobrick B-878 ställ en fråga nedan och andra användare kommer att svara dig
tvålpump Bobrick Manualer

19 Augusti 2025
19 Augusti 2025
9 Juni 2025
tvålpump Manualer
Nyaste tvålpump Manualer
7 Mars 2026
7 Oktober 2025
6 Oktober 2025
26 September 2025
26 September 2025
21 September 2025
13 September 2025
26 Augusti 2025