ESYLUX PD 360i/24 Bruksanvisning
ESYLUX Rörelsedetektorer PD 360i/24
Läs gratis den bruksanvisning för ESYLUX PD 360i/24 (4 sidor) i kategorin Rörelsedetektorer. Guiden har ansetts hjälpsam av 50 personer och har ett genomsnittsbetyg på 4.3 stjärnor baserat på 3 recensioner. Har du en fråga om ESYLUX PD 360i/24 eller vill du ställa frågor till andra användare av produkten? Ställ en fråga
Sida 1/4
Reading in the current lighting level as the value to switch on/off the lighting.
the activation/ deactivation value.
Comment: press in programming mode. Rapid flashing of the shows that
the current lighting level is too high (> 2000 Lux) or too low (< 5 Lux), i.e.
the current lighting level cannot be read in.
Input method: When the required ambient light value is reached, press
in programming mode. Confirmation of the signal received: The connected
lighting is switched ON/OFF and the flashes slowly. The flashes
slowly during the entire programming process. When the activation value is
set, the lighting is switched ON.
The programming for the deactivation value is then started.
Input method: When the required light intensities are reached, press when
programming mode is locked. Confirmation of the signal received:
The connected lighting switches OFF/ON and the flashes slowly.
The flashes slowly during the entire programming process. When the activation
value is set, the lighting is switched OFF. The activation value is then programmed.
This takes 10 seconds. When the programming process has been successfully
completed, the lighting switches ON and the lights up continuously again.
www.esylux.com
Test
15
sec.
30min.
30
1
min.
2
5
10
16
1
2
3
4
5
LUX
M
A
120min.
5min.
10
15
30
40
50
60
www.esylux.com
Auto
•Werksprogramm
Default programme
LUX: Arbeitsbereich
Working area
:5 min.
:60 min.
A/M:Vollautomat
Fully automatic
• Oder einstellbar per
Fernbedienung
Or adjustable via remote control
RC
Potentiometer LUX
Position
•Durchgangsbereiche= 1 - 2
Transfer areas
•Arbeitsbereiche = 2 - 3
Working areas
•Tätigkeiten mit hohem= > 3
Lichtbedarf
Activities of high
lighting need
RC
1
2
3
4
5
LUX
1
Test
15
sec.
30min.
30
1
min.
2
5
10
16
Auto
•Werksprogramm
Default programme
LUX: Arbeitsbereich
Working area
:5 min.
:60 min.
A/M:Vollautomat
Fully automatic
•Oder einstellbar per
Fernbedienung
Or adjustable via remote control
RC
RC
a
c
1
2
3
4
5
LUX
Test
15
sec.
30
min.
30
1
min.
2
5
10
16
Auto
•Werksprogramm
Default programme
LUX: Arbeitsbereich
Working area
:5 min.
:60 min.
A/M:Vollautomat
Fully automatic
•Oder einstellbar per
Fernbedienung
Or adjustable via remote control
RC
RC
a
1
2
3
4
5
LUX
Test
15
sec.
30
min.
30
1
min.
2
5
10
16
Auto
•Werksprogramm
Default programme
LUX: Arbeitsbereich
Working area
:5 min.
:60 min.
A/M:Vollautomat
Fully automatic
•Oder einstellbar per
Fernbedienung
Or adjustable via remote control
RC
RC
a
PRÄSENZMELDERPRESENCE SENSORDÉTECTEUR DE PRÉSENCE
M
A
Test
15
sec.
30min.
30
1
min.
2
5
10
16
1
2
3
4
5
LUX
RC
120min.
5min.
10
15
30
40
50
60
M
A
Test
15
sec.
30min.
30
1
min.
2
5
10
16
1
2
3
4
5
LUX
RC
120min.
5min.
10
15
30
40
50
60
M
A
Test
15
sec.
30min.
30
1
min.
2
5
10
16
1
2
3
4
5
LUX
RC
120min.
5min.
10
15
30
40
50
60
a
cde
Technische DaTen • Technical DaTa • DOnnÉes TechniQUes
Technische und optische Änderungen ohne Ankündigung vorbehalten. Aktuelle Informationen zum Produkt finden Sie immer auf der ESYLUX Homepage • Technical and design features may be subject to change. You can find out more about this
product on the ESYLUX homepage • Des modifications techniques et esthétiques peuvent être apportées sans préavis. Pour plus d’informations sur ce produit, consultez le site Internet d‘ESYLUX.
NETZSPANNUNG
MAINS VOLTAGE
TENSION SECTEUR
ZONE DE DETECTION
PORTEE
HAUTEUR DE MONTAGE RECOMMANDEE
REGLAGES
CANAL 1 = ÉCLAIRAGE
PUISSANCE DE COMMUTATION
DELAI DE RETARD
VALEUR DE LUMINOSITE
MESURE DE LUMINOSITE
ENTREE TOUCHE
TYPE DE PROTECTION
CLASSE DE PROTECTION
TEMPERATURES AUTORISEES
BOITIER
DIMENSIONS
COULEUR
ERFASSUNGSBEREICH
FIELD OF DETECTION
REICHWEITE
RANGE
EMPFOHLENE MONTAGEHÖHE
RECOMMENDED INSTALLATION HEIGHT
EINSTELLUNGEN
SETTINGS
NACHLAUFZEIT
FOLLOW-UP TIME
LICHTWERT CA.
LIGHT EXPOSURE RANGE
LICHTMESSUNG
LIGHT MEASURING
TASTEREINGANG
INPUT BY PUSHBUTTON SWITCH
MAXIMALE SCHALTLEISTUNG
MAXIMUM BREAKING CAPACITY
SCHUTZART
PROTECTION TYPE
SCHUTZKLASSE
PROTECTION CLASS
BETRIEBSTEMPERATURBEREICH
OPERATING TEMPERATURE RANGE
GEHÄUSE
CASING
ABMESSUNGEN CA.
APPROX. DIMENSIONS
FARBE
COLOUR
230 V ~ 50 Hz
360°
2,50 m - 3 m
5 - 2000 Lux
100 W/460 VA
II
-25 °C…+55° C
230 V ~ 50 Hz, 2300 W/10 A (cos φ = 1), 1150 VA/5 A (cos φ= 0,5),
EVG: 30 x (1 x 18 W), 20 x (2 x 18 W), 25 x (1 x 36 W), 15 x (2 x 36 W), 20 x (1 x 58 W), 10 x 2 x 58 W )
max. Einschaltstrom 800 A/200 µs / max. inrush current 800 A/200 µs / courant d‘appel maximal 800 A/200 µs
PD 360i/8 ca. 8 m · PD 360i/24 ca. 24 m · PD 360i/24 Korridor ca. 40 m im Durchmesser bei einer Montagehöhe von ca. 3 m
PD 360i/8 approx. 8 m · PD 360i/24 approx. 24 m · PD 360i/24 Korridor approx. 40 m in diameter at an installation height of approx. 3 m
PD 360i/8 env. 8 m · PD 360i/24 env. 24 m · PD 360i/24 Korridor env. 40 m
de diamètre avec une hauteur de montage d’env. 3 m
mechanisch über Einstellregler, elektronisch mit Infrarot-Fernbedienung (Zubehör)
mechanically using setting controls, electronically using infrared remote control (accessory)
mécanique par régleur, électronique par télécommande infrarouge (en option)
Impuls/ca. 15 Sek. - 30 Min.
Impulse/approx. 15 seconds - 30 minutes
Impulsion 15 s à 30 min
DELAI DE RETARD
ENTRÉE SLAVE
NACHLAUFZEIT
FOLLOW-UP TIME
SLAVE-EINGANG
SLAVE INPUT
Impuls/ca. 5 Min - 120 Min.
Impulse/approx. 5 minutes - 120 minutes
ja
yes
Impulsion 5 min à 120 min
oui
CANAL 2 = CONTACT HLK
libre de potentiel 230 V ~/2 A, 24 V =/2 A
CAPACITÉ DE COUPURE
Mischlicht
Mixed light
Lumière mixte
ja
yes
Oui
IP 20 als UP-Version, IP 54 mit AP-Dose (Zubehör)
IP 20 for recessed model, IP 54 with surface mounting box (accessory)
potenzialfrei 230 V ~ /2 A, 24 V = /2 A
floating output 230 V ~/2A, 24 V =/2 A
IP 20 en version sous enduit, IP 54 avec boîtier sur enduit (en option)
UV-stabilisiertes Polycarbonat
UV stabilised polycarbonate
Polycarbonate stabilisé aux UV
PD 360i/8 Version sous enduit : Ø 140 mm, hauteur 47,7 mm
PD 360i/24, PD 360i/Korridor Version sous enduit : Ø 140 mm, hauteur 60 mm
blanc, semblable à RAL 9010
PD 360i/8 UP-Version: Ø 140 mm, Höhe 47,7 mm · PD 360i/24, PD 360i/Korridor UP-Version: Ø 140 mm, Höhe 60 mm
PD 360i/8 Recessed model: Ø 140 mm, height 47,7 mm · PD 360i/24, PD 360i/Korridor Recessed model: Ø 140 mm, height 60 mm
weiß, ähnlich RAL 9010
white, similar to RAL 9010
1 • sicherheiTshinweise
Das Produkt ist nur für den sachgemäßen Gebrauch (wie in der Bedienungsanleitung beschrieben)
bestimmt. Änderungen, Modifikationen oder Lackierungen dürfen nicht vorgenommen werden, da
ansonsten jeglicher Gewährleistungsanspruch entfällt. Sofort nach dem Auspacken ist das Gerät
auf Beschädigungen zu prüfen. Im Falle einer Beschädigung darf das Gerät keinesfalls in Betrieb
genommen werden.
Wenn anzunehmen ist, dass ein gefahrloser Betrieb des Gerätes nicht gewährleistet werden kann,
so ist dieses unverzüglich außer Betrieb zu nehmen und gegen unbeabsichtigten Betrieb zu sichern.
2 • BeschreiBUnG
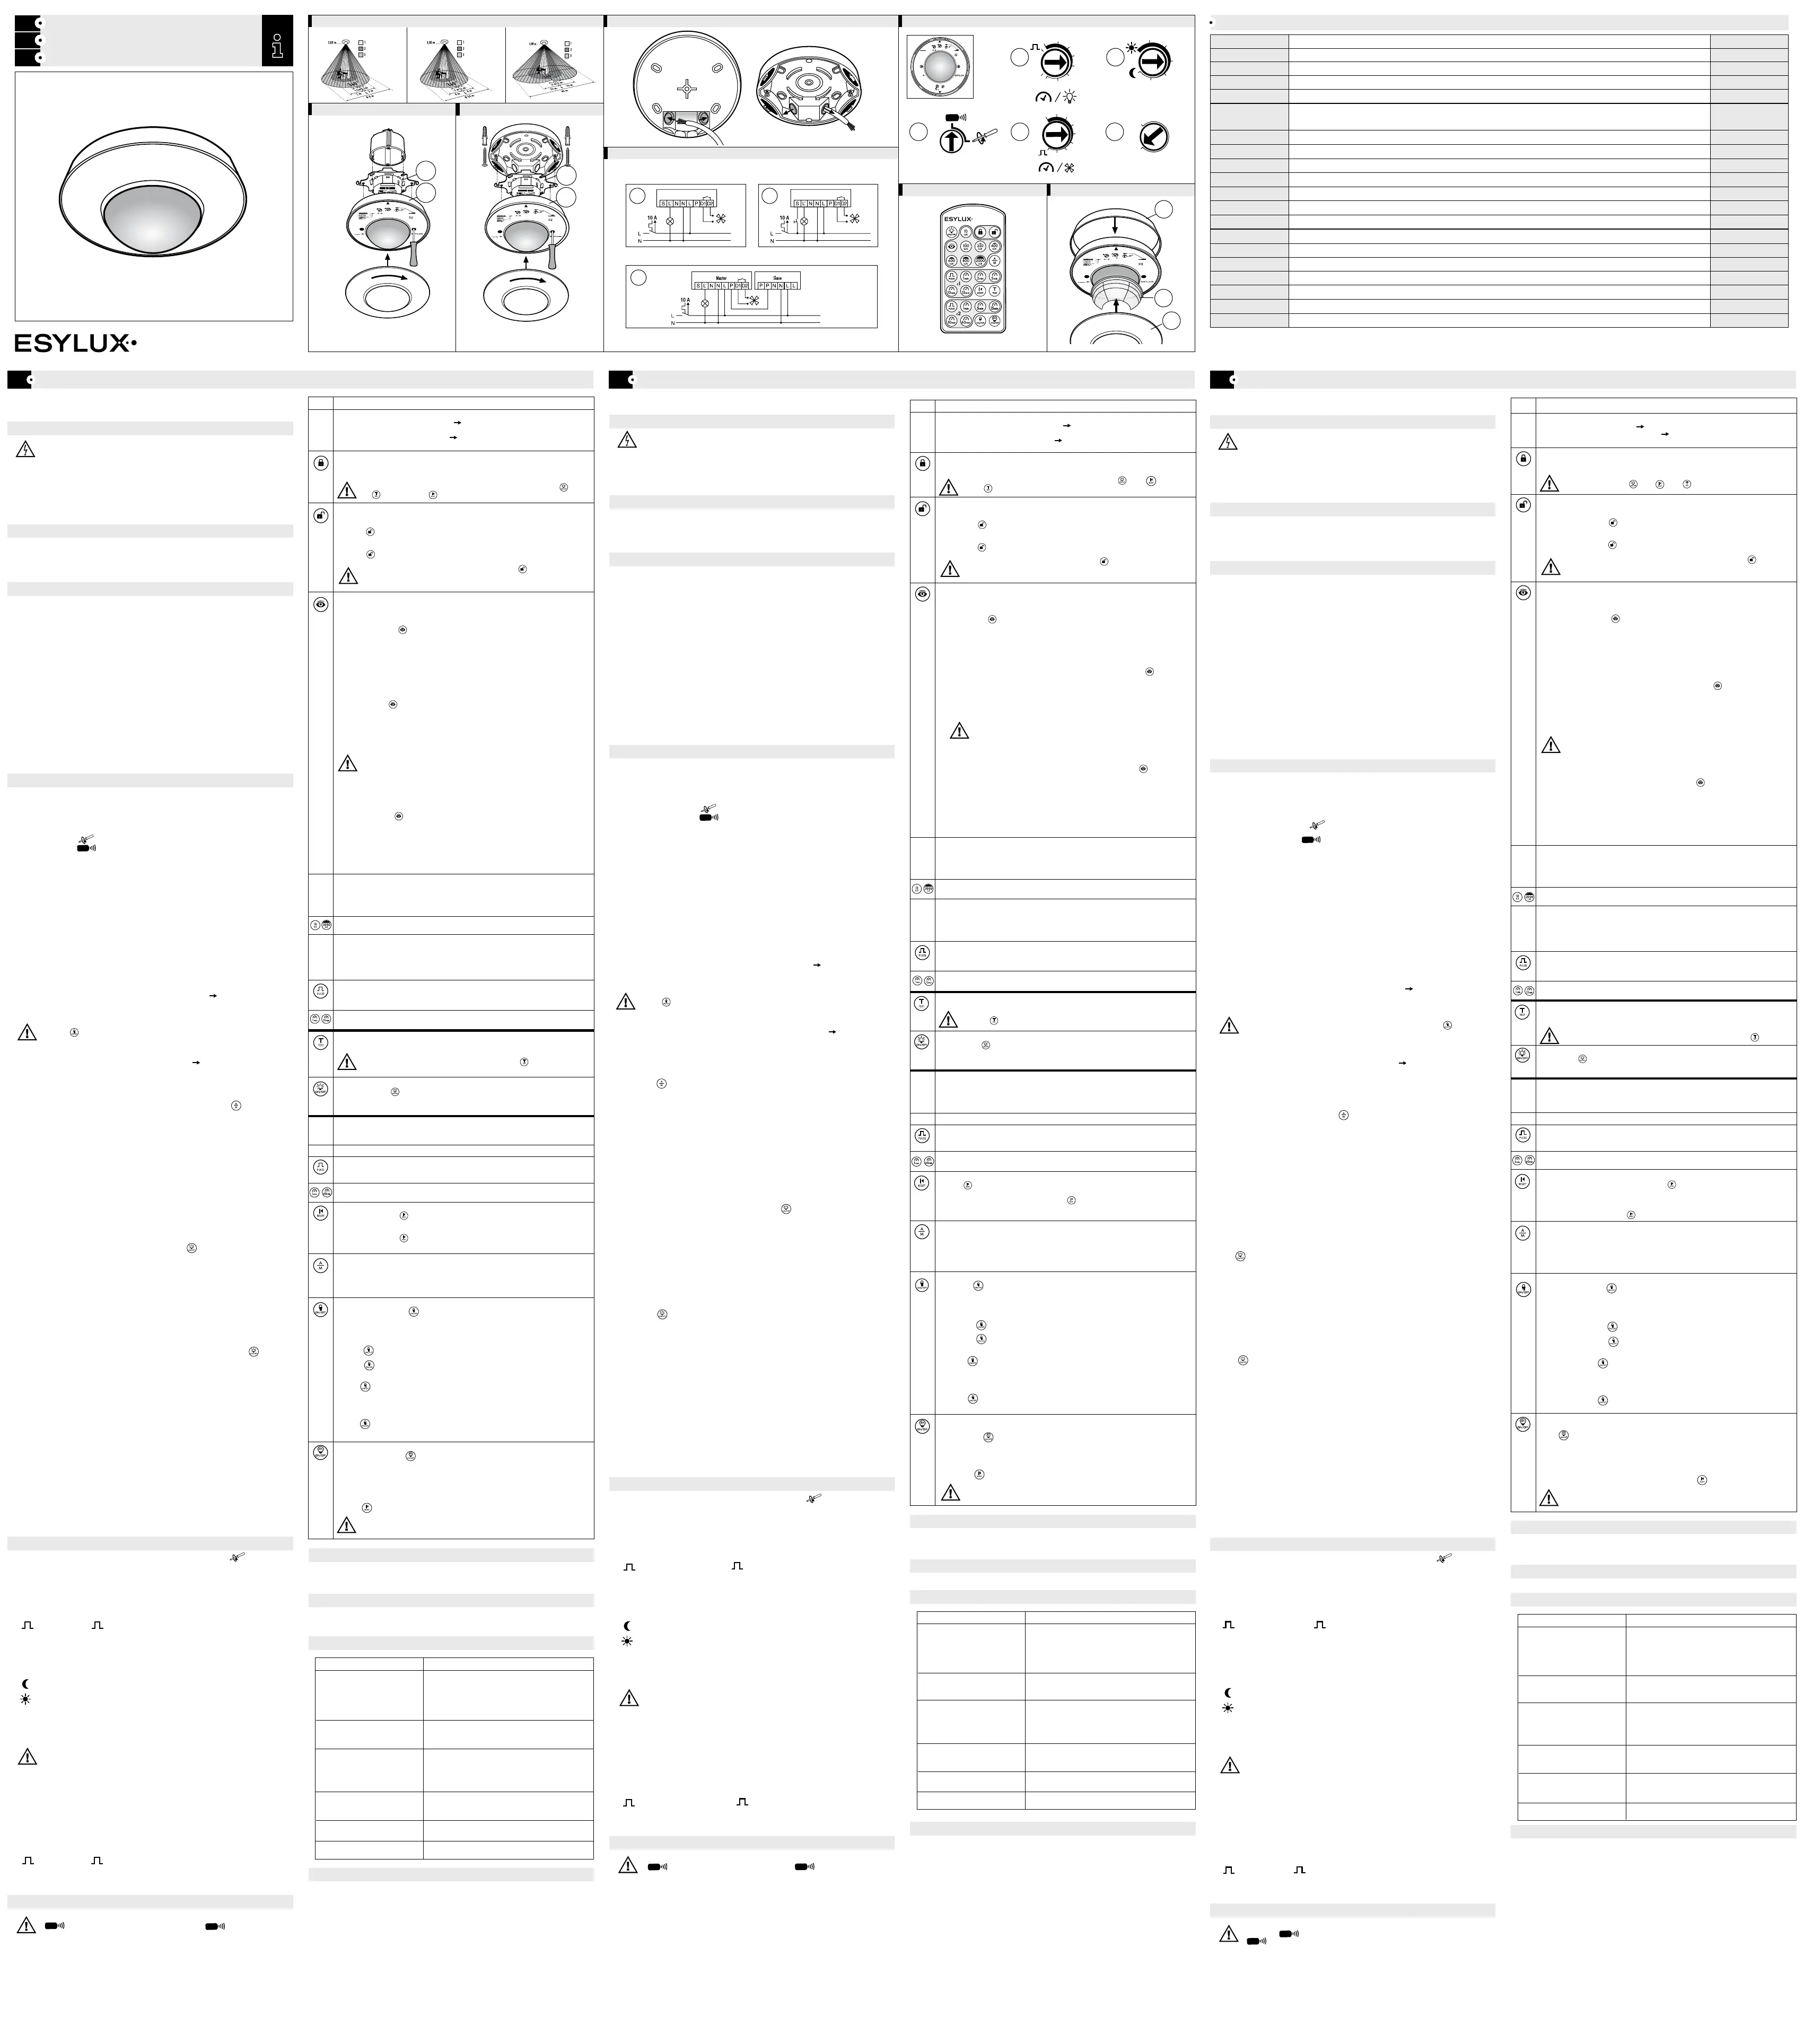
Die ESYLUX PD360i/8, PD360i/24 und PD360i/Korridor sind Präsenzmelder mit 360°
Erfassungsbereich für die Deckenmontage. Automatische Lichtsteuerung in Abhängigkeit von
Anwesenheit und Tageslicht. Zusätzlicher Schaltkontakt „HLK” zur Ansteuerung von Heizung-Lüftung-
Klima in Abhängigkeit von Anwesenheit. Programmierbar per Fernbedienung, somit schnelles und
exaktes Einstellen diverser Parameter ganz ohne Werkzeug und ohne Leiter.
3 • insTallaTiOn / mOnTaGe / anschlUss
• Die empfohlene Montagehöhe beträgt 2,50 - 3 m. Mit steigender Montagehöhe wird die
Reichweite größer, die Empfindlichkeit wird jedoch kleiner. Die Bewegung quer zum Melder ist
optimal für eine Auslösung. Bei einem direkten und frontalen Zugehen ist es für den Melder
schwieriger eine Bewegung zu erkennen, somit ist die Reichweite deutlich geringer.
• Die Platzierung des Melders sollte entsprechend den räumlichen Gegebenheiten und Anforderungen
erfolgen
Der PD360i/Korridor ist so zu montieren, dass die beiden aufgedruckten Dreiecke in
Längsrichtung des Korridors zeigen.
• Vor der Montage des Produktes ist die Netzspannung freizuschalten. Der PD 360i/... ist in der
Standard-Ausführung für die Unterputz-Montage ausgeführt . Netzteil gemäß
Anschlussplan anschließen und in der UP-Dose befestigen.
• Für die Aufputzmontage wird eine AP-Dose (Zubehör) benötigt . AP-Dose an der Decke mit
entsprechenden Dübel und Schrauben ausreichend befestigen . Netzteil
gemäß Anschlussplan anschließen und in der AP-Dose, durch anziehen der beiden
Schrauben, befestigen .
• Sensorteil durch leichten Druck auf das Netzteil aufstecken und die
Schrauben festziehen.
4 • inBeTrieBnahme
Der Melder wird in der Einstellung Werksprogramm/fernbedienbar ausgeliefert und ist somit sofort
betriebsbereit. Individuelle Einstellungen können einfach per Fernbedienung vorgenommen
werden oder manuell über Einstellelemente durch Umschalten des Wahlschalters .
Eine Fehlbedienung kann somit ausgeschlossen werden.
Steht der Pfeil auf „ “, arbeitet der Melder in Abhängigkeit der Einstellelemente.
Steht der Pfeil auf „ “, arbeitet der Melder wie folgt:
a) Noch keine Werte mittels Fernbedienung eingegeben = in Abhängigkeit des Werksprogrammes:
Lux –Wert: Arbeitsbereich (ca. 400 Lux)
Zeiteinstellung 5 Min.
Zeiteinstellung 60 Min.
LED Funktion: aktiv
Vollautomat-Modus
b) In Abhängigkeit der Einstellungen per IR-Fernbedienung.
Es beginnt eine Initialisierungsphase (warm up) von ca. 60 Sek.
Die signalisiert die Zustände des = Beleuchtung und die den = HLK.
und blinken langsam (f = 1Hz) = EEPROM ist leer.
und blinken schnell (f = 4Hz) = EEPROM hat Daten aus Fernbedienungs-
einstellung gespeichert. Angeschlossene Beleuchtung ist eingeschaltet.
Das Umgebungslicht liegt unterhalb des voreingestellten Lichtwertes
danach ist
die als Anzeige für die Bewegungserfassung aktiv = 2 x kurzes Blitzen je erfasster Bewegung
. Angeschlossene Beleuchtung ist eingeschaltet.
Das Umgebungslicht liegt über dem voreingestellten Lichtwert
die ist aus. Anzeige der
Bewegungserfassung nur über die . Angeschlossene Beleuchtung ist aus.
„Vollautomatik” und „Halbautomatik” kann per A/M-Regler oder per Taste auf der
IR-Fernbedienung ausgewählt werden. Drehen Sie den A/M-Regler auf „A”, wird durch 3 Sek.
langes blinken der „Vollautomatik” bestätigt. Drehen Sie „”, wird durch 3 Sek. langes
Blinken der „Halbautomatik” bestätigt.
Die Beleuchtung wird automatisch angeschaltet, wenn der Melder durch Bewegung ausgelöst
wurde und das Umgebungslicht den voreingestellten Lichtwert unterschritten hat. Das Licht wird
automatisch ausgeschaltet bei Abwesenheit von Bewegungen und wenn die voreingestellte
Nachlaufzeit abgelaufen ist.
Um plötzliche Helligkeitswechsel bei Anwesenheit durch unerwünschtes An-/Ausschalten der
Beleuchtung zu vermeiden, wird der Melder ausschließlich zeitverzögert ausgelöst. Zum Beispiel:
Eine vorbeiziehende Wolke wäre in der Lage, ein unnötiges Schalten zu verursachen.
Zeitverzögerung von „hell zu dunkel“: 30 Sek.
Zeitverzögerung von „dunkel zu hell“: 5 Min.
Die Beleuchtung kann zu jeder Zeit per IR-Fernbedienung Taste oder durch Betätigen des externen
Tasters (Taster – Arbeitsstrom – mit N-Leiter-Anschluss), welcher mit der „S“-Klemme des Melders
verbunden ist, manuell eingeschaltet oder ausgeschaltet werden . Wird trotz hoher Raum-
helligkeit (Umgebungslicht ist höher als der eingestellte Lichtwert) das Kunstlicht manuell eingeschaltet,
bleibt die Beleuchtung solange angeschaltet wie der Melder noch eine Bewegung erfasst.
Nach Erfassen der letzten Bewegung, wird die Beleuchtung ausgeschaltet, nachdem die eingestellte
Nachlaufzeit abgelaufen ist. Jedoch wird zur effektiven Energieeinsparung die Beleuchtung automa-
tisch nach 30 Minuten ausgeschaltet, auch wenn noch Bewegung erfasst wird oder die Nachlaufzeit
aktiv ist. Die Beleuchtung kann jederzeit danach wieder manuell geschaltet werden. Wird das
Kunstlicht manuell ausgeschaltet, bleibt die Beleuchtung solange ausgeschaltet wie der Melder noch
eine Bewegung erfasst. Nach Erfassen der letzten Bewegung kehrt der Melder zum vorherigen
Einstellmodus zurück, erst nachdem die Nachlaufzeit abge laufen ist.
Wenn “Halbautomatik” gewählt wurde, muss die Beleuchtung per IR-Fernbedienung oder durch
Betätigen des externen Tasters (Taster – Arbeitsstrom – mit N-Leiter-Anschluss), welcher mit dem
„S“-Terminal des Melders verbunden ist, eingeschaltet werden. Das bedeutet, der Melder kann nicht
durch Bewegungen ausgelöst werden.
Wird trotz hoher Raumhelligkeit (Umgebungslicht ist höher als der eingestellte Lichtwert) das Kunst-
licht manuell eingeschaltet, bleibt die Beleuchtung solange angeschaltet wie der Melder noch eine
Bewegung erfasst (die Lichtmessung ist deaktiv). Nach Erfassen der letzten Bewegung, wird die
Beleuchtung ausgeschaltet nachdem die eingestellte Nachlaufzeit abgelaufen ist. Jedoch wird zur
effektiven Energieeinsparung, die Beleuchtung automatisch nach 30 Minuten ausgeschaltet, auch
wenn noch Bewegung erfasst wird oder die Nach laufzeit aktiv ist. Die Beleuch tung kann jederzeit
danach wieder manuell geschaltet werden.
Wird bei geringer Raumhelligkeit (Umgebungslicht ist unter dem eingestellten Lichtwert) das Kunst-
licht manuell eingeschaltet, bleibt die Beleuchtung solange angeschaltet wie der Melder noch
eine Bewegung erfasst (die Lichtmessung ist aktiv). Nach Erfassen der letzten Bewegung, wird die
Beleuchtung ausgeschaltet nachdem die eingestellte Nachlaufzeit abgelaufen ist. Steigt jedoch der
Tageslichtanteil an und das Umgebungslicht übersteigt den eingestellten Lichtwert, so schaltet der
Melder die Beleuchtung automatisch 5 Minuten nach dem Erreichen des eingestellten Lichtwertes
aus. Die Beleuchtung kann jederzeit danach wieder manuell geschaltet werden.
Der HLK-Kanal (zusätzliche Lichtquelle/Tafelbeleuchtung oder Heizung, Ventilator, Klimaanlage etc.)
wird automatisch geschaltet, wenn der Melder durch Bewegung ausgelöst wurde und wird nicht
durch den Lichtwert kontrolliert. Der HLK-Kanal wird automatisch ausgeschaltet bei Abwesenheit von
Bewegungen und wenn die voreingestellte Nachlaufzeit abgelaufen ist.
5 • einsTellUnG Per einsTellelemenTe
Die Zeit kann zwischen 15 Sek. und 30 Min. gewählt werden.
Steht der Pfeil auf ist der „Testmodus“ gewählt, d.h.:
• Der Lichtwert ist deaktiviert.
• Sobald der Melder durch Bewegung ausgelöst wurde, leuchtet die sowie die
angeschlossene Beleuchtung (Kanal 1) wiederholt im Rhythmus 1 Sek. EIN, 2 Sek. AUS.
: Steht der Pfeil auf , ist „Kurzimpuls“ gewählt, d.h.:
• Der Melder reagiert auf Bewegungen sowie auf den voreingestellten Umgebungslichtwert.
• Sobald der Melder durch Bewegung ausgelöst wurde, wird und die
Beleuchtung (Kanal 1) für 1 Sek. eingeschaltet und dann für 9 Sek. ausgeschaltet.
Die Lichtwerte können zwischen 5 Lux und 2000 Lux gewählt werden.
: Lichtwert beträgt ca. 5 Lux.
: Tag-/Nachtbetrieb
Zur Erleichterung ist die Skalierung in Anwendungsbereiche eingeteilt:
• Durchgangsbereiche = 1 - 2 (40 - 200 Lux)
• Arbeitsbereiche = 2 - 3 (200 - 600 Lux)
• Tätigkeiten mit hohem Lichtbedarf = > 3 (> 600 Lux)
Dieser Einsteller ist für die Auswahl der Betriebsart „Vollautomatik“/„Halbautomatik“.
„Vollautomatik“: Steht der Pfeil auf „A“, ist „Vollautomatik“ gewählt
(siehe Absatz für einzelne Funktionsbeschreibungen).
„Halbautomatik”: Steht der Pfeil auf , ist „Halbautomatik“ gewählt
(siehe Absatz für einzelne Funktionsbeschreibungen).
Die Zeit kann variabel zwischen 5 Min. und 120 Min. gesetzt werden.
: Steht der Pfeil auf , ist „Kurzimpuls“ gewählt, d.h.:
• Der Melder reagiert nur auf Bewegungen und wird nicht durch den Lichtwert kontrolliert.
• Sobald der Melder durch Bewegung ausgelöst wurde, ist die und der Kanal 2
für 5 Sek. eingeschaltet und dann 5 Sek. ausgeschaltet.
6 • einsTellUnG Per FernBeDienUnG
Sämtliche Eingaben per Fernbedienung werden dauerhaft gespeichert. Bei Stromausfall bleiben die
Werte erhalten. Mit der Fernbedienung Mobil-PDi/MDi können Sie die Einstellungen bequem
vom Boden, ohne Leiter und Werkzeug vornehmen. Für einen optimalen Empfang richten Sie die
Fernbedienung bei der Programmierung auf den Präsenzmelder. Bitte beachten Sie, dass bei direkter
Sonneneinstrahlung die Standardreichweite von ca. 6 m bedingt durch den Infrarotanteil der Sonne
stark reduziert werden kann.
7 • FarBen
Die Standard-Ausführung ist in der Farbe weiß. Die Abdeckblende und der Designring
sind abnehmbar und können Kundenspezifisch lackiert werden oder durch ein Abdeck-Set
in silber (Zubehör) ersetzt werden.
8 • linsenmasKe
Mit der beiliegenden Linsenmaske (Halbschale) können Erfassungssegmente
gezielt ausgeblendet werden.
9 • PraKTische TiPPs
10 • esYlUX hersTellerGaranTie
ESYLUX Produkte sind nach geltenden Vorschriften geprüft und mit größter Sorgfalt hergestellt.
Der Garantiegeber, die ESYLUX Deutschland GmbH, Postfach 1840, D-22908 Ahrensburg (für
Deutschland) bzw. der entsprechende ESYLUX Distributor in Ihrem Land (eine vollständige Übersicht
finden Sie unter www.esylux.com) übernimmt für die Dauer von drei Jahren ab Herstelldatum eine
Garantie auf Herstellungs-/Materialfehler der ESYLUX Geräte. Diese Garantie besteht unabhängig
von Ihren gesetzlichen Rechten gegenüber dem Verkäufer des Geräts. Die Garantie bezieht
sich nicht auf die natürliche Abnutzung, Veränderung/Störung durch Umwelteinflüsse oder auf
Transportschäden sowie nicht auf Schäden, die infolge Nichtbeachtung der Bedienungsanleitung,
der Wartungsanweisung und/oder unsachgemäßer Installation entstanden sind. Mitgelieferte
Batterien, Leuchtmittel und Akkus sind von der Garantie ausgeschlossen. Die Garantie kann nur
gewährt werden, wenn das unveränderte Gerät unverzüglich nach Feststellung des Mangels mit
Rechnung/Kassenbon sowie einer kurzen schriftlichen Fehlerbeschreibung, ausreichend frankiert
und verpackt an den Garantiegeber eingesandt wird. Bei berechtigtem Garantieanspruch wird der
Garantiegeber nach eigener Wahl das Gerät in angemessener Zeit ausbessern oder austauschen.
Weitergehende Ansprüche umfasst die Garantie nicht, insbesondere haftet der Garantiegeber
nicht für aus der Fehlerhaftigkeit des Geräts entstehende Schäden. Sollte der Garantieanspruch
nicht gerechtfertigt sein (z.B. nach Ablauf der Garantiezeit oder bei Mängeln außerhalb des
Garantieanspruchs), so kann der Garantiegeber versuchen, das Gerät kostengünstig gegen
Berechnung für Sie zu reparieren.
- Die rote oder blinkt für 2 Sek.
Das Signal von der Fernbedienung wurde verstanden.
- Die rote oderblitzt 2 x kurz.
Das Signal von der Fernbedienung wurde nicht verstanden.
Durch Drücken dieser Taste wird der Programmiermodus beendet.
Melder reagiert nun automatisch entsprechend den eingestellten Werten.
Beleuchtung schaltet nicht ein,
bzw. Beleuchtung schaltet aus
bei Anwesenheit und Dunkelheit
- Lichtwert zu niedrig eingestellt
- Melder auf Halbautomat eingestellt
- Beleuchtung wurde manuell ausgeschaltet
- Person nicht im Erfassungsbereich
- Hindernis(se) stören Erfassung
- Nachlaufzeit zu kurz eingestellt
Beleuchtung ist an bei
Anwesenheit, trotz genügend
Helligkeit
- Lichtwert zu hoch eingestellt
- Beleuchtung wurde vor kurzem manuell eingeschaltet
- Melder im Testbetrieb
Beleuchtung schaltet nicht aus,
bzw. Beleuchtung schaltet
bei Abwesenheit spontan ein
- Nachlaufzeit abwarten
- Thermische Störquellen im Erfassungsbereich:
Heizlüfter, Glühlampe/Halogenstrahler, sich bewegende
Objekte (z. B. Vorhänge bei offenen Fenstern), Last
(EVGs Relais) nicht entstört
Taster funktioniert nicht- Gerät noch in der Startphase oder Leuchttaster ohne
Null-Leiteranschluss verwendet
- Taster nicht auf „S”-Klemme geführt
Licht schaltet in warm-up Phase
ständig EIN und AUS
- Zuviel Kunstlicht fällt auf den Melder
- Lichtwert erhöhen oder Melder umplatzieren
Gerät reagiert nicht- Netzspannung prüfen
Test
RC
Auto
Test
RC
Auto
Durch drücken dieser Taste wird der Programmiermodus geöffnet.
1. Die angeschlossene Beleuchtung ist aus.
- Taste drücken, Beleuchtung schaltet EIN/AUS. Die rote undleuchten
permanent solange sich der Melder im Programmiermodus befindet.
2. Die angeschlossene Beleuchtung ist an.
- Taste drücken, Beleuchtung schaltet AUS. Die rote und leuchten
permanent solange sich der Melder im Programmiermodus befindet.
: Drücken Sie im geöffneten Programmiermodus.
Schnelles Blinken von der signalisiert, dass der aktuelle Umge bungslichtwert
zu hell ist (> 2000 Lux) oder zu dunkel (< 5 Lux),
d.h., der aktuelle Umgebungslichtwert kann nicht eingelesen werden.
Methode des Einlesens: Wenn der gewünschte Umgebungslichtwert erreicht
ist, drücken Sie im geöffneten Programmiermodus.
Quittierung des empfangenen Signales:
Angeschlossene Beleuchtung schaltet EIN/AUS und blinkt langsam.
Während des gesamten Einlesevorgangs blinkt die langsam.
Ist der Einschaltwert eingelesen, schaltet die Beleuchtung EIN.
Nun beginnt das Einlesen des Ausschaltwertes.
Methode des Einlesens: Wenn die gewünschten Lichtverhältnisse erreicht
sind, drücken Sie im gesperrten Programmiermodus.
Quittierung des empfangenen Signales:
Angeschlossene Beleuchtung schaltet AUS/EIN und blinkt langsam.
Während des gesamten Einlesevorgangs blinkt die langsam.
Ist der Ausschaltwert eingelesen, schaltet die Beleuchtung AUS.
Nun beginnt das Einlesen des Einschaltwertes. Die Einlesezeit beträgt
10 Sek. Ist der Einlesevorgang erfolgreich beendet, schaltet die Beleuchtung
EIN und die leuchtet wieder permanent.
1. Die angeschlossene Beleuchtung ist AUS.
- Taste drücken, Beleuchtung schaltet EIN/AUS. Die blinkt für 2 Sek.
2. Die angeschlossene Beleuchtung ist EIN.
- Taste drücken, Beleuchtung schaltet AUS/EIN. Die blinkt für 2 Sek.
Tastenfeld
c1
Tastenfeld
c2
1. Die angeschlossene Beleuchtung ist AUS.
- Taste drücken, Beleuchtung schaltet EIN/AUS. Die blinkt für 2 Sek.
2. Die angeschlossene Beleuchtung ist EIN.
- Taste drücken, Beleuchtung schaltet AUS/EIN. Die blinkt für 2 Sek.
Taste drücken. Die blinkt für 2 Sek.
Der Melder reagiert nur auf Bewegungen und wird nicht durch den Lichtwert
kontrolliert. Sobald der Melder durch Bewegung ausgelöst wurde, ist die und der
Kanal 2 für 5 Sek. eingeschaltet und dann 5 Sek. ausgeschaltet.
Der Melder reagiert auf Bewegungen sowie auf den voreingestellten
Umgebungslichtwert. Sobald der Melder durch Bewegung ausgelöst wurde, wird die
und die Beleuchtung für 1 Sek. angeschaltet und dann für 9 Sek. ausgeschaltet.
Der Lichtwert ist deaktiviert. Sobald der Melder durch Bewegung ausgelöst wurde,
leuchtet die sowie die angeschlossene Beleuchtung 1 Sek. EIN, 2 Sek. AUS.
Durch Drücken von , kann die Beleuchtung jederzeit eingeschaltet werden falls die
Beleuchtung aus war. Wiederholen Sie diesen Vorgang, kann die Beleuchtung ausgeschaltet
werden (siehe Absatz für „Manuelle Beleuchtungssteuerung“ Funktionsbeschreibung).
• Durch Drücken von im geöffneten Programmiermodus werden die
Informationen im EEPROM gelöscht und der Melder arbeitet in Abhängigkeit
der Einstellelemente.
• Durch Drücken von im gesperrten Programmiermodus schalten sich die Beleuchtung
und der Kontakt für HLK aus und der Melder ist im voreingestellten Modus.
Um zwischen „Vollautomatik” oder „Halbautomatik zu wählen,
darf die IR-Fernbedienung nicht gesperrt sein.
Vollautomat = Taste drücken, blinkt ca. 3 Sek.;
Halbautomat = Taste drücken, blinkt ca. 3 Sek.
Durch Betätigen der Taste im geöffneten Programmiermodus können
die und die deaktiviert bzw. aktiviert werden.
1. Die angeschlossene Beleuchtung ist AUS.
- Taste drücken, Beleuchtung schaltet EIN/AUS.
2. Die angeschlossene Beleuchtung ist EIN.
- Taste drücken, Beleuchtung schaltet AUS/EIN.
- Taste drücken. Die und die sind für 2 Sek. aus.
Die sind nun deaktiviert und funktionieren nur noch in der
warm-up-Phase und im geöffnenten
Programmiermodus als Quittierungsanzeige.
- Taste drücken. Die und die blinken für 2 Sek.
Die sind nun auch wieder im Betriebsmodus aktiv.
1 • saFeTY insTrUcTiOns
Use this product only as intended (as described in the user instructions). Changes or modifications
to the product or painting it will result in loss of warranty. You should check the device for damage
immediately after unpacking it. If there is any damage, you should not install the device under any
circumstances. If you suspect that safe operation of the device cannot be guaranteed, you should turn
the device off immediately and make sure that it cannot be operated unintentionally.
2 • DescriPTiOn
The ESYLUX PD360i/8, PD360i/24 and PD360i/Korridor are ceiling-mounted presence sensors
with a 360° range. The light is automatically controlled depending on whether the room/area is
occupied an on the presence of daylight. Additional “HKL” switching contact to control heating -
air-conditioning - climate if the area/room is occupied. It can be programmed by remote control,
allowing quick and precise setting of a range of parameters without the need for tools or a ladder.
3 • insTallaTiOn / mOUnTinG / cOnnecTiOn
• The recommended installation height is 2.50 - 3 m. The greater the installation height, the
greater the range. The sensitivity is, however, reduced. The detector is at its most sensitive if
approached diagonally. If approached directly or frontally it is difficult for the detector to
recognise motion and the range is therefore much smaller.
• The detector should be positioned as suits the local environment and the user requirements
.The
PD360i/Korridor should be mounted so that both printed triangles run parallel to the
length of the corridor.
• Switch off the mains supply before installing the product. The PD 360i... standard model
is designed for recessed installation . Connect the power supply as
shown in the circuit diagram and fit into the recessed box.
• If surface mounting, a surface mounting box (accessory) is required . Secure the surface
mounting box firmly using the appropriate wall plugs and screws . Connect the power
supply as shown in the circuit diagram and secure in the surface
mounting box by tightening both screws .
• Gently press the sensor section into the power pack and tighten the screws.
4 • sTarTinG UP
The sensor is supplied with default settings, can be operated by remote control, and is thus immediately
ready for use. Individual settings can simply be made using the remote control or manually
using the setting controls by switching the mode switch . This ensures that there
are no operating errors.
If the arrow is pointing to „ „ the detector is controlled by the setting controls.
If the arrow is pointing to „ „, the detector works in the following way:
a) No values yet entered via the remote control = as per the default settings:
Lux value: work area (approx. 400 Lux)
Time setting channel 1: 5 minutes
Time setting : 60 minutes
LED function: enabled
Fully-automatic mode
b) As per settings set with the remote control.
An initialisation phase (warm-up) starts. This lasts approximately 60 seconds.
The shows the status of channel 1 = lighting, while the shows the status of = HLK.
and flash slowly (f = 1Hz) = EEPROM is empty.
and flash quickly (f = 4Hz) = EEPROM has saved data from the remote control
settings. The connected lighting is switched on.
When the ambient lighting level is lower than the default light value
the is enabled to
indicate motion detection: two short flashes each time movement is detected .
The connected lighting is switched on.
with the infrared remote control.
When the ambient lighting level is higher than the default light intensity value the is
disabled. Motion detection is indicated by the only. The connected lighting is switched off.
“Fully automatic” and “semi-automatic” mode can be selected using the A/M controller or
by using the “ ” button on the infrared remote control. If you turn the A/M-controller to , the
„fully automatic“ will flash for 3 seconds to confirm the setting. If you select , the „semi-
automatic” mode is confirmed by the flashing for 3 seconds.
The lighting is automatically switched on if the sensor is triggered by motion and the lighting level
is below the set value. The light automatically switches off if motion is no longer detected and when
the set follow-up time has expired.
To avoid sudden changes in the lighting level caused by inadvertent activation/deactivation of the
light when the room/area is occupied, the sensor is only trigged with a time delay. For instance:
A passing cloud would be able to cause unnecessary activation of the light.
Time delay from “light to dark”: 30 seconds
Time delay from “dark to light”: 5 minutes
The lighting can be switched on or off at any time using the button on the infrared remote control
or with the external button (button – operating current – with neutral wire connection) connected to the
sensor with the “S” clip .
If the artificial light is switched on manually despite the high level of light in the room (surrounding
lighting level higher than the set lighting level). The lighting stays on for as long as motion is detected.
When motion is no longer detected the lighting is switched off after the set follow-up time. To ensure
effective energy saving, the lighting is automatically switched off after 30 minutes, even if motion is
still detected or the follow-up time is still active. The lighting can then be switched back on manually
at any time. If the artificial light is switched on manually it remains switched on for as long as motion
is still detected. When no further motion is detected the sensor does not return to the previous setting
mode until the follow-up time has expired.
If “semi-automatic” operating mode is selected, the lighting must be switched on using the infrared
remote control or with the external button (button – operating current – with neutral wire
connection) connected to the “S”-terminal of the sensor. This means that the sensor cannot be
activated by motion. If the artificial light is switched on manually despite the high level of light in
the room (surrounding light higher than the set lighting level) the lighting stays on for as long as
motion is detected (lighting level detection is deactivated). When no further motion is detected the
lighting is switched off after the set follow-up time has expired. To ensure effective energy saving,
the lighting is automatically switched off after 30 minutes, even if motion is still detected or the
follow-up time is still active. The lighting can then be switched back on manually at any time. If the
artificial light is switched on manually and the level of light in the room is low (surrounding light
lower than the set lighting level) the lighting stays on for as long as motion is detected (lighting
level detection is activated). When no further motion is detected the lighting is switched off after the
set follow-up time has expired. If, however, the level of natural light increases and the surrounding
lighting level rises above the set lighting level, the sensor automatically switches the lighting off
5 minutes after the set lighting level is reached. The lighting can then be switched back on
manually at any time.
The HVAC channel (additional light source/panel lighting or heating, fan, air-conditioning system,
etc.) will be operated automatically when the detector has been triggered by movement and is
not being controlled by the light intensity value. In the absence of movement and once the default
switch-off delay time has elapsed, the HVAC channel will be automatically switched off.
5 • seTTinG wiTh The seTTinG cOnTrOls
The time can be selected between 15 seconds and 30 minutes
If the arrow is pointing to , test mode is selected, i.e.:
• The light value is deactivated.
• When the detector is activated by motion, the and the connected lighting
(channel 1) flash ON for 1 second and OFF for 2 seconds.
: If the arrow is pointing towards „short impulse“ is selected, i.e.:
• The detector reacts to motion and to the set value for the lighting level.
• When the detector is activated by motion, the and the lighting (channel 1) are
switched on for 1 second and off for 9 seconds.
The lighting values can be selected from 5 Lux to 2000 Lux.
: Lighting value is approx. 5 Lux
: Day / night operating mode
To facilitate operation, the lighting values in the various areas are divided as follows:
• transit areas = 1 - 2 (40 - 200 Lux)
• work areas = 2 - 3 (200 - 600 Lux)
• activities where bright light is required = > 3 (> 600 Lux)
This setter is used for selecting the operating mode “fully automatic” / „semi-automatic“.
“Fully automatic” If the arrow is pointing to , “fully automatic” mode is selected
(see section for individual description of functions).
“Semi-automatic”: If the arrow is pointing to , “semi-automatic” mode is selected
(see section for individual description of functions).
The time can be set between 5 and 120 minutes.
: If the arrow is pointing towards , „short impulse“ is selected, i.e.:
• The sensor only responds to motion and is not controlled by the lighting level.
• When the sensor is activated by motion, the and channel 2
are switched on for 5 seconds and then switched off for 5 seconds.
6 • seTTinG BY remOTe cOnTrOl
default settings.
All entries made by remote control are saved. If there is a power cut the values are not lost. The
remote control Mobil-PDi/MDi allows you to set the device conveniently from the ground,
without the need for a ladder or tools. To ensure the best reception, the remote control should be
pointed towards the presence sensor. Please note that the standard range of approx. 6 m can be
substantially affected by direct sunlight, on account of the infrared rays of the sun.
7 • cOlOUrs
The standard model is white. The covering screen and the design ring can be
removed and can be varnished in a colour of the customer‘s choice, or replaced by a silver
cover set (accessory).
8 • lens masK
Use the lens mask provided (half shell) to mask specific areas of detection.
9 • PracTical aDVice
10 • esYlUX manUFacTUrer’s GUaranTee
ESYLUX products are tested in accordance with applicable regulations and manufactured with the
utmost care. The guarantor, ESYLUX Deutschland GmbH, Postfach 1840, D-22908 Ahrensburg,
Germany (for Germany) or the relevant ESYLUX distributor in your country (visit www.esylux.com
for a complete overview) provides a guarantee against manufacturing/material defects in ESYLUX
devices for a period of three years from the date of manufacture. This guarantee is independent of
your legal rights with respect to the seller of the device. The guarantee does not apply to natural
wear and tear, changes/interference caused by environmental factors or damage in transit, nor
to damage caused as a result of failure to follow the user or maintenance instructions and/or
as a result of improper installation. Any illuminants or batteries supplied with the device are not
covered by the guarantee. The guarantee can only be honoured if the device is sent back with the
invoice/receipt, unchanged, packed and with sufficient postage to the guarantor, along with a
brief description of the fault, as soon as a defect has been identified. If the guarantee claim proves
justified, the guarantor will, within a reasonable period, either repair the device or replace it. The
guarantee does not cover further claims; in particular, the guarantor will not be liable for damages
resulting from the device’s defectiveness. If the claim is unfounded (e.g. because the guarantee has
expired or the fault is not covered by the guarantee), then the guarantor may attempt to repair the
device for you for a fee, keeping costs to a minimum.
- The red or flashes for 2 seconds.
The signal from the remote control has
been understood.
- The red or flashes briefly 2 x.
The signal from the remote control has not
been understood.
Programming mode is ended by pressing this key.
The detector only reacts automatically in accordance with the set values.
Lighting does not switch on or
lighting switches despite motion
and darkness
- Lighting value is set too low
- Sensor set to semi-automatic mode
- Lighting was switched off manually
- Person is not in the field of detection
- Obstacle(s) affect(ed) detection
- Set follow-up time too short
Lighting switches on if motion is
detected, even if the lighting level
is sufficient
- Lighting value is set too high
- Lighting has been recently operated manually
- Detector is in test mode
Lighting does not switch off or
lighting switches on, even if
there is no motion
- Wait for follow-up time
- Thermal disturbance in field of detection:
Patio heaters, halogen flood light/light bulb,
moving objects (e.g. curtains at an open window), load
(series connection unit relay) not suppressed
Pushbutton switch does not work- Device used in start phase or lighting key used
without neutral wire connection
- Key not fed onto „S“ clip
Light constantly switches ON and
OFF in the warm-up phase
- Too much artificial light on the detector
- Increase lighting value or reposition detector
Device does not react- Check mains voltage
Cause
Test
RC
Auto
Test
RC
Auto
The programming mode is opened with this key.
1. The connected lighting is switched off.
- Press the key; this lighting switches ON/OFF. The red and is lit continuously,
providing the detector is in programming mode.
2. The connected lighting is switched on.
- Press the key; this lighting switches OFF. The red and is lit up continuously,
providing the detector is in programming mode.
1. The connected lighting is switched OFF.
- Press the key; the lighting switches ON/OFF. The flashes for 2 seconds.
2. The connected lighting is switched ON.
- Press the key; the lighting switches OFF/ON. The flashes for 2 seconds.
Keypad
c1
Keypad
c2
1. The connected lighting is switched OFF.
- Press the key; the lighting switches ON/OFF. The flashes for 2 seconds.
2. The connected lighting is switched ON.
- Press the key; the lighting switches OFF/ON. The flashes for 2 seconds.
Press the button. The flashes for 2 seconds.
The sensor only responds to motion and is not controlled by the lighting level.
When the detector is activated by motion, the and channel 2 is activated for 5
seconds and then deactivated for 5 seconds.
The detector reacts to motion and to the set value for the lighting level. When
the detector is activated by motion, the and the lighting are switched on for 1
second and off for 9 seconds.
The light value is deactivated. When the detector is activated by motion, the
and the connected lighting switch ON for 1 second and OFF for 2 seconds.
By pressing the key the lighting can be switched on at any time in case it was switched
off. If you repeat this process the lighting can be switched off. (See section for „Manual
lighting control“, function outline).
Resetting
• Press in programming mode to clear the information stored in the EEPROM.
The detector will then operate according to the settings programmed using the device.
• When programming mode is locked, press to disable the lighting and the HVAC
contact. The detector will switch to the default settings.
To switch between “fully automatic” mode and “semi-automatic” mode, the infrared
remote control must not be locked.
Fully automatic mode = press key, flashes for approximately 3 seconds.
Semi-automatic = press key, flashes for approximately 3 seconds.
1 • cOnsiGnes De sÉcUriTÉ
Ce produit ne doit être utilisé que dans les conditions prévues par le présent mode d’emploi. Toute
modification du produit (ajout, peinture, etc.) entraîne l’annulation de la garantie. Une fois que vous
avez déballé l’appareil, vérifiez qu’il ne présente aucun défaut. En cas d’anomalie, ne le mettez pas
en marche. Si vous n’êtes pas certain que l’appareil peut être utilisé en toute sécurité, éteignez-le
immédiatement et prenez vos dispositions pour empêcher toute utilisation involontaire.
2 • DescriPTiOn
ESYLUX PD360i/8, PD360i/24 et PD360i/Korridor sont des détecteurs de présence avec un rayon
de détection de 360° à monter au plafond. Commande automatique de l’éclairage en fonction de
la présence et de la lumière naturelle. Contact supplémentaire „HLK” pour la commande d’installation
de chauffage/ventilation/climatisation en fonction de la présence. Programmable par télécommande,
donc réglage rapide et précis des divers paramètres sans aucun outil et sans échelle.
3 • insTallaTiOn / mOnTaGe / raccOrDemenT
• La hauteur de montage recommandée est de 2,50 - 3 m. La portée augmente en fonction de la
hauteur de montage, mais la sensibilité diminue. Pour un déclenchement optimal du détecteur le
mouvement doit se faire perpendiculaire à ce dernier. En cas de déplacement frontal ou direct
vers le détecteur, la détection est plus difficile, et donc la portée est nettement plus faible.
• Le détecteur doit être disposé en fonction des conditions ambiantes et des exigences
.Le PD360i/Korridor doit être monté de sorte à ce que les deux triangles imprimés
soit orientés dans l’axe longitudinal du corridor.
• Avant le montage de ce produit, il faut arrêter la tension de secteur. Le PD 360i/...
en version standard est conçu pour le montage sous enduit . Raccorder le bloc
d‘alimentation conformément au plan des contacts et le fixer dans
le boîtier sous enduit.
• Pour le montage sur enduit un boîtier sur enduit est nécessaire (en option) . Fixer
correctement le boîtier sur enduit à l‘aide des chevilles et vis correspondantes . Raccorder le
bloc d‘alimentation conformément au plan des contacts et le fixer dans le
boîtier sur enduit en vissant les deux vis .
• Exercez une légère pression sur le bloc d’alimentation pour positionner la partie
capteur et serrez les vis.
4 • mise en serVice
Le senseur est fourni avec son réglage d‘usine/à télécommande, et donc il peut fonctionner
immédiatement. Les réglages individuels peuvent être pratiqués à l‘aide de la télécommande
ou en manuel à l‘aide des éléments de réglage en commutant le sélecteur .
On évite ainsi tout réglage incorrect.
Si la flèche est dirigée sur la « », le détecteur travaille en fonction des éléments de
réglage manuels.
Si la flèche est dirigée sur « », le détecteur travaille de la manière suivante :
a) Aucune valeur saisie à l‘aide de la télécommande = selon les réglages du programme d‘usine :
Valeur Lux : Plage de fonctionnement (env. 400 Lux)
Durée ajustée canal 1: 5 min.
Durée ajustée : 60 min.
DEL : actives
Mode totalement automatique
b) Selon les réglages effectués à l‘aide de la télécommande IR
Une phase d‘initialisation débute (réchauffement) d‘environ 60 s.
La indique le statut du canal 1= Éclairage et la DEL verte celui du = HLK.
et verte clignotant lentement (f = 1Hz) = EEPROM est vide.
et verte clignotant lentement (f = 4Hz) = l‘EEPROM a mémorisé des réglages de la
télécommande. L‘éclairage raccordé est en marche.
La luminosité ambiante est plus faible que la valeur limite définie
la indique les
mouvements détectés = 2 clignotements courts par mouvement perçu .
L’éclairage raccordé s’allume.
La luminosité ambiante est supérieure à la valeur limite définie
la est éteinte.
La détection de mouvement n’est signalée que via la . L’éclairage raccordé est éteint.
La fonction “Automatique totale” et “Semi-automatique” peut être sélectionnée à l’aide de l’organe
de réglage A/M ou de la touche ” ” de la télécommande IR. Tourner l’organe de
réglage sur , la clignote 3 secondes pour confirmer le mode „Automatique“. Tourner
sur , un la clignote 3 secondes pour confirmer le mode „Semi-automatique“.
L’éclairage est automatiquement déclenché dès que le détecteur a été activé par un mouvement et
que la lumière ambiante est au-dessous de valeur de luminosité pré-ajustée. L’éclairage est
automatiquement éteint si aucun mouvement n’intervient et lorsque la durée résiduelle pré-ajustée
est écoulée.
Pour éviter un brusque changement de luminosité par allumage/extinction de l’éclairage lors d’un
mouvement, le détecteur est exclusivement activé par temporisation. Exemple : le passage d’un
nuage pourrait provoquer un allumage inutile.
Temporisation „clair vers sombre“ : 30 Sek.
Temporisation „sombre vers clair“ : 5 Min.
Il est possible d’allumer ou d’éteindre manuellement l’éclairage à tout moment à l’aide de la
touche de la télécommande IR ou du bouton externe (Bouton – courant de service – avec raccord
fil N), qui est relié à la borne „S“ du détecteur . Si la lumière artificielle s’allume malgré la
haute luminosité intérieure (lumière ambiante supérieure à la valeur de luminosité pré-ajustée),
l’éclairage reste allumé tant que le détecteur enregistre encore un mouvement. Après avoir enregistré
le dernier mouvement, l’éclairage sera éteint après écoulement de la temporisation pré-ajustée. Pour
une économie d’énergie effective, l’éclairage sera cependant automatiquement éteint au bout de
30 minutes, même si un mouvement est encore enregistré ou si la durée résiduelle est encore active.
L’éclairage peut ensuite être de nouveau allumé manuellement. Lorsque la lumière artificielle est étein-
te manuellement, l’éclairage reste éteint tant que le détecteur enregistre encore un mouvement. Après
avoir enregistré le dernier mouvement, le détecteur se replace sur le mode de service précédemment
ajusté uniquement après écoulement de la durée résiduelle.
Lorsque le mode “Semi-automatique” est sélectionné, l’éclairage doit être allumé à l’aide de la
touche de la télécommande IR ou à l’aide du bouton externe (Bouton – courant de service –
avec raccord fil N), qui est relié à la borne „S“ du détecteur. Cela signifie que le détecteur ne peut
pas être activé par des mouvements.
Si la lumière artificielle est allumée manuellement malgré la haute luminosité intérieure (lumière
ambiante supérieure à la valeur de luminosité pré-ajustée), l’éclairage reste allumé tant que le
détecteur enregistre encore un mouvement (la mesure de luminosité est désactivée). Après avoir
enregistré le dernier mouvement, l’éclairage sera éteint après écoulement de la durée résiduelle
pré-ajustée. Pour une économie d’énergie effective, l’éclairage sera cependant automatiquement
éteint au bout de 30 minutes, même si un mouvement est encore enregistré ou si la durée résiduelle
est encore active. L’éclairage peut ensuite être de nouveau allumé manuellement.
Si la lumière artificielle est allumée manuellement lorsque la luminosité intérieure est faible (lumière
ambiante inférieure à la valeur de luminosité pré-ajustée), l’éclairage reste allumé tant que le détecteur
enregistre encore un mouvement (la mesure de luminosité est activée). Après avoir enregistré le
dernier mouvement, l’éclairage sera éteint après écoulement de la durée résiduelle pré-ajustée.
Si la quantité de lumière naturelle augmente et si la lumière ambiante dépasse la valeur de luminosité
pré-ajustée, le détecteur éteindra automatiquement l’éclairage 5 minutes après que la valeur de
luminosité pré-ajustée aura été atteinte. L’éclairage peut à tout moment être ensuite de nouveau
allumé manuellement.
Le canal CVC (luminaire supplémentaire, éclairage de tableau, chauffage/ventilation/climatisation,
etc.) s’active automatiquement lorsque le détecteur perçoit une présence. La luminosité n’est pas prise
en compte. Le canal CVC se désactive automatiquement lorsqu’il ne détecte plus de mouvement et que
la durée d’allumage programmée est écoulée.
5 • reGlaGe Par les elemenTs manUel
On peut régler un délai entre 15 s et 30 min
Si la flèche est dirigée sur , le «mode de test» est sélectionné, cela signifie :
• que la valeur de luminosité est désactivée.
• dès que le détecteur est activé par un mouvement, la s‘allume et l‘éclairage raccordé
(canal 1) cimmute de façon répétitive au rythme d‘1 s sur MARCHE et de 2 s sur ARRET.
: Si la flèche est dirigée sur , la sélection est «Impulsion brève», cela signifie :
• que le détecteur réagit aux mouvements ainsi qu‘à la valeur de luminosité
ambiante réglée.
• dès que le détecteur à été déclenché en raison d‘un mouvement, la
et l‘éclairage raccordé (canal 1) sont allumés pendant 1 s, puis éteint pendant 9 s.
La valeur de luminosité peut être réglée entre 5 et 2000 Lux
: La valeur de luminosité est ª 5 Lux
: Mode jour/nuit
Pour simplifier la graduation est effectuée suivant des plages d‘application :
• Plages de seuil = 1 - 2 (40 - 200 Lux)
• Plages de travail = 2 - 3 (200 - 600 Lux)
• Activités avec grands besoins de lumière = > 3 (> 600 Lux)
Cet organe de réglage sert à sélectionner le mode de service „Automatique“/„Semi-automatique“.
„Automatique“ : Si la flèche est sur „A“, le mode „Automatique“ est sélectionné
(voir paragraphe sur les descriptions des fonctions respectives).
„Semi-automatique“ : Si la flèche est sur , le mode „Semi-automatique“ est sélectionné
(voir paragraphe sur les descriptions des fonctions respectives).
La durée peut être réglée entre 5 min. et 120 min.
: Si la flèche est sur , „Impulsion courte“ est sélectionnée, cela signifie :
• Le détecteur réagit uniquement aux mouvements et n’est pas contrôlé par la valeur de luminosité.
• Dès que le détecteur est activé par un mouvement, la et le canal 2 sont
enclenchés pour 5 sec. et éteints après 5 sec.
6 • reGlaGes Par TelecOmmanDe
Toutes les saisies faites par télécommande sont mémorisées définitivement. En cas de panne de
courant les valeurs restent mémorisées. A l‘aide de la télécommande Mobil-PDi/MDi on peut
effectuer les réglages confortablement au sol sans besoin d‘échelle ou d‘outil. Pour une réception
optimale il faut diriger la télécommande vers le détecteur de présence pendant la programmation.
Veuillez noter qu‘en cas de rayonnement solaire direct, la portée standard d‘environ 6 m peut être
fortement réduite en raison de la proportion d‘infrarouges dans la lumière du soleil.
7 • cOlOris
Le modèle standard est de couleur blanche. Le cache et la bague décorative sont
amovibles et peuvent être laqués selon les souhaits du client ou remplacés remplacés par un kit
argenté (en option).
8 • caPUchOn
Le capuchon fourni (demi-coque) permet de masquer certaines zones de détection.
9 • cOnseils PraTiQUes
10 • esYlUX - GaranTie DU cOnsTrUcTeUr
Les produits ESYLUX sont fabriqués avec le plus grand soin et testés selon la réglementation en vigueur.
Les produits ESYLUX sont fabriqués avec le plus grand soin et testés selon les normes en vigueur. Le
garant, ESYLUX Deutschland GmbH, Case postale 1840, D-22908 Ahrensburg (pour l’Allemagne) ou
le distributeur de la marque dans votre pays (vous trouverez toutes les informations nécessaires à ce
sujet sur le site www.esylux.com) garantit les appareils ESYLUX contre les défauts de fabrication et de
matériaux pour une durée de 3 ans à partir de la date d’achat. Cette garantie est indépendante de
vos droits légaux vis-à-vis du vendeur de l’appareil. L’usure naturelle, les modifications de l’appareil
dues à son milieu d’installation et les dommages résultant de son transport n’entrent pas dans le cadre
de la garantie. De même, ne sont pas couverts les défauts dus au non-respect des instructions de
montage et d’entretien et/ou à une installation inappropriée. Sont également exclues de la garantie
les batteries, sources lumineuses et piles fournies avec l’appareil. La procédure de garantie ne pourra
être enclenchée que sur présentation d’un appareil non modifié après constatation du défaut, ainsi
que d’un ticket de caisse valable, accompagnés d’une courte description de l’anomalie constatée et
expédié au garant dans un emballage approprié et suffisamment affranchi. Si le recours en garantie
s’avère justifié, le garant peut décider soit de réparer, soit de remplacer l’appareil dans les meilleurs
délais. La garantie ne comprend aucun autre recours. Le garant n’est notamment pas responsable
de tout dommage causé par un défaut de l’appareil. Si le recours de garantie s’avère injustifié (par
exemple, si la garantie a expiré ou si le défaut constaté n’est pas couvert par celle-ci), le garant tentera
de réparer l’appareil au meilleur coût.
- La et verte clignote 2 s.
Le signal de la télécommande a été reçu.
- La et verte jette 2 éclairs brefs.
Le signal de la télécommande n‘a pas
été compris.
En actionnant cette touche on arrête le mode de programmation. Le détecteur
réagit maintenant automatiquement en fonction des paramètres réglés.
L‘éclairage ne s‘allume pas ou
s‘éteint en cas d‘absence ou
d‘obscurité
- Valeur de luminosité réglée trop faible
- Détecteur réglé sur semi-automatique
- Eclairage éteint en manuel
- Personne dans la zone de détection
- Un obstacle gêne la détection
- Délai de retard réglé trop court
L‘éclairage commute malgré
suffisamment de luminosité en cas
d‘absence
- Valeur de luminosité réglée trop élevée
- Eclairage a été mis en marche auparavant en manuel
- Détecteur en mode de test
L‘éclairage ne s‘éteint plus ou se
met spontanément en
marche en cas d‘absence
- Attendre le délai de retard
- Source thermique parasite dans la zone de détection :
Ventilateur thermique, ampoule/projecteur halogène,
objets mobiles (par exemple rideaux à une fenêtre
ouverte), tension (relais EVG) pas antiparasités
Touche ne fonctionne pas
- Appareil encore en phase de démarrage ou
utilisation d‘une touche lumineuse sans raccordement à
la phase neutre Touche non raccordée à la borne «S»
Dans la phase de réchauffement
la lampe s‘ALLUME et s‘ETEINT en
permanence
- Trop de lumière électrique désorganise le détecteur
- Augmenter la valeur de luminosité ou déplacer le
détecteur
L‘appareil de réagit pas
- Vérifier la tension secteur
Cause
Test
RC
Auto
Test
RC
Auto
En actionnant cette touche on active le mode de programmation.
1. L‘éclairage raccordé est éteint.
- Actionner la touche , l‘éclairage commute en MARCHE/ARRET. La et verte
est allumée en permanence, tant que le détecteur se trouve en mode de programmation.
2. L‘éclairage raccordé est allumé.
- Actionner la touche , l‘éclairage commute à l‘ARRET. La et verte est
allumée en permanence, tant que le détecteur se trouve en mode de programmation.
1. L‘éclairage raccordé est arrêté.
- Actionner la touche, l‘éclairage commute en MARCHE/ARRET. - La clignote 2 s.
2. L‘éclairage raccordé est en MARCHE.
- Actionner la touche, l‘éclairage commute en MARCHE/ARRET. - La clignote 2 s.
Champ de
touches
c1
Champ de
touches
c2
1. L‘éclairage raccordé est arrêté.
- Actionner la touche, l‘éclairage commute en MARCHE/ARRET. - La clignote 2 s.
2. L‘éclairage raccordé est en MARCHE.
- Actionner la touche, l‘éclairage commute en MARCHE/ARRET. - La clignote 2 s.
Appuyer sur la touche. La clignote pendant 2 sec.
le détecteur réagit uniquement aux mouvements et n‘est pas contrôlé par la
valeur de luminosité. Dés que le détecteur a été activé par un mouvement, la et le
canal 2 sont enclenchés pour 5 sec. et éteints après 5 sec.
Le détecteur réagit aux mouvements ainsi qu‘à la valeur de luminosité
ambiante réglée. Dès que le détecteur à déclenché en raison d‘un mouvement, la
s‘allume ainsi que l‘éclairage raccordé pendant 1 s, et s‘éteint 9 s.
La valeur de luminosité est désactivée. Dès que le détecteur à déclenché
en raison d‘un mouvement, la clignote ainsi que l‘éclairage raccordé 1 s en
MARCHE et s‘ETEINT 2 s.
• En mode de programmation, un appui sur permet de supprimer les informations
stockées dans la mémoire EEPROM. Le détecteur fonctionne alors conformément aux
réglages effectués sur l’appareil.
• Lorsque le mode de programmation est verrouillé, l’éclairage et le contact CVC peuvent
être désactivés via la touche et le détecteur bascule vers le mode préalablement défini.
Pour pouvoir commuter sur „Automatique” ou „Semi-automatique“, la télécommande
IR ne doit pas être bloquée. Automatique = Appuyer sur la touche, la
clignote pendant env. 3 s.
Semi-automatique = Appuyer sur la touche,
la clignote pendant env. 3 s.
M
A
Test
15
sec.
30min.
30
1
min.
2
5
10
16
1
2
3
4
5
LUX
RC
120min.
5min.
10
15
30
40
50
60
M
A
Test
15
sec.
30min.
30
1
min.
2
5
10
16
1
2
3
4
5
LUX
RC
120min.
5min.
10
15
30
40
50
60
KANAL 1 = BELEUCHTUNG
SCHALTLEISTUNG
CHANNEL 1 = LIGHTING
BREAKING CAPACITY
KANAL 2 = HLK KONTAKT
CHANNEL 2 = HLK CONTACT
Mobil-PDi/MDi
Pressing the key in open programming mode allows the red and to
be deactivated or activated.
1. The connected lighting is switched OFF.
- Press the key; the lighting switches ON/OFF.
2. The connected lighting is switched ON.
- Press the key; the lighting switches OFF/ON.
- Press the key. The and the are switched off for 2 seconds. The
are now deactivated and only work in the warm-up phase and when programming mode is
open as a confirmation display.
- Press the key. The and the flash for 2 seconds.
The are now once again active in operating mode.
En actionnant la touche quand le mode de programmation est actif, on peut activer ou
désactiver les .
1. L‘éclairage raccordé est à l‘ARRET.
- Actionner la touche , commute l‘éclai rage en MARCHE/ARRET.
2. L‘éclairage raccordé est en MARCHE.
- Actionner la touche , commute l‘éclai rage en ARRET/MARCHE.
- Actionner la touche . Les et verte s‘éteignent 2 s
Les sont maintenant désactivées et fonctionnent uniquement en phase de réchauffement
et avec le mode de programmation actif, en tant qu‘affichage de confirmation.
- Actionner la touche . Les clignotent 2 s. Les sont de nouveau
actives aussi dans le mode de fonctionnement.
de seuil de commutation.
appuyez sur en mode de programmation. Un clignotement rapide de la
indique que la valeur de la luminosité ambiante actuelle est trop forte (> 2000
Lux) ou trop faible (< 5 Lux), ce qui signifie que la lecture de la valeur de la luminosité
ambiante actuelle est impossible.
Méthode de saisie : lorsque la luminosité ambiante (valeur en lux) souhaitée est
atteinte, passez en mode de programmation et appuyez sur .
Acquittement du signal lumineux reçu :
L’éclairage raccordé commute sur MARCHE/ARRÊT et la clignote
lentement. Durant la lecture, la clignote lentement. Lorsque la valeur
d’allumage a été lue, l’éclairage commute sur MARCHE. À présent commence la
lecture de la valeur d’extinction.
Méthode de saisie : lorsque les conditions de luminosité souhaitées sont atteintes,
verrouillez le mode de programmation et appuyez sur .
Acquittement du signal lumineux reçu :
L’éclairage raccordé commute sur ARRÊT/ MARCHE et la clignote lentement.
Durant la lecture, la clignote lentement. Lorsque la valeur d’extinction a
été lue, l’éclairage commute sur ARRÊT. À présent commence la lecture de la
valeur d’allumage. Le temps de lecture dure 10 sec. Lorsque la lecture s’est
déroulée avec succès, l’éclairage commute sur MARCHE et la reste de
nouveau allumée en permanence.
Test
RC
Auto
Test
RC
Auto
Test
RC
Auto
• •
PD 360i/8
• •
PD 360i/24
• •
PD 360i/KORRIDOR
PRÄSENZMELDER
PRESENCE SENSOR
DÉTECTEUR DE PRÉSENCE
Durch Drücken der Taste kann die Beleuchtung jederzeit für 4 Std.
dauerhaft eingeschaltet werden, falls die Beleuchtung AUS war.
Wiederholen Sie diesen Vorgang, kann die Beleuchtung für 4 Std.
dauerhaft ausgeschaltet werden.
Nach Ablauf der 4 Std. kehrt der Melder in den entsprechend eingestellten
Betriebsmodus zurück.
Abbrechen dieser Funktion vor dem Ablauf der 4 Std. durch Drücken
der Taste .
If the lighting is OFF, it can be switched on at any time for a duration of 4 hours
by pressing the key.
Press this key again to switch the 4 hour-lighting OFF.
Once the 4 hours have expired, the detector will switch back to the
corresponding set operating mode.
You can interrupt the feature before the 4 hours have expired by
pressing the key.
En actionnant on peut mettre à tout moment l‘éclairage en marche, s‘il était éteint.
En répétant l‘opération on peut arrêter l‘éclairage. (voir la section «Commande d‘éclairage
manuelle» description de fonction).
Lorsque l’éclairage est inactif, vous pouvez à tout moment appuyer sur la
touche pour l’activer pendant 4 heures.
Et si vous appuyez une seconde fois sur cette touche, vous désactiverez
totalement l’éclairage pour une durée de 4 heures.
Une fois les 4 heures écoulées, le détecteur retourne automatiquement au mode
de fonctionnement précédemment sélectionné.
permanente de l’éclairage pendant peut
être interrompue avant son terme au moyen de la touche .
.
MA00267601 • ALK 08/2014
Produktspecifikationer
| Varumärke: | ESYLUX |
| Kategori: | Rörelsedetektorer |
| Modell: | PD 360i/24 |
| Vikt: | 266 g |
| Bredd: | 140 mm |
| Djup: | 140 mm |
| Höjd: | 60 mm |
| Placering: | inomhus |
| Certifiering: | CE, RoHS, SundaHus, WEEE |
| Bildsensortyp: | Passiv infraröd (PIR) sensor |
| Spänning: | 230 V |
| Ljuskänslighet: | 2000 lx |
| Produktens färg: | Vit |
| bruksanvisning: | Ja |
| Antal per förpackning: | 1 styck |
| Ingångsfrekvens: | 50 hz |
| Strömförbrukning (vanlig): | 1 W |
| Temperatur vid drift: | 0 - 50 ° C |
| Intervall för relativ operativ luftfuktighet: | 5 - 93 % |
| Internationellt skydd (IP) kod: | IP20 |
| Material, hölje: | Polykarbonat |
| Anslutningsteknologi: | Kabel |
| Monteringssätt: | Tak |
| Strömkälla av typen: | AC |
| LED-färg: | Vit |
| Avkänningsavstånd: | 24 m |
| Detektionsvinkel: | 360 ° |
| Monteringshöjd (min): | 3 m |
| Monteringshöjd (max): | 10 m |
| Varaktighet justering: | 30 - 0 s |
| UV-beständig: | Ja |
Behöver du hjälp?
Om du behöver hjälp med ESYLUX PD 360i/24 ställ en fråga nedan och andra användare kommer att svara dig
Rörelsedetektorer ESYLUX Manualer

30 September 2024
24 September 2024
6 Augusti 2024
6 Augusti 2024
4 Augusti 2024
4 Augusti 2024
2 Augusti 2024
2 Augusti 2024
2 Augusti 2024
1 Augusti 2024
Rörelsedetektorer Manualer
Nyaste Rörelsedetektorer Manualer
9 Januari 2025
10 Oktober 2024
6 Oktober 2024
4 Oktober 2024
3 Oktober 2024
27 September 2024
22 September 2024
17 September 2024
6 Augusti 2024
6 Augusti 2024