GVM 2D Bruksanvisning
Läs gratis den bruksanvisning för GVM 2D (1 sidor) i kategorin Inte kategoriserad. Guiden har ansetts hjälpsam av 18 personer och har ett genomsnittsbetyg på 4.9 stjärnor baserat på 9 recensioner. Har du en fråga om GVM 2D eller vill du ställa frågor till andra användare av produkten? Ställ en fråga
Sida 1/1
MOTORIZED SLIDER
1
1
1
11
Packing list
2
2
2
22
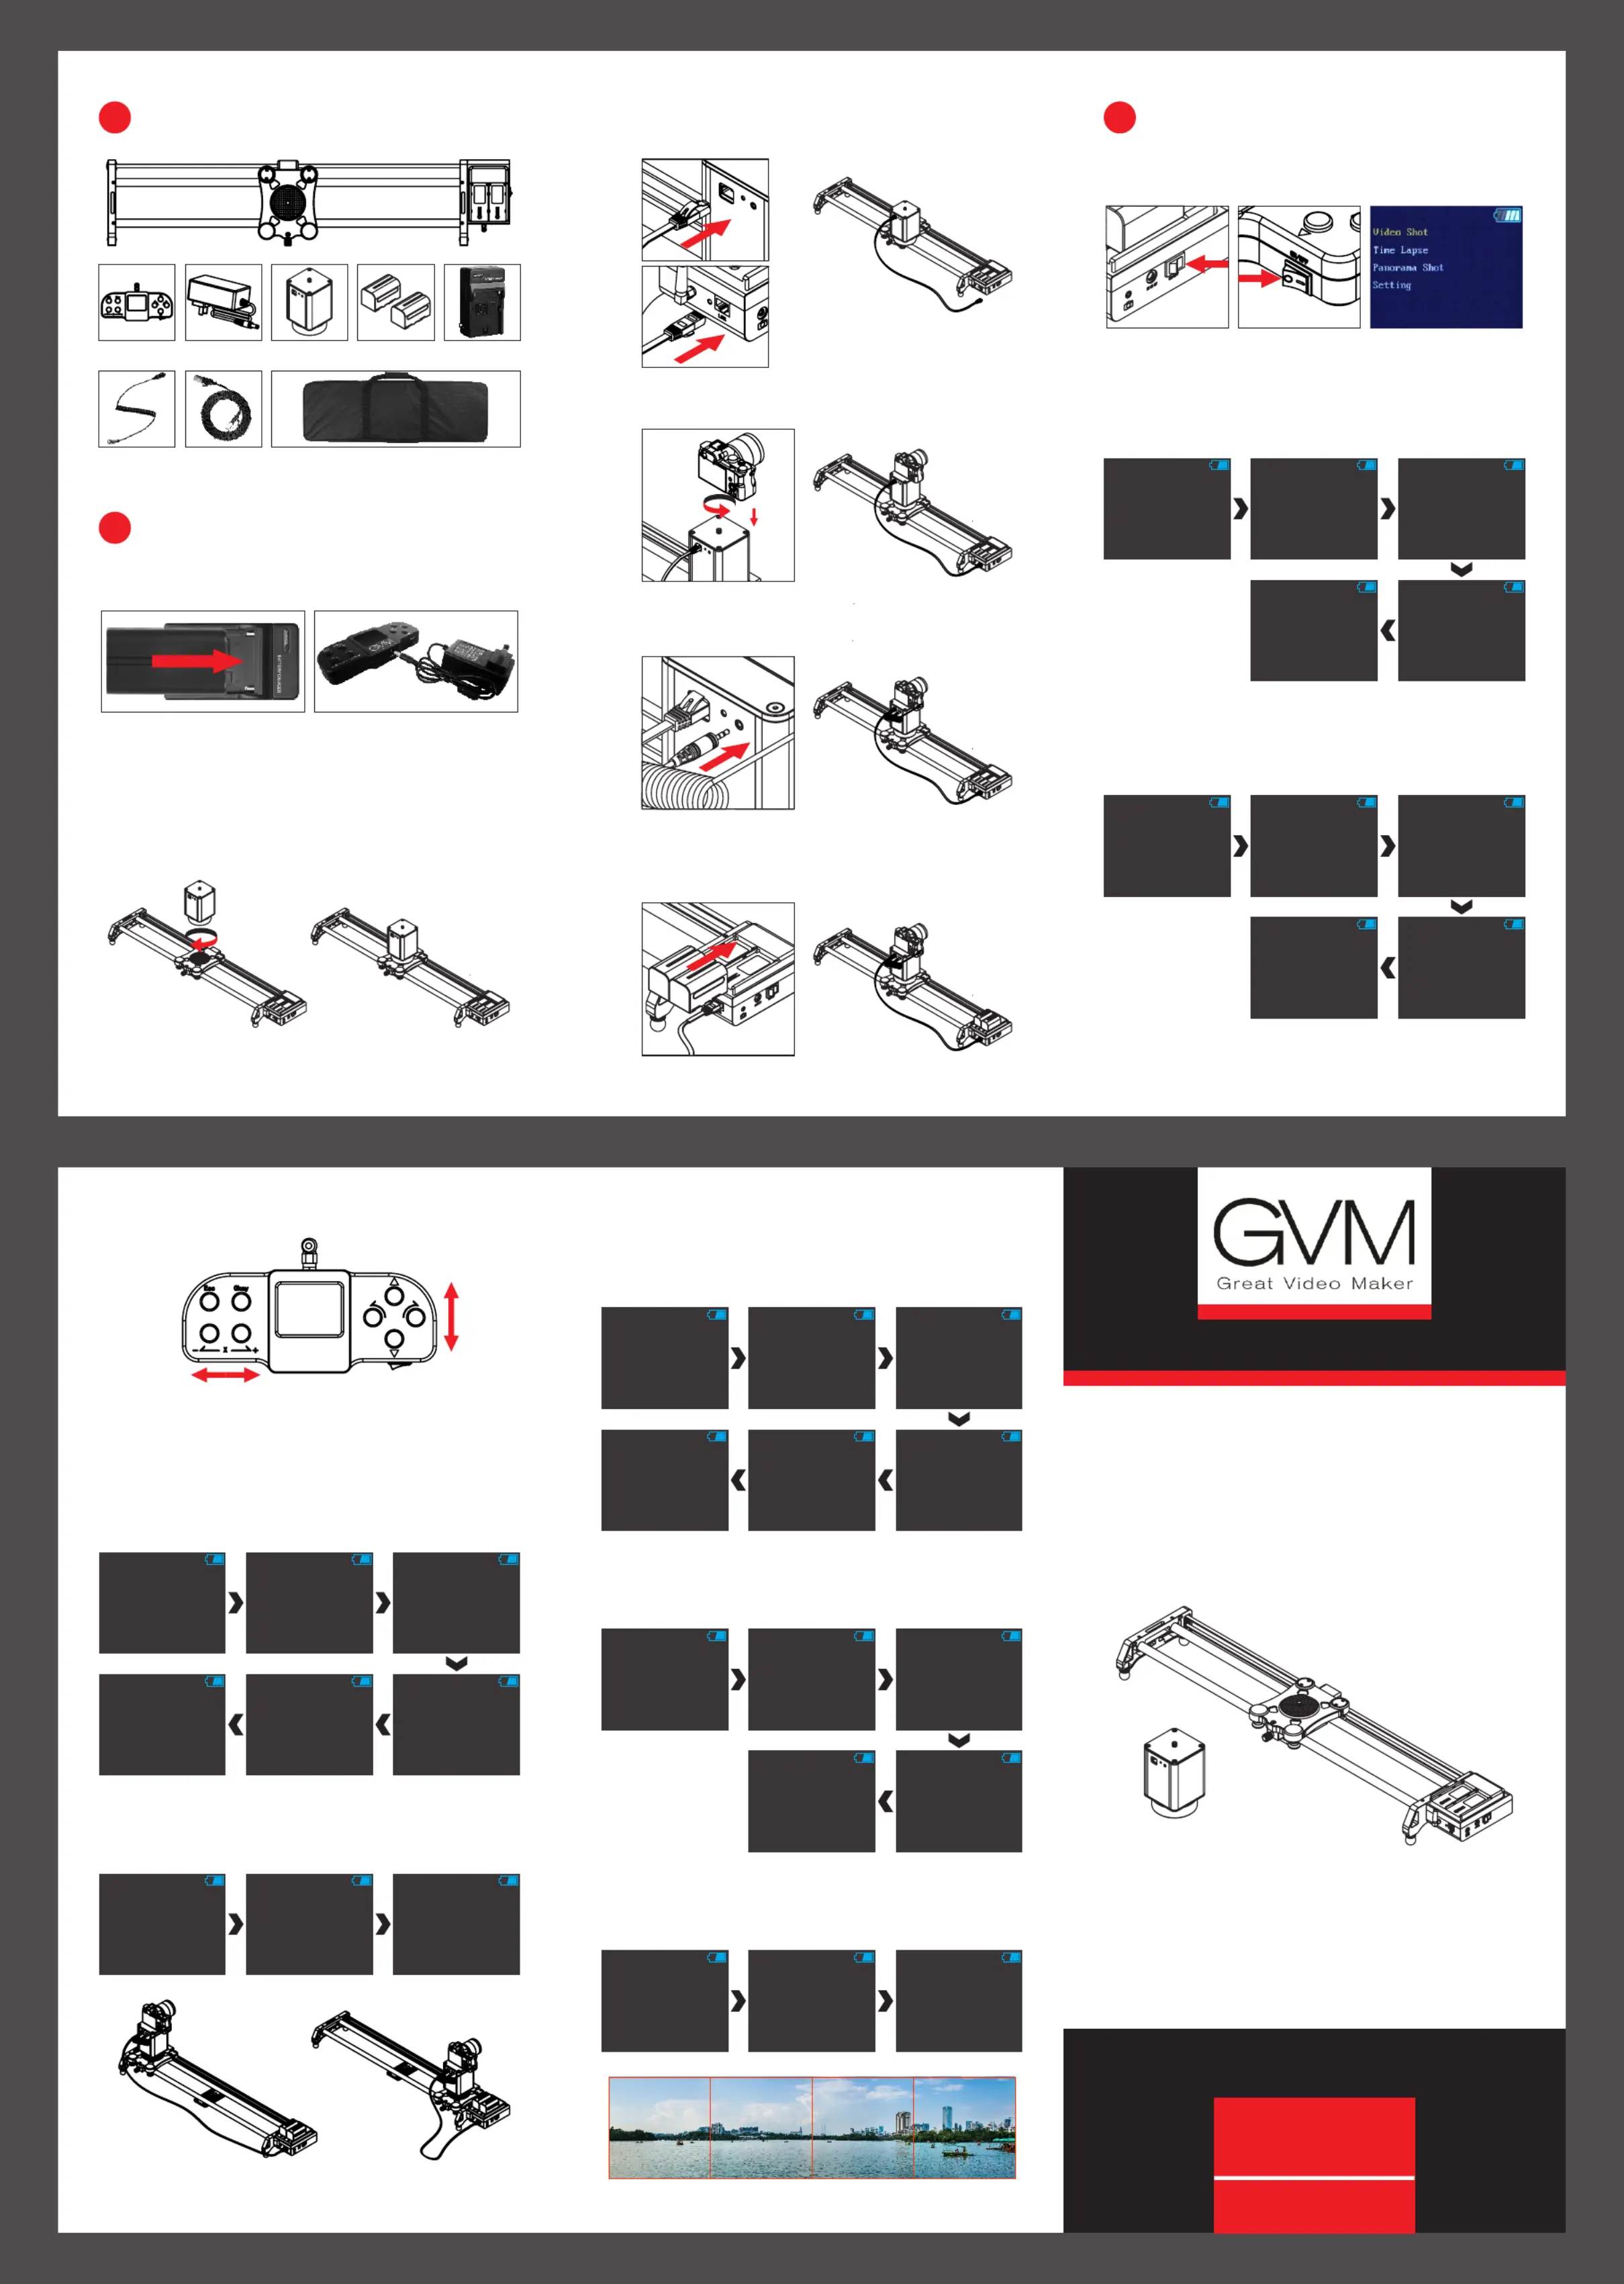
Mounting the slider and camera
1.Please charge the wireless controller and battery before
using this product.
2. Please install and use this product as shown in the picture.
1Mounting the motorized camera head on the slider. )
(As shown below)
12
12
2Use the signal cable to connect the motorized camera )
head and slider. (As shown below)
12
3Mounting the camera on the slider. (As shown below))
12
4Use the shutter cable to connect the motorized camera )
head and camera. (As shown below)
12
3
5Install the battery on the slider and check the signal )
cable or shutter cable connecting correctly or not.
(As shown below)
12
3
3
3
33
Slider motion
1.Turn on the slider and wireless controller. (The slider’s
LED indicator light open and blinking, the controller’s
screen open as shown below)
3. Manual operation mode:“Video Shot”-“Manual Mode”
(Press the button of the controller and the orbit will act
accordingly)-choose the “speed” menu can adjust the
current speed.
4.Auto operation mode:
Append Point A
(Start point)
①: Setting the append point
A : “Video Shot”-“Auto Mode”-“Set key”-“Append Point A”
(Move the camera to the start point you need)-“Save:Yes”
(As shown below)
B : “Video Shot”-“Auto Mode”-“Set key”-“Append Point B”
(Move the camera to the end point you need)-“Save:Yes”
(As shown below)
Append Point B
(End poin)
5.Time Lapse: “Time Lapse Setting” - setting the “Times”,
“ Photos”,”Stop Time”,”Delay Time”,Set start” and “set End”
-”Execution”(As shown below)
GVM - 2D
4
5
wireless
controller*1
battery*2battery
charger*1
wireless controller
charger*1
shutter cable*1
motorized
camera head*1
signal cable*1Carry bag*1
sketch of charge the wireless controllersketch of charge the battery
2.Bluetooth wireless connection: press “Setting”-
“Bluetooth Setting”-“Searching Device”-choose the device
code which start with letter D-press”OK” button to confirm
the device(The upper right of the screen will show if
the connecting is successful)
--››
VideoShot
Time Lapse
Panotama Shot
Setting
LanguageEnglish :
ResetNo :
Version100 : ..
BluetoothSetting
SearchingDevice
LanguageEnglish :
ResetNo :
Version100 : ..
BluetoothSetting
1: D8B04CEAC83F
--››
VideoShot
Time Lapse
Panotama Shot
Setting
Manual Mode
Auto Mode
Speed100 : %
AxisX0 :
AxisY0 :
AxisZ0 :
------››››››
Speed100 : %
AxisX0 :
AxisY0 :
AxisZ0 :
Speed100 : %
AxisX1058 :
AxisY0 :
AxisZ0 :
----››››
② Auto Loop mode:
“Video Shot”-“Auto Mode”-“Auto Loop”-adjust the “Speed”-
setting the start point-setting the end point-setting the
“Loop Count”-“Execution”(As shown below)
Diagonal ADiagonal B
VideoShot
Time Lapse
Panotama Shot
Setting
Manual Mode
Auto Mode
Set Key
Auto Loop
Auto Stop
Append Point : A
Axis X : 0
Axis Y : 0
Axis Z : 0
Save : Yes
Append Point
Update Point
Delete Point
Point :
void
------››››››
------››››››
Append Point : B
Axis X : 0
Axis Y : 0
Axis Z : 0
Save : Yes
Append Point
Update Point
Delete Point
Point :
void
------››››››
Set Key
Auto Loop
Auto Stop
Speed : 100%
Set Start : A
Set End : B
Loop Count : 6
Execution
Speed : 100%
Set Start : A
Set End : B
Loop Count : 6
Execution
Speed : 100%
Set Start : A
Set End : B
Loop Count : 6
Execution
Speed : 100%
Set Start : A
Set End : B
Loop Count : 6
Execution
Speed : 100%
Set Start : A
Set End : B
Loop Count : 6
Execution
------››››››
------››››››
VideoShot
Time Lapse
Panotama Shot
Setting
Set Key
Time Lapse Setting
Times : 00:00:01.0
Photos : 1
Stop Time : 1.0
Delay Time : 0.2
Set start : A
Set End : B
TimeLapse : StatusRunning
Completion : 0
Remaining : 0
Run Time : 00:00:01
Battery : 0.000
--››
Loop : Yes
Execution
--››
------››››››
VideoShot
Time Lapse
Panotama Shot
Setting
Diagonal A
Diagonal B
AxisX Photos : 4
AxisY Photos : 1
Stop Time : 1.0
Delay Time : 0.2
Execution
------››››››
6.panorama shot: Setting the “Diagonal A” and “Diagonal B”
- Setting the “Axis X photos”(As shown below), then press
“Execution”
Produktspecifikationer
| Varumärke: | GVM |
| Kategori: | Inte kategoriserad |
| Modell: | 2D |
Behöver du hjälp?
Om du behöver hjälp med GVM 2D ställ en fråga nedan och andra användare kommer att svara dig
Inte kategoriserad GVM Manualer

31 December 2025
7 Oktober 2024
4 Oktober 2024
23 September 2024
13 September 2024
9 September 2024
3 September 2024
1 September 2024
25 Augusti 2024
24 Augusti 2024
Inte kategoriserad Manualer
Nyaste Inte kategoriserad Manualer
9 April 2025
9 April 2025
9 April 2025
9 April 2025
9 April 2025
9 April 2025
9 April 2025
9 April 2025
9 April 2025
9 April 2025