GVM GT-J80D Bruksanvisning
GVM Inte kategoriserad GT-J80D
Läs gratis den bruksanvisning för GVM GT-J80D (1 sidor) i kategorin Inte kategoriserad. Guiden har ansetts hjälpsam av 39 personer och har ett genomsnittsbetyg på 4.4 stjärnor baserat på 4 recensioner. Har du en fråga om GVM GT-J80D eller vill du ställa frågor till andra användare av produkten? Ställ en fråga
Sida 1/1
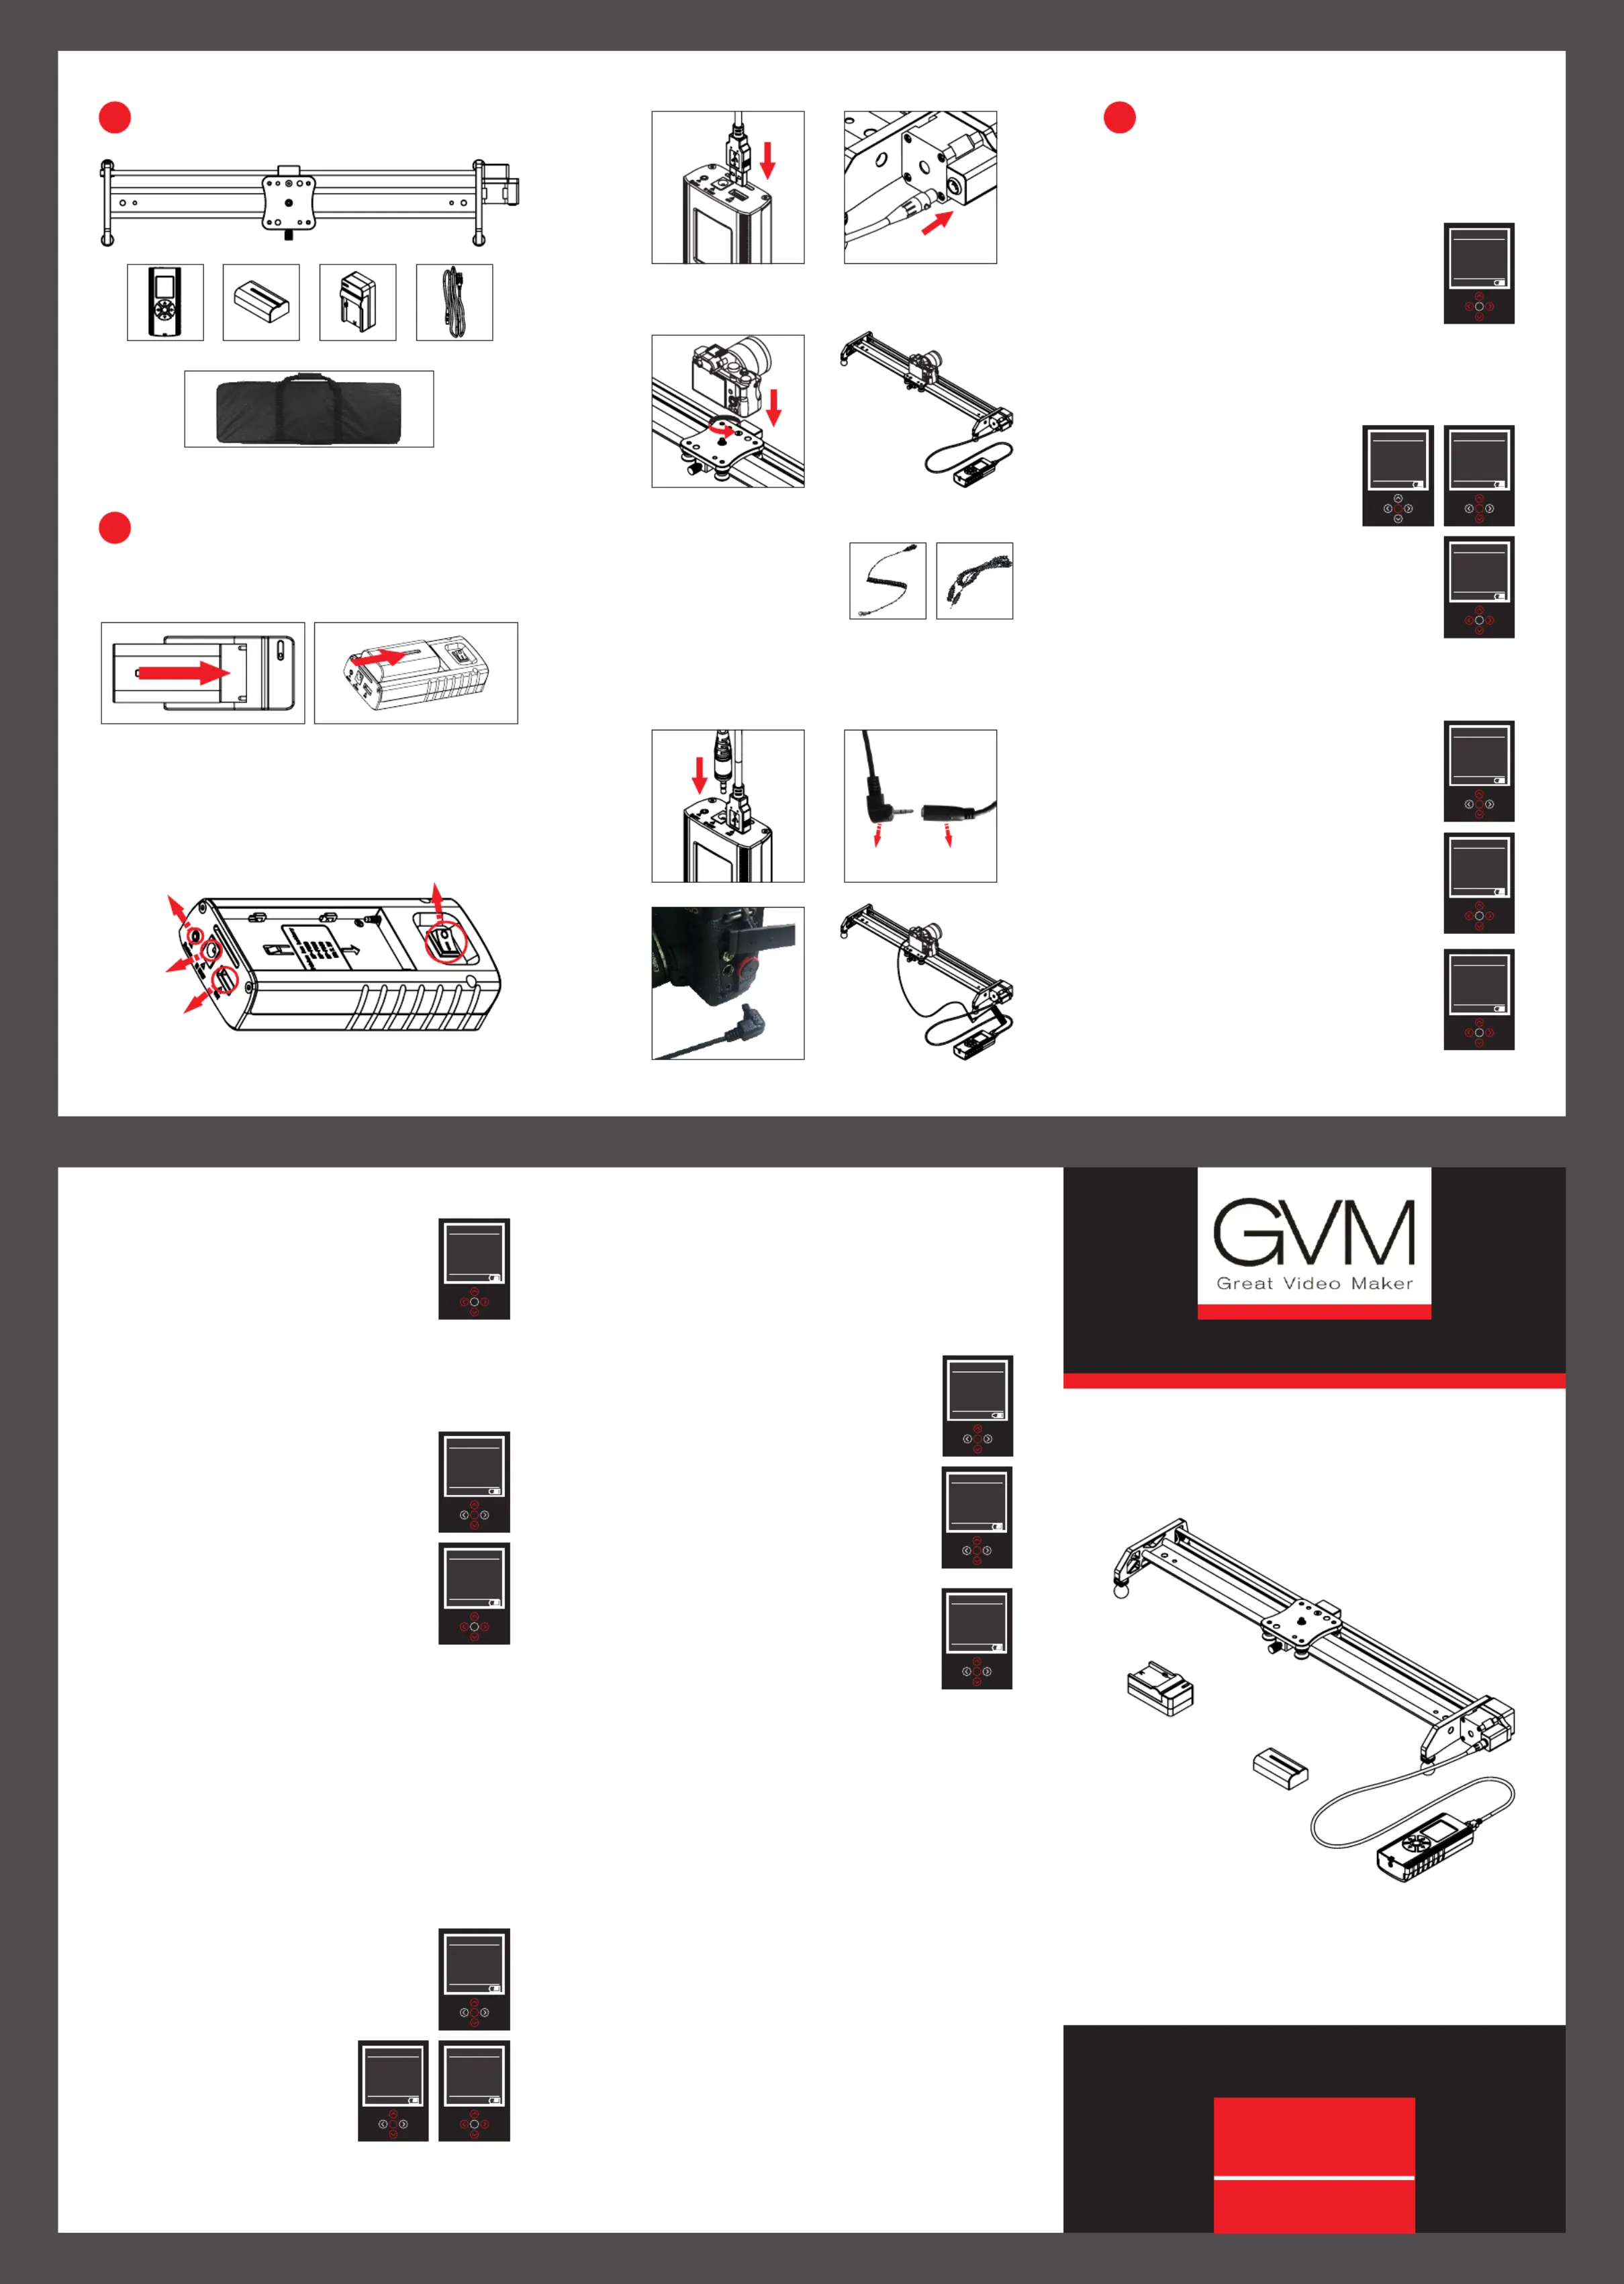
MOTORIZED SLIDER
1.Please charge the battery before use the product.
2.Please install the battery on the controller as shown in
the picture. (As shown below)
Schematic diagram of mount
the battery
3Connect the controller and slider as shown in the follo.
wing pictures.(As shown below)
12
1
3
GT - 60D
45
3
3
3
33
4. Mounting the camera on the slider. (As shown below)
12
23
P
P
P
Po
o
o
ow
w
w
we
e
e
er s
r s
r s
r sw
w
w
wi
i
i
it
t
t
tc
c
c
ch
h
h
hPower switch
5Time-Lapse photography connect method :.
1After finished above steps, )
take out the shutter release cable
and extension cable. ( The cables
need to be purchased separately )
12
Sh
Sh
Sh
Shut
ut
ut
utte
te
te
ter
r
r
r r
r
r
re
e
e
elea
lea
lea
lease
se
se
se
ex
ex
ex
exte
te
te
tens
ns
ns
nsio
io
io
ion
n
n
n c
c
c
cab
ab
ab
able
le
le
le
Shutter release
extension cable
34
battery*1battery charger*1
Carry bag*1
1
1
1
11
Packing list
2
2
2
22
Mounting the camera on the slider
Remote cable*1Remote controller*1
Interface
Interface
Interface
Interface of
of
of
of DC
DC
DC
DC
power
power
power
power cable
cable
cable
cable
Interface of DC
power cable
I
I
I
In
n
n
nt
t
t
te
e
e
er
r
r
rf
f
f
fa
a
a
ac
c
c
ce o
e o
e o
e of c
f c
f c
f ca
a
a
am
m
m
me
e
e
er
r
r
ra
a
a
a
s
s
s
sh
h
h
hu
u
u
ut
t
t
tt
t
t
te
e
e
er r
r r
r r
r re
e
e
el
l
l
le
e
e
ea
a
a
as
s
s
se c
e c
e c
e ca
a
a
ab
b
b
bl
l
l
le
e
e
e
Interface of camera
shutter release cable
I
I
I
In
n
n
nt
t
t
te
e
e
er
r
r
rf
f
f
fa
a
a
ac
c
c
ce o
e o
e o
e of
f
f
f
c
c
c
co
o
o
on
n
n
nt
t
t
tr
r
r
ro
o
o
ol
l
l
ll
l
l
le
e
e
er
r
r
r
c
c
c
co
o
o
on
n
n
nn
n
n
ne
e
e
ec
c
c
ct c
t c
t c
t ca
a
a
ab
b
b
bl
l
l
le
e
e
e
Interface of
controller
connect cable
Schematic diagram of charge
the battery
Shutter release
cable
Shutter release
extension cable
Sh
Sh
Sh
Shut
ut
ut
utte
te
te
ter r
r r
r r
r rele
ele
ele
elease
ase
ase
aseShutter release
Ca
Ca
Ca
Came
me
me
mera
ra
ra
ra sh
sh
sh
shutte
utte
utte
utter
r
r
r
re
re
re
releas
leas
leas
lease
e
e
e in
in
in
inpu
pu
pu
put
t
t
t
Camera shutter
release input
P3
P2
P4
Set Start
Set End
Language:English
Reset:No
Version: 1.0
Setting
Video Shot
Time Lapse
Shutter setup
Setting
Set Start
Set End
Language:English
Reset:No
Version: 1.0
Setting
Speed:50%
Step:0
Set Sart:-33554432
SetStart
Set Start
Set End
Language:English
Reset:No
Version: 1.0
Setting
P4
P8
Video Shot
Time Lapse
Shutter setup
Setting
Interval:.10
Time-lapse: 1.0
Stop Time:.12
Photo:1000
Auto LoopNo:
Setting
Speed:50%
Step:0
Set Sart:-33554432
SetStart
P10
Video Shot
Time Lapse
Shutter setup
Setting
ManualMode
AutoMode
Setting
Set Start
Set End
Language:English
Reset:No
Version: 1.0
Setting
P11
P9
P1
P5
P6
Speed:50%
Step:0
Set End:-33554432
Set End
Settings Menu
5/ Reset:
1.Highlight the Reset option(P7).
2.Press the right r left arrow button to choose
"Yes"or"No".Press the middle button to reset
the remote control or go back setting menu.
3.Long press the middle button to save the setting.
3. Time lapse menu
1/ Set the start point:
1. Press the up or down arrow and highlight
the Time Lapse menu option (P8).
2. Press the middle button.
3. Highlight the parameter you want to
change and adjust its value by pressing
the right or left arrow button (P9).
4. Press the middle button when complete.
5. Press the right or left arrow button to
begin time lapse shooting.
6. Press the middle button to pause any motion.
7. “Interval” means the slider moving time, the time unit
is “seconds”.
8. “Time-lapse” means the camera shutter shot time after
stop moving, the time unit is “seconds”.
9. “Stop time” means the time interval between the slider's
two movements, the time unit is “seconds”.
10. The minimum Interval time is 0.1 second, the
minimum Time-lapse time is 0.1 second, the minimum
stop time is 1 second. Note: the Stop Time needs longer
than the Time-lapse time at least 0.2 seconds.
4. Video shot menu
1/ Manual Mode:
1. Press the up or down arrow and highlight
the Video Shot menu option (P10) and then
press the middle button.
2. Highlight Manual Mode and
then press the middle button(P11).
3. Press the left or right arrow
button to begin motion (P12).
4. You can adjust the speed at any time by pressing the
Up or Down arrow buttons.
P7
ManualMode
AutoMode
Setting
Speed50:%
DirectionPause:
ManualMode
VideoShot
1. Turn off power to reset the remote control.
2. Settings Menu
1/ Set the Language:
1. Press the up or down arrow and highlight
the Language menu option (P1).
2. Press the right or left arrow button to
change language between English and
Chinese. Long press the middle button to save your
settings.
Set the start point:2/
1. Press the up or down arrow
and highlight the Settings menu
option (P2).
2. Press the middle button.
3. Highlight the Set Start option
and press the middle button (P3).
4. Press the right or left arrow button to
move the slider. Press the middle button
to stop the motion.
5. Press the middle button a second time
to select the start point (P4)
6. Long press the middle button to save the start point.
Set the end point:3/
1. Highlight the Set End option and press
the middle button (P5)
2. Press the right or left arrow button to
move the slider. Press the middle button to
stop the motion.
3. Press the middle button a second time to
select the end point (P6)
4. Long press the middle button to save the
end point.
Set the speed:4/
1. At any time while setting the start or end
points, you can adjust the speed from [1-
100%] by pressing the Up or Down arrows
(P4), (P6).
5. Auto Mode
Auto Mode has two options: Auto Loop and Auto Stop.
To use either one, you first must set the start and end
points as described in the Settings section.
1. Press the up or down arrow and highlight the Video
Shot menu option. Then press the middle button.
2. Press the up or down arrow buttons and
highlight the Auto Mode menu option (P13).
Auto Loopwill provide motion between 1/
the start and end points indefinitely.
1. Highlight the Auto Loop button and then
press the middle button (P14).
2. Press the right or left arrow to start motion.
3. Press the middle button to pause the
motion.
Auto Stopwill provide motion between 2/
the start and end points one time.
1. Highlight the Auto Stop button and then
press the middle button (P15).
2. Press the right or left arrow to start motion.
3. Press the middle button to pause the motion.
TROUBLE SHOOTING
1. Use a standard Sony NP-F550/F570/F770/F9XX
series battery.
2. Monitor the battery power level shown on the bottom
of the remote controller.
3. Make sure all cables are firmly inserted into all
devices.
4. If the slider is not horizontal, make sure to lock the
center brake before turning off the power or
disconnecting the cable. Under normal operations, the
motor acts as a break and any loss of power will permit
the camera base to quickly fall to its lowest point
potentially damaging your camera or slider.
Auto Loop
Auto Stop
Auto Mode
Auto Loop
Auto Stop
Auto Mode
P14
P15
P13
2Insert the cable into the controller's shutter release cable )
interface (use the extension cable if needed) . Connect the
other side to the camera shutter release cable interface.
(As following pictures show)
P12
Produktspecifikationer
| Varumärke: | GVM |
| Kategori: | Inte kategoriserad |
| Modell: | GT-J80D |
Behöver du hjälp?
Om du behöver hjälp med GVM GT-J80D ställ en fråga nedan och andra användare kommer att svara dig
Inte kategoriserad GVM Manualer

31 December 2025
7 Oktober 2024
4 Oktober 2024
23 September 2024
13 September 2024
9 September 2024
3 September 2024
1 September 2024
25 Augusti 2024
24 Augusti 2024
Inte kategoriserad Manualer
Nyaste Inte kategoriserad Manualer
9 April 2025
9 April 2025
9 April 2025
9 April 2025
9 April 2025
9 April 2025
9 April 2025
9 April 2025
9 April 2025
9 April 2025