Mikrotik LtAP 4G kit Bruksanvisning
Mikrotik
accesspunkt
LtAP 4G kit
Läs gratis den bruksanvisning för Mikrotik LtAP 4G kit (8 sidor) i kategorin accesspunkt. Guiden har ansetts hjälpsam av 3 personer och har ett genomsnittsbetyg på 4.8 stjärnor baserat på 2 recensioner. Har du en fråga om Mikrotik LtAP 4G kit eller vill du ställa frågor till andra användare av produkten? Ställ en fråga
Sida 1/8

LtAP 4G kit
The LtAP 4G kit is a wireless access point with three SIM card slots for cellular data modems.
Quickstart
Please follow these quick steps to set up your device:
Unscrew two screws and remove doors to access all ports. Please see section.Mounting
Connect your Internet cable to the Ethernet port (this is optional if using LTE as the primary connection).
Insert the SIM card into the SIM 2 slot (middle).
Connect GPS antenna (optional),(see ).GPS
Mount unit in your desired place (see ).Mounting
Choose your powering solution (see ).Powering
Set your computer IP configuration to automatic (DHCP).
From your PC or smartphone, connect to the wireless network name which starts with “MikroTik”.
Once connected to the wireless network, open http://192.168.88.1 in your web browser to start
configuration, since there is no password by default, you will be logged in automatically.
We recommend clicking the “Check for updates” button and updating your RouterOS software to the latest
version to ensure the best performance and stability.
Choose your country, to apply country regulation settings and set up your password in the screen that
loads.
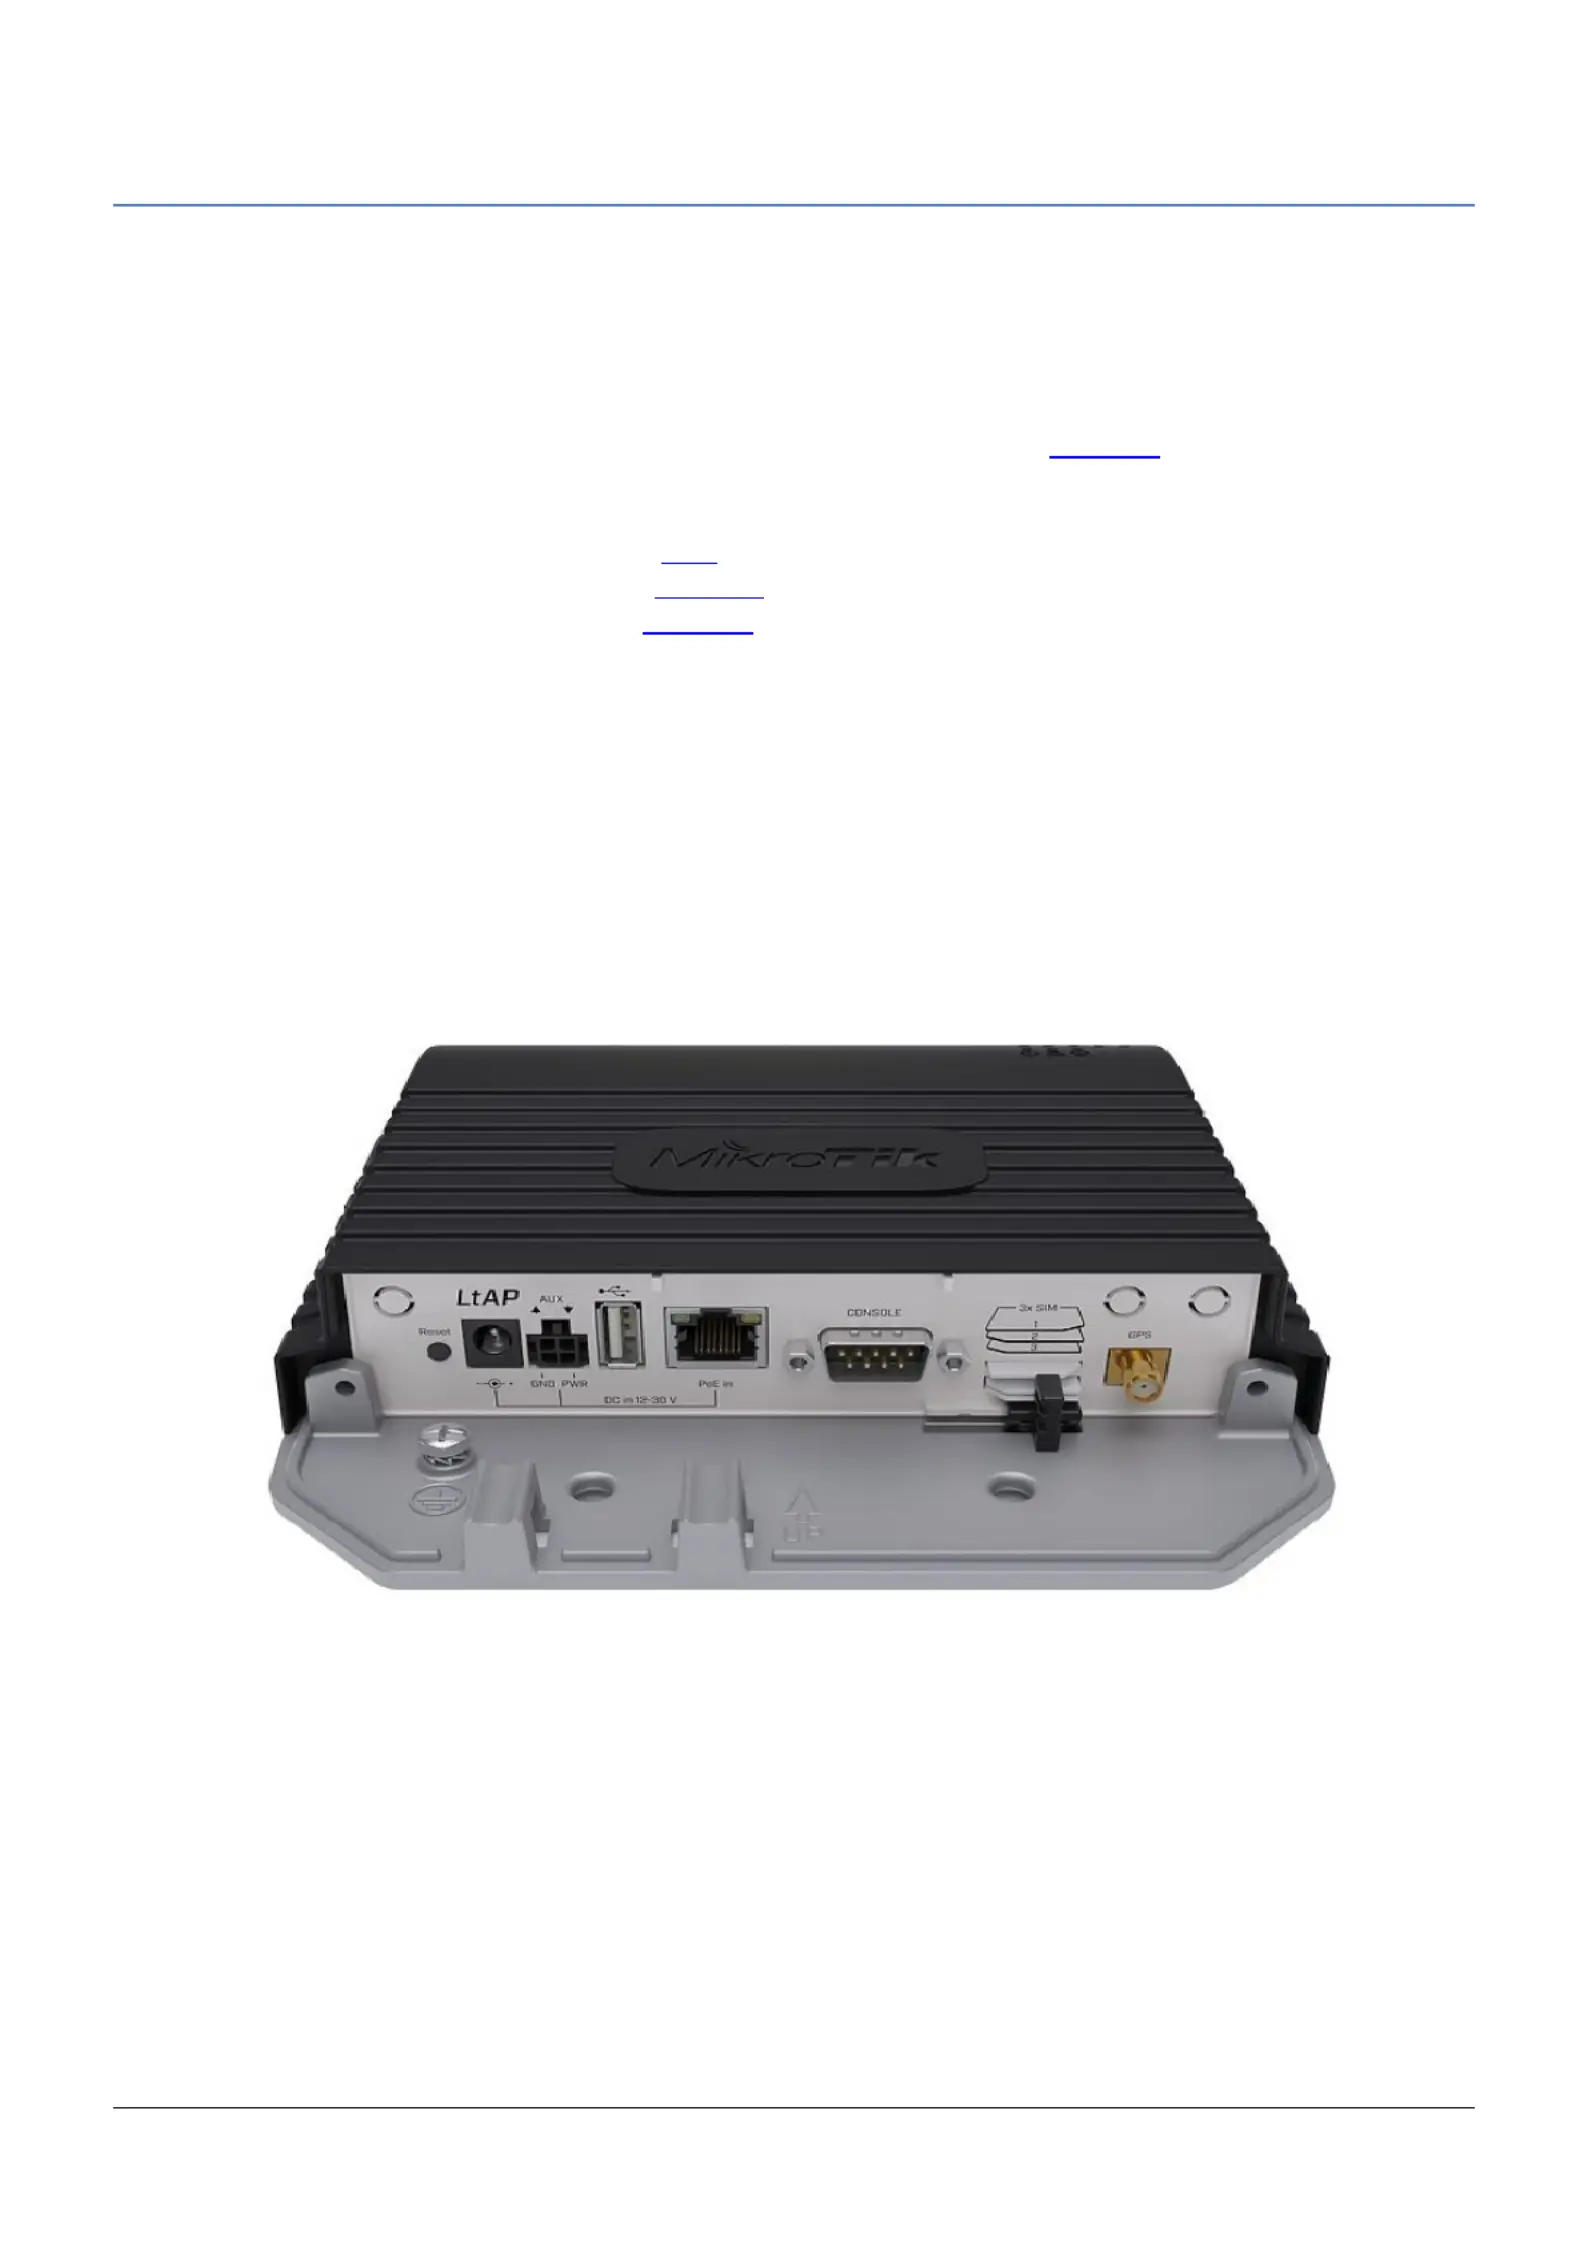
Extension slots and ports
•Built-in 2 GHz wireless access point module, AP/station/bridge/p2p modes are supported. Onboard PIF
antennas built in, as well as MMCX connectors for external antennas (software selectable).
•Two miniPCIe slots and three SIM slots.
•Built-in GPS module with an external SMA connector.
•Gigabit Ethernet port, supporting automatic cross/straight cable correction (Auto MDI/X). Either straight or
crossover cable can be used for connecting to other network devices. The Ethernet port accepts 12-30 V
DC powering from a passive PoE injector.
•One DB9 RS232 serial port for serial console access. Configured as 115200 bit/s, 8 data bits, 1 stop bit, no
parity.
•One USB 2.0 port for storage devices or cellular modems.
See mikrotik.com/products for the latest version of this document. Page 1, Document #49496 Modified on: 19.DEC.2019

Mounting
1. It is possible to attach the device to a wall, using the provided four screws and designed four holes on the
unit.
2. The ports are protected with a small door, that is held in place with two screws. Remove to access Ethernet
ports, antenna connector, SIM slots etc.
3. The door has cut-out places for all available ports, so you can guide though all necessary cables, but
please only break out the openings that you will use.
4. Several places for external antennas are provided on the case, use an appropriate size drill, to make them
available. Be careful and measure the chosen antenna, so that it does not touch the internal PCB board
when installed.
The device can be used both indoors and outdoors. The IP rating scale of IP54.
If you intend to mount outdoors, please ensure that any cable openings are directed downwards. The
Mounting direction is indicated on the device with an arrow pointing up. Use POE injector and proper
grounding. Recommended using Cat6 shielded cable.
Warning! This equipment should be installed and operated with a minimum distance of 30 cm between the
device and your body. Operation of this equipment in the residential environment could cause radio
interference.
The device enclosure has places where you can drill openings for external LTE and GPS antennas. Use a drill to
make holes that are appropriate for the antenna cable used.
Configuration
We recommend clicking the “Check for updates” button and updating your RouterOS software to the latest version
to ensure the best performance and stability. RouterOS includes many configuration options in addition to what is
described in this document. We suggest starting here to get yourself accustomed to the possibilities:
http://mt.lv/help http://mt.lv/winbox. In case IP connection is not available, the Winbox tool ( ) can be used to connect
to the MAC address of the device from the LAN side (all access is blocked from the internet port by default). For
recovery purposes, it is possible to boot the device from a network, see the section Reset button.
See mikrotik.com/products for the latest version of this document. Page 2, Document #49496 Modified on: 19.DEC.2019

GPS
The built-in GPS module requires an external antenna to be used (SMA connector is already mounted
behind the unit door). Please see section on how to remove door. Mounting
Attention the GPS uses an active antenna, only connect and disconnect the antenna, when the device is
turned off!
Make sure that GPS package is installed on your device. Check by following command /system package print. If
not installed please download extra packages at our download page accordingly to your RouterOS version and
install GPS package by dragging it to the Files menu. Enable GPS and start working:
•Enabling - /system gps set enable=yes;
•Setting antenna to external - /system gps set gps-antenna-select=external;
•Checking configuration - /system gps print.
Powering
•Direct-input power jack (5.5 mm outside and 2 mm inside, female, pin positive plug) accepts 12-30 V DC ⎓
with provided 24 V, 1.2 A adapter.
•Ethernet port accepts passive Power over Ethernet 12-30 V DC ⎓ (compensate for the loss on cable, so
more than 12 V recommended).
•The automotive connector can be used to power the device from regular 12/24 V ⎓ connections in
automobiles and buses. The plug has four pins: bottom left (black) is the ground, bottom right is power in
(red). The upper two (AUX) are reserved for future use.
The power consumption under maximum load can reach 12 W without attachments. Please attach ground (earth)
wire to the screw under the door.
Connecting to a POE Adapter: (Not included)
1. Connect the Ethernet cable from the device to the POE out port of the POE adapter.
2. Connect an Ethernet cable from your LAN to the POE adapter.
3. Connect the power cord to the adapter, and then plug the power cord into a power outlet.
Front status LED behavior
1. Solid Blue – the device is powered on.
2. Solid Green – user defined LED, can be configured in system settings.
3. Solid Green – state of GPS module.
4. Solid Green– the set of five green LED, shows signal strength of cellular network.
See mikrotik.com/products for the latest version of this document. Page 3, Document #49496 Modified on: 19.DEC.2019
Produktspecifikationer
Varumärke: | Mikrotik |
Kategori: | accesspunkt |
Modell: | LtAP 4G kit |
Bredd: | 170 mm |
Djup: | 162 mm |
Höjd: | 40 mm |
Processorfrekvens: | 880 MHz |
Strömförbrukning (max): | 24 W |
Internminne: | 128 MB |
SIM-kortplats: | Ja |
Ethernet WAN: | Ja |
Flashminne: | 16 MB |
Maximal dataöverföringshastighet: | 300 Mbit/s |
2,4 GHz: | Ja |
5 GHz: | Ja |
Maximal dataöverföringshastighet (2,4 GHz): | 300 Mbit/s |
DSL WAN: | Ja |
Produktens färg: | Svart |
Inbyggd processor: | Ja |
Datahastighet för Ethernet-LAN: | 10,100,1000 Mbit/s |
Strömförsörjning via Ethernet (PoE) stöd: | Ja |
Antal LAN (RJ-45) anslutningar: | 1 |
Temperatur vid drift: | -40 - 70 ° C |
AC-inspänning: | 12 - 30 V |
AC-adapter inkluderad: | Ja |
Antal USB 2.0 anslutningar: | 1 |
Kommunikationsstandarder: | IEEE 802.11b, IEEE 802.11g, IEEE 802.11n |
Antenntyp: | Intern |
Behöver du hjälp?
Om du behöver hjälp med Mikrotik LtAP 4G kit ställ en fråga nedan och andra användare kommer att svara dig
accesspunkt Mikrotik Manualer
17 Augusti 2025
16 Augusti 2025
16 Augusti 2025
16 Augusti 2025
16 Augusti 2025
14 Augusti 2025
accesspunkt Manualer
- Edimax
- Sitecom
- Cisco
- Belkin
- Devolo
- LevelOne
- Planet
- Vivitek
- Grandstream
- Advantech
- Intellinet
- Lancom
- Cudy
- Milesight
Nyaste accesspunkt Manualer
16 Augusti 2025
15 Augusti 2025
15 Augusti 2025
15 Augusti 2025
15 Augusti 2025
15 Augusti 2025
15 Augusti 2025
15 Augusti 2025
15 Augusti 2025
15 Augusti 2025