Nitecore MH12 Pro Bruksanvisning
Läs gratis den bruksanvisning för Nitecore MH12 Pro (2 sidor) i kategorin Ficklampa. Guiden har ansetts hjälpsam av 35 personer och har ett genomsnittsbetyg på 4.2 stjärnor baserat på 3 recensioner. Har du en fråga om Nitecore MH12 Pro eller vill du ställa frågor till andra användare av produkten? Ställ en fråga
Sida 1/2
Superior Performance
USB-C Rechargeable Compact Flashlight
MH12 Pro
(English) MH12 Pro
(Deutsch) MH12 Pro
(Español)
MH12 Pro
Features
Accessories
Specications
Battery Options
Technical Data
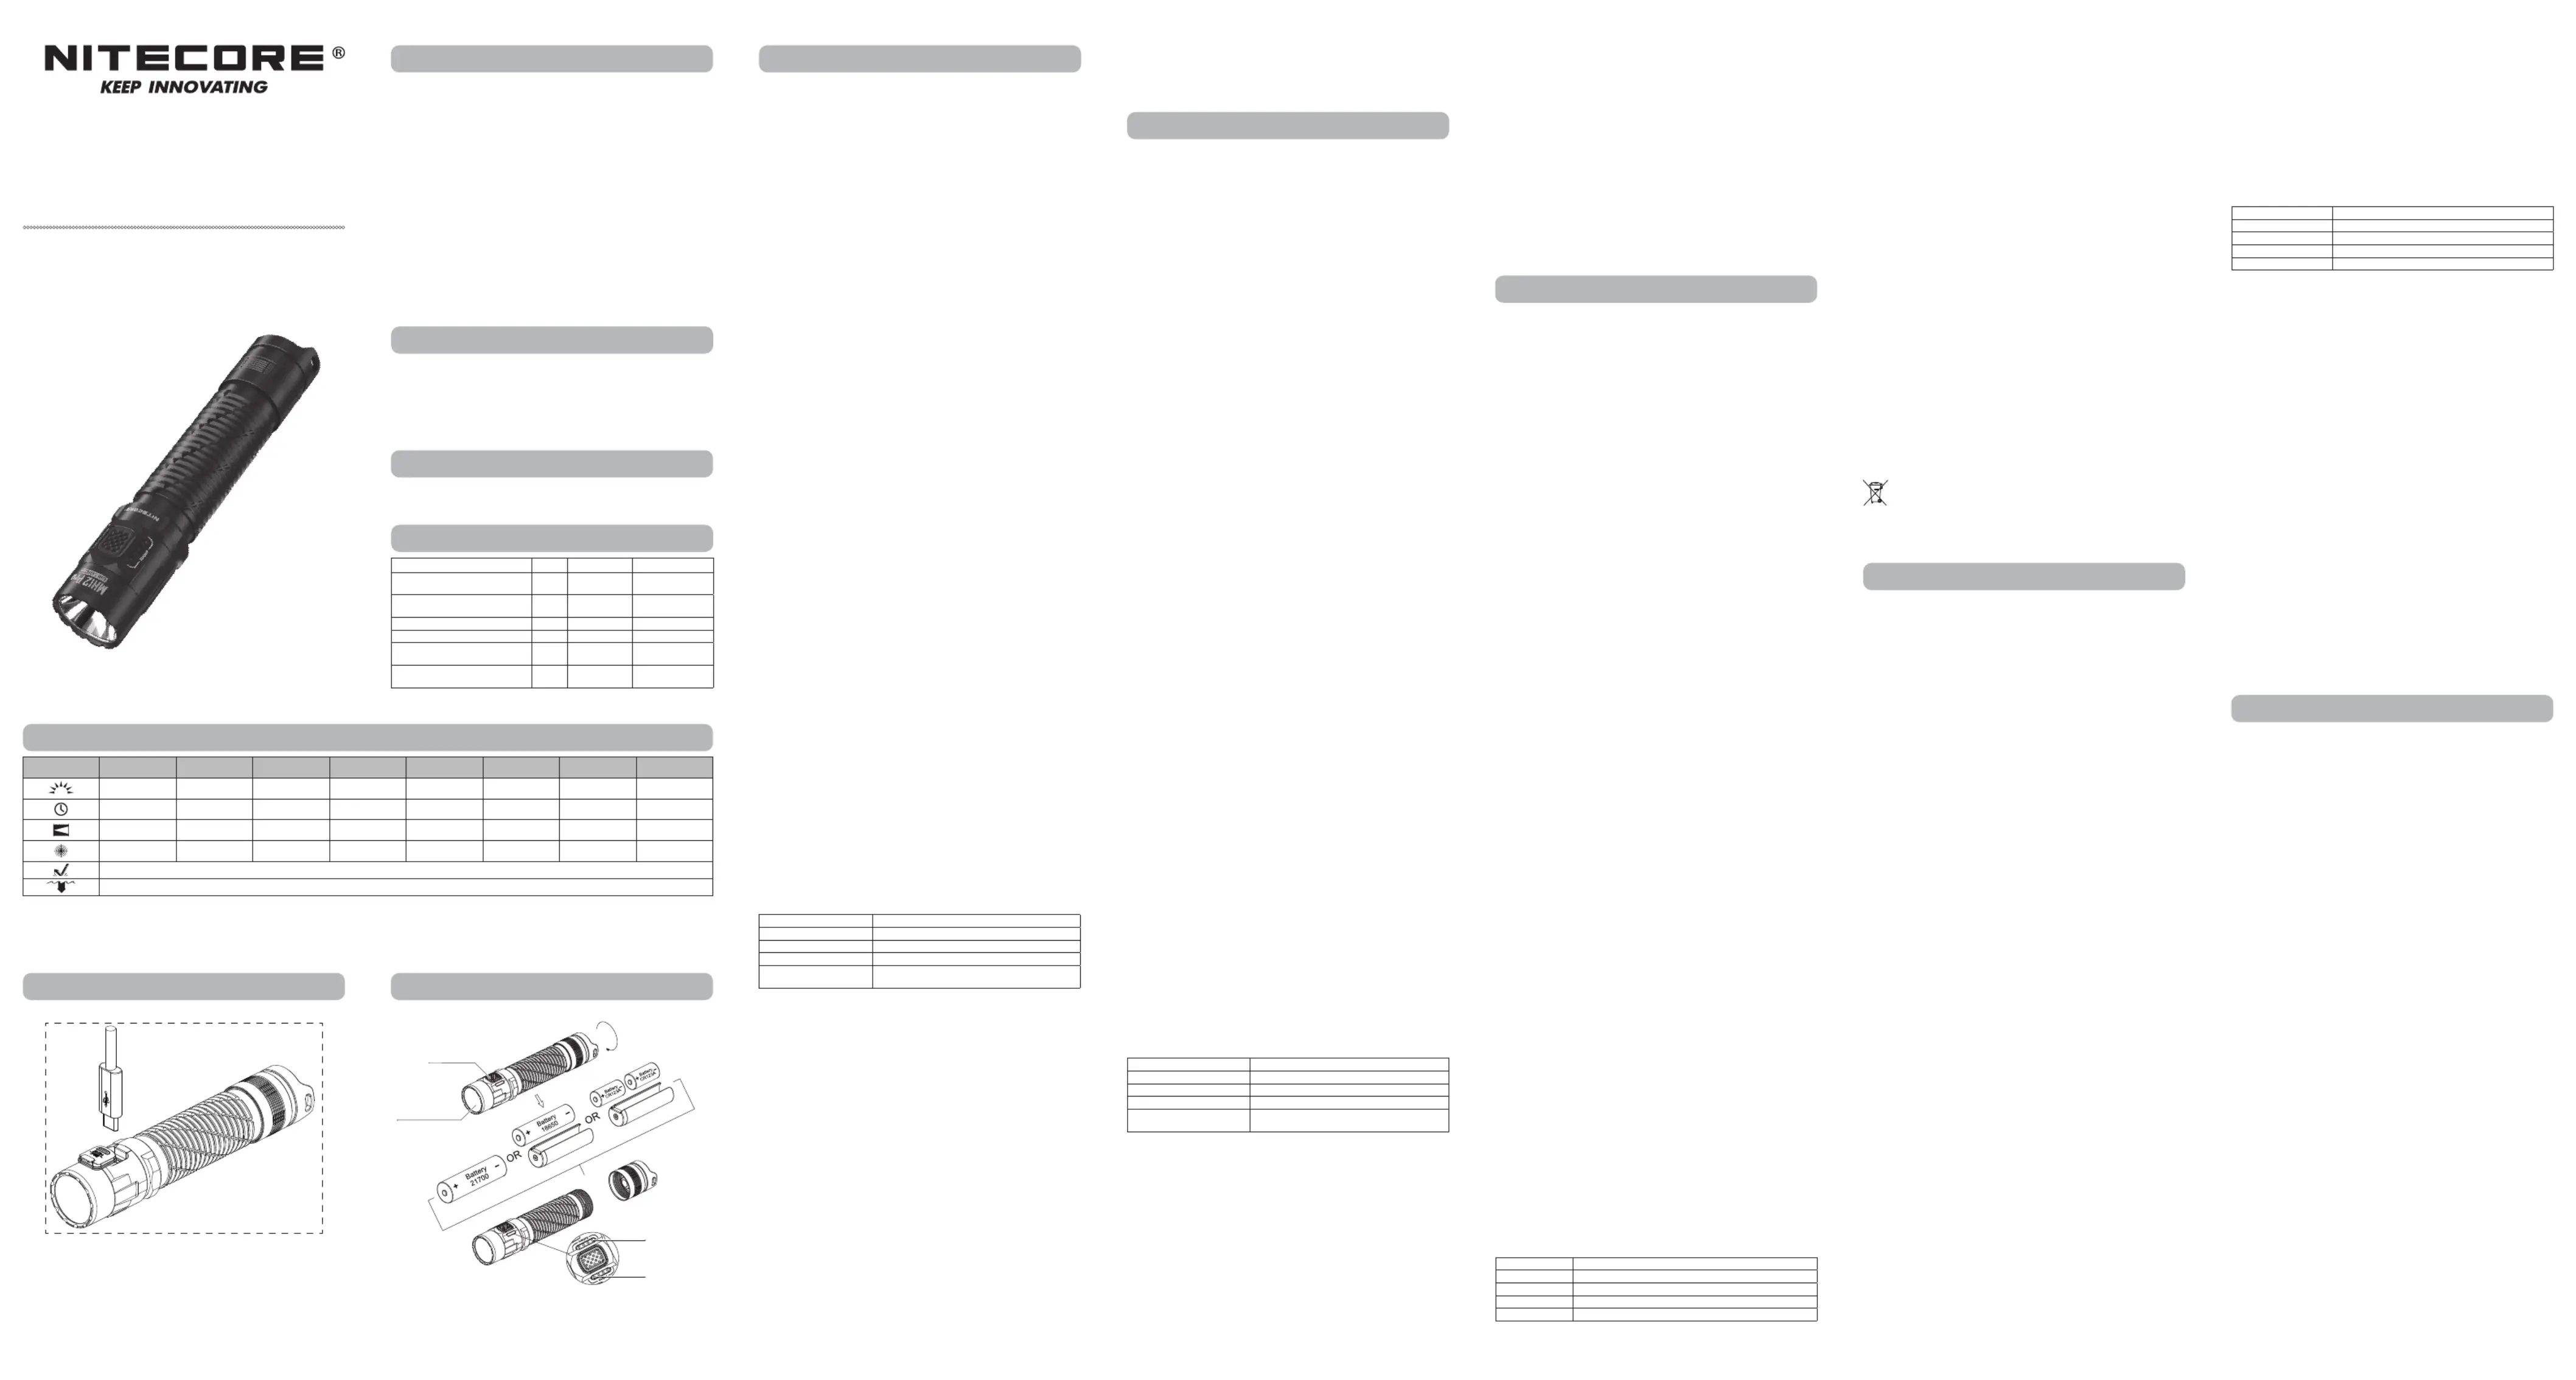
Charging FunctionBattery Installation / Removal
•Utilizes a UHi 40 LED with a max output of 3,300 lumens
•Max peak beam intensity of 63,500cd and max throw of 505 meters
•An optical system combined with crystal coating and "Precision Digital Optics Technology"
(PDOT)
•Powered by a 21700 high capacity Li-ion battery while compatible with 18650 and
CR123 batteries, to provide a runtime up to 650 hours
•Tactical Mode and Daily Mode available
•The tactical tail switch and the mode button control 5 brightness levels and 3 special
modes
•STROBEModeusesrandomlychangingfrequenciesforstrongerdizzyingeects
•Power indicators beside the mode button indicate the remaining battery power
•Level indicators beside the mode button indicate the current brightness level
•Intelligent Li-ion battery charging circuit with a USB-C charging port
•NITECORE 21700 Li-ion battery included (NL2153HP 5,300mAh)
•Highlyecientconstantcurrentcircuitprovidesastableoutput
•Incorporated Advanced Temperature Regulation (ATR) module
(Patent No. ZL201510534543.6)
•Electronic reverse polarity protection
•Optical lenses with double-sided scratch resistant coating
•Constructed from aero grade aluminum alloy
•HAIIImilitarygradehard-anodizednish
•Waterproof and dustproof rating in accordance with IP68 (2 meters submersible)
•Impact resistant to 1 meter
Length: 138.5mm (5.45")
Head Diameter: 26.8mm (1.06")
Tube Diameter: 26.0mm (1.02")
Tail Diameter: 27.0mm (1.06")
Weight: 82g (2.89 oz) (Battery Not Included)
NITECORE 21700 Rechargeable Li-ion Battery (NL2153HP 5,300mAh), USB-C Charging
Cable, Clip, Lanyard, Spare O-ring, Holster
TypeNominal VoltageCompatibility
21700 Rechargeable Li-ion Battery
(Discharge Current Over 15A)
217003.6V/3.7VY (Recommended)
18650 Rechargeable Li-ion Battery
(Discharge Current Over 15A)
186503.6V/3.7VY (Compatible)
Primary Lithium Battery*CR1233VY (Compatible)
Rechargeable Li-ion Battery*RCR1233.6V/3.7VY (Compatible)
21700 Rechargeable Li-ion Battery
(Discharge Current Below 15A)
217003.6V/3.7VN (Incompatible)
18650 Rechargeable Li-ion Battery
(Discharge Current Below 15A)
186503.6V/3.7VN (Incompatible)
Note: DO NOT attempt to use the MH12 Pro to charge CR123/RCR123 batteries.
FL1 STANDARDTURBOHIGHMIDULTRALOWSTROBEBEACONSOSLOW
3,300 Lumens1,200 Lumens300 Lumens50 Lumens1 Lumen3,300 Lumens3,300 Lumens3,300 Lumens
*30min4h 30min8h 30min50h650h───
505m323m170m73m8m───
63,500cd26,100cd7,280cd1,340cd16cd───
1m (Impact Resistance)
IP68, 2m (Waterproof and Submersible)
Note:ThestateddataismeasuredinaccordancewiththeinternationalashlighttestingstandardsANSI/PLATOFL1-2019,using1x21700Li-ionbattery(5,300mAh)underlaboratory
conditions.Thedatamayvaryinrealworlduseduetodierentbatteryusageorenvironmentalconditions.
*The runtime of TURBO is tested without the temperature regulation.
*TURBO Availability: The TURBO Level is only accessible when using a 21700/18650 rechargeable Li-ion battery with a discharge current over 15A. It is inaccessible when using CR123/
RCR123 batteries.
Ladefunktion
Die MH12 Pro ist mit einem intelligenten Ladesystem ausgestattet. Schrauben Sie die
Endkappe nach dem Einlegen der Akkus fest und schließen Sie dann - wie abgebildet
- ein externes Netzteil (z. B. einen USB-Adapter, einen Computer oder andere USB-
Ladegeräte) über das USB-Kabel am USB-C-Anschluss an, um den Ladevorgang zu
beginnen.
•Während des Ladevorgangs gehen die vier grünen Anzeige-LEDs allmählich von
Blinken zu Dauerlicht über, um den Akkustand anzuzeigen.
•Wenn der Akku vollständig aufgeladen ist, beendet die MH12 Pro den Ladevorgang
und die LED-Anzeigen leuchtet dauerhaft.
•Wenn das Licht eingeschaltet ist, schaltet sich die Lampe automatisch aus, wenn sie
an eine Stromquelle angeschlossen wird. Die Taschenlampe geht automatisch auf
„LOW“, wenn sie von der Stromquelle getrennt wird.
•Die Ladezeit für einen 21700 Li-Ion-Akku (5300mAh) beträgt ca. 3 Stunden 30 Minuten
(Auadungüberden5V/2A-Adapter)
Bedienungsanleitung
Einsetzen / Entnehmen der Akkus
Installieren Sie / Entfernen Sie die Akkus - wie dargestellt -und drehen Sie die Heckkappe
fest.
HINWEIS:
Vor dem Einlegen der Batterien bitte den Silikat-Beutel entnehmen!
WARNUNG:
1. Legen Sie die Batterien mit dem positiven (+) Ende in Richtung des Lampenkopfes ein.
Mit falsch eingesetzten Batterien/Akkus wird die MH12 Pro nicht funktionieren!
2. Verwenden Sie das Batterie-Magazin wenn Sie 1 x 18650 oder 2 x CR123 Batterien/
Akkus verwenden wollen. Dies verhindert ein Klappern im Gehäuse und gewährleistet
eine stabile Energieversorgung.
3. Wenn der Ladestand niedrig ist, verwenden Sie bitte die Taschenlampe nicht mehr und
entfernen Sie den Akku, um eine Beschädigung des Akkus zu vermeiden.
4. Wenn Sie die Taschenlampe in einem Rucksack aufbewahren oder für längere Zeit
nicht benutzten, entfernen Sie bitte alle Akkus, um eine versehentliche Aktivierung der
Lampe oder ein Auslaufen der Akkus zu vermeiden.
Momentlicht
Drücken Sie den Schalter der Heckkappe halb durch, um das Licht einzuschalten. Zum
Ausschalten die Taste einfach loslassen.
Ein-/Ausschalten
Einschalten: Drücken Sie den Heckschalter ganz durch, bis Sie ein "Click" hören.
Ausschalten: Drücken Sie den Heckschalter erneut ganz durch, bis Sie den "Click" hören.
Auswahl eines Benutzer-Mode
Die MH12 Pro bietet 2 Benutzer-Modi.
• In diesem Benutzer-Mode stehen 5 Daily-Mode (Standardeinstellung):
Helligkeitsstufen und 3 Spezial-Modi (STROBE, BEACON und SOS) zur Verfügung. Die
MH12 Pro speichert 4 Helligkeitsstufen oder den „STROBE“-Mode (ausgenommen:
„ULTRALOW-“„BEACON“- und „SOS“-Mode) und greift wieder darauf zu, wenn sie
erneut aktiviert wird, es sei denn, sie wurde in den anderen Benutzer-Mode geschaltet.
•In diesem Benutzer-Mode stehen nur 5 Helligkeitsstufen und der Taktik-Mode:
„STROBE“-Mode zur Verfügung. Die MH12 Pro speichert nur den „TURBO“- oder den
„STROBE“-Mode und greift darauf wieder zu, wenn sie reaktiviert wird, es sei denn, sie
wurde in den anderen Benutzer-Mode geschaltet.
Zugriff auf ULTRALOW
Wenn das Licht aus ist, halten Sie die Mode-Taste gedrückt und klicken Sie dann auf den
Heckschalter, um auf ULTRALOW zuzugreifen.
Auswahl eines gewünschten Benutzer-Mode
1. Wenn das Licht ausgeschaltet ist, halten Sie die Mode-Taste gedrückt und klicken Sie
dann auf den Heckschalter, um auf ULTRALOW zuzugreifen.
2. Halten Sie die Mode-Taste etwa 5 Sekunden lang gedrückt. Die Taschenlampe zeigt
den ausgewählten Benutzermodus durch einmaliges Blinken für den Daily-Mode und
zweimaliges Blinken für den Taktik-Mode an.
Helligkeitsstufen
• Wenn das Licht eingeschaltet ist, drücken Sie kurz auf die Mode-Taste, Daily-Mode:
um fortlaufend durch die folgenden Helligkeitsstufen zu schalten: "LOW" - "MID" -
"HIGH" - "TURBO".
• Wenn das Licht eingeschaltet ist, drücken Sie kurz auf die Mode-Taste, Taktik Mode:
um fortlaufend durch die folgenden Helligkeitsstufen zu schalten: "TURBO" - "HIGH" -
"MID" - "LOW".
Spezial-Modi (STROBE / BEACON / SOS)
• Wenn das Licht eingeschaltet ist, halten Sie die Mode-Taste gedrückt, Daily-Mode:
um fortlaufend durch die folgenden Spezial-Modi zu schalten: "STROBE" - "BEACON" -
"SOS". Lassen Sie los, um den gewünschten Spezial-Mode auszuwählen.
• Wenn das Licht eingeschaltet ist, drücken Sie die Mode-Taste lang, um Taktik-Mode:
den STROBE-Mode aufzurufen.
•Wenn einer der Spezial-Modi eingeschaltet ist, drücken Sie die Mode-Taste kurz/lang,
um die Spezial-Modi zu verlassen und Zur vorherigen Helligkeitsstufe zurückzukehren
oder klicken Sie auf den Heckschalter, um das Licht auszuschalten.
Restenergie-Anzeige
Wenn die Lampe eingeschaltet ist, leuchten die grünen LED-Anzeigen kontinuierlich auf,
um die verbleibende Akkuleistung anzuzeigen.
Hinweis: Die Batterien sollten ausgetauscht oder die Akkus aufgeladen werden, wenn
die Leistung nachlässt oder die Taschenlampe aufgrund der geringen Leistung nicht mehr
reagiert.
Anzeige-LEDsPower Level
4 Konstant an75%–100%
3 Konstant an50%–75%
2 Konstant an25%–50%
1 Konstant an0% – 25% (Bitte laden Sie die Akkus so schnell wie möglich auf.)
• Utilizes UHi 40 LED
• 3,300 Lumens Max Output
• 505 Meters Max Throw
Mode Button
Built-in Optical Sensor
Power Indicators
Level Indicators
*The battery magazine is sold separately.
Charging Function
The MH12 Pro is equipped with an intelligent charging system. As illustrated, after
inserting the battery and tightening the tail cap, use the USB cable to connect an external
power supply (e.g. a USB adapter or other USB charging devices) to the charging port to
begin the charging process.
•
During the charging process, the four green indicator lights will gradually transition
fromashingtoasteadylighttodisplaythebatterylevel.
•
When the battery is fully charged, the MH12 Pro will cease the charging process and
the power indicators will become steadily turned on to inform the user.
•
Whenthelightison,connectingtoapowersourcewillautomaticallyturnthelighto.The
ashlightwillautomaticallyaccessLOWwhenitisdisconnectedfromthepowersource.
•
The charging time for a 21700 Li-ion battery (5,300mAh) is approx. 3 hours 30
minutes. (Charged via the 5V/2A adapter)
Operating Instructions
Battery Installation / Removal
As illustrated, after unscrewing the battery cap, insert / remove the battery(s) and screw
to tighten the tail cap.
Warnings:
1. Make sure the battery(s) are inserted with the positive end facing towards the head.
The product will not work if the battery(s) are incorrectly inserted.
2. Please use the battery magazine when using 1 x 18650 / 2 x CR123 batteries to avoid
battery rattling and ensure a stable contact.
3. When the power level is low, please stop using the product and replace or recharge
the battery to prevent damage.
4. If the product is stored in a backpack or left unused for an extended period of time,
please remove all batteries to prevent accidental activation or battery leakage.
Tactical Momentary Illumination
HalfpressandholdtheTailSwitchtoturnonthelightmomentarily.Releasetoturnito.
On / Off
On:Whenthelightiso,presstheTailSwitchuntilaclicksoundisheardtoturniton.
O:Whenthelightison,presstheTailSwitchuntilaclicksoundisheardtoturnito.
User Mode Selection
TheMH12Proprovides2usermodesfordierentusersandsituations.
•
Daily Mode (Default Setting): In this user mode, there are 5 brightness levels and
3 special modes (STROBE, BEACON and SOS) available. The MH12 Pro will memorize
and re-access 4 brightness levels or STROBE Mode (ULTRALOW, BEACON, and SOS
excluded) when reactivated, unless it has been switched to the other user mode.
•
Tactical Mode: In this user mode, there are only 5 brightness levels and STROBE
Mode available. The MH12 Pro will only memorize and re-access the TURBO Level or
STROBE Mode when reactivated, unless it has been switched to the other user mode.
ULTRALOW Activation
Whenthelightiso,pressandholdtheModeButton,thenclicktheTailSwitchtoaccess
ULTRALOW.
To select a desired user mode:
1.Whenthelightiso,pressandholdtheModeButton,thenclicktheTailSwitchto
access ULTRALOW.
2.KeepholdingtheModeButtonforapproximately5seconds.Theashlightwillindicate
theselectedusermodebyashingonceforDailyModeandashingtwiceforTactical
Mode.
Brightness Levels
•
Daily Mode: When the light is on, short press the Mode Button to cycle through the
following brightness levels: LOW - MID - HIGH - TURBO.
•
Tactical Mode: When the light is on, short press the Mode Button to cycle through
the following brightness levels: TURBO - HIGH - MID - LOW.
Special Modes (STROBE / BEACON / SOS)
•
Daily Mode: When the light is on, keep holding the Mode Button to cycle through
the following special modes: STROBE – BEACON - SOS. Release to select the desired
special mode.
•
Tactical Mode: When the light is on, long press the Mode Button to access the
STROBE Mode.
•
When one of the special modes is on, short/long press the Mode Button to exit special
modesandreturntothepreviousbrightnesslevel;orclicktheTailSwitchtoturno
the light.
Power Indication
When the light is on, the green power indicators will become steadily turned on to
indicate the remaining battery power.
Note: The battery should be replaced or recharged when the output appears to be dim
ortheashlightbecomesunresponsiveduetolowpower.
Status of IndicatorsPower Level
4 Constant-on75%–100%
3 Constant-on50%–75%
2 Constant-on25%–50%
1 Constant-on
0%–25%
(Please charge the product as soon as possible)
Sensor Protection Function
Whenthebuilt-inopticalsensordetectsanobstructionahead,theashlightbrightness
will automatically decrease to prevent overheating and prolong the lifespan of the
ashlight.Thesensitivityofthesensormaydierduetovariationsinthecolorand
material of obstructions.
•
WhentheashlightisinHIGHorTURBO,ifthebuilt-inopticalsensordetectsan
obstruction ahead, the brightness will automatically decrease to 300 lumens. Once the
obstructionisremoved,theashlightwillreturntothepreviousbrightnesslevel.
•
WhentheashlightisinSTROBEMode,ifthebuilt-inopticalsensordetectsan
obstruction ahead, the brightness will automatically decrease to 1,200 lumens. To
restore the previous brightness, simply reactivate the STROBE function.
Note:
1.ThisfeatureisonlyavailablewhentheashlightisinHIGH,TURBO,andSTROBE
Mode.
2. It is important to keep the front lens clean to ensure that the built-in sensor functions
properly to its optimal sensor performance.
ATR (Advanced Temperature Regulation)
The integrated ATR technology regulates the output of the MH12 Pro according to the
working condition and ambient environment to maintain the optimal performance.
Warnings:
1.WhenusingTURBOMode(3,300lumens),theheadoftheashlightwillgenerate
massive amount of heat. It is not recommended for users to use TURBO Mode for an
extended period to avoid burns.
2. CAUTION! Possible dangerous radiation! Don't look into the light! May be dangerous
for your eyes.
3. DO NOT cover or place objects near the head of the product to prevent accidents.
4. The product will generate massive heat during prolonged operation. Please exercise
caution when using it to avoid potential burns.
5. Dispose of the device/batteries in accordance with applicable local laws and regulations.
Maintenance
Every 6 months, threads should be wiped with a clean cloth followed by a thin coating of
silicon-based lubricant.
Función de carga
La MH12 Pro está equipada con un Sistema de carga inteligente. Como se muestra en
la imagen, después de insertar la batería y enroscar la tapa trasera, utilice el cable USB
para conectar a una fuente de alimentación externa (Por ejemplo, un adaptador USB u
otros dispositivos de carga USB) al puerto de carga para iniciar el proceso de carga.
•Durante el proceso de carga, los cuatro indicadores verdes luminosos gradualmente
pasarán de estar parpadeando a permanecer encendidos para mostrar el nivel de batería.
•Cuando la betería está completamente cargada, la MH12 Pro detendrá el proceso de
carga y los indicadores de carga permanecerán encendidos para informar al usuario.
•Cuando la luz está encendida, al conectar la linterna a una fuente de alimentación
automáticamente apagará la luz. La linterna automáticamente accederá al modo BAJO
cuando se desconecte de la fuente de alimentación.
•El tiempo de carga para una batería Li-ion 21700 (5,300mAh) es de aprox. 3 horas 30
minutos. (Cargando mediante un adaptador de 5V/2A)
Instrucciones de operación
Instalación/extracción de las baterías
Como se muestra en la imagen, después de desenroscar la tapa de la(s) batería(s),
inserte/retire la(s) batería(s) y enrosque para apretar la tapa trasera.
Advertencias:
1. Asegúrese que la(s) batería(s) está(n) insertada(s) con el polo positivo hacia la cabeza
de la linterna. El producto no funcionará si la(s) batería(s) está(n) incorrectamente
insertada(s).
2. Por favor utilice el adaptador de baterías cuando utilice una batería 18650 o dos
CR123 para evitar vibración de las mismas y asegurar un contacto estable.
3. Cuando la carga esté baja, por favor deje de utilizar el producto y reemplace o
recargue la batería para evitar daños.
4. Cuando deje el producto en una mochila o se deje de usar por periodos prolongados
de tiempo, por favor remueva todas las baterías para prevenir activación accidental o
fugas en las baterías.
Iluminación táctica momentánea
Mantenga presionado el botón trasero hasta la mitad para encender la luz
momentáneamente. Suéltelo para apagar.
Encendido / Apagado
Encendido: Cuando la luz está apagada, presione el botón trasero hasta escuchar un
click para encender.
Apagado: Cuando la luz está encendida, presione el botón trasero hasta escuchar un
click para apagar.
Selección del modo de usuario
La MH12 Pro provee 2 modos de usuario para diferentes usuarios y situaciones.
• En este modo de usuario, hay 5 Modo diario (Conguración predeterminada):
niveles de intensidad y 3 modos especiales disponibles (ESTROBO, BALIZA y SOS).
La MH12 Pro memorizará y re accederá a 4 niveles de intensidad o modo ESTROBO
(ULTRABAJO, BALIZA, y SOS excluidos) cuando es reactivada, a menos que haya sido
cambiada a otro modo de usuarios.
•En este modo de usuario, hay sólo 5 niveles de intensidad y modo Modo táctico:
ESTROBO disponibles. La MH12 Pro sólo memorizará y re accederá al nivel TURBO o
modo ESTROBO cuando sea reactivada, a menos que haya sido cambiada a otro modo
de usuario.
Activación de ULTRABAJO
Cuando la luz está apagada, presione y mantenga presionado el botón Mode, a
continuación, presione el botón trasero para acceder a ULTRABAJO.
Selección del modo de usuario deseado:
1. Cuando la luz está apagada, presione y mantenga presionado el botón Mode, a
continuación, presione el botón trasero para acceder a ULTRABAJO.
2. Mantenga presionado el botón Mode por aproximadamente 5 segundos. La linterna
indicará el modo de usuario seleccionado parpadeando una vez para el modo Diario y
dos veces para el modo Táctico.
Niveles de intensidad
• Cuando la luz está encendida, presione brevemente el botón Mode para Modo diario:
cambiar entre los siguientes niveles de intensidad: BAJO - MEDIO - ALTO - TURBO.
•Modo táctico: Cuando la luz está encendida, presione brevemente el botón Mode para
cambiar entre los siguientes niveles de intensidad: TURBO - ALTO - MEDIO - BAJO.
Modos especiales (ESTROBO / BALIZA / SOS)
• Cuando la luz está encendida, mantenga presionado el botón Mode Modo diario:
para cambiar entre los siguientes modos especiales: ESTROBO – BALIZA - SOS. Suelte
para seleccionar el modo especial deseado.
• Cuando la luz está encendida, mantenga presionado el botón Mode Modo táctico:
para acceder al modo ESTROBO.
•Cuando alguno de los modos especiales está encendido, presione brevemente/
mantenga presionado el botón Mode para salir de los modos especiales y regresar al
nivel de intensidad anterior; o presione el botón trasero para apagar la luz.
Indicador de batería
Cuando la luz está encendida, los indicadores verdes permanecerán encendidos para
indicar el nivel de batería restante.
Nota: La batería debe ser reemplazada o recargada cuando la intensidad parece débil o
la linterna no responda debido a la batería baja.
Estado de los indicadoresNivel de carga
4 Encendido constante75%–100%
3 Encendido constante50%–75%
2 Encendido constante25%–50%
1 Encendido constante
0%–25%
(Por favor cargue el producto lo antes posible)
Función de sensor de protección
Cuando el sensor óptico integrado detecta una obstrucción adelante, la intensidad de la
linterna automáticamente disminuye para prevenir sobrecalentamiento y prolongar la vida
útil de la linterna. La sensibilidad del sensor puede variar según el color y material de los
obstáculos.
•Cuando la linterna está en ALTO o TURBO, si el sensor óptico integrado detecta un
obstáculo adelante, la intensidad disminuirá automáticamente a 300 lúmenes. Una vez
que el obstáculo sea removido, la linterna regresará al nivel de intensidad previo.
•Cuando la linterna está en modo ESTROBO, si el sensor óptico integrado detecta un
obstáculo adelante, la intensidad disminuirá automáticamente a 1,200 lúmenes. Para
regresar al nivel de intensidad anterior, simplemente reactive la función ESTROBO.
Nota:
1. Esta función sólo está disonible cuando la linterna está en modos ALTO, TURBO y
ESTROBO.
2. Es importante mantener limpio el lente frontal para asegurar que el sensor integrado
funcione adecuadamente en su rendimiento óptimo.
ATR (Regulación Avanzada de Temperatura)
La tecnología ATR integrada regula la intensidad de la MH12 Pro de acuerdo a las
condiciones de trabajo y medio ambiente para mantener un rendimiento óptimo.
Advertencias:
1. Cuando se utiliza el modo TURBO (3,300 lúmenes), la cabeza de la linterna generará
gran cantidad de calor. No se recomienda a los usuarios utilizar el modo TURBO por
periodos prolongados de tiempo para evitar quemaduras.
2. ¡PRECAUCIÓN! Posible radiación peligrosa, NO mire directo a la luz, puede ser
peligroso para sus ojos.
3. NO cobra o coloque objetos cerca de la cabeza del producto para evitar accidentes.
4. El producto generará gran cantidad de calor durante una operación prolongada. Por
favor tenga cuidado cuando lo utilice para evitar posibles quemaduras.
5. Elimine el dispositivo/baterías de acuerdo con las leyes y normativas locales aplicables.
Mantenimiento
Cada 6 meses se deberán limpiar las juntas con un paño limpio, seguido a esto, debe
aplicarseunanacapadelubricanteabasedesilicón.
Sensor-Schutzfunktion
Wenn der eingebaute optische Sensor ein Hindernis erkennt, wird die Helligkeit der
Taschenlampe automatisch verringert, um eine Überhitzung zu vermeiden und die
LebensdauerderTaschenlampezuverlängern.DieEmpndlichkeitdesSensorskann
aufgrund von Farb- und Materialunterschieden bei Hindernissen variieren.
•Wenn die Taschenlampe auf „HIGH“ oder „TURBO“ steht und der eingebaute optische
Sensor ein Hindernis vor sich erkennt, wird die Helligkeit automatisch auf 300 Lumen
reduziert. Sobald das Hindernis beseitigt ist, kehrt die Taschenlampe auf die vorherige
Helligkeitsstufe zurück.
•WennsichdieTaschenlampeim„STROBE“-Modebendetunddereingebaute
optische Sensor ein Hindernis erkennt, wird die Helligkeit automatisch auf 1200 Lumen
verringert. Um die vorherige Helligkeit wiederherzustellen, aktivieren Sie einfach
wieder den „STROBE“-Mode.
Hinweis:
1. Diese Funktion ist nur verfügbar, wenn sich die Taschenlampe im „HIGH“-, „TURBO“-
oder„STROBE“-Modebendet.
2. Es ist wichtig, die Frontlinse sauber zu halten, um sicherzustellen, dass der eingebaute
Sensor ordnungsgemäß funktioniert und seine optimale Sensorleistung erreicht.
ATR
Die automatische Temperaturregulierung (ATR) steuert die Ausgangsleistung der MH12 Pro
entsprechend den Bedingungen der Umgebung, um eine optimale Leistung zu gewährleisten.
Warnungen
1. Wenn Sie den „TURBO“-Mode (3300 Lumen) verwenden, erzeugt der Kopf der
Taschenlampe eine große Menge an Wärme. Es wird empfohlen, den „TURBO“-Mode
NICHT über einen längeren Zeitraum zu verwenden, um Verbrennungen zu vermeiden.
2. VORSICHT! Mögliche gefährliche Strahlung! Schauen Sie nicht in das Licht! Dies kann
gefährlich für Ihre Augen sein.
3. Decken Sie den Lampenkopf NICHT ab und platzieren Sie keine Gegenstände in der
Nähe, um Unfälle zu vermeiden.
4. Die Lampe erzeugt bei längerem Betrieb große Hitze. Bitte seien Sie bei der Verwendung
vorsichtig, um mögliche Verbrennungen zu vermeiden.
5. Entsorgen Sie das Gerät/die Batterien in Übereinstimmung mit den geltenden örtlichen
Gesetzen und Vorschriften.
Wartung
Alle 6 Monate sollte das Gewinde mit einem sauberen Tuch abgewischt und anschließend
mit einer dünnen Schicht Silikonfett geschmiert werden.
Entsorgung von Elektro- und Elektronikgeräten
DiedurchgestricheneMülltonnebedeutet,dassSiegesetzlichverpichtetsind,
diese Geräte einer vom unsortierten Siedlungsabfall getrennten Erfassung
zuzuführen. Die Entsorgung über die Restmülltonne oder die gelbe Tonne ist
untersagt. Enthalten die Produkte Batterien oder Akkus, die nicht fest verbaut sind,
müssen diese vor der Entsorgung entnommen und getrennt als Batterie entsorgt werden.
(Francais)MH12 Pro
Fonction de charge
La MH12 Pro est équipée d'un système de charge intelligent. Comme illustré, après avoir
inséré la batterie et serré le capuchon, utilisez le câble USB pour connecter une source
d'alimentation externe (par exemple, un adaptateur USB ou d'autres dispositifs de charge
USB) au port de charge pour commencer le processus de charge.
•Pendant le processus de charge, les quatre voyants verts passent progressivement du
clignotement à une lumière constante pour indiquer le niveau de la batterie.
•Lorsque la batterie est entièrement chargée, la MH12 Pro cesse le processus de charge
et les voyants d'alimentation s'allument en continu pour informer l'utilisateur.
•Lorsque la lumière est allumée, la connexion à une source d'alimentation éteint
automatiquement la lumière. La lampe torche passe automatiquement en mode LOW
lorsqu'elle est déconnectée de la source d'alimentation.
•Le temps de charge d'une batterie 21700 Li-ion (5 300 mAh) est d'environ 3 heures 30
minutes (charge via l'adaptateur 5V/2A).
Instructions d'utilisation
Installation / retrait de la batterie
Comme illustré, après avoir dévissé le capuchon de la lampe, insérez / retirez la (les)
batterie(s) et vissez pour serrer le capuchon de la queue.
Avertissements :
1. Veillez à ce que les piles soient insérées avec l'extrémité positive orientée vers la tête.
Le produit ne fonctionnera pas si la ou les piles ne sont pas correctement insérées.
2. Veuillez utiliser un compartiment à piles lorsque vous utilisez 1 x 18650 / 2 x CR123
pilesand'éviterquelespilesnes'entrechoquentetd'assureruncontactstable.
3. Lorsque le niveau de puissance est faible, arrêtez d'utiliser le produit et remplacez ou
rechargezlabatterieand'évitertoutdommage.
4. Si le produit est rangé dans un sac à dos ou inutilisé pendant une période prolongée,
veuillezretirertouteslespilesand'éviteruneactivationaccidentelleouunefuitedes
piles.
Éclairage tactique momentané
Appuyez à moitié sur l'interrupteur de la queue et maintenez-le enfoncé pour allumer
momentanément la lampe. Relâcher pour l'éteindre.
On / Off
On: Lorsque la lampe est éteinte, appuyez sur l'interrupteur de la queue jusqu'à ce qu'un
clic se fasse entendre pour l'allumer.
O: Lorsque la lampe est allumée, appuyez sur l'interrupteur de la queue jusqu'à ce
qu'un déclic se fasse entendre pour l'éteindre.
Sélection du mode utilisateur
LaMH12Proproposedeuxmodesd'utilisationpourdiérentsutilisateursetdiérentes
situations.
•Dans ce mode utilisateur, 5 niveaux de Mode quotidien (réglage par défaut) :
luminosité et 3 modes spéciaux (STROBE, BALISE et SOS) sont disponibles. La MH12
Pro mémorise 4 niveaux de luminosité ou le mode STROBE (ULTRALOW, BALISE et
SOS exclus) et y accède à nouveau lorsqu'elle est réactivée, à moins qu'elle n'ait été
basculée dans l'autre mode utilisateur.
• Dans ce mode utilisateur, seuls 5 niveaux de luminosité et le mode Mode tactique :
STROBE sont disponibles. La MH12 Pro ne mémorise et n'accède au niveau TURBO ou
au mode STROBE que lorsqu'elle est réactivée, à moins qu'elle n'ait été basculée dans
l'autre mode utilisateur.
Activation du mode ULTRALOW
Lorsque la lumière est éteinte, appuyez sur le bouton mode et maintenez-le enfoncé, puis
cliquez sur le bouton de la queue pour accéder au mode ULTRALOW.
Pour sélectionner le mode utilisateur souhaité :
1. Lorsque la lumière est éteinte, appuyez sur le bouton Mode et maintenez-le enfoncé,
puis cliquez sur le bouton de la queue pour accéder au mode ULTRALOW.
2. Maintenez le bouton Mode enfoncé pendant environ 5 secondes. La lampe torche
indique le mode utilisateur sélectionné en clignotant une fois pour le mode quotidien
et deux fois pour le mode tactique.
Niveaux de luminosité
• Lorsque la lampe est allumée, appuyez brièvement sur le bouton Mode quotidien :
Mode pour passer d'un niveau de luminosité à l'autre : LOW - MID - HIGH - TURBO.
•Mode tactique :Lorsque la lampe est allumée, appuyez brièvement sur le bouton de
modepourfairedélerlesniveauxdeluminositésuivants:TURBO-HIGH-MID-LOW.
Modes spéciaux (STROBE / BALISE / SOS)
• Lorsque la lampe est allumée, maintenez le bouton Mode enfoncé Mode quotidien :
pour passer d'un mode spécial à l'autre : STROBE - BALISE - SOS. Relâchez le bouton
pour sélectionner le mode spécial souhaité.
• Lorsque la lumière est allumée, appuyez longuement sur le bouton Mode Tactique :
de mode pour accéder au mode STROBE.
•Lorsque l'un des modes spéciaux est activé, appuyez brièvement ou longuement sur
le bouton de mode pour quitter les modes spéciaux et revenir au niveau de luminosité
précédent, ou cliquez sur l'interrupteur de la queue pour éteindre la lampe.
Indication de puissance
Lorsque le voyant est allumé, les indicateurs d'alimentation verts s'allument en continu
pour indiquer la charge restante de la batterie.
Remarque : la batterie doit être remplacée ou rechargée lorsque l'intensité de la lumière
est faible ou que la lampe torche ne réagit plus en raison d'une faible puissance.
Statut des indicateursNiveau de puissance
4 Constants75%–100%
3 Constants50%–75%
2 Constants25%–50%
1 Constant0%–25% (Veuillez charger le produit dès que possible)
Fonction de protection du capteur
Lorsque le capteur optique intégré détecte un obstacle, la luminosité de la lampe torche
diminueautomatiquementpouréviterlasurchaueetprolongerladuréedeviede
la lampe torche. La sensibilité du capteur peut varier en fonction de la couleur et du
matériau des obstacles.
•Lorsque la lampe de poche est en mode HIGH ou TURBO, si le capteur optique intégré
détecte un obstacle, la luminosité est automatiquement réduite à 300 lumens. Une fois
l'obstacle éliminé, la lampe de poche revient au niveau de luminosité précédent.
•Lorsque la lampe de poche est en mode STROBE, si le capteur optique intégré détecte
un obstacle, la luminosité diminue automatiquement à 1 200 lumens. Pour rétablir la
luminositéprécédente,ilsutderéactiverlafonctionSTROBE.
Remarque :
1. Cette fonction n'est disponible que lorsque la lampe est en mode HIGH, TURBO et
STROBE.
2.Ilestimportantdemaintenirlalentillefrontalepropreandegarantirlebon
fonctionnement du capteur intégré et ses performances optimales.
ATR (régulation avancée de la température)
La technologie ATR intégrée régule la puissance de la MH12 Pro en fonction des conditions
detravailetdel'environnementambiantandemaintenirdesperformancesoptimales.
Avertissements :
1. Lors de l'utilisation du mode TURBO (3 300 lumens), la tête de la lampe de poche
génère une quantité importante de chaleur. Il n'est pas recommandé d'utiliser le mode
TURBOpendantunepériodeprolongéeand'éviterlesbrûlures.
2. ATTENTION ! Risque de radiation dangereuse ! Ne regardez pas la lumière ! Peut être
dangereux pour les yeux.
3. NE PAS couvrir ou placer d'objets près de la tête du produit pour éviter les accidents.
4. Le produit génère une chaleur importante en cas de fonctionnement prolongé. Veuillez
fairepreuvedeprudencelorsquevousl'utilisezand'éviterlesbrûlurespotentielles.
5. Jetez l'appareil/les piles conformément aux lois et réglementations locales en vigueur.
Maintenance
Touslessixmois,lespasdeletagesdoiventêtrenettoyésàl'aided'unchionpropre,
puisrecouvertsd'unenecouchedelubriantàbasedesilicone.
(Italiano)MH12 Pro
Funzione di ricarica
L'MH12 Pro è dotata di un sistema di ricarica intelligente. Come illustrato, dopo aver
inserito la batteria e serrato il tappo, utilizzare il cavo USB per collegare un alimentatore
esterno (ad esempio un adattatore USB o altri dispositivi di ricarica USB) alla porta di
ricarica per avviare il processo di ricarica.
•Durante il processo di ricarica, le quattro spie verdi passano gradualmente da
lampeggiantiasseperindicareillivellodellabatteria.
•Quando la batteria è completamente carica, l'MH12 Pro interrompe il processo di carica
e gli indicatori di alimentazione si accendono costantemente per informare l'utente.
•Quando la luce è accesa, il collegamento a una fonte di alimentazione la spegne
automaticamente. La torcia accede automaticamente a LOW quando viene scollegata
dalla fonte di alimentazione.
•Il tempo di ricarica di una batteria agli ioni di litio 21700 (5.300 mAh) è di circa 3 ore e
30 minuti (ricaricata tramite adattatore 5V/2A).
Istruzioni per l'uso
Installazione/rimozione della batteria
Come illustrato, dopo aver svitato il tappo della batteria, inserire/rimuovere la batteria (o
le batterie) ed avvitare per stringere il tappo.
Avvertenze:
1. Assicurarsi che le batterie siano inserite con l'estremità positiva rivolta verso la testa. Il
prodotto non funziona se le batterie non sono inserite correttamente.
2. Si prega di utilizzare il caricabatterie quando si utilizzano 1 x 18650 / 2 x CR123 per
evitare che la batteria si muova e garantire un contatto stabile.
3. Quando il livello di potenza è basso, interrompere l'uso del prodotto e sostituire o
ricaricare la batteria per evitare danni.
4. Se il prodotto viene riposto in uno zaino o lasciato inutilizzato per un periodo di tempo
prolungato, rimuovere tutte le batterie per evitare un'attivazione accidentale o una
perdita di acido dalla batteria.
Illuminazione tattica momentanea
Tenere premuto a metà l'interruttore di coda per accendere momentaneamente la luce.
Rilasciare per spegnerla.
Accensione e Spegnimento
Accensione:Quandolatorciaèspenta,premerel'interruttoredicodanoasentireun
clic per accenderla.
Spegnimento:Quandolatorciaèaccesa,premerel'interruttoredicodanchénonsi
sente un clic per spegnerla.
Selezione della modalità utente
L'MH12Proore2modalitàdiutilizzoperutentiesituazionidiverse.
• In questa modalità utente Modalità giornaliera (impostazione predenita):
sono disponibili 5 livelli di luminosità e 3 modalità speciali (STROBE, BEACON e SOS).
L'MH12 Pro memorizza e riaccede a 4 livelli di luminosità o alla modalità STROBE
(ULTRALOW, BEACON e SOS escluse) quando viene riattivata, a meno che non sia
stata commutata in un'altra modalità utente.
• In questa modalità utente sono disponibili solo 5 livelli di luminosità Modalità tattica:
e la modalità STROBE. L'MH12 Pro memorizza e riaccede al livello TURBO o alla
modalità STROBE solo quando viene riattivata, a meno che non sia stata commutata in
un'altra modalità utente.
Attivazione di ULTRALOW
Quando la torcia è spenta, tenere premuto il pulsante MODE, quindi fare clic
sull'interruttore di coda per accedere a ULTRALOW.
Produktspecifikationer
| Varumärke: | Nitecore |
| Kategori: | Ficklampa |
| Modell: | MH12 Pro |
| Vikt: | 81.5 g |
| Höjd: | 138.5 mm |
| Antal lampor: | 1 lamp(or) |
| LED-indikatorer: | Ja |
| Batterikapacitet: | 5300 mAh |
| Ljusstyrka: | 63500 CD |
| Vattentät: | Ja |
| Vattentät upp till: | 2 m |
| Ljusflöde: | 3300 LM |
| Laddningskälla: | USB |
| Färgtemperatur: | 6300 K |
| Batteriteknik: | Litium-Ion (Li-Ion) |
| Batterityp: | 21700 |
| Antal batterier: | 1 |
| Produktens färg: | Svart |
| Kontrolltyp: | Knappar |
| Antal per förpackning: | 1 styck |
| Huvuddiameter: | 26.8 mm |
| Internationellt skydd (IP) kod: | IP68 |
| Lamptyp: | LED |
| Material, hölje: | Gjuten aluminium |
| Kabel inkluderad: | USB |
| laddningsbart batteri: | Ja |
| Antal spänningsnivåer: | 4 |
| Batterier medföljer: | Ja |
| Drifttid för batteri: | 650 h |
| Antal batterier medföljer: | 1 styck |
| Stöttålig: | Ja |
| Ficklampstyp: | Ficklampa |
| Ljuskäglans avstånd (max): | 505 m |
| Batterikapacitet (boost-läge): | 30 h |
| Stötsäker upp till: | 1 m |
| Ficklampans lägen: | Ultralow, High, Low, Medium, SOS mode, Strobe mode, Turbo |
Behöver du hjälp?
Om du behöver hjälp med Nitecore MH12 Pro ställ en fråga nedan och andra användare kommer att svara dig
Ficklampa Nitecore Manualer

25 Mars 2026
23 Mars 2026
12 Mars 2026
11 Mars 2026
7 Oktober 2025
7 Oktober 2025
6 Oktober 2025
18 Juni 2025
16 Juni 2025
16 Juni 2025
Ficklampa Manualer
Nyaste Ficklampa Manualer
1 April 2026
30 Mars 2026
28 Mars 2026
28 Mars 2026
27 Mars 2026
26 Mars 2026
25 Mars 2026
24 Mars 2026
13 Mars 2026
3 Mars 2026