Nitecore TM39 Lite Bruksanvisning
Läs gratis den bruksanvisning för Nitecore TM39 Lite (2 sidor) i kategorin Ficklampa. Guiden har ansetts hjälpsam av 35 personer och har ett genomsnittsbetyg på 4.8 stjärnor baserat på 5 recensioner. Har du en fråga om Nitecore TM39 Lite eller vill du ställa frågor till andra användare av produkten? Ställ en fråga
Sida 1/2
(English) TM39/TM39 Lite(Deutsch) TM39/TM39 Lite
(Francais)
TM39/TM39 Lite(Русский) TM39/TM39 Lite
Features
• Utilizes a LUMINUS SBT-90 GEN2 LED with a max output of 5,200 lumens
• Maximum beam intensity of 562,500cd and maximum throw of 1,500 meters
• Multifunctional OLED real-time display for lumens, voltage, runtime, temperature etc.
• Thermal regulation function prevents overheating
• Intelligent charging circuit ensures a safe charging process
•Highlyecientconstantcurrentcircuitprovidesastableoutput
• Dual side switches control 4 brightness levels and 3 special modes
• An optical system combined with crystal coating and “Precision Digital Optics Technology” (PDOT)
• Optimal heat dissipation to improve overall performance
• Optical lenses with double-sided scratch resistant coating
• Constructed from aero grade aluminum alloy
•HAIIImilitarygradehard-anodizednish
• Rating in accordance with IP68 (2 meters submersible)
Specications
Accessories
TM39:
Length: 276mm (10.87”)
Head Diameter: 90mm (3.54")
Tail Diameter: 50mm (1.97")
Weight: 1361g (48.01oz) (Battery Pack Included)
TM39 Lite:
Length: 195mm (7.68”)
Head Diameter: 90mm (3.54")
Tail Diameter: 50mm (1.97")
Weight: 876g (30.9oz) (Batteries Not Included)
AC Adapter (3.5mm), Quality Sling, Lanyard, Spare O-ring, Spare Charging Port Cover
Battery Options
TM39: NBP68HD Ultra High Performance Li-ion Battery Pack
ModelNBP68HD
Capacity98Wh (3400mAh×8)
Voltage3.7V
Charging Current2A (Standard Charge) / 4A (Fast Charge)
Charging Port3.5mm 12V DC Port / 4.0mm 12V DC Port
TM39 Lite:
TypeNominal VoltageCompatibility
NITECORE NL1835HP (3500mAh)186503.6V
Y (Recommended and
Rechargeable)
IMR 18650 Rechargeable Li-ion
Battery (Button-topped)
IMR186503.6V/3.7V
Y (Recommended and
Rechargeable)
18650 Rechargeable Li-ion Battery
(Discharge Current over 8A)
186503.6V/3.7V
Y (Recommended and
Rechargeable)
Primary Lithium BatteryCR1233V
N (Incompatible and Not
Rechargeable)
Rechargeable Li-ion BatteryRCR1233.6V/3.7V
N (Incompatible and Not
Rechargeable)
18650 Rechargeable Li-ion Battery
(Discharge Current below 8A)
186503.6V/3.7VN (Incompatible)
Operating Instructions
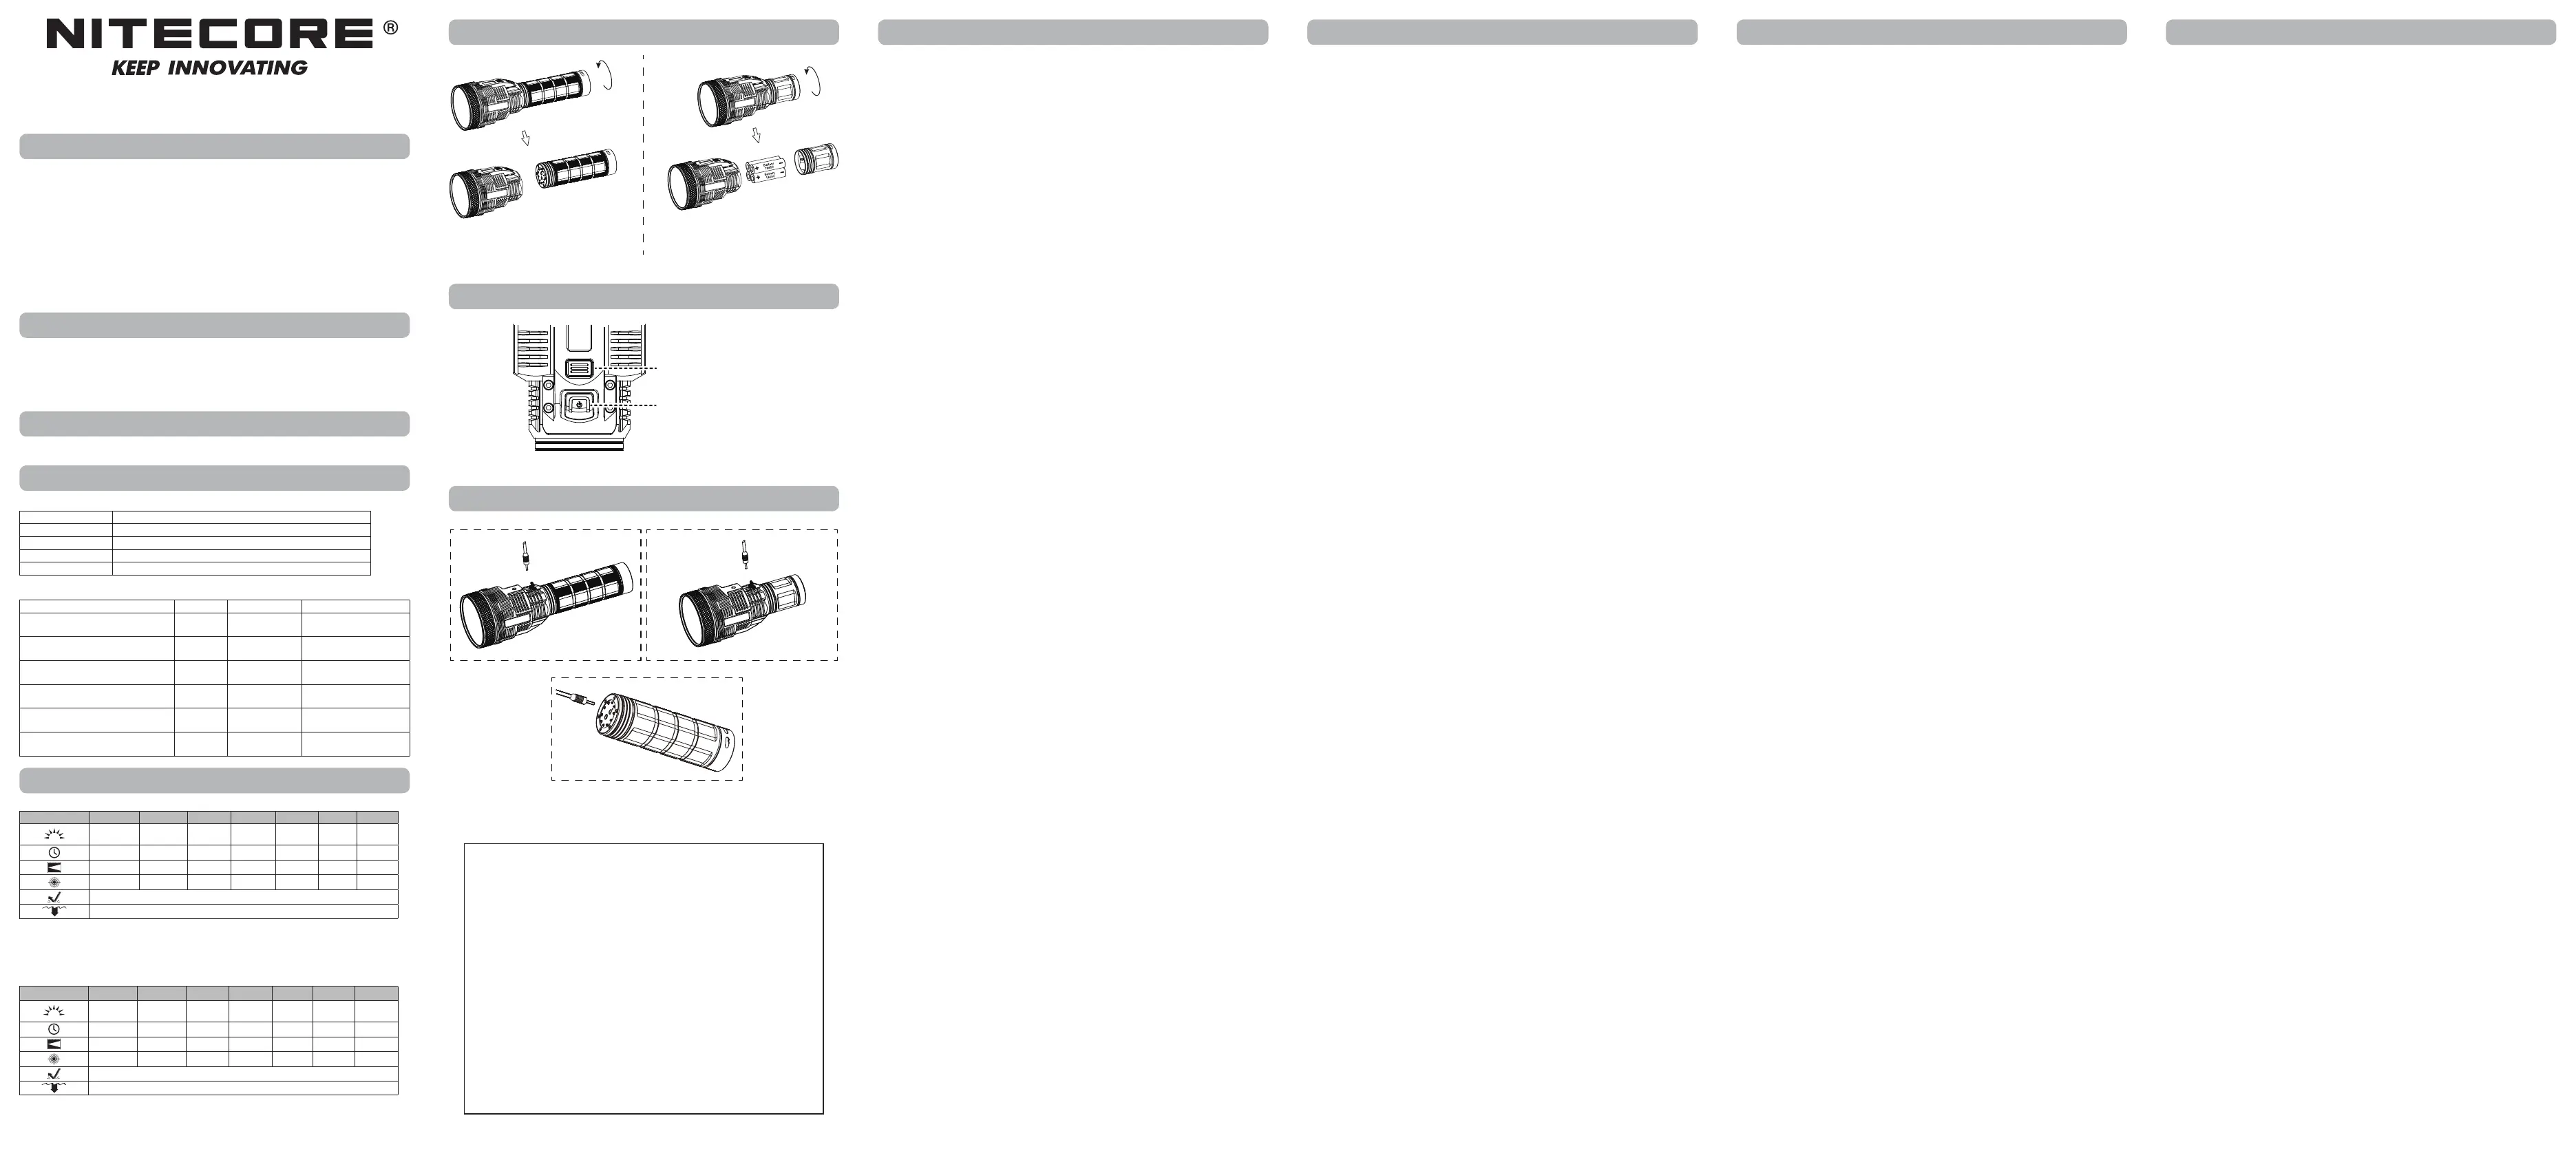
Battery Installation
TM39: Install the NBP68HD Battery Pack as illustrated.
TM39 Lite: Insert the battery(s) with the positive end towards the head as illustrated and screw
to tighten the tube. In emergency situations, 1 - 3 x 18650 batteries can be used. Please refer to
note 1 in the Warnings Section below.
Warnings:
1. Using less than 4 x 18650 batteries might trigger the overload protection circuit in Li-ion
batteries, which might lead to explosion or inaccessibility to the TURBO/HIGH Level. In this
case, it is recommended to use the product with caution and only when necessary.
2. Ensure the 18650 battery(s) is/are inserted with the positive end towards the head. The product
might be damaged if the battery(s) is/are incorrectly inserted.
3. DO NOT mix rechargeable and non-rechargeable batteries.
4.DONOTmixbatteriesofdierenttypes/brands.
5.DONOTmixbatteriesofdierentpowerlevels.
6. The product is only compatible with button-topped 18650 Li-ion batteries.
7. CAUTION! Possible dangerous radiation! Don't look into the light! Maybe dangerous for your
eyes.
8. When the power level is low, please stop using the product and replace or recharge the battery
to prevent damage to the battery.
Multifunctional OLED Display
• After the battery pack installation / battery insertion, the OLED display will show the text
"NITECORE"followedbythebatteryvoltage(±0.01V)andbatterylevel,beforegoingoand
accessing the Standby status in approx. 10 seconds.
• When the TM39/TM39 Lite is turned on, the display will show the current information of the
ashlightincludingbrightnesslevel,beamdistance,lumenoutput,batteryvoltage,battery
level,runtimeremainingandtemperature,beforegoingoinapprox.30seconds.Whenthe
displayiso,shortpressingtheModeButtoncanreactivatethedisplay.
On / O
On:Whenthelightiso,shortpressthePowerButtontoturniton.
O:Whenthelightison,shortpressthePowerButtontoturnito.
Note: Pleaseremovethelensprotectorbeforetherstuse.
Brightness Levels
When the light and the display is on, short press the Mode Button to cycle through the following
brightness levels: LOW – MID – HIGH.
(Thisaccesshasmemoryfunction.Whenreactivated,theashlightwillautomaticallyaccessthe
previous memorized brightness level.)
Note:Whenthedisplayiso,shortpresstheModeButtontoactivatethedisplay.Afterthe
display is activated, short press the Mode Button to adjust the brightness level.
TURBO Activation
Whenthelightison/o,longpresstheModeButtontoaccessTURBO.
Direct Access to LOW
Whenthelightiso,longpressthePowerButtontodirectlyaccessLOW.
Special Modes (STROBE / SOS / BEACON)
When the light is on, double press the Power Button to access the STROBE Mode. After the
STROBE Mode is on, short press the Mode Button to cycle through the following special modes:
SOS – BEACON – STROBE. When one of the special modes is on, short press the Power Button to
exitspecialmodesandturnothelight.(Whenoneofthespecialmodesisselected,thedisplay
will indicate the current special mode.)
Charging Function
The TM39/TM39 Lite is equipped with an intelligent charging system. As illustrated, use the AC
adapter to connect a power outlet to the charging port of the tube to begin the charging process.
• During the charging process, the display will show the battery voltage and the charging battery
level. When the battery is fully charged, the battery level will show full.
• When the charging process is abnormal, the display will show the text "ERROR".
•Whenthelightison,connectingtoapowersourcewillautomaticallyturnthelighto.Thelight
will return to its previous status when it is disconnected from the power source.
• The charging time for the TM39 Lite to charge 4 x 18650 Li-ion batteries (3,500mAh) is approx.
8 hours.
The included AC adapter of the TM39 can also charge the NBP68HD Battery Pack directly. As
illustrated, use the AC adapter to connect a power outlet to the charging port (2A, 3.5mm) of
the battery pack to begin the charging process. During the charging process, the blue indicator
willashquicklytoinformtheuser.Whenthechargingprocessisclosetocompletion(98%),the
indicatorwillashslowly.Whenthechargingprocessiscomplete,theindicatorwillbesteadily
turned on.
• The charging time for the TM39 or NBP68HD Battery Pack is approx. 15 hours.
• The NBP68HD Battery Pack can also be charged with the fast charging AC adapter as an
optional accessory via the fast charging port (4A, 4.0mm). In this case, the charging time is
reduced to approx. 8 hours, half of the standard charging time.
Lockout / Unlock
Lockout:Whenthelightison,pressandholdthePowerButtonuntiltheashlightashesonce
beforegoingoandthedisplayshowsthetext"LOCK"toaccessLockoutMode.
Unlock: In Lockout Mode, press and hold both buttons to exit Lockout Mode and return to its
previous status.
Note:
1.WheneitherbuttonispressedinLockoutMode,thedisplaywillshow"LOCK"toindicatethat
theashlightislocked.
2. When the product is kept in a backpack or left unused for prolonged time, please remove all
batteries to prevent accidental activation or battery leakage.
Thermal Regulation
The TURBO/HIGH Level will produce massive heat during long-time activation and might cause
discomfort of the user. Therefore, it is not recommended to use the TURBO/HIGH Level for a
prolonged time. The thermal regulation of the TM39/TM39 Lite can automatically lower its output
whenitstemperaturereaches60℃(140℉)orhigher.
Note: DONOTsubmergetheashlightintoanyliquidwhenitishot.Doingsomaycause
irreparabledamagetothelightduetothedierenceofairpressureinsideandoutsideofthetube.
Maintenance
Every 6 months, threads should be wiped with a clean cloth followed by a thin coating of silicon-
based lubricant.
Bedienungsanleitung
Installation der Batterie
TM39: Installieren Sie den NBP68HD-Akku-Pack wie abgebildet.
TM39Lite:SetzenSiedieBatterie(n)mitdempositivenEndezumKopfhinein-wieabgebildet
- und schrauben Sie die Heckkappe fest. In Notfallsituationen können 1 - 3 x 18650 Batterien
verwendet werden. Bitte beachten Sie Hinweis 1 im Abschnitt Warnungen unten.
Warnungen:
1. Die Verwendung von weniger als 4 x 18650 Batterien kann die Überlast-Schutzschaltung in
Lithium-Ionen-Batterien auslösen, was zu einer Explosion oder zu Unzugänglichkeiten im
TURBO/HIGH-Mode führen kann. In diesem Fall wird empfohlen, das Produkt mit Vorsicht und
nur bei zwingender Notwendigkeit zu verwenden!
2.
StellenSiesicher,dassdie18650-Batterie(n)mitdempositivenEndezumKopfhineingesetzt
sind. Das Produkt könnte beschädigt werden, wenn die Batterie(n) falsch eingesetzt wird (werden).
3.VermischenSieNICHTwiederauadbareAkkusmitnichtwiederauadbarenBatterien!
4. Mischen Sie NICHT Batterien/Akkus verschiedener Typen/Marken.
5. Mischen Sie NICHT Batterien/Akkus verschiedener Leistungsstufen.
6. Das Produkt ist nur mit 18650 Lithium-Ionen-Batterien mit Button-Top kompatibel.
7. VORSICHT! ACHTUNG! Möglicherweise gefährliche optische Strahlung! Bei Betrieb NICHT direkt
in das Licht blicken. Dies kann für die Augen gefährlich sein!
8. Wenn die Leistung zu gering ist, stellen Sie bitte die Verwendung des Produkts ein und tauschen
Sie die Batterien aus oder laden Sie sie den Akku auf, um Schäden an der Batterie/den Akkus
zu vermeiden.
Multifunktions OLED-Anzeige
- Nach der Installation des Akkupacks / Einlegen der Batterie zeigt das OLED-Display den Text
"NITECORE", gefolgt von der Batteriespannung (±0,01V) und dem Batteriestand, bevor es nach
ca. 10 Sekunden erlischt und den Standby-Status anzeigt.
- Wenn die TM39/TM39 Lite eingeschaltet wird, zeigt das Display die aktuellen Informationen der
Taschenlampe an, einschließlich Helligkeitsstufe, Leuchtweite, Leuchtstärke, Batteriespannung,
Batteriestand, verbleibende Leuchtzeit und Temperatur, bevor es nach ca. 30 Sekunden erlischt.
Wenn das Display ausgeschaltet ist, kann es durch kurzes Drücken der Mode-Taste wieder
aktiviert werden.
Ein / Aus
Ein: Wenn das Licht aus ist, drücken Sie kurz auf den Ein/Aus-Schalter, um es einzuschalten.
Aus: Wenn das Licht eingeschaltet ist, drücken Sie kurz auf den Ein/Aus-Schalter, um es auszuschalten.
Hinweis: Bitte entfernen Sie den Linsenschutz vor der ersten Verwendung.
Helligkeitsstufen
Wenn das Licht und das Display eingeschaltet sind, drücken Sie kurz die Mode - Taste, um
fortlaufend durch die Modi "LOW" - "MID" - "HIGH" zu schalten. Die Taschenlampe wird direkt auf
die zuvor gespeicherte Helligkeitsstufe zugreifen, wenn sie erneut aktiviert wird.
Hinweis: Wenn die Anzeige ausgeschaltet ist, drücken Sie kurz die Modue-Taste, um die Anzeige
zu aktivieren. Nachdem die Anzeige aktiviert ist, drücken Sie kurz auf die Modue-Taste, um die
Helligkeitsstufe einzustellen.
Zugang zu „TURBO“
Wenn das Licht aus ist, drücken Sie lange auf die Mode-Taste, um auf "TURBO" zuzugreifen.
Direktzugang zu "LOW"
Wenn das Licht aus ist, drücken Sie lange auf die Power-Taste, um direkt auf "LOW" zuzugreifen.
Spezial-Modi (STROBE / SOS / BEACON)
Wenn das Licht eingeschaltet ist, drücken Sie zweimal auf die Ein-/Aus-Schalter, um den STROBE-
Mode aufzurufen. Wenn der STROBE-Mode eingeschaltet ist, drücken Sie kurz auf die Mode-
Taste, um nacheinander fortlaufend die folgenden Spezial-Modi zu durchlaufen: „SOS“ – „BEACON“
– „STROBE“. Wenn einer der Spezial-Modi eingeschaltet ist, drücken Sie kurz auf den Ein/Aus-
Schalter, um die Spezial-Modi zu verlassen und das Licht auszuschalten. (Wenn einer der Spezial-
Modi ausgewählt ist, zeigt das Display den aktuellen Sonder-Mode an).
Ladefunktion
Die TM39/TM39 Lite ist mit einem intelligenten Ladesystem ausgestattet. Verwenden Sie das
Netzteil wie abgebildet, um eine Steckdose mit dem Ladeanschluss am Gehäuse zu verbinden und
den Ladevorgang zu beginnen.
- Während des Ladevorgangs zeigt das Display die Batteriespannung und den Ladezustand des
Akku an. Wenn der Akku vollständig aufgeladen ist, wird der Akkustand als voll angezeigt.
- Wenn der Ladevorgang unnormal verläuft, zeigt das Display den Text "ERROR" an.
- Wenn das Licht eingeschaltet ist, wird es beim Anschluss an eine Stromquelle automatisch
ausgeschaltet. Die Lampe kehrt in ihren vorherigen Zustand zurück, wenn sie von der
Stromquelle getrennt wird.
- Die Ladezeit für die TM39 Lite zum Laden von 4 x 18650 Lithium-Ionen-Akkus (3500mAh)
beträgt ca. 8 Stunden.
Mit dem mitgelieferten Netzteil der TM39 kann das NBP68HD Akku Pack auch direkt aufgeladen
werden. Verwenden Sie den AC-Adapter wie abgebildet, um eine Steckdose mit dem Ladeanschluss
(2A, 3,5mm) des Akkupacks zu verbinden und den Ladevorgang zu starten. Während des
LadevorgangsblinktdieblaueAnzeigeschnell.WennderLadevorgangfastabgeschlossenist(98%),
blinkt die Anzeige langsam. Wenn der Ladevorgang abgeschlossen ist, leuchtet die Anzeige stetig.
- Die Ladezeit für die TM39 oder das NBP68HD Akku Pack beträgt ca. 15 Stunden.
- Das NBP68HD Akku Pack kann auch mit dem Schnelllade-Netzteil (optionales Zubehör) über
den Schnellladeanschluss (4A, 4,0 mm) aufgeladen werden. In diesem Fall reduziert sich die
Ladezeit auf ca. 8 Stunden, die Hälfte der Standardladezeit.
Sperren / Entsperren
Sperren: Wenn das Licht eingeschaltet ist, drücken und halten Sie die Ein/Aus-Taste, bis die
Taschenlampeeinmalblinkt,bevorsieerlischtundaufdemDisplayderText"LOCK"angezeigtwird.
Entsperren: Halten Sie im Sperr-Mode beide Tasten gedrückt, um den Sperr-Mode zu verlassen
und zum vorherigen Status zurückzukehren.
Hinweis:
1.WennimSperr-ModeeinederbeidenTastengedrücktwird,zeigtdasDisplay"LOCK"an,um
anzuzeigen, dass die Taschenlampe gesperrt ist.
2. Wenn die Lampe in einem Rucksack aufbewahrt oder für längere Zeit unbenutzt bleibt,
entfernen Sie bitte alle Batterien/Akkus, um eine versehentliche Aktivierung oder ein Auslaufen
der Batterien/Akkus zu verhindern.
Temperaturregulierung
Der TURBO-/HIGH-Mode erzeugt während einer Langzeitaktivierung extreme Hitze und kann beim
Benutzer Unbehagen verursachen. Daher wird empfohlen, den TURBO-/HIGH-Mode NICHT über
einen längeren Zeitraum zu verwenden. Die Wärmeregulierung der TM39/TM39 Lite kann die
Leistungautomatischverringern,wenndieTemperatur60℃oderhöhererreicht.
Hinweis: Tauchen Sie die Taschenlampe NICHT in eine Flüssigkeit ein, wenn sie heiß ist. Dies
kann aufgrund des Gehäuses zu irreparablen Schäden an der Lampe führen.
Wartung
Alle 6 Monate sollte das Gewinde mit einem sauberen Tuch abgewischt und anschließend mit einer
dünnen Schicht Silikonfett geschmiert werden.
Instructions
Installation des batteries
TM39: Installer la batterie NBP68HD comme indiqué.
TM39 Lite: Installer la (les) batterie(s) avec le pole positif pointé vers la tête de lampe comme
indiquéetserrerletube.Encasd’urgence,1à3batteries18650Li-ionpeuventsurepour
alimenter la lampe. Dans ce cas, se reporter à la note 1 dans la section Avertissements ci-dessous.
Avertissements :
1. L'utilisation de moins de 4 x 18650 batteries peut déclencher le circuit de protection contre les
surcharges des batteries Li-ion, ce qui peut provoquer une explosion ou l’impossibilité d’accéder
aux niveaux TURBO/HIGH. Dans ce cas, il est recommandé d'utiliser le produit avec prudence
et uniquement lorsque cela est nécessaire. Insérez les batteries en pointant le pôle positif (+)
vers la tête de lampe. Le produit peut être endommagé si la ou les batteries sont mal insérées.
2. Ne mélangez pas les batteries rechargeables et non rechargeables
3.Nemélangezpasdesbatteriesdediérentstypes/marques.
4.Nemélangezpasdesbatterieschargéesàdesniveauxdiérents.
5. Cette lampe n’est compatible qu’avec les batteries Li-ion 18650 button-topped.
6. Attention! Forte luminosité ! Evitez le contact direct avec les yeux! Peut être dangereux pour vos
yeux.
7. Lorsque le niveau de puissance est faible, veuillez cesser d'utiliser le produit et remplacer ou
recharger la batterie pour éviter d'endommager la batterie
Ecran OLED
• Après installation du pack batterie/ des batteries, le message « NITECORE » apparait sur l’écran
OLED, suivi de la tension de la batterie (à 0,01 V près). La lampe entre en mode Standby sous
10 secondes.
•Lorsquelalampes’allume,l’écranOLEDestautomatiquementactivéetachel’éclairageen
lumens, le mode de luminosité, le voltage des batteries, le statut des batteries, l’autonomie
approximative et la température, L’écran s’éteint au bout de 30 secondes. L’écran peut être
reactive en appuyant sur le bouton MODE .
On / O
Pour allumer : Pressez l’interrupteur ON/OFF
Pour éteindre : Pressez une nouvelle fois l’interrupteur ON/OFF pour éteindre..
Note: Veuillez retirer le protège-objectif avant la première utilisation.
Niveaux d’éclairage
Quand la lampe et l’écran sont allumés, appuyer brièvement sur le bouton Mode pour naviguer
entre les niveaux: LOW – MID – HIGH. (Cet accès possède une fonction mémoire. Lorsqu'elle est
réactivée, la lampe accède automatiquement au niveau d’éclairage mémorisé précédent.)
Note: Quand l’écran est éteint, appuyer brièvement sur le bouton mode pour le réactiver. Une fois
l’écran activé, appuyer sur le bouton mode pour adjuster le niveau d’éclairage souhaité.
Activation du mode TURBO
A n’importe quel moment, rester appuyé sur le bouton Mode pour accéder au niveau TURBO.
Accès direct à LOW
Quand la lampe est éteinte, rester appuyé sur l’interrupteur pour accéder au niveau LOW.
Modes spéciaux (STROBE / SOS / BEACON)
Lorsque la lampe est allumée, appuyez deux fois sur l’interrupteur pour accéder au mode STROBE.
Une fois le mode STROBE activé, appuyez brièvement sur le bouton Mode pour naviguer entre
les modes spéciaux suivants: SOS – Balise– STROBE. Lorsque l'un des modes spéciaux est activé,
appuyez brièvement sur l’interrupteur pour quitter les modes spéciaux et éteindre la lampe.
(Lorsqu'undesmodesspéciauxestsélectionné,l'achageindiquelemodespécialactuel.)
Charge
La lampe TM39/TM39 Lite est équipée d’un système intelligent de charge. Comme illustré, utiliser
l'adaptateur secteur pour connecter une prise de courant au port de charge. Le processus de
charge démarre.
•Pendantleprocessusdecharge,l'écranachelatensiondelabatterieetleniveaudecharge
de la batterie. Lorsque la batterie est complètement chargée, le niveau de la batterie sera
complet.
•Lorsqueleprocessusdechargeestanormal,l'écranacheraletexte"ERROR".
• Lorsque la lampe est allumée, la connexion à une source d'alimentation éteindra
automatiquement la lumière. La lampe revient à son état précédent lorsqu'elle est déconnectée
de la source d'alimentation.
• Le temps de charge pour la TM39 Lite avec 4 batteries 18650 Li-ion (3,500mAh) est d’environ 8
heures.
L'adaptateur secteur inclus du TM39 peut être utilisé pour charger la batterie NBP68HD. Comme
illustré, utilisez l'adaptateur secteur pour connecter une prise de courant au port de charge de la
batterie (2A, 3.5mm) pour démarrer la charge. Pendant le processus de charge, l'indicateur bleu
clignote rapidement pour informer l'utilisateur. Lorsque le processus de charge est presque terminé
(98%),l'indicateurclignotelentement.Unefoisleprocessusdechargeterminé,l'indicateursera
allumé en continu.
• Le temps de charge de la TM39 ou de la batterie NBP68HD est d’environ 15 heures.
• La batterie NBP68HD peut également être chargé avec l'adaptateur secteur à charge rapide
comme accessoire en option via le port de charge rapide (4A, 4.0mm). Dans ce cas, le temps
de charge est réduit à env. 8 heures soit la moitié du temps de charge standard.
Verrouillage / Deverrouillage
Verrouillage : Quand la lampe est allumée, rester appuyé sur l’interrupteur jusqu'à ce que la lampe
clignoteunefoisavantdes'éteindreetquel'écranacheletexte"LOCK"pouraccéderaumodeLOCK.
Deverrouillage: Quand la lampe est verrouillée, rester appuyer simultanéement sur les 2 boutons
pour sortir du mode verrouillage et revenir au mode d’utilisation normale..
Note:
1.Enmodedeverrouillage,lorsquel'undesboutonsestenfoncé,l'écranache"LOCK"pour
indiquer que la lampe est verrouillée.
2. Retirer les batteries si la lampe reste inutilisée pendant une longue période pour éviter toute
activation accidentelle ou fuite de batteries.
Régulation de la temperature
Les niveaux TURBO/HIGH entraine une augmentation continue de la température de la lampe,
la rendant trop chaude pour être tenue en main confortablement. Il est recommandé de ne pas
utiliser la lampe en mode TURBO/HIGH sur des périodes prolongées. La puissance de la sortie est
automatiquement réduite lorsque la lampe atteint la température de 60 degrés.
Note: Lorsque la lampe est chaude, n’essayez pas de la refroidir en l’immergeant dans un liquide.
Acausedeladiérenceentrepressionsinterneetexterne,lalampepourraitsubirdesdommages
irréparables.
Maintenance
Touslessixmois,leletagedoitêtreessuyéavecunchionpropreetrecouvertd’unlubriantà
base de silicone.
Инструкция по эксплуатации
Установка батареи
TM39:установитеаккумуляторныйблокNBP68HD,какизображенонарисунке.
TM39Lite:установитебатарею(-и)положительнымконцомвнаправленииголовнойчастифонаря,
какизображенонарисунке,изакрутитетрубу.Вчрезвычайныхситуацияхможноиспользовать1-3
хбатареитипа18650.См.примечание1вразделепредупрежденийниже.
Предупреждения:
1.Использованиебатарейтипа18650вколичествеменее4можетвызватьперегрузкузащитной
цепилитий-ионныхбатарей,чтоможетпривестиквзрывуилиневозможностииспользования
режимовТУРБО/ВЫСОКАЯЯРКОСТЬ.Втакомслучаерекомендуетсяиспользоватьизделиес
осторожностьюитольковслучаенеобходимости.
2.Убедитесьвтом,чтоположительныйконецаккумулятора(-ов)типа18650приустановке
направленвсторонуголовнойчасти.Некорректнаяустановкааккумулятора(-ов)может
повредитьустройство.
3.НЕиспользуйтеперезаряжаемыеинеперезаряжаемыебатареиодновременно.
4.НЕиспользуйтеодновременнобатареиразныхтипов/марок.
5.НЕиспользуйтеодновременнобатареиразныхемкостей.
6.Изделиесовместимотолькослитий-ионнымибатареямисвыступающимиконтактамитипа18650.
7.ВНИМАНИЕ!Возможноопасноеизлучение!Несмотритенасветовойлуч!Этоможетбытьопасным
дляглаз.
8.Принизкомуровнезарядаследуетпрекратитьиспользованиеизделияизаменитьилизарядить
аккумулятор,чтобыпредотвратитьегоповреждение.
Многофункциональный ОСД-дисплей
•Послеустановкиаккумуляторногоблока/батареинаОСД-дисплеепоявитсянадпись"NITECORE",
азатемнапряжениебатареи(±0,01В)иуровеньзарядабатареи.Примерночерез10секунд
дисплейгаснетипереходитврежиможидания.
•КогдаTM39/TM39Liteвключен,надисплейпримерновтечение30секундвыводитсятекущая
информация,включаяуровеньяркости,дальностьлуча,световойпоток,напряжениебатареи,
уровеньзарядабатареи,оставшеесявремяработыитемпературу.Затемдисплейгаснет.
Кратковременноенажатиепереключателярежимовактивируетэкран,еслионотключен.
Включение/Выключение
Включение:Еслифонарьвыключен,нажмитекнопкупитания,чтобывключитьего.
Выключение:Еслифонарьвключен,нажмитекнопкупитания,чтобывыключитьего.
Примечание:Снимитезащитулинзыпередпервымиспользованием.
Уровни яркости
Привключенномсветеиэкранеосуществляйтекратковременноенажатиенакнопку«РЕЖИМ»
длятого,чтобыпоследовательнопереключатьследующиеуровнияркости:НИЗКАЯ–СРЕДНЯЯ–
ВЫСОКАЯ.(Уданнойпоследовательностиестьфункцияпамяти.Приповторнойактивациифонарь
автоматическипереходиткуровнюяркости,сохраненномувпамятипоследним.)
Примечание:Кратковременноенажатиепереключателярежимовактивируетэкран,если
онотключен.Послевключенияэкранакратковременнымнажатиемпереключателярежимов
отрегулируйтеуровеньяркости.
Активация уровня яркости ТУРБО
Привключенном/выключенномсветенажмитеиудерживайтекнопку«РЕЖИМ»длявключения
режимаТУРБО.
Быстрый переход в режим НИЗКАЯ ЯРКОСТЬ
Когдафонарьвыключен,нажмитеиудерживайтепереключательрежимовдлявключениярежима
НИЗКАЯЯРКОСТЬ.
Специальные режимы (СТРОБОСКОП / SOS / МАЯК)
Привключенномсветедваждынажмитекнопкупитания,чтобыактивироватьрежимСТРОБОСКОП.
КогдарежимСТРОБОСКОПвключен,нажмитекнопку«РЕЖИМ»дляпереходамеждуследующими
специальнымирежимами:SOS–МАЯК–СТРОБОСКОП.Когдаодинизспециальныхрежимов
включен,нажмитекнопкупитания,чтобывыйтиизспециальногорежимаивыключитьсвет.(Если
выбранодинизспециальныхрежимов,наэкранебудетуказантекущийспециальныйрежим).
Функция зарядки
TM39/TM39Liteоснащенинтеллектуальнойсистемойзарядки.Используйтеадаптерпеременного
токадляподключенияэлектрическойрозеткикзарядномупортутрубкидляначалапроцесса
зарядки,какизображенонарисунке.
•Вовремяпроцессазарядкинаэкранебудетвыводитьсянапряжениебатареииуровеньзаряда
батареи.Приполнойзарядкебатареиуровеньзарядабудетизображенкакполный.
•Вслучаенарушенияпроцессазарядкинаэкранепоявитсянадпись"ERROR"(ОШИБКА).
•Еслифонарьвключен,топриподключениикисточникупитанияонавтоматическиотключится.
Индикаторвернетсявпрежнеесостояниеприотключенииотисточникапитания.
•Времязарядки4литий-ионныхбатарейтипа18650(3500мА/ч)фонарямоделиTM39Lite
составляетпримерно8часов.
АдаптерпеременноготокаизкомплектаTM39такжеможетнапрямуюзаряжатьаккумуляторный
блокNBP68HD.Используйтеадаптерпеременноготокадляподключенияэлектрическойрозеткик
зарядномупорту(2А,3,5мм)аккумуляторногоблокадляначалапроцессазарядки,какизображено
нарисунке.Впроцессезарядкиголубойиндикаторбудетбыстромигать.Когдапроцессзарядки
приближаетсякзавершению(98%),индикаторбудетмигатьмедленно.Послезавершениязарядки
индикаторбудетгоретьпостоянно.
•ВремязарядкиTM39илиаккумуляторногоблокаNBP68HDсоставляетприблизительно15часов.
•АккумуляторныйблокNBP68HDтакжеможнозаряжатьспомощьюадаптерапеременного
токабыстройзарядки,которыйпоставляетсядополнительно,черезпортбыстройзарядки(4
А,4,0мм).Вэтомслучаевремязарядкисокращаетсяприблизительнодо8часов,половины
стандартноговременизарядки.
Блокировка / разблокировка
Блокировка:Когдафонарьвключен,нажмитеиудерживайтекнопкупитания,покафонарьне
мигнетодинраз,азатемотключится,инаэкранепоявитсянадпись"LOCK"(БЛОКИРОВКА)для
доступаврежимблокировки.
Разблокировка:Врежимеблокировкинажмитеиудерживайтеобекнопкидлявыходаизрежима
блокировкиивозвратакпредыдущемурежиму.
Примечание:
1.Принажатиилюбойизкнопокврежимеблокировкинаэкранебудетвыводитьсянадпись"LOCK"
(БЛОКИРОВКА),указываянато,чтофонарьзаблокирован.
2.Еслиустройствохранитсяврюкзакеилинеиспользуетсядлительноевремя,необходимоизвлечь
всеаккумуляторы,чтобыпредотвратитьслучайноевключениеиутечкуэлектролита.
Терморегулировка
ВовремяпродолжительнойработыврежимахТУРБО/ВЫСОКАЯЯРКОСТЬвырабатывается
большоеколичествотепла,чтоможетвызыватьупользователянеприятныеощущения.Поэтому
использоватьрежимТУРБО/ВЫСОКАЯЯРКОСТЬвтечениедлительноговременинерекомендуется.
ФункциятерморегулировкиTM39/TM39Liteпозволяетавтоматическиснижатьвыходнуюмощность
придостижениитемпературы60℃(140℉)иливыше.
Примечание:НЕпогружайтенагретыйфонарьвжидкость.Этоможетпривестикнеобратимому
повреждениюфонаряиз-заразницыдавленийвоздухавнутрииснаружикорпуса.
Техническое обслуживание
Каждые6месяцеврезьбовыесоединенияследуетпротиратьчистойтканьюинаноситьнаних
тонкийслойсмазкинасиликоновойоснове.
Technical Data
TM39:
FL1 STANDARDTURBOHIGHMIDLOWSTROBESOSBEACON
5,200
Lumens
2,000
Lumens
800
Lumens
200
Lumens
5,200
Lumens
5,200
Lumens
5,200
Lumens
*1h30min*4h10h36h───
1,500m950m600m300m───
562,500cd225,600cd90,000cd22,500cd───
1m (Impact Resistance)
IP68, 2m (Waterproof and Submersible)
Note: Thestateddataismeasuredinaccordancewiththeinternationalashlighttesting
standards ANSI/PLATO FL 1-2019, using the NBP68HD Battery Pack under laboratory conditions.
Thedatamayvaryinrealworlduseduetodierentbatteryusageorenvironmentalconditions.
* The runtime for TURBO/HIGH Level is tested without the temperature regulation.
TM39 Lite:
FL1 STANDARDTURBOHIGHMIDLOWSTROBESOSBEACON
5,200
Lumens
2,000
Lumens
800
Lumens
200
Lumens
5,200
Lumens
5,200
Lumens
5,200
Lumens
*45min*2h5h20h───
1,500m950m600m300m───
562,500cd225,600cd90,000cd22,500cd───
1m (Impact Resistance)
IP68, 2m (Waterproof and Submersible)
Note:Thestateddataismeasuredinaccordancewiththeinternationalashlighttesting
standards ANSI/PLATO FL 1-2019, using 4 x 18650 Li-ion batteries (3,500mAh) under laboratory
conditions.Thedatamayvaryinrealworlduseduetodierentbatteryusageorenvironmental
conditions.
* The runtime for TURBO/HIGH Level is tested without the temperature regulation.
Battery Installation
Operating Instructions
Charging Function
TM39TM39 Lite
Mode Button
Power Button
TM39/TM39 Lite USER MANUAL
Warranty Service
All NITECORE
®
products are warranted for quality. Any DOA / defective product
can be exchanged for a replacement through a local distributor/dealer within 15
days of purchase. After that, all defective / malfunctioning NITECORE
®
products
can be repaired free of charge within 60 months from the date of purchase.
Beyond 60 months, a limited warranty applies, covering the cost of labor and
maintenance, but not the cost of accessories or replacement parts.
Thewarrantywillbenulliedif
1.theproduct(s)is/arebrokendown,reconstructedand/ormodiedby
unauthorized parties;
2. the product(s) is/are damaged due to improper use; (e.g. reversed polarity
installation)
3. the product(s) is/are damaged due to battery leakage.
For the latest information on NITECORE
®
products and services, please contact a
local NITECORE
®
distributor or send an email to [email protected]
※Allimages,textandstatementsspeciedhereinthisusermanualarefor
reference purpose only. Should any discrepancy occur between this manual
andinformationspeciedonwww.nitecore.com,SysmaxInnovationsCo.,Ltd.
reserves the rights to interpret and amend the content of this document at any
time without prior notice.
Produktspecifikationer
| Varumärke: | Nitecore |
| Kategori: | Ficklampa |
| Modell: | TM39 Lite |
Behöver du hjälp?
Om du behöver hjälp med Nitecore TM39 Lite ställ en fråga nedan och andra användare kommer att svara dig
Ficklampa Nitecore Manualer

25 Mars 2026
23 Mars 2026
12 Mars 2026
11 Mars 2026
7 Oktober 2025
7 Oktober 2025
6 Oktober 2025
18 Juni 2025
16 Juni 2025
16 Juni 2025
Ficklampa Manualer
Nyaste Ficklampa Manualer
1 April 2026
30 Mars 2026
28 Mars 2026
28 Mars 2026
27 Mars 2026
26 Mars 2026
25 Mars 2026
24 Mars 2026
13 Mars 2026
3 Mars 2026