Presto FreshDaddy 05621 Bruksanvisning
Presto
vakumförpackare
FreshDaddy 05621
Läs gratis den bruksanvisning för Presto FreshDaddy 05621 (9 sidor) i kategorin vakumförpackare. Guiden har ansetts hjälpsam av 3 personer och har ett genomsnittsbetyg på 4.3 stjärnor baserat på 2 recensioner. Har du en fråga om Presto FreshDaddy 05621 eller vill du ställa frågor till andra användare av produkten? Ställ en fråga
Sida 1/9

©2023 National Presto Industries, Inc. Form 4108-202A
INSTRUCTIONS
TABLE OF CONTENTS
Important Safeguards 2. . . . . . . . . . . . . . . . . . . . . . . . . . . . . . . . . .
Cord Information 2 . . . . . . . . . . . . . . . . . . . . . . . . . . . . . . . . . . . . . .
Important Safety Precautions for Vacuum Sealing 2 . . . . . . .
Introduction 3. . . . . . . . . . . . . . . . . . . . . . . . . . . . . . . . . . . . . . . . . . .
Getting Acquainted 3. . . . . . . . . . . . . . . . . . . . . . . . . . . . . . . . . . . .
How to Use
How to Make a Bag from Roll Material . . . . . . . . . . . . . . . . . 3
How to Vacuum Seal a Bag. . . . . . . . . . . . . . . . . . . . . . . . . . . . 4
Tips for Vacuum Sealing
General Tips . . . . . . . . . . . . . . . . . . . . . . . . . . . . . . . . . . . . . . . . . 5
Tips for Vacuum Sealing Meat, Fish, and
Other Moist Food. . . . . . . . . . . . . . . . . . . . . . . . . . . . . . . . . . 5
Tips for Vacuum Sealing Fruits, Vegetables,
and Baked Goods. . . . . . . . . . . . . . . . . . . . . . . . . . . . . . . . . . 5
Tips for Vacuum Sealing Fine-Grained Foods,
such as Coffee, Flour, and Spices . . . . . . . . . . . . . . . . . . . . 5
Tips for Vacuum Sealing Soups, Stews, and Casseroles . . . 5
Storing, Thawing, and Heating Vacuum Sealed Food 5. . . . .
Non-Food Uses for Vacuum Sealing 6 . . . . . . . . . . . . . . . . . . . . .
Care and Cleaning 6 . . . . . . . . . . . . . . . . . . . . . . . . . . . . . . . . . . . . .
Vac Accessory Button Function 6 . . . . . . . . . . . . . . . . . . . . . . . . .
Troubleshooting 7. . . . . . . . . . . . . . . . . . . . . . . . . . . . . . . . . . . . . . .
Consumer Service Information 8 . . . . . . . . . . . . . . . . . . . . . . . . .
Warranty 8 . . . . . . . . . . . . . . . . . . . . . . . . . . . . . . . . . . . . . . . . . . . . . .
FreshDaddy™ Vacuum Sealer Accessories 9 . . . . . . . . . . . . . . .
Visit www.GoPresto.com
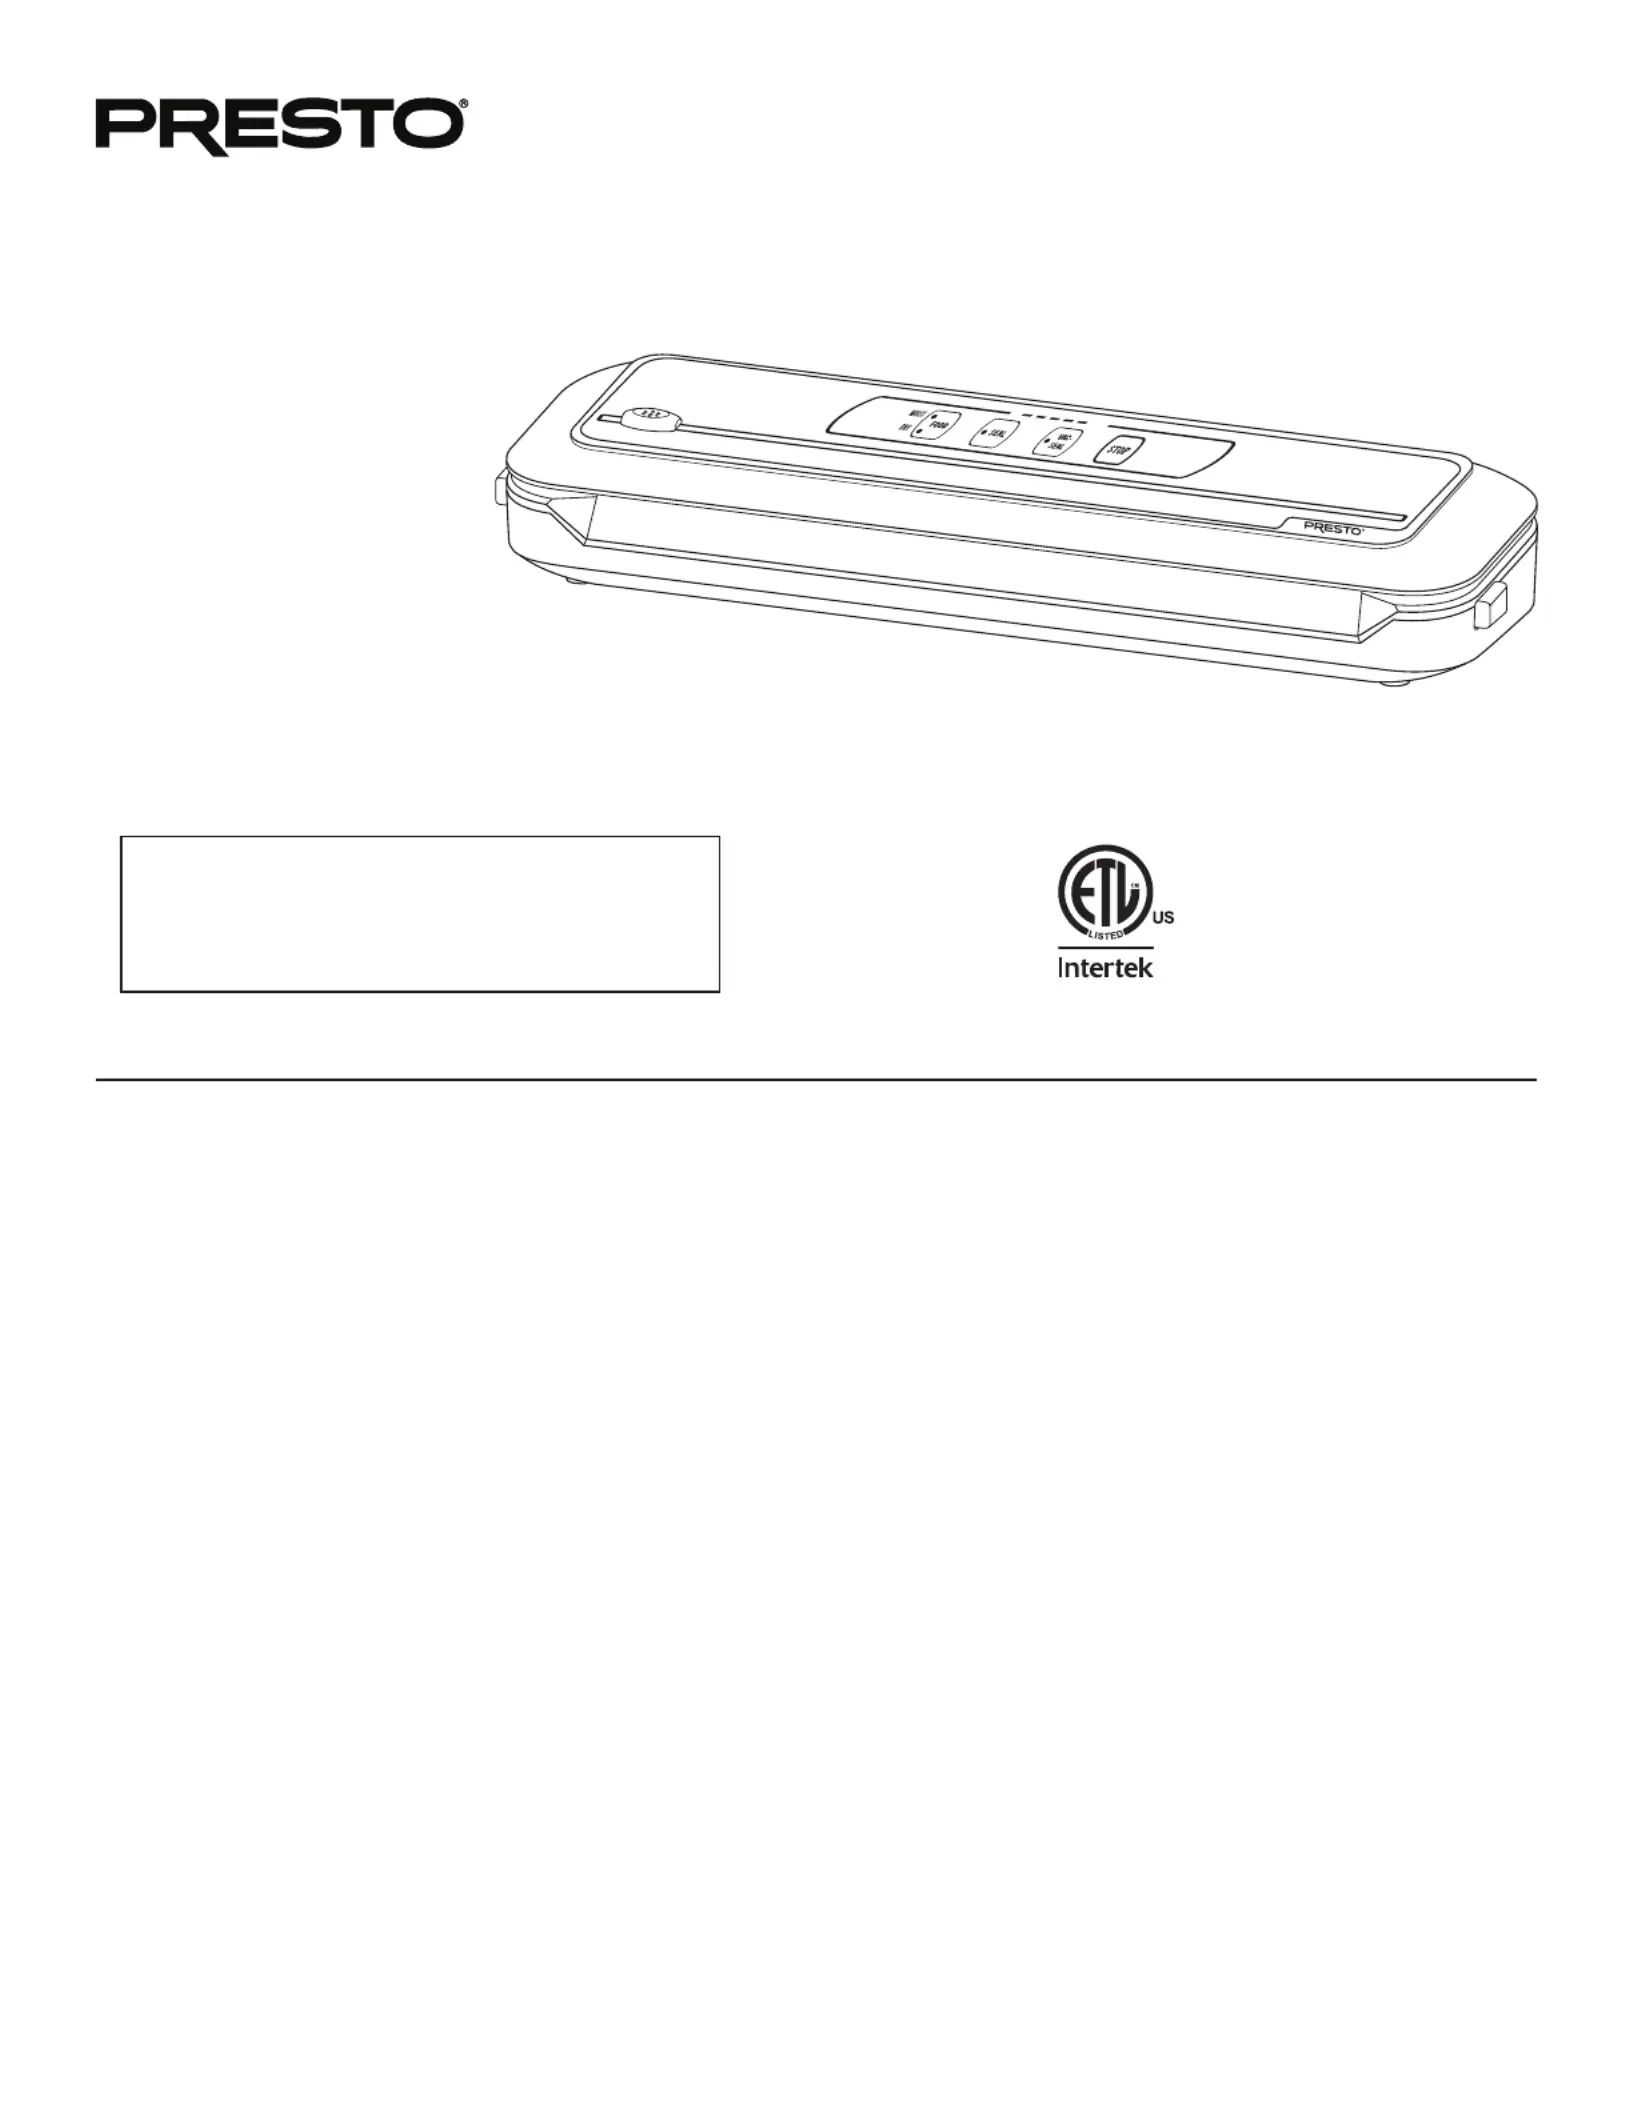
FreshDaddy
™
compact electric
Vacuum Sealer
• Vacuum sealing keeps
food fresh up to five times
longer than ordinary
methods.
• Settings for dry or moist
food, seal only, vacuum
seal, and stop/pulse.
• Built-in bag cutter makes custom-size bags in seconds.
• Includes starter set of bags.
• Vacuum tube accessory port for sealing zipper bags with ports and vacuum seal storage containers.*
Estas instrucciones también están disponibles en español.
Para obtener una copia impresa:
• Descargue en formato PDF en www.GoPresto.com/espanol.
• Envíe un correo electrónico a contact@GoPresto.com.
• Llame al 1-800-877-0441, oprima 2 y deje un mensaje.
Compatible with FreshDaddy™ and most other brands of vacuum sealer bags and rolls.
* Vacuum tube, zipper bags with ports, and vacuum seal storage containers sold separately.

2
This is an Listed appliance. The following important safeguards are recommended by most portable appliance manufacturers.
IMPORTANT SAFEGUARDS
To reduce the risk of personal injury or property damage when using electrical appliances, basic safety precautions should always be
followed, including the following:
1. Read all instructions before using this appliance.
2. The brown sealing strip becomes hot during the sealing process. To prevent burns, avoid touching the sealing strip during and
immediately after use.
3. To protect against electrical shock, do not immerse the cord, plug, or vacuum sealer in water or other liquid.
4. Close supervision is necessary when any appliance is used near children. Children should be supervised to ensure that they do not
play with the appliance.
5. This appliance is not intended for use by persons (including children) with reduced physical, sensory, or mental capabilities, or
lack of experience and knowledge, unless they are closely supervised and instructed concerning use of the appliance by a person
responsible for their safety.
6. Always attach plug to appliance first, then plug into the wall outlet. To disconnect, remove plug from wall outlet and then from
appliance.
7. Unplug from outlet when not in use and before cleaning. Allow to cool before putting on or taking off parts and before cleaning
the appliance.
8. Do not operate any appliance with a damaged cord or plug, or in the event the appliance malfunctions or has been damaged in
any manner. Return the appliance to the Presto Factory Service Department for examination, repair, or electrical or mechanical
adjustment.
9. Do not let cord hang over edge of table or counter or touch hot surfaces.
10. The use of accessory attachments not recommended by the appliance manufacturer may cause injuries.
11. Do not use outdoors.
12. Do not place on or near a hot gas or electric burner or in a heated oven.
13. Do not use this appliance for other than intended use.
SAVE THESE INSTRUCTIONS
THIS APPLIANCE IS FOR HOUSEHOLD USE ONLY.
CORD INFORMATION
• This appliance has a polarized plug (one blade is wider than the other). To reduce the risk of electric shock, this plug is intended to
fit into a polarized outlet only one way. If the plug does not fit fully into the outlet, reverse the plug. If it still does not fit, contact a
qualified electrician. Do not attempt to modify the plug in any way.
• A short detachable power supply cord is provided to reduce the risk of becoming entangled in or tripping over a longer cord. An
extension cord may be used if care is properly exercised in its use.
• If an extension cord is used, the marked electrical rating of the extension cord should be at least as great as the electrical rating of
the appliance. The extension cord should be arranged so that it will not drape over the countertop or tabletop where it can be pulled
on by children or tripped over unintentionally.
• Plug the power cord into the AC port on the back of the vacuum sealer and then plug into a 120VAC electrical wall outlet only. The
light on the food button will illuminate. To save energy, after 10 minutes of nonuse the light will go out. To reactivate, press the
FOOD button.
IMPORTANT SAFETY PRECAUTIONS FOR VACUUM SEALING
WARNING! Vacuum sealing is NOT a substitute for pressure or water bath canning, refrigeration, or freezing. To prevent food
spoilage, perishable food that is vacuum sealed must be refrigerated or frozen after sealing.
Some foods should never be vacuum sealed due to the risk of anaerobic bacteria*. These foods include:
• Due to the nature of soft cheeses, they are more likely to grow mold and anaerobic bacteria when vacuumed Soft cheeses:
sealed. Examples include Brie, Blue, Goat, Ricotta, and Mozzarella, and unpasteurized cheese. It is perfectly safe to vacuum
seal hard cheeses.
• Gases emitted by raw onions and garlic can inflate the vacuum sealed bag and cause spoilage. Raw Raw onions and garlic:
onions and garlic spoil faster when vacuum sealed, increasing the risk of anaerobic bacteria.
• Raw mushrooms decay faster when vacuum sealed due to their ripening cycle, increasing the risk of Raw mushrooms:
anaerobic bacteria. Cooked mushrooms are safe to vacuum seal.
• Similar to raw mushrooms, raw bananas ripen faster when vacuum sealed, increasing the risk of anaerobic Raw bananas:
bacteria. Once a banana is peeled and frozen, it is safe to vacuum seal.
*Anaerobic Bacteria Clostridium botulinum, grows in an environment with low or no oxygen. a type of anaerobic bacteria, produces a spore that makes a poisonous toxin which causes botulism.

Fig. B
Power cord port
BACK OF VACUUM SEALER
Protective
rubber plug
Vacuum nozzle/
Vacuum tube port
Upper sealing
gasket
Lower sealing gasket
Vacuum cavity
Brown sealing strip
Fig. A
Unlock button
Unlock button
Silicone contact bar
VAC
accessory
button**
Press lid down firmly on each side until you
hear each side click. Then press .SEAL
Fig. D
Fig. C
Sealing strip
Place open end of bag material
over sealing strip.
Open end
of bag
material
Bag cutter
Unlock
button
Stop
button
Indicator
lights
Unlock
button
Vac and
Seal mode
Seal only
mode
Dry/moist
food modes
Fig. E
3
INTRODUCTION
Oxygen promotes certain reactions in food which causes them to deteriorate. The process of vacuum sealing removes air from
packages which helps prevent the growth of mold and bacteria and keeps food fresh longer. Vacuum sealing is ideal for many foods,
including those you buy in bulk, cheese, cold cuts, fresh berries, meat and more. The airtight seal helps extend refrigerator and pantry
shelf life, prevent freezer burn, and reduce waste.
There are some foods that should never be vacuum sealed (see safety precautions on page 2), and others that require special instructions
before vacuum sealing, such as broccoli and cauliflower (see page 5).
In addition to keeping food fresh longer, the vacuum sealer is perfect for sous vide cooking. Steaks, fish, vegetables and more can be
sealed in vacuum bags for delicious sous vide meals.
GETTING ACQUAINTED
Before using the vacuum sealer for the first
time, become familiar with the unit (Fig. A) and
read the instructions thoroughly. Also, remove
the protective film from the vacuum sealer lid.
To access the AC port on the back of the unit,
lift and rotate the protective rubber plug
(Fig. B). Plug the power cord into the port and
then into a 120VAC electrical wall outlet.
HOW TO USE
Always use the vacuum sealer on a dry level
surface.
How to Make a Bag from Roll Material
1. Open the vacuum sealer and position a
roll of bag material so the entire open end
overlaps the brown sealing strip (Fig. C).
Do not block the vacuum nozzle (Fig. A).
The sealing strip heats the bag material and
forms the seal. Make sure the bag material
is smooth; there should be no folds or
wrinkles.
2. Close the unit. Use the heels of your hands to firmly press each side of the lid down
separately (Fig. D) until you feel and hear each side click. This indicates the unit is
locked.
IMPORTANT: The unit must be locked to create a complete seal.
3. Press the button (Fig. E). The button light will illuminate. As the unit warms up and SEAL
during the sealing process, the indicator lights scroll. When the seal is complete, the unit
shuts off and the seal button and indicator lights go out.
4. Press the unlock buttons on the sides of the vacuum sealer (Fig. E), open the unit, and
remove the bag material.
CAUTION! To prevent burns, avoid touching the brown sealing
strip immediately after use, as it may be hot.
5. Verify the seal is complete and it is a smooth straight line. If there
are folds or wrinkles in the seal, cut off the sealed end, wait 60
seconds, and repeat the sealing process.
Once you have sealed the end of a bag, complete the vacuum
sealing process before cutting and sealing the next bag. That
provides a 60 second cooldown between each seal, which is ideal
for continuous use of the vacuum sealer. Less time between seals
can cause the unit to overheat.
If overheated, the unit will enter and overheat protection mode
several lights on the unit will flash at the same time. After a 5 to 10 minute cooling period, the unit will operate as normal.
Produktspecifikationer
Varumärke: | Presto |
Kategori: | vakumförpackare |
Modell: | FreshDaddy 05621 |
Vikt: | 961 g |
Bredd: | 390 mm |
Djup: | 114.3 mm |
Höjd: | 177 mm |
Förpackningens bredd: | 417 mm |
Bärbar: | Ja |
Produktens färg: | Black, Grey |
Kontrolltyp: | Knappar |
Effekt: | 110 W |
Låddjup: | 96 mm |
Vikt inkl. förpackning: | 1406 g |
Ytterförpackningens bruttovikt: | 3070 g |
Ytterförpackningens höjd: | 185.9 mm |
Ytterförpackningens längd: | 199.8 mm |
Ytterförpackningens bredd: | 423.9 mm |
AC-inspänning: | 120 V |
Kontrollampa: | Ja |
Antal dammsugarpåsar: | 4 |
Slangöppning: | Ja |
Rulle för vakuumförsegling ingår: | Ja |
Behöver du hjälp?
Om du behöver hjälp med Presto FreshDaddy 05621 ställ en fråga nedan och andra användare kommer att svara dig
vakumförpackare Presto Manualer
26 Juli 2025
25 Juli 2025
25 Juli 2025
vakumförpackare Manualer
Nyaste vakumförpackare Manualer
24 Juli 2025
6 Juli 2025
5 Juli 2025
5 Juli 2025
5 Juli 2025
5 Juli 2025
1 Juli 2025
19 Juni 2025
12 Juni 2025
8 Juni 2025