Quoizel GLY648CS Bruksanvisning
Läs gratis den bruksanvisning för Quoizel GLY648CS (3 sidor) i kategorin Lampa. Guiden har ansetts hjälpsam av 2 personer och har ett genomsnittsbetyg på 4.0 stjärnor baserat på 3 recensioner. Har du en fråga om Quoizel GLY648CS eller vill du ställa frågor till andra användare av produkten? Ställ en fråga
Sida 1/3
Pleasegotoforproductcleaningtips.Gototheselection.
(6)B10CandelabraBaseBulbs60WMaximum.
30-45minutes
Identifyandinspectallpartsbeforebeginninginstallation.Checkpackagecontentlistanddiagramsbelowtobesureallpartsare
present.Ifanypartsaremissingordamaged,donotattempttoassemble,install,oroperatethefixture.Contactcustomerserviceforreplacement
parts.
www.quoizel.comCare+Maintenance
LightSource:
EstimatedAssemblyTime:
Preparation:
ToolsRequired:Flatheadscrewdriver,Phillipsscrewdriver,pliers,wirecutters,wirestrippers,electricaltape,safetyglasses.
WarningsandCautions
1of3
AssemblyInstructionSheet#IS-GLY648CS
ForStyleGLY648CS
6CORPORATEPARKWAY
GOOSECREEKSC29445
wwwquoizelcom
,.
..
2016QuoizelInc.
Turnoffelectricityatcircuitbreakerormainfuseboxbeforeinstallation.Consultalicensedelectricianifindoubt.
Theseinstructionsareprovidedforyoursafety.Itisveryimportantyoureadthemcompletelybeforeinstallingthefixture.Westrongly
recommendthatalicensed,professionalelectricianperformtheinstallation.
Disconnectfixturefrompowersourcebeforereplacingbulbs.Makesurebulbsaregivensufficienttimetocoolbeforeremoval.
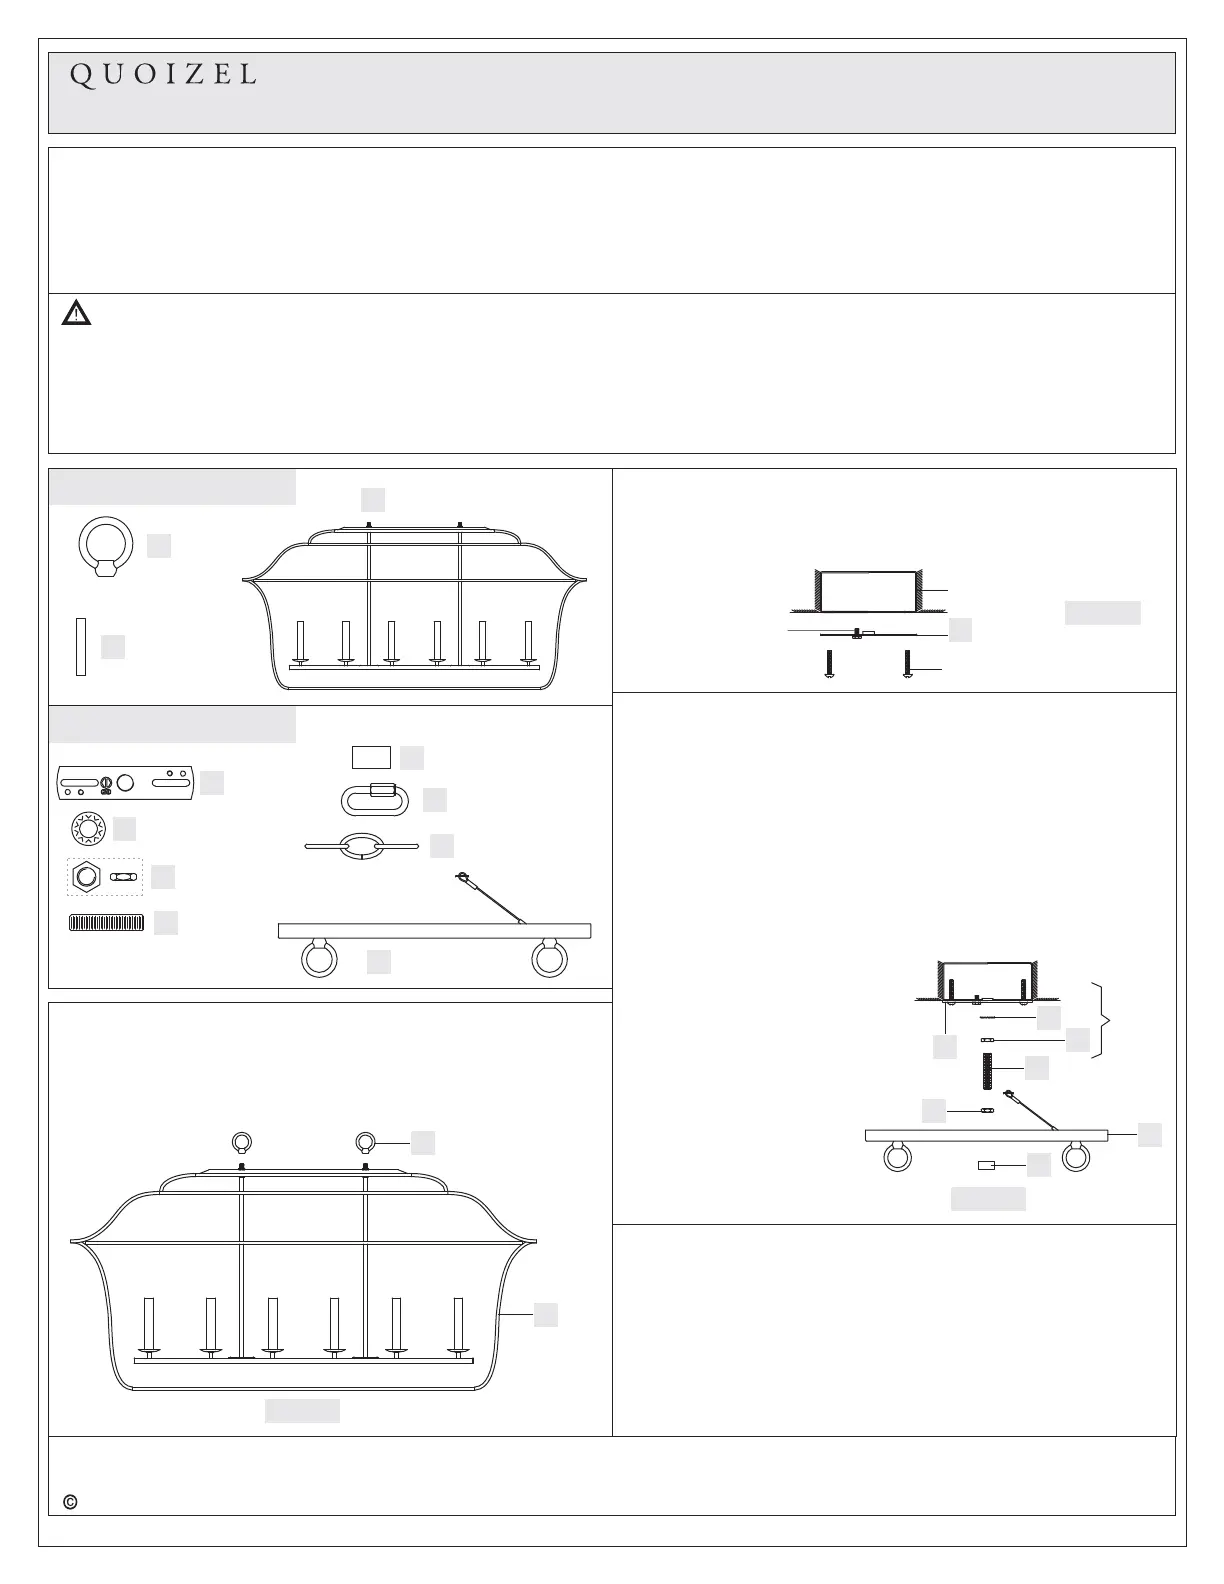
PackageContents
HardwareContents
AA
BB
CC
DD
Crossbar
x1
LockWasher
x1
HexNut
x3
Nipple
x1
GG
QuickLink
x4
CeilingCanopy
x1
ReleasedDate:2016-12-07
B
FixtureBody
x1
EE
A
Fixture
Loop
x2
STEP2InstallCrossbar-
A.AA)AttachtheCrossbar(totheOutletBoxwiththeheadofthe
GreenGroundScrewfacingyou.SecureitwithOutletBoxScrews
(notincluded).Tightenuntilsnug.
Figure2
OutletBox
OutletBoxScrew
(notincluded)
GreenGround
Screw
AA
STEP3InstallNippletoCrossbar-
*Pliersisrequiredforthisstep.
A.ThreadoneHexNut(CC)tothemiddleoftheNipple(DD).Placethe
LockWasher(BB)overtheNipple(DD)andthenthreadtheNipple
(DD)intotheCrossbar(AA)untiltheNipple(DD)isabout0.375”
abovetheCrossbar(AA).
B.PlacetheCeilingCanopy(HH)overtheNipple(DD)againstthe
ceilingtodeterminethecorrectpositionoftheNipple(DD).Thread
theLockBall(FF)ontotheNipple(DD).AdjusttheNipple(DD)to
allowtheCeilingCanopy(HH)torestagainsttheceilingwhenheld
inplacebytheLockBall(FF).
C.RemovetheCeilingCanopy(HH)andthentightentheHexNut(CC)
againsttheCrossbar(AA)tosecureinplace.
AA
BB
CC
DD
StepA
Figure3
CC
D.ThreadanotherHexNut
(CC)ontotheendofthe
Nipple(DD).ThreadthisHex
Nut(CC)onjustenoughso
theinsidesurfaceofthe
CeilingCanopy(HH)rests
againstit.*Youmayhaveto
trialfittheCeilingCanopy
(HH)onemoretimesto
insurethisdistancealso.
ThisHexNut(CC)isneeded
heretopreventyoufrom
crushingdownthecenterof
theCeilingCanopy(HH).
ThankyouforpurchasingaQuoizelproduct.
Needassistancewithpartsorassembly?CallQuoizelcustomerserviceat1-800-645-3184
orvisituson-lineatwww.quoizel.com
FF
LockNut
x1
HH
FixtureChain
x2
STEP1AssembleFixtureLooptoFixtureBody-
A.ThreadtheFixtureLoop(A)ontothetopoftheFixtureBody(B).
Handtightenuntilsnug.Makesure(2)FixtureLoops(A)areinthe
samedirectionaftertighten.
A
B
Figure1
FF
STEP4-InstallFixtureChain
A.AdjusttheFixtureChain(GG)toyourdesiredlengthbyremoving
linksifneeded.
Pliersisrequiredforthisstep.
B.WiththeFixtureChains(GG)notattachedtotheFixtureLoopson
thetopoftheFixtureBody(B)andonthebottomoftheCeiling
Canopy(HH),pullthesupplywiresandgroundwirethroughoneof
theFixtureChain(GG)alternatinglinks.Afterthesupplywiresand
groundwirearethroughtheFixtureChain(GG),pulltheSupply
*
HH
C
Optional
CandleCover
x6
Produktspecifikationer
| Varumärke: | Quoizel |
| Kategori: | Lampa |
| Modell: | GLY648CS |
Behöver du hjälp?
Om du behöver hjälp med Quoizel GLY648CS ställ en fråga nedan och andra användare kommer att svara dig
Lampa Quoizel Manualer

17 Mars 2026
17 Mars 2026
17 Mars 2026
17 Mars 2026
17 Mars 2026
25 September 2024
25 September 2024
25 September 2024
25 September 2024
25 September 2024
Lampa Manualer
Nyaste Lampa Manualer
16 Mars 2026
16 Mars 2026
16 Mars 2026
15 Mars 2026
14 Mars 2026
14 Mars 2026
14 Mars 2026
13 Mars 2026
13 Mars 2026
12 Mars 2026