Russound SLM-1K Bruksanvisning
Russound Inte kategoriserad SLM-1K
Läs gratis den bruksanvisning för Russound SLM-1K (5 sidor) i kategorin Inte kategoriserad. Guiden har ansetts hjälpsam av 44 personer och har ett genomsnittsbetyg på 4.9 stjärnor baserat på 9 recensioner. Har du en fråga om Russound SLM-1K eller vill du ställa frågor till andra användare av produkten? Ställ en fråga
Sida 1/5
SLM-1K
Universal Surface Mount IR Kit
Installation Manual
Overview
The SLM-1K IR Kit is a complete, easy-to-use, infrared
extender system. It is designed to allow you to locate your
IR controllable devices out of sight, or even out of the room
from where the remote control will be sending commands.
The most common use is for locating equipment such as
cable boxes, Blu-ray or DVD players, or other media devices
inside a cabinet or in a common equipment closet, out-of-
sight from the room where a television is used. By utilizing
the SLM-1K, you are able to place our slim IR Receiver
discreetly on your television bezel and hide all of your other
connected equipment out of sight, placing one of our IRE-
1 Infrared Emitters on each device, and then connecting
them all with simple, color-coded plugs into the included
connecting block.
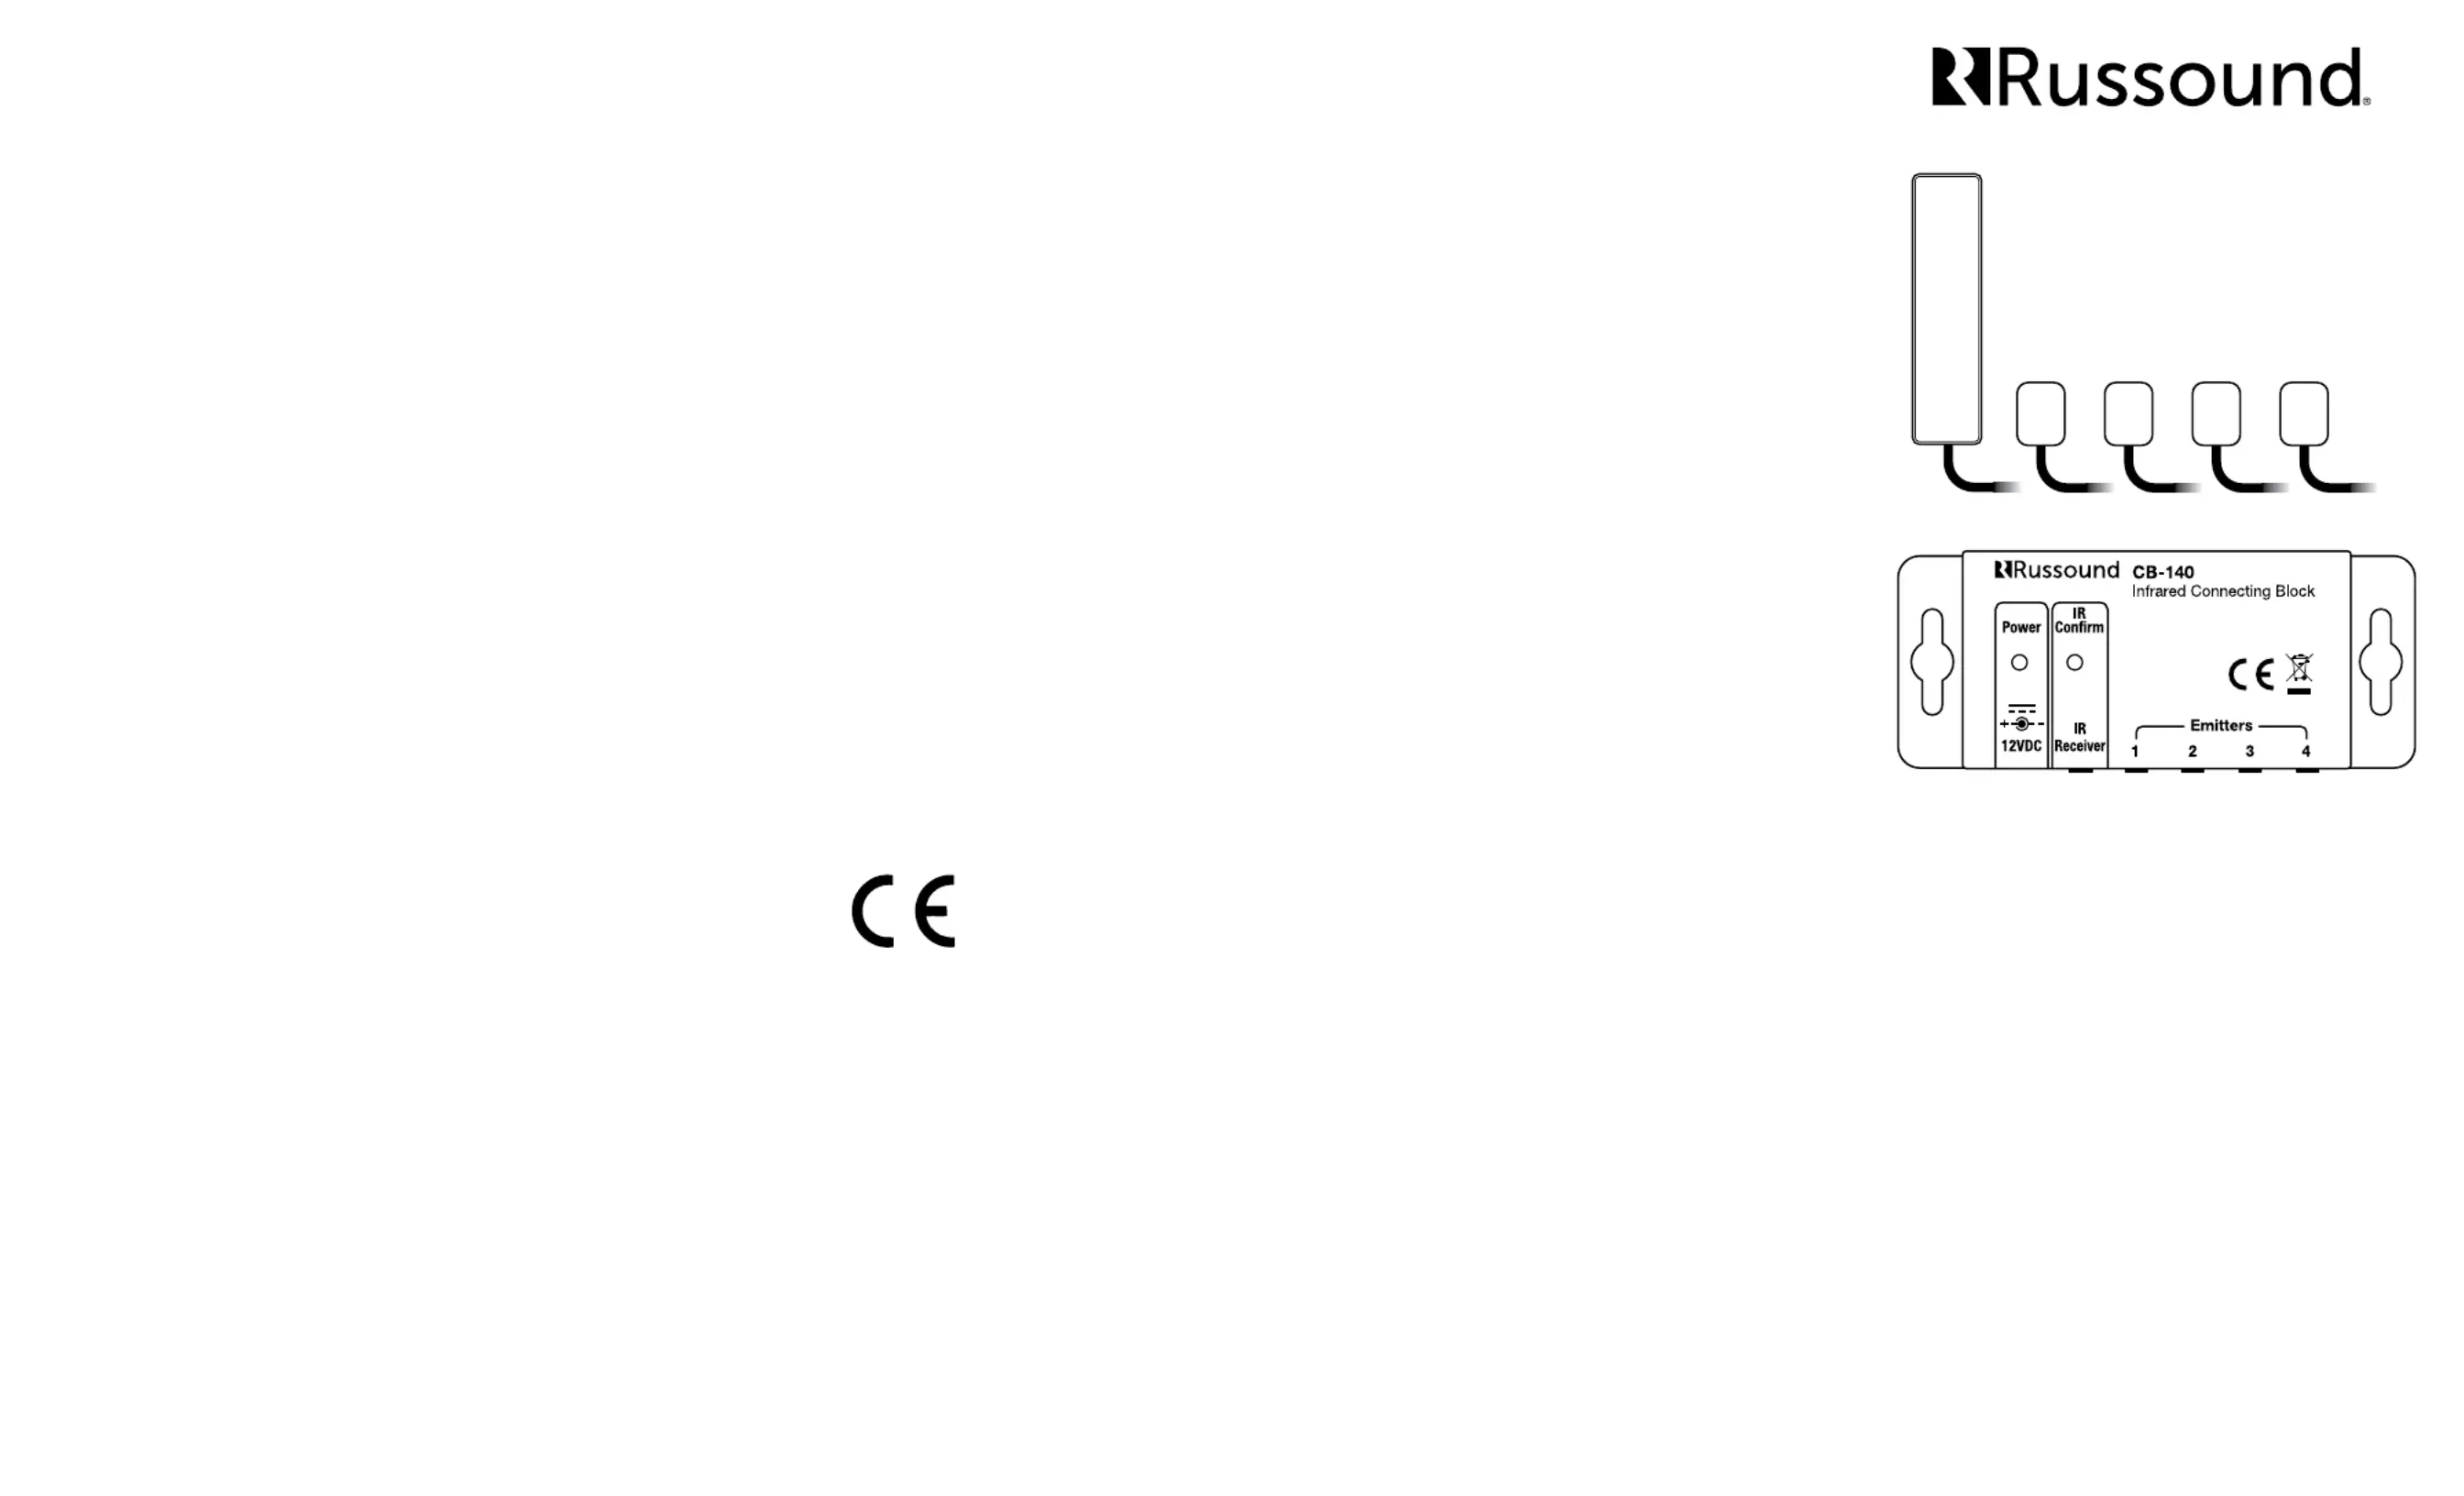
Four items are needed to make an infrared extender
system, and each of these is included in the SLM-1K kit.
Connecting Block, Infrared Receiver, Infrared Emitter,
Power Supply
Additionally, Russound manufactures a variety of other
receiver and emitter options to match system requirements.
Please consult your Russound dealer or the Russound
website at www.russound.com for more information.
Russound, Inc. 1 Forbes Rd., Newmarket, NH 03857, USA
tel +1.603.659.5170 • fax +1.603.659.5388 www.russound.com
technical support: +1.866.888.7466
e-mail: [email protected] 28-1397 07.29.15
Copyright ©2015 Russound® All rights reserved. All trademarks
are the property of their respective owners. Specications are
subject to change without notice.
Specications
CB-140
Power Requirements: 12VDC, 500mA
Dimensions: 3.86”W x 0.75”H x 1.5”D
(98 x 20 x 40mm)
Weight: 6oz (170g)
SLM-1
Receive Frequency Range: 36kHz to 58kHz
Transmit Frequencies: 40kHz and 56kHz
Dimensions: 2.0”W x 0.25”H x 0.5”D
(50 x 6.3 x 13mm)
Weight: 2oz (57g)
Cord Length: 84” (213cm)
FInish: Black
CB-PS
Power: 12VDC 500mA Max
Weight: 6oz (170g)
IRE-1
Dimensions: 0.47”W x 0.35”H x 0.1”D
(12 x 9 x 2.8mm)
Cord Length: 120” (305cm)
Limited Warranty
The Russound SLM-1K IR Kit is guaranteed for two (2) years
from the date of purchase against all defects in materials and
workmanship. For this warranty to apply, the unit must be
installed and used according to its written instructions. During this
period, Russound will replace any defective parts and correct any
defect in workmanship without charge for either parts or labor.
Accidental damage and shipping damage are not considered
defects under the terms of this warranty. Russound assumes
no responsibility for defects resulting from abuse or servicing
performed by an agency or person not specically authorized in
writing by Russound. If service is necessary, it must be performed
by Russound. Damage to or destruction of components due to
excessive power voids the warranty. In these cases, the repair will
be made at the owner’s expense. To return for repairs, the unit
must be shipped to Russound at the owner’s expense, along with
a note explaining the nature of the service required. Be sure to
pack in a corrugated container with at least 3 inches of resilient
material to protect the unit from damage in transit.
Before returning a unit for repair, call Russound at (603) 659-
5170 for a Return Authorization number. Write the RA number on
the shipping label and ship to: Russound, ATTN: Service, 1 Forbes
Road, Newmarket NH 03857
Russound sells product only through authorized Dealers and
Distributors to ensure that customers obtain proper support and
service. Any Russound product purchased from an unauthorized
dealer or other source, including retailers, mail order sellers and
online sellers will not be honored or serviced under existing
Russound warranty policy. Any sale of products by an unauthorized
source or other manner not authorized by Russound shall void the
warranty on the applicable product.
SLM-1
CB-140
IRE-1IRE-1IRE-1IRE-1
Testing the Connections
Now that all of the connections are made, it is time to test
the equipment.
• Make sure the source equipment to be tested is selected
as the proper input on the TV or Home Theater amplier.
• Point the source equipment IR remote at the SLM-1
Receiver and try to turn the equipment on and o.
• If the equipment powers on and o, great! The IR control
is successful.
• Select the next input source on the TV or Home Theater
amplier and test the next source.
Troubleshooting
If the source equipment IR remote does not control the
equipment, check these things:
• Check that the IR Conrm LED on the CB-140 Connecting
Block illuminates when an IR signal from the source
equipment remote is sent to the SLM-1 IR Receiver.
• Check that the CB-PS power supply is properly connected
to a power outlet.
• Check that the Emitter for the source equipment is in
the proper placement according to the manufacturer, or by
following step 1 or 2 under the section “Location of Emitters”
• Check that the source equipment IR remote can still
control the equipment directly. Replace batteries if
necessary.
Produktspecifikationer
| Varumärke: | Russound |
| Kategori: | Inte kategoriserad |
| Modell: | SLM-1K |
Behöver du hjälp?
Om du behöver hjälp med Russound SLM-1K ställ en fråga nedan och andra användare kommer att svara dig
Inte kategoriserad Russound Manualer

25 September 2024
25 September 2024
25 September 2024
25 September 2024
25 September 2024
25 September 2024
25 September 2024
21 September 2024
21 September 2024
21 September 2024
Inte kategoriserad Manualer
Nyaste Inte kategoriserad Manualer
9 April 2025
9 April 2025
9 April 2025
9 April 2025
9 April 2025
9 April 2025
9 April 2025
9 April 2025
9 April 2025
9 April 2025