Somfy Situo 1 io Bruksanvisning
Somfy
fjärrkontroll
Situo 1 io
Läs gratis den bruksanvisning för Somfy Situo 1 io (2 sidor) i kategorin fjärrkontroll. Guiden har ansetts hjälpsam av 57 personer och har ett genomsnittsbetyg på 4.7 stjärnor baserat på 29 recensioner. Har du en fråga om Somfy Situo 1 io eller vill du ställa frågor till andra användare av produkten? Ställ en fråga
Sida 1/2

Met de Situo 1 Variation RTS afstandsbediening
kunt u een groep van een of meer toepassingen
bedienen. Met de Situo5VariationRTS afstandsbediening
kunt u maximaal 5 groepen van een of meer toepassingen
bedienen.
1. Veiligheid en aansprakelijkheid
1. 1. Aansprakelijkheid
De gebruiker moet deze informatie goed bewaren. Het
niet naleven van deze aanwijzingen of een gebruik van het
product buiten zijn toepassingsgebied is niet toegestaan
en zal leiden tot het uitsluiten van de aansprakelijkheid en
van de garantie van Somfy.
Dit Somfy product moet geïnstalleerd worden door een
erkende installateur van automatiseringssystemen in
woningen. De installateur moet zich altijd aan de in
het land van installatie geldende normen en wettelijke
voorschrien houden en zijn klanten informeren over de
gebruiks- en onderhoudsomstandigheden van het product.
Vóór de installatie aangevat wordt, moet gecontroleerd
worden of dit product compatibel is met de aanwezige
apparatuur en accessoires. Raadpleeg bij twijfel tijdens de
installatie van dit product of voor aanvullende informatie
uw Somfy leverancier of ga naar de website www.somfy.
com.
1. 2. Veiligheidsvoorschrien
Bij gebruik in combinatie met een motor ook de betreffende
instructies raadplegen.
Het product alleen binnenshuis installeren en gebruiken.
Om te voorkomen dat het product beschadigd wordt, mag
u het niet onderdompelen in een vloeistof, niet laten vallen
en niet blootstellen aan schokken, brandbare stoffen, een
warmtebron, vocht of diverse vloeistoffen.
Waarschuwing
Dit product bevat een knoopcel.
De batterij niet inslikken: risico op chemische
brandwonden, kunnen binnen 2uur dodelijk zijn.
Wanneer de batterij in het lichaam terechtkomt of bij
twijfel onmiddellijk een arts raadplegen.
(Nieuwe en gebruikte) batterijen en het product buiten het
bereik van kinderen houden. Als het batterijvak niet meer
sluit, het product niet meer gebruiken en het buiten het
bereik van kinderen houden.
Risico op explosie, vloeistoflekkage of ontvlambare
gassen van de batterij als deze bij een hoge temperatuur
(warme oven, vuur) wordt bewaard, wordt geplet, wordt
doorgesneden of in geval van een heel lage luchtdruk.
Niet-oplaadbare batterijen mogen niet opgeladen worden.
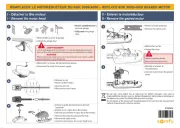
2. Situo1RTS II en Situo5RTS II in details
(FiguurA)
a
Plaats van de wandsteun
b
Toets Op/ Inschakelen/ Openen/ Draaien/ Meer licht
c
STOP/MY toets
d
Toets Neer/ Uitschakelen/ Sluiten/ Draaien/ Minder
licht
e
Controlelampje voor het bedienen van de toetsen
f
Controlelampjes voor het bedienen van de toetsen
en de groepkeuzeschakelaar
g
Groepkeuzeschakelaar
h
PROG toets
i
Wandhouder.
3. Selectie van groepen op Situo5RTS II
(FiguurB)
Controleer voorafgaand aan de bediening met de
Situo 5 RTS II of de juiste groep is gekozen.
-Druk kort op de groepkeuzeschakelaar
g
: weergave
van de geselecteerde groep.
-Opeenvolgend drukken: wijziging van de geselecteerde
groep.
De led
f
van groep 1 tot en met 4 licht afzonderlijk op en
vervolgens branden alle leds voor de selectie van groep 5.
4. Installatie
4. 1. SituoRTS II toevoegen/verwijderen
Programmeren van de eerste bediening: zie de
handleiding van de motor of de RTS-ontvanger.
U kunt als volgt de SituoRTS II aan een systeem toevoegen
of eruit verwijderen:
(Figuur C)
1) Op de bediening die al aan het systeem is gekoppeld:
• Druk (≈ 2 s) op de PROG toets tot de toepassing
heen en weer beweegt.
2) Op de toe te voegen of te verwijderen SituoRTS II:
Selecteer bij de Situo 5 RTS II eerst de groep
g
.
• Druk kort op de PROG toets: de toepassing gaat op
en neer, de SituoRTS II is toegevoegd of verwijderd.
Il telecomando Situo 1 RTS II permette di
comandare un gruppo di una o più applicazioni. Il
telecomando Situo5RTS II permette di comandare fino a
5gruppi di una o più applicazioni.
1. Sicurezza e responsabilità
1. 1. Responsabilità
L'utente dovrà aver cura di conservare questi manuali. Il
mancato utilizzo delle istruzioni o un utilizzo del prodotto
che esula dal suo campo di applicazione, comporta
l'annullamento della responsabilità e della garanzia
Somfy.
Questo dispositivo Somfy deve essere installato da un
professionista della motorizzazione e della domotica.
L’installatore è tenuto a rispettare le normative e la
legislazione in vigore nel paese nel quale viene effettuata
l’installazione, e deve informare i suoi clienti sulle
condizioni di utilizzo e di manutenzione del prodotto.
Prima di effettuare l'installazione, verificare la
compatibilità di questi prodotti con le apparecchiature e gli
accessori installati. In caso di dubbi durante l'installazione
del prodotto e/o per avere maggiori informazioni,
consultare un interlocutore Somfy o visitare il sito www.
somfy.com.
1. 2. Istruzioni di sicurezza
In caso di utilizzo con un motore, fare riferimento anche
alle istruzioni di quest'ultimo.
Non installare né utilizzare il prodotto all'aperto.
Non esporre il prodotto a urti o cadute, a materiali
infiammabili o fonti di calore, all'umidità, a getti di liquidi;
non immergere.
Avvertenza
Questo prodotto contiene una batteria a bottone.
Non ingerire la batteria: pericolo di ustioni chimiche, che
possono rivelarsi mortali nel giro di 2 ore.
Se si introduce la batteria in una parte del corpo o in caso
di dubbi, rivolgersi immediatamente ad un medico.
Tenere le pile (nuove e utilizzate) e il prodotto fuori dalla
portata dei bambini. Se il vano pile non si chiude più, non
utilizzare più il prodotto e tenerlo fuori dalla portata dei
bambini.
Se si conserva la batteria a temperature elevate (forno
caldo, fuoco), se la si rompe, taglia o sottopone ad una
pressione dell'aria estremamente bassa, si corre il pericolo
di esplosioni e di perdite di liquidi o gas infiammabili.
Non ricaricare le pile non ricaricabili.
2. Situo1RTS II e Situo5 RTS II in dettaglio
(FiguraA)
a
Installazione del supporto a muro
b
Tasto alzare / accendere / aprire / orientare /
aumentare l'intensità
c
Tasto STOP / my
d
Tasto abbassare / spegnere / chiudere / orientare /
diminuire l'intensità
e
Spia di pressione dei tasti
f
Spie di pressione dei tasti e di selezione del gruppo
g
Selettore del gruppo
h
Pulsante PROG
i
Supporto a muro.
3. Selezione dei gruppi su Situo5RTS II
(FiguraB)
Prima di ogni operazione con il telecomando
Situo 5 RTS II, verificare che sia selezionato il gruppo
corretto.
-Premere brevemente sul selettore del gruppo
e
g
: per
visualizzare il gruppo selezionato.
-Effettuare più pressioni consecutive per modificare il
gruppo selezionato.
La spia
f
di ogni gruppo da 1 a 4 si accende individualmente,
poi tutte le spie si accendono per la selezione del gruppo 5.
4. Installazione
4. 1. Aggiunta/eliminazione di Situo RTS II
Per registrare il primo telecomando: consultare il
manuale del motore o del ricevitore RTS.
Per aggiungere o eliminare il SituoRTS II da un'applicazione:
(Figura C)
1) Sul telecomando singolo già associato al prodotto
portante:
• Premere (≈ 2 s) il pulsante PROG. fino a un breve
movimento di salita/discesa dell'applicazione.
2) Sul Situo RTS II da aggiungere o cancellare:
Per Situo 5 RTS II, selezionare prima il gruppo
g
.
• Premere brevemente il pulsante PROG.:
l’applicazione effettua un breve movimento salita/
discesa, SituoRTS II viene aggiunto o cancellato.
Mit der Fernbedienung Situo 1 RTS II können Sie eine
Gruppe mit einer oder mehreren Anwendungen bedienen.
Mit der Fernbedienung Situo5 RTS II können Sie bis zu 5 Gruppen
mit einer oder mehreren Anwendungen bedienen.
1. Sicherheit und Gewährleistung
1. 1. Gewährleistung
Der Benutzer muss diese Anleitungen aufbewahren. Für
Schäden und Mängel, die durch nicht bestimmungsgemäße
Verwendung oder Nichtbeachtung der Anweisungen und
Hinweise in dieser Anleitung entstehen, ist die Haung und
Gewährleistung durch Somfy ausgeschlossen.
Dieses Somfy-Produkt muss von einem Fachmann für
Gebäudeautomation installiert werden. Der Installateur muss sich
außerdem an die Normen und Vorschrien des Installationslandes
halten und die Kunden darüber informieren, was bei der Benutzung
und Wartung des Produkts zu beachten ist.
Vor der Installation muss die Kompatibilität dieses Produkts mit
den dazugehörigen Ausrüstungs- und Zubehörteilen geprü
werden. Bei Fragen zur Installation dieses Produkts und für
weiterführende Informationen wenden Sie sich bitte an Ihren
Somfy-Ansprechpartner oder besuchen Sie unsere Website
www.somfy.com.
1. 2. Sicherheitshinweise
Bei Verwendung mit einem Antrieb beachten Sie auch die
Anleitungen des Antriebs.
Dieses Produkt darf nicht im Freien installiert und verwendet
werden.
Setzen Sie das Produkt keinen Stößen aus und lassen Sie es
nicht fallen. Bringen Sie es nicht in Kontakt mit brennbaren
Stoffen, Wärmequellen, Feuchtigkeit und Spritzwasser.
Tauchen Sie es nicht in Flüssigkeiten.
Warnung
Dieses Produkt enthält eine Knopfbatterie.
Batterien nicht verschlucken: Verschluckte Batterien können
innerhalb von 2 Stunden zu chemischen Verätzungen mit
Todesfolge führen.
Wird eine Batterie in eine Körperöffnung eingeführt oder bestehen
diesbezüglich Zweifel, wenden Sie sich umgehend an einen Arzt.
Bewahren Sie (neue und gebrauchte) Batterien außerhalb der
Reichweite von Kindern auf. Verwenden Sie das Produkt nicht
mehr, wenn sich das Batteriefach nicht schließen lässt, und
bewahren Sie es außerhalb der Reichweite von Kindern auf.
Es besteht Explosionsgefahr und brennbare Flüssigkeiten oder Gase
können aus der Batterie austreten, wenn sie auf hohe Temperaturen
(heißer Ofen, Feuer) erhitzt, gequetscht, durchschnitten oder einem
extrem niedrigen Ludruck ausgesetzt wird.
Nicht wiederaufladbare Batterien dürfen nicht
wiederaufgeladen werden.
2. Situo1RTS II und Situo5RTS II im Detail
(AbbildungA)
a
Aufnahme der Wandhalterung
b
Taste AUF/Einschalten/Öffnen/Neigen/Intensität erhöhen
c
Taste STOP/my
d
Taste AB/Ausschalten/Schließen/Neigen/Intensität reduzieren
e
LED Statusanzeige der Tastenbetätigung
f
LEDs Statusanzeige der Tastenbetätigung und der
Gruppenwahl
g
Gruppenwahlschalter
h
PROG-Taste
i
Wandhalterung
3. Auswahl von Gruppen an der Situo5RTS II
(Abbildung B)
Stellen Sie vor jedem Befehl mit der Situo 5 RTS II sicher,
dass die richtige Gruppe gewählt ist.
-Drücken Sie kurz den Gruppenwahlschalter
g
: Anzeigen
der gewählten Gruppe.
-Wiederholte Betätigung: Wechsel der gewählten Gruppe.
Die LED
f
der einzelnen Gruppen 1 bis 4 leuchtet auf und dann
leuchten alle LEDs für die Wahl der Gruppe 5.
4. Installation
4. 1. Hinzufügen/Entfernen einer Situo RTS II
Einlernen der ersten Fernbedienung: siehe
Gebrauchsanleitung für den RTS-Antrieb oder den
RTS-Empfänger.
Situo RTS II in einer Anwendung hinzufügen oder löschen:
(Abbildung C)
1) Bei einer Fernbedienung, die bereits in der Anwendung
eingelernt ist:
• Drücken Sie (ca. 2 s) auf die PROG-Taste, bis die
Anwendung eine kurze Auf-/Abbewegung durchführt.
2) Auf der SituoRTS II, der hinzugefügt oder gelöscht werden soll:
Wählen Sie zunächst die Gruppe
g
an der Situo 5
RTS II aus.Drücken Sie kurz die PROG-Taste: Die
Anwendung bestätigt mit einer kurzen Auf-/
Abbewegung, die Situo RTS II ist hinzugefügt oder
entfernt.
The Situo1RTS II remote control allows a group
of one or more applications to be controlled. The
Situo5RTS II remote control allows up to 5groups of one
or more applications to be controlled.
1. Safety and liability
1. 1. Liability
These instructions must be kept by the user. Failure to
follow these instructions or use of the product outside
its field of application is forbidden and will invalidate the
warranty and discharge Somfy of all liability.
This Somfy product must be installed by a professional
drive and home automation installer. Moreover, the
installer must comply with the standards and legislation
currently in force in the country in which the product is
being installed, and inform his customers of the operating
and maintenance conditions for the product.
Never begin installing without first checking the
compatibility of this product with the associated
equipment and accessories. If in doubt when installing
this product and/or to obtain additional information,
contact a Somfy representative or visit the website
www.somfy.com.
1. 2. Safety instructions
If used with a motor, you should also consult the
instructions provided with the motor.
Do not use or install this product outdoors.
Do not knock or drop the product, expose it to flammable
materials or sources of heat or moisture, or splash or
immerse it.
Warning
This product contains a cell battery.
Do not swallow the battery: risk of potentially fatal
chemical burns in less than 2hours.
If the battery is inserted into a part of the body or if in any
doubt, call a doctor immediately.
Keep batteries (new and used) and the product out of the
reach of children. If the battery compartment no longer
closes, do not use the product and keep out of the reach
of children.
Risk of explosion, leaking flammable liquids or gases
from the battery if it is kept at a high temperature (hot
oven, fire), crushed, cut or subject to very low air pressure.
Non-rechargeable batteries must not be recharged.
2. Situo1RTS II and Situo5RTS II in detail
(FigureA)
a
Wall mount recess
b
Up / On / Open / Tilt / Increase intensity button
c
STOP/my button
d
Down / Off / Close / Tilt / Reduce intensity button
e
Button activation indicator light
f
Button activation and group selection indicator lights
g
Group selector switch
h
PROG button
i
Wall mounting.
3. Selection of groups on Situo5RTS II
(FigureB)
Before performing any operation with the Situo 5 RTS
II, check that the correct group has been selected.
-Short press on the group selector
g
: visualisation of the
group selected.
-Press several times: change the group selected.
The indicator light
f
for each group from 1 to 4 is lit
individually then all the indicator lights are lit if group 5 is
selected.
4. Installation
4. 1. Adding/deleting SituoRTS II
To program the first control: refer to the instructions
for the RTS motor or receiver.
To add or delete the Situo RTS II to/from an application:
(Figure C)
1) On the individual control already associated with the
application:
• Press the PROG button (≈ 2 s) until the application
moves up and down.
2) On the SituoRTS II to be added or removed:
For the Situo 5 RTS II, first select the group
g
.
• Briefly press the PROG button: the application
moves up and down and the SituoRTS II is added
or deleted.
Situo1RTS II
Situo5RTS II
FR
NOTICE
EN
INSTRUCTIONS
DE
ANLEITUNG
IT
ISTRUZIONI
NL
HANDLEIDING
Ref.5150124A
100% recycled paper
SOMFY ACTIVITÉS SA
50 avenue du Nouveau Monde
F - 74300 Cluses
www.somfy.com
La télécommande Situo1RTS II permet de piloter
un groupe de une ou plusieurs applications. La
télécommande Situo 5 RTS II permet de piloter jusqu’à
5groupes de une ou plusieurs applications.
1. Sécurité et responsabilité
1. 1. Responsabilité
Ces notices doivent être conservées par l’utilisateur.
Le non respect de ces instructions ou l’utilisation du
produit hors de son domaine d’application est interdit
et entrainerait l’exclusion de la responsabilité et de la
garantie Somfy.
Ce produit Somfy doit être installé par un professionnel
de la motorisation et de l’automatisation de l’habitat.
L’installateur doit par ailleurs, se conformer aux normes
et à la législation en vigueur dans le pays d’installation,
et informer ses clients des conditions d’utilisation et de
maintenance du produit.
Avant toute installation, vérifier la compatibilité de ce
produit avec les équipements et accessoires associés.
Si un doute apparait lors de l’installation de ce produit
et/ou pour obtenir des informations complémentaires,
consulter un interlocuteur Somfy ou aller sur le site
www.somfy.com.
1. 2. Consignes de sécurité
Dans le cas d’utilisation avec un moteur, se reporter
également aux instructions de celui-ci.
Ne pas installer ni utiliser le produit à l’extérieur.
Ne pas exposer le produit à des chocs ou des chutes, à
des matières inflammables ou à une source de chaleur, à
l’humidité, à des projections de liquide, ne pas l’immerger.
Avertissement
Ce produit contient une pile bouton.
Ne pas avaler la pile : risque de brûlures chimiques en à
peine 2heures pouvant être mortelles.
En cas d’introduction de la pile dans une partie du corps
ou en cas de doute, appelez immédiatement un médecin.
Tenir hors de portée des enfants les piles (neuves et
usagées) et le produit. Si le compartiment pile ne ferme
plus, ne plus utiliser le produit et le tenir hors de portée
des enfants.
Risque d’explosion, de fuite de liquide ou de gaz
inflammables de la pile si elle est maintenue à haute
température (four chaud, feu), écrasée, coupée, ou
soumise à une pression de l’air extrêmement faible.
Les batteries non rechargeables ne doivent pas être
rechargées.
2. Situo1RTS II et Situo5RTS II en détails
(FigureA)
a
Logement du support mural
b
Touche Monter/ Allumer/ Ouvrir/ Orienter/
Augmenter l’intensité
c
Touche STOP / my
d
Touche Descendre/ Eteindre/ Fermer/ Orienter/
Diminuer l’intensité
e
Voyant témoin d’appui sur les touches
f
Voyants témoins d’appui sur les touches et de
sélection de groupe
g
Sélecteur de groupe
h
Bouton PROG
i
Support mural.
3. Sélection des groupes sur Situo5RTS II
(FigureB)
Avant toute opération avec Situo 5 RTS II, s’assurer que
le bon groupe est sélectionné.
-Un appui bref sur le sélecteur de group
e
g
: visualisation
du groupe sélectionné.
-Des appuis successifs : changement du groupe
sélectionné.
Le voyant
f
de chaque groupe de 1 à 4 s’allume
individuellement puis tous les voyants s’allument pour la
sélection du groupe5.
4. Installation
4. 1. Ajout/Suppression de SituoRTS II
Pour enregistrer la première commande : se référer
à la notice du moteur ou du récepteur RTS.
Pour ajouter ou supprimer SituoRTS II à une application:
(Figure C)
1) Sur la commande individuelle déjà associée à
l’application:
• Appuyer (≈ 2 s) sur son bouton PROG. jusqu’au
va-et-vient de l’application.
2) Sur SituoRTS II à ajouter ou à supprimer:
Pour Situo 5 RTS II, sélectionner d’abord le groupe
g
.
• Faire un appui bref sur son bouton PROG.:
l’application effectue un va-et-vient, SituoRTS II est
ajoutée ou supprimée.
FR EN DE IT
1/2
1)
2)
2 s
C
0.5 s
NL
1
2
3
4
5
B
A
Situo1RTS II
Situo5RTS II
e
a
d
i
b
c
d
c
b
a
g
f
h
h
Produktspecifikationer
| Varumärke: | Somfy |
| Kategori: | fjärrkontroll |
| Modell: | Situo 1 io |
Behöver du hjälp?
Om du behöver hjälp med Somfy Situo 1 io ställ en fråga nedan och andra användare kommer att svara dig
fjärrkontroll Somfy Manualer
30 Juli 2025

30 Juli 2025
30 Juli 2025
30 Juli 2025
30 Juli 2025
11 Juli 2025
11 Juli 2025
11 Juli 2025
11 Juli 2025
11 Juli 2025
fjärrkontroll Manualer
- Danfoss
- Leica
- DJI
- Insignia
- Motion
- WiiM
- Sony
- DataVideo
- Optex
- Hager
- Rii
- Schwaiger
- Showtec
- Hama
- Rademacher
Nyaste fjärrkontroll Manualer
11 Oktober 2025
10 Oktober 2025
7 Oktober 2025
7 Oktober 2025
7 Oktober 2025
5 Oktober 2025
2 Oktober 2025

2 Oktober 2025
1 Oktober 2025
30 September 2025