Sommer Flexy Bruksanvisning
Sommer Inte kategoriserad Flexy
Läs gratis den bruksanvisning för Sommer Flexy (2 sidor) i kategorin Inte kategoriserad. Guiden har ansetts hjälpsam av 25 personer och har ett genomsnittsbetyg på 5.0 stjärnor baserat på 8 recensioner. Har du en fråga om Sommer Flexy eller vill du ställa frågor till andra användare av produkten? Ställ en fråga
Sida 1/2
D
Handsender (30-Befehl)
Technische Daten
F
requenz868,8 MHz
Temperaturbereich-20 - +55 °C
R
eichweiteumgebungsabhängig, ca. 25 m
S
chutzklasseIP 64
B
atterieTyp: CR 123 A (3 Volt)
A
bmessungen142 x 44 x 30 mm
Gewichtca. 180 g (inkl. Batterie ohne Halter)
Funkbefehle30 (je 10 pro Ebene, bei 3 Ebenen)
Symbole
H
inweis
Information, nützlicher Hinweis !
Signal EIN (Funkmanager S)
S
ymbolisiert den Summer, der ein akustisches Signal ()¯
erzeugt. Jedes Symbol () steht für ein Signal.¯
S
ignal AUS (Funkmanager S)
Symbolisiert den Summer, der kein akustisches Signal
() erzeugt.¯
Verweist zu Beginn oder im Text auf eine entsprechende
Taste am Handsender, die gedrückt werden soll.
D
ie Taste ist nur als Beispiel abgebildet.
Verweist zu Beginn oder im Text auf eine entsprechendes
P
osition in einem Bild.
Funktionsbeschreibung
Der Handsender ist ein Gerät, das per Funk einen Funkbefehl
an einen Empfänger/Antrieb (z.B. Garagentorantrieb) sendet.
Hinweis !
Es muss immer auf den Pfeil (- ) der Tasten ge-
drückt werden, darunter befindet sich der Taster.
S
obald eine der Tasten - (Pfeile - ) gedrückt
ist, sendet der Handsender den Funkbefehl - LED (A.2 + A.3)
leuchten.
Dieser Handsender hat 30 Funkbefehle, wobei die Funkbefehle
zu je 10 auf 3 Ebenen verteilt sind. Wird ein Funkbefehl von
E
bene 2 (A.5) oder 3 (A.6) benötigt, muss vorher die Taste
gedrückt werden. 1x für Ebene 2 (A.5) - LED (A.3) leuch-
tet und 2x für Ebene 3 (A.6) - LED (A.2) leuchtet.
Sicherheitshinweise
•Funkfernsteuerung nicht an funktechnisch empfindlichen Or-
t
en oder Anlagen betreiben (z.B. Flugzeuge, Krankenhäuser).
•Das Herrunterfallen der Funkfernsteuerung, kann zu Beschä-
d
igungen oder verringerter Reichweite führen.
•Diese Montage- und Betriebsanleitung muss von der Person,
die die Funkfernsteuerung montiert, betreibt oder wartet, gele-
s
en, verstanden und beachtet werden.
•
Nur Original-Ersatzteile, -Zubehör und -Befestigungsmaterial
des Herstellers verwenden.
•Der Benutzer muss darüber informiert werden, daß die Fern-
s
teuerung von Anlagen mit Unfallrisiko, wenn überhaupt, nur
bei direktem Sichtkontakt erfolgen darf.
•Die Funkfernsteuerung darf nur benutzt werden, wenn die Be-
w
egung des Tores eingesehen werden kann und sich keine
Personen oder Gegenstände im Bewegungsbereich befinden.
•Funkfernsteuerung nicht im Schwenkbereich eines Tores mon-
t
ieren.
•
Funkfernsteuerung mit direkter Sicht auf das zu steuernde Ge-
rät montieren.
•Die Funkfernsteuerung nie einem Wasserstrahl aussetzen,
z
.B.: aus einem Wasserschlauch oder Hochdruckreiniger. Es
kann Wasser eindringen und die Funkfernsteuerung beschädi-
gen oder zerstören.
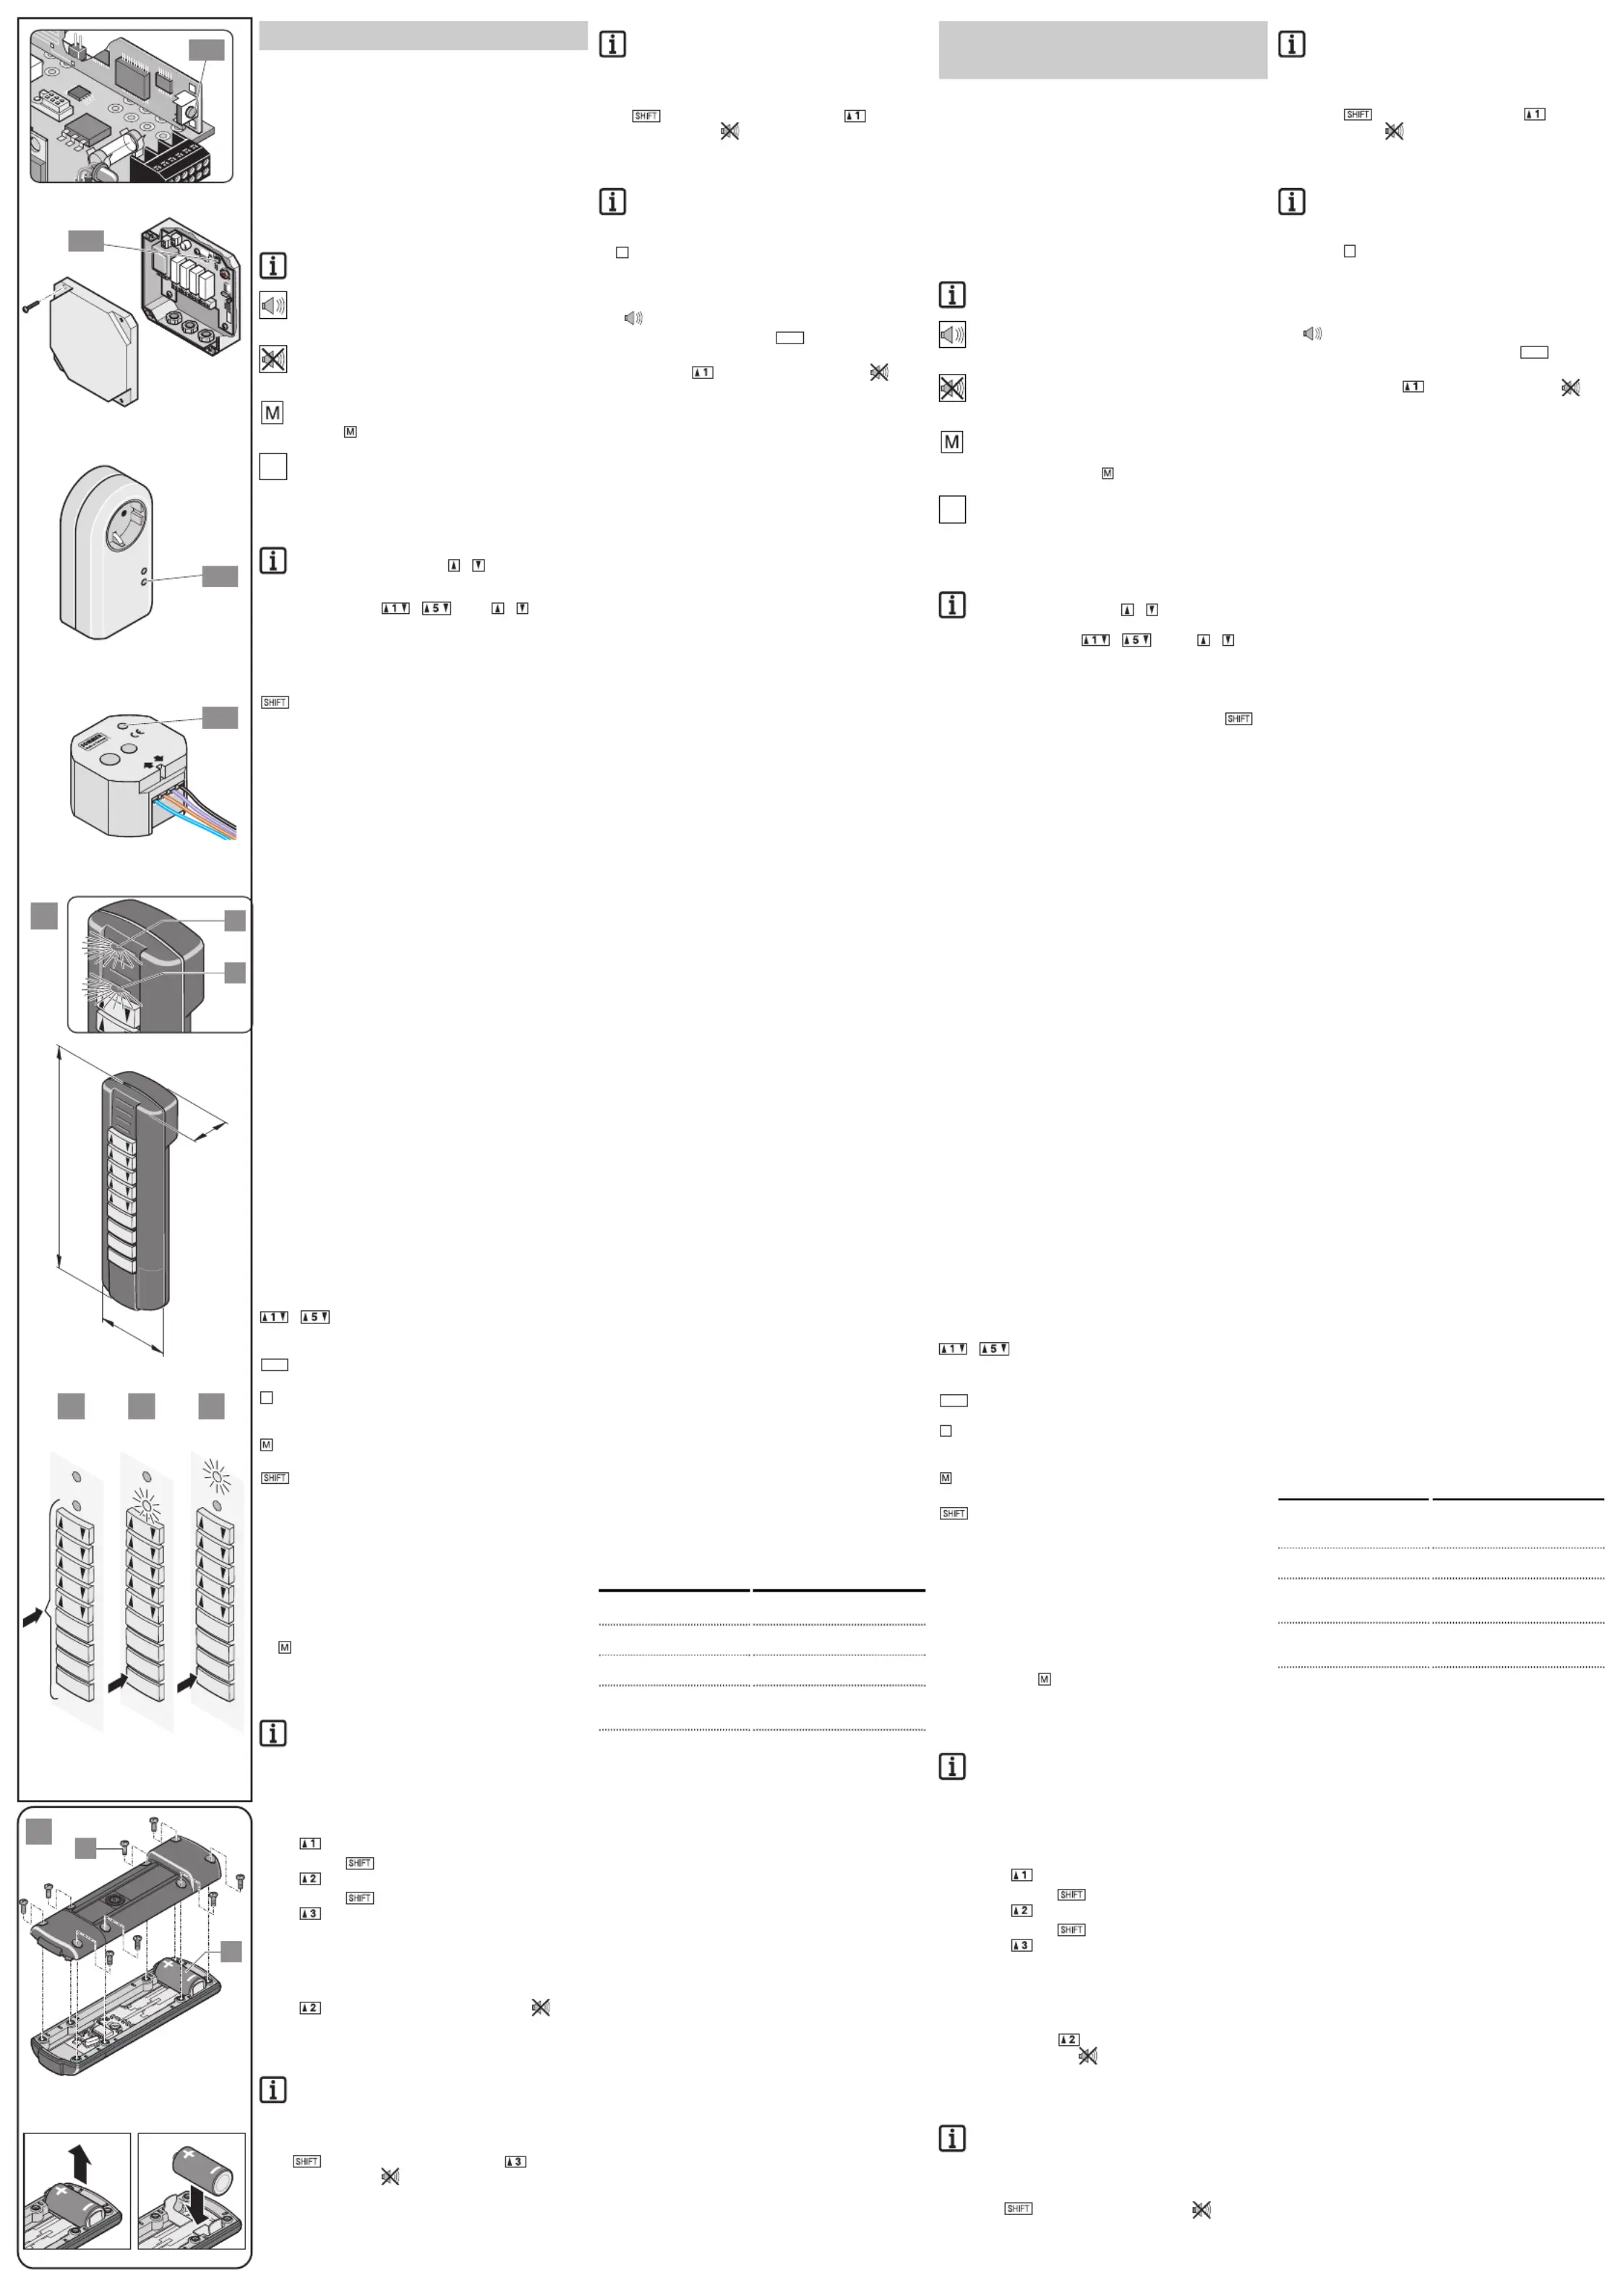
A.Anzeige- und Tastenerklärung
A.1-Lerntaste an einem Empfänger, z.B.: bei ei-
nem Garagentorantrieb.
A.2 (LED rot)-Sendebetrieb:
Leuchtet gemeinsam mit LED (A.3).
-
Anzeige Befehlsebene 2: leuchtet
A.3 (LED gelb)-Sendebetrieb:
Leuchtet gemeinsam mit LED (A.2).
-Anzeige Befehlsebene 3: leuchtet
-Reset-Meldung: blinkt
- -Zifferntaste
L
inks und rechts der Zahl, ist jeweils ein Pfeil
unter dem die Taste ist.
Abbruch- / Löschtaste
-Eingabe Funkcode abbrechen
Programmiertaste
-Programmiermodus für Funkmanager S ein-
schalten, LED (A.2 + A.3) blinken.
Programmiertaste
-Handsender einschalten
Wahltaste
-Wählt die Befehlsebene aus.
Standard ->Ebene 1 LED (A.3 + A.2) aus
1x drücken ->Ebene 2 LED (A.3) leuchtet
2x drücken ->Ebene 3 LED (A.2) leuchtet
Montage
Halterung für die Wandmontage als Zubehör (# 4641V000) ver-
fügbar.
•Montagehöhe bei einer Wandmontage, min. 1,6 m.
Handsender einschalten
1.für 5 Sekunden drücken. LED (A.2) blinkt 3x.
►Danach leuchten LED (A.2 + A.3) für 2 Sekunden.
Handsender eingeschaltet.
Handsender einlernen
Hinweis !
Sie benötigen immer die Montage- und Betriebsanleitung,
des entsprechenden Empfängers/Antriebes.
Variante 1: auf Empfänger/Antrieb
1.Lerntaste (A.1) am Empfänger/Antrieb drücken.
2.Gewünschten Funkbefehl wählen:
Ebene 1:
z.B. drücken, bis LED am Funkempfänger erlischt.
Ebene 2:1x drücken - LED (A.3) leuchtet -
z.B. drücken, bis LED am Funkempfänger erlischt.
Ebene 3:2x drücken - LED (A.2) leuchtet -
z.B. drücken, bis LED am Funkempfänger erlischt.
►Einlernen beendet.
Variante 2: auf Funkmanager S (Funkbefehl von Ebene 1)
1.Funkmanager S in Lernbetrieb versetzen, siehe Montage-
und Betriebsanleitung Funkmanager S.
2.z.B. drücken und halten bis Funkmanager S .
LED (A.2 + A.3) leuchten
►Einlernen beendet.
Variante 3: auf Funkmanager S (Funkbefehl von Ebene 2)
Hinweis !
Bei älteren Funkmanager S Steuerungen, ist es nicht
möglich die Taste 5 der Ebene 2 + 3 einzulernen.
1.Funkmanager S in Lernbetrieb versetzen, siehe Montage-
und Betriebsanleitung Funkmanager S.
2.1x drücken - LED (A.3) leuchtet - z.B. drücken,
bis Funkmanager S .
►Einlernen beendet.
Variante 4: auf Funkmanager S (Funkbefehl von Ebene 3)
Hinweis !
B
ei älteren Funkmanager S Steuerungen, ist es nicht
m
öglich die Taste 5 der Ebene 2 + 3 einzulernen.
1.Funkmanager S in Lernbetrieb versetzen, siehe Montage-
u
nd Betriebsanleitung Funkmanager S.
2.2x drücken - LED (A.2) leuchtet - z.B. drücken,
b
is Funkmanager S .
►Einlernen beendet.
Lernbetrieb bei Funkmanager S aktivieren
H
inweis !
Eine Taste des Handsenders muss beim Funkmanager S
eingelernt sein, um mit dieser den Lernbetrieb zu aktivie-
r
en.
1.1x drücken - LED (A.2 + A.3) blinken.
H
andsender im Programmiermodus für Funkmanager S.
2
.Bereits eingelernte Taste drücken und gedrückt halten, bis
d
er Funkmanager S den Lernbetrieb signalisiert
- ____...¯¯¯
3
.Programmiermodus beenden, 1x drücken.
4
.Neue gewünschte Taste (Funkbefehl) wählen:
Ebene 1:z.B. drücken, bis Funkmanager S .
►
Einlernen beendet.
Taste des Handsenders aus einem Funk-
empfänger löschen
Siehe Montage- und Betriebsanleitung des jeweiligen Funkemp-
f
ängers.
Taste des Handsenders aus Funkmanager S
löschen
Siehe Montage- und Betriebsanleitung Funkmanager S.
Betrieb
Voraussetzungen:
-
Gewünschten Funkbefehl auf Empfänger eingelernt.
Jetzt kann durch Drücken einer Taste ein Funkbefehl (z.B. Ga-
ragentor öffnen) ausgelöst werden.
►LED (A.2 + A.3) leuchten solange die Taste gedrückt wird.
B.Batterietausch
•Batterie vor Kindern schützen. Wird die Batterie verschluckt,
s
ofort einen Arzt aufsuchen.
•Batterie nicht verschlucken, nicht öffnen, nicht nachladen oder
in Kontakt mit Wasser, Feuer oder hohen Temperaturen brin-
g
en: diese könnte sonst explodieren, auslaufen und Schaden
verursachen.
•Batterie nur durch Typ CR 123 A (3 Volt) ersetzen.
•Batterie beim Lagern oder Wegwerfen immer einpacken. Bat-
terie darf nicht mit anderen metallischen Gegenständen in
Kontakt kommen, dies könnte die Batterie entladen, entzün-
den oder beschädigen.
•
Batterie nicht in den Hausmüll werfen.
•Beschädigte oder verbrauchte Batterien vorschriftsmäßig ent-
sorgen. Wenden Sie sich an Ihre örtliche Umweltbehörde oder
I
hren Abfallentsorgungsbetrieb.
•Verpolungsschutz nicht entfernen. Dieser verhindert bei einem
f
alschen Einbau der Batterie, eine Beschädigung oder Zerstö-
rung der Funkfernsteuerung.
•
Immer die Schrauben (1) über Kreuz anziehen (wie beim Rad-
wechsel eines PKWs), damit das Gehäuse ohne Verspannun-
gen geschlossen wird. Sonst kann Wasser in das Gehäuse
e
indringen.
Die Funkfernsteuerung muss sich leicht in den Halter (Zube-
hör, nicht im Lieferumfang enthalten) einschieben lassen, an-
s
onsten die Schrauben (1) nachziehen.
Ablauf:
1.Schrauben (1) lösen und entfernen
2.Handsender öffnen.
3
.Batterie (2) herausnehmen und neue Batterie genau so ein-
setzen (Auf korrekte Polung achten!).
4.Zusammenbau in umgekehrter Reihenfolge: Pos. 2 ...1
Gewährleistung und Kundendienst
Die Gewährleistung entspricht den gesetzlichen Bestimmungen.
D
er Ansprechpartner für eventuelle Gewährleistungen ist der
Fachhändler. Der Gewährleistungsanspruch gilt nur für das
Land, im dem das Produkt erworben wurde.
Bei gewaltsamen Öffnen des Gehäuses, erlischt die Gewähr-
leistung.
Batterien, Sicherungen und Glühbirnen sind von der Gewähr-
leistung ausgeschlossen.
Wenn Sie Kundendienst, Ersatzteile oder Zubehör benötigen,
wenden Sie sich bitte an Ihren Fachhändler.
Wir haben versucht, die Betriebsanleitung so übersichtlich wie
möglich zu gestalten. Haben Sie Anregungen für eine bessere
Gestaltung oder fehlen Ihnen Angaben, schicken Sie bitte Ihre
Vorschläge an:
Fax.:0049 / (0)7021 / 8001-403
email:[email protected]
Entsorgung
Die jeweiligen Ländervorschriften beachten.
Hilfe bei Störungen
Kommen Sie nicht weiter, fragen Sie Ihren Fachhändler oder
suchen Sie Hilfe im Internet unter “http://www.sommer-torantrie-
be.de”.
EU-Konformitätserklärung
www.sommer.eu/mrl
Hand-held transmitter
(30-command unit)
Technical data
R
adio frequency868,8 MHz
Temperature range-20 - +55 °C
Usage rangedepending on environment, approx. 25 m
Safety classIP 64
B
atteryTyp: CR 123 A (3 Volt)
D
imensions142 x 44 x 30 mm
W
eightca. 180 g (incl. battery without holder)
R
adio commands30 (10 per level, with 3 levels)
Symbols
N
ote
I
nformation, useful tip!
S
ignal ON (radio manager S)
Symbolises the buzzer generating the acoustic signal
(). Each symbol ()stands for one signal.¯¯
S
ignal OFF (radio manager S)
Symbolises the buzzer that does not generate an audible
s
ignal ().¯
Indicates the key on the hand-held transmitter that is to
be pressed in connection with the instructions in the
related text section.
T
his example shows key .
U
sed in text; refers to the corresponding item in a picture.
Description of functions
T
he hand-held transmitter sends commands in the form of radio
signals to a receiver/drive system (e.g. garage door operator).
Note!
Always press first the arrow (- ) of the key. The
actual button is located below the key.
As soon as one of the keys -(arrows - ) is
p
ressed, the hand-held transmitter sends the radio command -
The LEDs (A.2 + A.3) are on.
This hand-held transmitter caters for 30 radio commands that
a
re distributed in groups of 10 to 3 different levels. To activate a
radio command at level2 (A.5) or 3 (A.6), first press the
key. Press 1x for level 2 (A.5) - LED (A.3) is on. Press 2x for
level 3 (A.6) - LED (A.2) is on.
Safety instructions
•Never use the radio control device at locations where it could
interfere with other equipment (e.g. airports, hospitals).
•Do not drop the hand-held transmitter as it could become
damaged or its range could be reduced.
•These installation and operating instructions must be read
and fully understood by the persons operating or servicing the
device. All instructions must be fully adhered to.
•Use only original spare parts, accessories and securing
devices approved by the manufacturer.
•If the remote control device is used for the control of a unit
where there is a risk to persons, the operator must at all times
b
e able to see the unit during operation of the remote control.
•The radio remote control may only be used, if all movements
o
f the door can be supervised by the operator and are not
obstructed.
•
Do not install remote control within the opening range of the
door.
•Install remote control in a location that allows for an unob-
structed view of the controlled unit.
•
Protect the hand-held transmitter against water, e.g. from a
high-pressure cleaner or water hose. There is a risk of water
penetrating the housing, damaging the radio remote control
d
evice.
A.Display and key functions
A
.1-'Teach' key at a receiver e.g. a garage door
drive system
A
.2 (red LED)-Transmission mode:
ON together with LED (A.3).
-Display of command level 2: ON
A.3 (yellow LED)-Transmission mode:
ON together with LED (A.2).
-
Display of command level 3: ON
-Reset message: flashes
--Numerical keys
To the left and right of the figure, there is an
arrow below the key.
Cancel/delete key
-Cancel radio code entry
Programming key
-Switch on the programming mode for radio
manager S. The LEDs (A.2 + A.3) flash.
Programming key
-Switch on the hand-held transmitter
Selection key
-Select the command level:
Standard ->level 1 LED (A.3 + A.2) OFF
1x drücken ->level 2 LED (A.3) ON
2x drücken ->level 3 LED (A.2) ON
Installation
A special bracket for wall installation is available as an optional
extra (# 4641V000).
•Installation height for wall installation: min. 1.6m.
Switch the hand-held transmitter
1.Press and hold for 5 seconds. LED (A.2) flashes 3x.
►Subsequently LEDs (A.2 + A.3) are ON for 2 seconds.
The hand-held transmitter is switched on.
'Teaching' hand-held transmitter
Note!
Always first read the installation and operating manual of
your receiver/drive system.
Option 1: on the receiver/drive system
1.Press the 'Teach' key (A.1) at the receiver/drive system.
2.Select the desired radio command:
Level 1:
E.g. press until the LED at the receiver is OFF.
Level 2:Press 1x LED (A.3) is ON -
E.g. press until the LED at the receive is OFF.
Level 3:Press 2x 2x - LED (A.2) is ON -
E.g. press until the LED at the receive is OFF.
►Teaching process completed.
Option 2: on the radio manager S (level 1 radio command)
1.Set radio manager S to 'teach' mode (see radio manager S
installation and operating manual)
2.E.g. press and hold until the LEDs (A.2. + A.3) of the ra-
dio manager S are ON..
LED (A.2 + A.3) are ON
►Teaching process completed.
Option 3: on the radio manager S (level 2 radio command)
Note!
With older radio manager S control systems, key 5 of
levels 2 and 3 cannot be taught in.
1.Set radio manager to 'teach' mode (see radio manager S
installation and operating manual)
2.Press 1x - LED (A.3) is ON - e.g. press until the
radio manager S.
►Teaching process completed.
Option 4: on the radio manager S (level 3 radio command)
Note!
W
ith older radio manager S control systems, key 5 of
levels 2 and 3 cannot be taught in.
1.Set radio manager to 'teach' mode (see radio manager S
installation and operating manual)
2.Press 2x LED (A.2) is ON - e.g. press until the
radio manager S.
►Teaching process completed.
Activate 'teach' mode of the radio manager S
N
ote!
One key of the hand-held transmitter must be taught in
at the radio manager S, as it is otherwise not possible to
a
ctivate the 'teach' mode.
1.Press 1x LEDs (A.2 + A.3) flash.
T
he hand-held transmitter is in programming mode for the
r
adio manager S.
2
.Press and hold the already taught-in key until the radio
manager S indicates that it is in teach mode
-
____...¯¯¯
3.To terminate the programming mode, press1x.
4.Select the new desired key (radio command):
Level 1:e.g. press until the radio manager S.
►Teaching process completed.
Deleting the hand-held transmitter from a
radio receiver
S
ee installation and operating manual of the radio receiver.
Deleting the hand-held transmitter from the
radio manager S
See installation and operating manual of the radio manager S.
Operation
R
equirements:
-desired radio command has been taught to the receiver.
T
he radio command (e.g. "open garage door") can now be
activated by pressing the respective key of the hand-held trans-
mitter.
►LEDs (A.2 + A.3) are ON as long as the key is pressed.
B.Replacing batteries
•
Store batteries out of reach of children. If a battery has been
swallowed, immediately contact a doctor.
•
Do not ingest, open or recharge the battery. Protect it from
water, fire and high temperatures, as they could otherwise
explode, leak out or cause other damage.
•
Only use batteries of type CR 123 A (3 Volt).
•Store and dispose of batteries in packaging. Prevent any
contact with metal objects as this could discharge or damage
the battery or lead to ignition.
•Do not dispose of batteries in household waste.
•
Do not use damaged batteries. Dispose of damaged or empty
batteries according to the applicable regulations.
•Do not remove the polarity protection. It prevents incorrect
insertion of the battery, thus protecting the radio remote
control device from damage.
•Always tighten the screws (1) crosswise (similar to changing a
w
heel on a car), to ensure that the housing is tightly closed
without tension. Otherwise, there is a risk of water penetrating
the housing.
•
The radio remote control must be easily fit into the holder
(optional accessory, not included in delivery). If this is not the
case, retighten the screws (1).
P
rocedure:
1.Loosen and remove the screws (1).
2
.Open the hand-held transmitter.
3.Remove battery (2) and insert new battery (observe correct
p
olarity!).
4.Assemble the device by completing the above steps 2 … 1
in reverse order.
Warranty and customer service
T
his device is covered by statutory warranty. For warranty
services, please contact your retailer. The warranty is limited to
the country in which the product has been purchased.
O
pening of the housing voids all warranty.
Not included in the warranty are batteries, fuses and LEDs.
For customer service, spare parts and accessories, please
contact your dealer.
Every effort has been made to keep these instructions as user-
friendly and concise as possible. If you have any suggestions
on how this manual could be improved, please contact us:
Fax.:+49 (0)7021 8001 53
E-mail:[email protected]
Disposal
Always comply with the relevant statutory regulations.
Troubleshooting
If an error persists, contact your stockist or visit the “Forum”
page on our website at www.sommer-torantriebe.de.
EU Conformity Declaration
www.sommer.eu/mrl
(
x.1)
E
SC
P
P
ESC
Ursache
Handsender nicht eingelernt.
Batterie verbraucht.
Batterie verbraucht.
Handsender ausgeschaltet, siehe
Kapitel Handsender einschalten.
Elektrostatische Entladung durch
den Bediener. -> Bitte ESC-Taste
drücken.
Störung/Anzeige
Antrieb startet nicht
LED 1 blinkt beim Senden
eines Funkbefehles.
Keine Reaktion auf eine
Tastatureingabe.
Keine Reaktion auf das
Drücken einer Taste 1 ...5
(x.1)
E
SC
P
P
E
SC
Cause
Hand›held transmitter not
programmed.
Battery empty.
Battery empty.
Hand›held transmitter is swi
off; see section "Switching
hand›held transmitter".
Electrostatic discharge by t
operator. ›> Please press th
key.
Problem
Drive not responding
LED 1 flashes while a radio
command is transmitted.
No response to key
actuation.
No response when a key
(1 ... 5) is pressed.
M
P
P
P
P
P
E
E
E
E
E
M
M
M
M
M
C
C
C
C
C
S
S
S
S
S
SHIFT
S
S
S
SH
H
H
HI
I
I
IF
F
F
FT
T
T
T
5
5
5
5
5
4
4
4
4
4
3
3
3
3
3
2
2
2
2
2
1
1
1
1
1
142mm
A
44mm
30mm
8
23456
1
A
A.1
2
2
2
2
2
1
1
1
1
1
2
3
B
1
8x
1
2
Art.Nr.7006
Art.Nr.5980
Art.Nr.7001
Art.Nr.7002
K1
Ti
m
e
To
gg
l
e
T
i
p
K
2K
3K
4
NL
Fu
nk
Ma
na
ge
r
SL
RN
2
20
.
..
24
0
VAC
50
/6
0
HZ
max.
69
0W
I
P30
A.1
A.1
A.1
P
P
P
P
P
E
E
E
E
E
M
M
M
M
M
C
C
C
C
C
S
S
S
S
S
SHIFT
SHI
SHI
SHI
SHIFT
FT
FT
FT
5
5
5
5
5
4
4
4
4
4
3
3
3
3
3
2
2
2
2
2
1
1
1
1
1
P
P
P
P
P
E
E
E
E
E
M
M
M
M
M
C
C
C
C
C
S
S
S
S
S
SHIFT
SHI
SHI
SHI
SHIFT
FT
FT
FT
5
5
5
5
5
4
4
4
4
4
3
3
3
3
3
2
2
2
2
2
1
1
1
1
1
1x
2x
A.4A.5A.6
P
P
P
P
P
E
E
E
E
E
M
M
M
M
M
C
C
C
C
C
S
S
S
S
S
SHIFT
SHI
SHI
SHI
SHIFT
FT
FT
FT
5
5
5
5
5
4
4
4
4
4
3
3
3
3
3
2
2
2
2
2
1
1
1
1
1
46645V000-462005-0-OCE_Rev.
Produktspecifikationer
| Varumärke: | Sommer |
| Kategori: | Inte kategoriserad |
| Modell: | Flexy |
Behöver du hjälp?
Om du behöver hjälp med Sommer Flexy ställ en fråga nedan och andra användare kommer att svara dig
Inte kategoriserad Sommer Manualer

29 Mars 2025
29 Mars 2025
27 Mars 2025
27 Mars 2025
19 Mars 2025
19 Mars 2025
19 Mars 2025
19 Mars 2025
19 Mars 2025
Inte kategoriserad Manualer
Nyaste Inte kategoriserad Manualer
9 April 2025
9 April 2025
9 April 2025
9 April 2025
9 April 2025
9 April 2025
9 April 2025
9 April 2025
9 April 2025
9 April 2025