AccuLux HL 25 EX Bruksanvisning
Läs gratis den bruksanvisning för AccuLux HL 25 EX (2 sidor) i kategorin Ficklampa. Guiden har ansetts hjälpsam av 19 personer och har ett genomsnittsbetyg på 4.8 stjärnor baserat på 6 recensioner. Har du en fråga om AccuLux HL 25 EX eller vill du ställa frågor till andra användare av produkten? Ställ en fråga
Sida 1/2
D
KNICKKOPF-HANDLEUCHTE
HL 25 EX
SWIVEL-HEAD LAMP
HL 25 EX
LAMPE PORTATIVE À TÊTE ARTICULÉE
HL 25 EX
Witte + Sutor GmbH
Steinberger Str. 6
D-71540 Murrhardt
Fon +49 (0) 7192/92 92 0
Fax +49 (0) 7192/92 92 50
Internet www.acculux.de
e-Mail [email protected]
Bedienungsanleitung
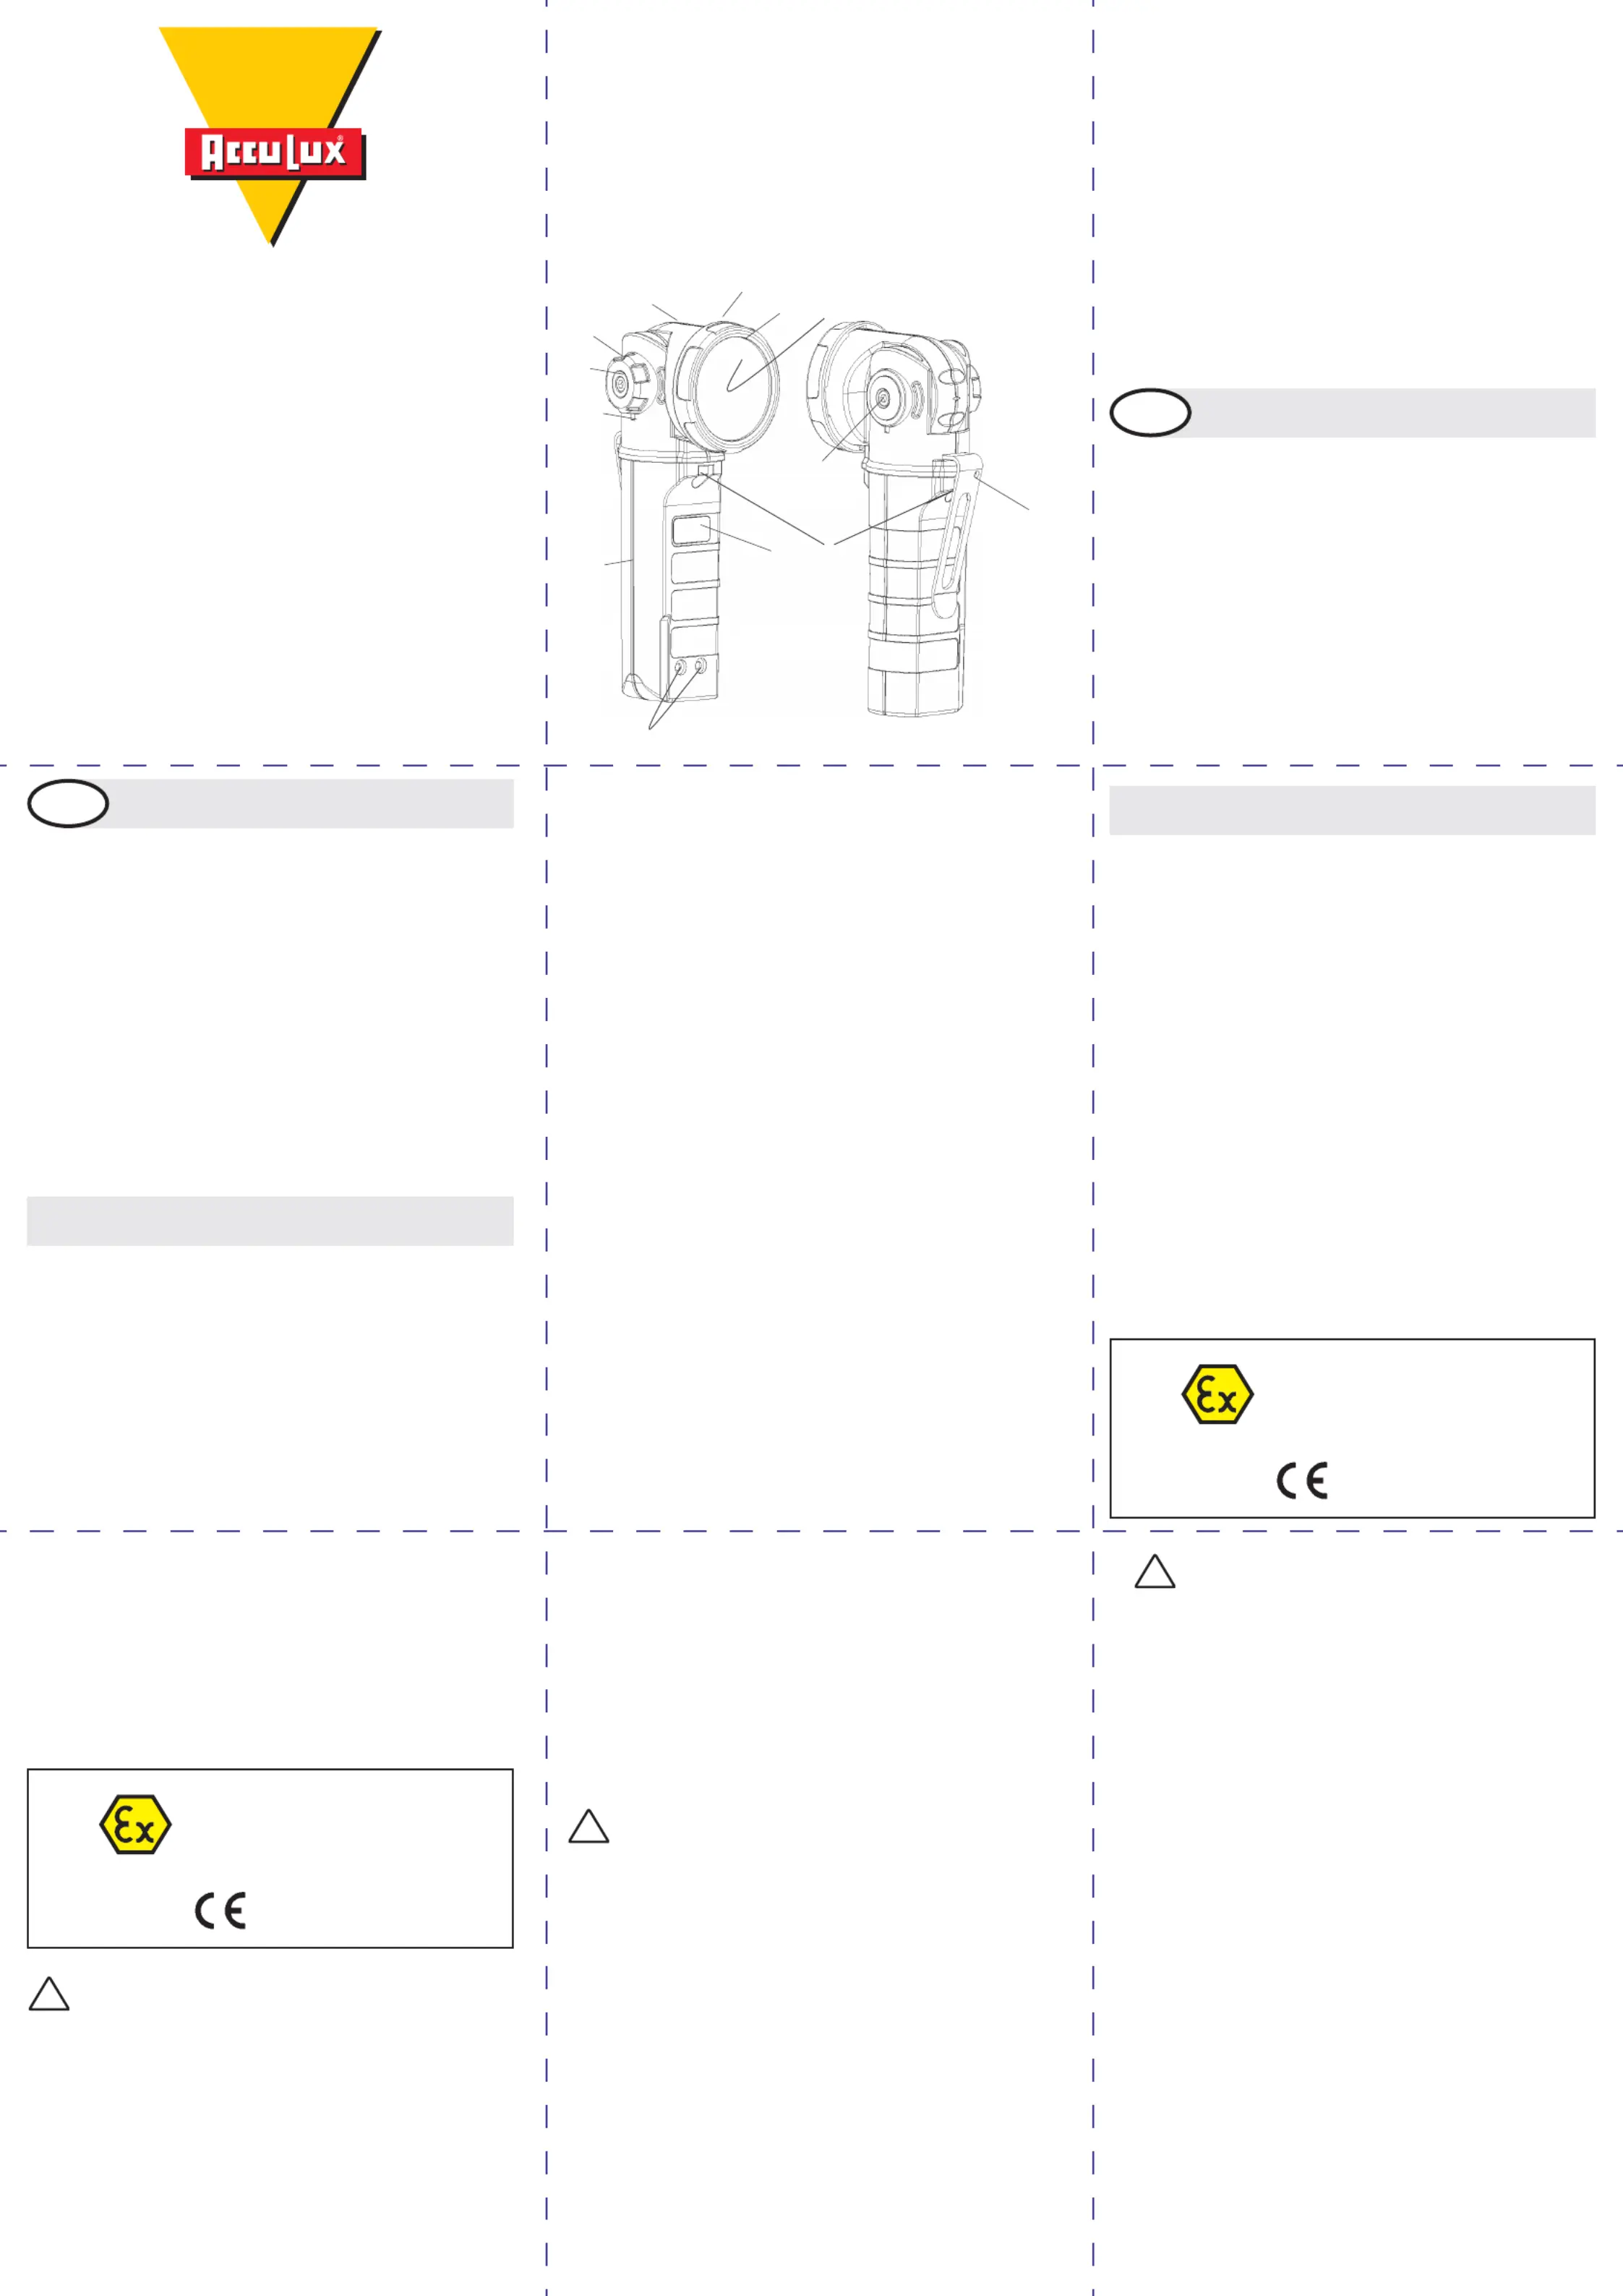
Das Gehäuse der Handleuchte besteht aus dem Gristück (09),
Lagerbock (10) und Schwenkkopf (16). Ein Befestigungsbügel (07)
befi ndet sich an der Rückseite des Gehäuses.
Der Schwenkkopf (16) ist auf dem Lagerbock (10) drehbar gelagert
und mittels der Schrauben (01) und (03) befestigt. Der Schalter (36)
ist drehbar am Lagerbock (10) angeordnet.
Das Schauglas (26) für die Displayanzeige befindet sich im Gris-
tück (09). Die Streuscheibe (12) ist mit dem Ring (13) am Schwenk-
kopf (16) befestigt.
Auf der LED-Platine (11) befinden sich zwei Leuchtdioden mit
Reflektoren/LED-Optiken (33). Akku (31) und HL25-Ex-Platine (30)
befi nden sich im Griffstück (09).
Zwei Innensechskantschrauben (27) für Imbus Gr. 4 zum Önen
vom Gehäuse für Akkuaustausch außerhalb von den Exbereichen.
Zwei Ladekontakte (28).
Technische Daten
Allgemeine Angaben
Abmessungen 203 x 48 x 48 mm
Masse 0,43 kg
Schutzgrad entsprechend IEC 60529 IP67
Umgebungstemperaturbereich – 20°C … +40°C
Elektrische Daten
Bemessungsspannung DC 12 V …. 30 V
Maximale Spannung 30 V
Ladestrom 1 A
Nennspannung des integrierten Akkus 3.7 V
Leerlaufspannung 4.3 V
Akku-Kapazität
Li-Ionen Akku Typ 458810 4.6 Ah
Li-Ionen Akku Typ 458820 5.0 Ah
Betriebszeit (5 h Hauptlampe, 1 h Pilotlampe) 6 h
Ladedauer 6 h
Kennzeichnung
II 2 G Ex ib IIC T4
II 2 D Ex ibD 21 T135°C
TÜV-A 10 ATEX 0006
0408
!
WARNUNG – Nicht im explosionsgefährdeten
Bereich aufladen!
Zulässige Verwendung
Diese eigensichere Hand- und Notstromleuchte entspricht der Ge-
rätegruppe II, Gerätekategorie 2 nach EG-Richtlinie 94/9/EG. Sie
darf in Bereichen mit explosionsfähiger Atmosphäre eingesetzt wer-
den, die in den Zonen 1, 2, 21 und 22 nach EG-Richtlinie 99/92/EG
entsprechen.
Die Hand- und Notstromleuchte darf nicht verwendet werden:
- wenn sie verändert wurde,
- wenn sie beschädigt ist.
Jede Veränderung und Beschädigung kann den Explosionsschutz
aufheben.
Betrieb
Mit dem Drehschalter (36), der durchdrehbar ist, wird die Sicher-
heitsleuchte eingeschaltet.
1 Mal drehen ist Haupt-LED (Fernbereich) an.
2 Mal drehen ist Pilot-LED (Nahbereich) an.
3 Mal drehen blinkt die Haupt-LED.
4 Mal drehen ist aus.
Die Kapazitätsanzeige wird an der LCD-Anzeige in drei blauen Seg-
menten und einem rotem Segment angezeigt.
Akku laden
Die Ladestationen sind nicht explosionsgeschützt und dürfen daher
nicht in einem Bereich mit explosionsfähiger Atmosphäre aufgestellt
und betrieben werden.
Die Ladestationen sind geeignet für den Anschluss über Stecker-
netzteil input 230 V AC und output 15 V DC, sowie 12 V DC KFZ-
Spannung oder 24 V DC KFZ-Spannung.
Ladestation (IP 20) mit drei Schrauben befestigen. Die Handleuch-
te muss in der Ladestation einrasten. Akkumulator laden, wenn nur
das rote Segment der LCD-Anzeige leuchtet. Während der Ladung
blinken die Segmente der LCD-Anzeige. Wenn der Akkumulator voll-
geladen ist, hört das Blinken der LCD-Anzeige auf.
Zum Laden an einer Fahrzeugbatterie mit 12 V sind mindestens 11,8
V, bei 24 V Batterien 23,6 V notwendig. Wenn diese Werte unter-
schritten werden, bricht das Gerät den Ladevorgang ab, um eine Tie-
fentladung der Spannungsquelle (Fahrzeugbatteie) zu vermeiden.
Dauerladung der Leuchte ist zulässig. Die Leuchte in der Ladestati-
on belassen, solange sie nicht benutzt wird.
Automatische Funktionen
Notlichtfunktionen: Die Notlichtfunktion der Leuchte wird eingeschal-
tet, wenn die Leuchte in der Ladestation eingesteckt ist, mit Drehen
am Schalter (36). Dabei wird in der LCD-Anzeige das Symbol (ren-
nendes Männchen) im blauen Bereich aktiviert.
Bei weiterem Drehen am Schalter (36) wird das Symbol im blauen
Bereich deaktiviert und die LCD-Anzeige im roten Bereich mit Sym-
bol (rennendes Männchen) aktiviert, dann ist die Notlichtfunktion
ausgeschaltet.
Wenn bei eingeschalteter Notlichtfunktion, die Spannungsversor-
gung der Ladestation ausfällt, schaltet die Hauptlampe der Not-
stromleuchte ein. Sie bleibt eingeschaltet, bis die Spannung wieder
vorhanden ist. Bei Entnahme der Leuchte aus der Ladestation bleibt
die Hauptlampe eingeschaltet, bis Sie manuell ausgeschaltet wird.
Information zum Fahrzeugeinbau
Die Ladestation ist nach RL 2009/19/EG geprüft und für den Einbau
in KFZ approbiert.
Die Ladestation ist für 12/24 V DC mit KFZ-Anschlussleitung vorge-
sehen. Der Pluspol ist mit einer Feinsicherung (F3A) abgesichert.
Wartung und Reparatur
!
WARNUNG
Durch fehlerhafte Wartungs- und Reparaturarbeiten kann der Explo-
sionsschutz verloren gehen. Nur erfahrenes Personal darf die Leuch-
te prüfen, warten und instand setzen. Bei der Ausbildung müssen
diesem Personal Kenntnisse über die verschiedenen Zündschutzar-
ten und Installationsverfahren, einschlägige Regeln und Vorschriften
sowie die allgemeinen Grundsätze der Bereichseinteilung vermittelt
werden EN 60079-19. Wartungs- und Reparaturarbeiten ausschließ-
lich außerhalb des explosionsgefährdeten Bereichs ausführen.
Akkumulator austauschen
Die Hand- und Notstromleuchte darf keinesfalls in Bereichen mit
explosionsfähiger Atmosphäre geönet werden. Das Hinweisschild
mit den zulässigen Akkutypen und der Artikelnummer 458810 oder
458820 ist auf den Akkus vermerkt.
Akku wie folgt wechseln:
- Die Hand- und Notstromleuchte vom Ladegerät trennen und
ausschalten.
- Die zwei Innensechskantschrauben (27) mit Impus Gr.4 am
Gehäuse (09,10) önen.
- Den zweipoligen Akkustecker an der Platine (30) zusammen-
drücken und abziehen.
(28)
(10)
(09)
(16)
(
03)
(01)
(36)
(07)
(26) (27)
(12)(11)
(13)
Operating Instructions
The housing of the hand lamp is comprised of the handle (09),
bearing block (10) and the swivel head (16). A fastening clip (07) is
located at the rear of the housing.
The swivel head (16) swivels in the bearing block (10) and is faste-
ned by means of the screws (01) and (03). The rotary switch (36) is
located on the bearing block (10).
The sight glass (26) for the display is located on the handle (09).
The diuser (12) is fastened to the swivel head (16).
Two light emitting diodes with refl ectors/LED optics (33) are located
on the LED board (11). The rechargeable battery (31) and HL25-Ex
board (30) are housed inside the handle (09).
Outside explosion protected areas, the housing can be opened to
replace the rechargeable battery by removing two socket-head bolts
(27) for socket key size 4. Two charge contacts (28).
Technical data
General information
Dimensions 203 x 48 x 48 mm
Mass 0.43 kg
Degree of protection to IEC 60529 IP67
Ambient temperature range – 20°C … +40°C
Electrical data
Rated voltage DC 12 V …. 30 V
Maximum voltage 30 V
Charge current 1 A
Rated voltage of the integrated rechargeable battery 3.7 V
Idling voltage 4.3 V
Battery capacity
Li-ion battery, type 458810 4.6 Ah
Li-ion battery, type 458820 5.0 Ah
Operating time (5 h main lamp, 1 h pilot lamp) 6 h
Charging time 6 h
Labelling
II 2 G Ex ib IIC T4
II 2 D Ex ibD 21 T135°C
TÜV-A 10 ATEX 0006
0408
!
WARNING – Do not charge in areas with
potentially explosive atmosphere!
Admissible operation
This intrinsically safe hand and emergency lamp conforms to device
group II, device category 2 according to EC directive 94/9/EC.
It may be used in areas with potentially explosive atmosphere, con-
sidered zones 1, 2, 21 or 22 according to EC directive 99/92/EC.
The hand and emergency lamp must not be used:
- if it has been altered,
- if it is damaged.
Any alteration or damage may compromise explosion protection.
Operation
The lamp is switched on at the infi nitely rotating rotary switch (36).
Turning it once switches the main LED (long-distance range) on.
Turning it twice switches the pilot LED (short-distance range) on.
Turning it three times causes the main-LED to flash.
Turning it a fourth time switches the lamp o again.
The capacity is indicated by the LCD with three blue and one read
segment.
Charging the battery
The charging stations are not explosion protected and must there-
fore not be installed or operated in areas with potentially explosive
atmosphere.
The charging stations are meant for connection to a plug-in charger
with 230 V AC supply and 15 V DC output voltage as well as for 12
V DC or 24 V DC vehicle on-board supply.
Fasten the charging station (IP 20) with three screws. The hand
lamp must snap into place in the charging station. Charge the batte-
ry when only the red segment of the LCD lights up. During charging,
the segments of the LCD are flashing. When the battery is fully char-
ged, the LCD stops fl
ashing.
GB
- Den vorhandenen Akku aus den Führungsschienen herausziehen.
- Den neuen Akku mit den vorstehenden Artikelnummern in die
Führungsschienen einsetzen.
- Den zweipoligen Akkustecker an der Platine (30) in die Buchse
rastend einstecken.
- Den Dichtungsring (beiliegend beim Akku) am Gehäuse (10)
austauschen.
- Die Hand- und Notstromleuchte in umgekehrter Reihenfolge
wieder verschließen.
- Vorsicht, keine Leitungen quetschen.
- Sicherstellen, dass die zwei Schrauben angezogen sind.
Außenansichten HandleuchteTyp HL 25 EX
Exterior views of hand-held lamp, type HL 25 EX
Vues extérieures de la lampe portative type HL 25 EX
Produktspecifikationer
| Varumärke: | AccuLux |
| Kategori: | Ficklampa |
| Modell: | HL 25 EX |
Behöver du hjälp?
Om du behöver hjälp med AccuLux HL 25 EX ställ en fråga nedan och andra användare kommer att svara dig
Ficklampa AccuLux Manualer

22 Juli 2025
22 Juli 2025
22 Juli 2025
22 Juli 2025
22 Juli 2025
22 Juli 2025
22 Juli 2025
22 Juli 2025
22 Juli 2025
9 December 2024
Ficklampa Manualer
Nyaste Ficklampa Manualer
1 April 2026
30 Mars 2026
28 Mars 2026
28 Mars 2026
27 Mars 2026
26 Mars 2026
25 Mars 2026
25 Mars 2026
24 Mars 2026
23 Mars 2026