Axxess AXPIO-JT1 Bruksanvisning
Axxess ej kategoriserat AXPIO-JT1
Läs gratis den bruksanvisning för Axxess AXPIO-JT1 (16 sidor) i kategorin ej kategoriserat. Guiden har ansetts hjälpsam av 19 personer och har ett genomsnittsbetyg på 4.9 stjärnor baserat på 6 recensioner. Har du en fråga om Axxess AXPIO-JT1 eller vill du ställa frågor till andra användare av produkten? Ställ en fråga
Sida 1/16
AXPIO-JT1
INSTALLATION INSTRUCTIONS
AxxessInterfaces.com © COPYRIGHT 2022 METRA ELECTRONICS CORPORATION REV. 7/5/22 INSTAXPIO-JT1
TOOLS & INSTALLATION ACCESSORIES REQUIRED
• Panel removal tool • Phillips screwdriver
• Torx screwdriver
TABLE OF CONTENTS
Dash Disassembly ..................................................2
Kit Assembly
- Radio provision ...................................................2
- Pioneer Modular DDIN radio provision ..............3
AXXESS Interface Installation ...........................4-16
Jeep
Gladiator JT 2020-Up
Note: This kit will function in both Single-Zone and Dual-Zone vehicles:
• All HVAC functions will be retained.
•
Single-Zone vehicles will only get status feedback of the HVAC functions,
while Dual-Zone vehicles can also be controlled through the radio screen.
• Compass is only retained on vehicles equipped with the UConnect 3
(5" touchscreen).
• The External Speaker is only required in vehicles with safety group features.
Attention! Designed specifically for Pioneer’s DMH-W4600NEX/WC4660NEX.
Pioneer 9" DMH-WC6600NEX will require the Metra Floating Mount Kit
109-UN02. (sold separately)
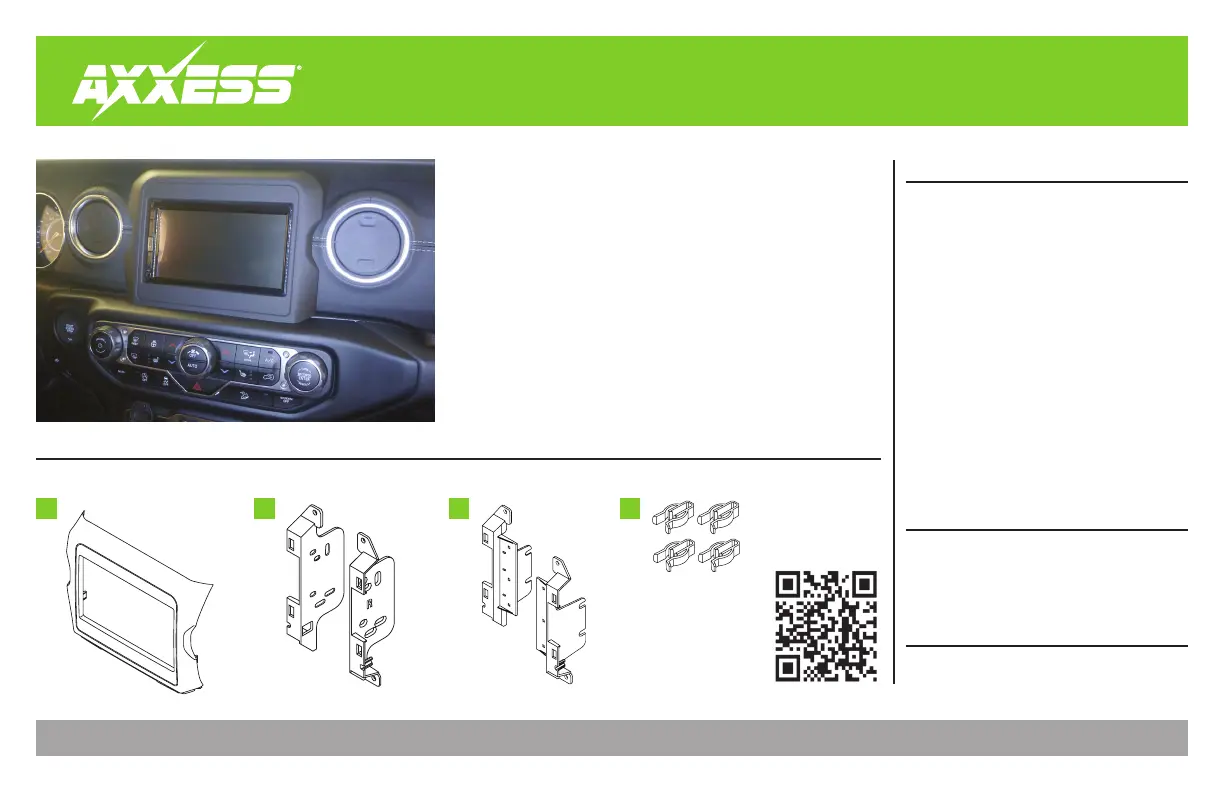
KIT COMPONENTS
• A) Radio bezel • B) Shallow mount brackets • C) Modular radio brackets • D) Panel clips (4)
ABCD
WIRING & ANTENNA CONNECTIONS
Wiring Harness: Included with Kit
Antenna Adapter:
Included with Kit
GPS
Antenna Adapter:
Included with Kit
Visit AxxessInterfaces.com for up-to-date
vehicle specific applications.
Product Info
Produktspecifikationer
| Varumärke: | Axxess |
| Kategori: | ej kategoriserat |
| Modell: | AXPIO-JT1 |
Behöver du hjälp?
Om du behöver hjälp med Axxess AXPIO-JT1 ställ en fråga nedan och andra användare kommer att svara dig
ej kategoriserat Axxess Manualer

4 Mars 2026
9 Oktober 2025
8 Oktober 2025
8 Oktober 2025
8 Oktober 2025
8 Oktober 2025
8 Oktober 2025
8 Oktober 2025
8 Oktober 2025
8 Oktober 2025
ej kategoriserat Manualer
Nyaste ej kategoriserat Manualer
3 April 2026
3 April 2026
3 April 2026
3 April 2026
3 April 2026
3 April 2026
3 April 2026
3 April 2026
3 April 2026