Denver CCT-5000 Bruksanvisning
Läs gratis den bruksanvisning för Denver CCT-5000 (5 sidor) i kategorin Dashcam. Guiden har ansetts hjälpsam av 11 personer och har ett genomsnittsbetyg på 4.5 stjärnor baserat på 6 recensioner. Har du en fråga om Denver CCT-5000 eller vill du ställa frågor till andra användare av produkten? Ställ en fråga
Sida 1/5

User Manual
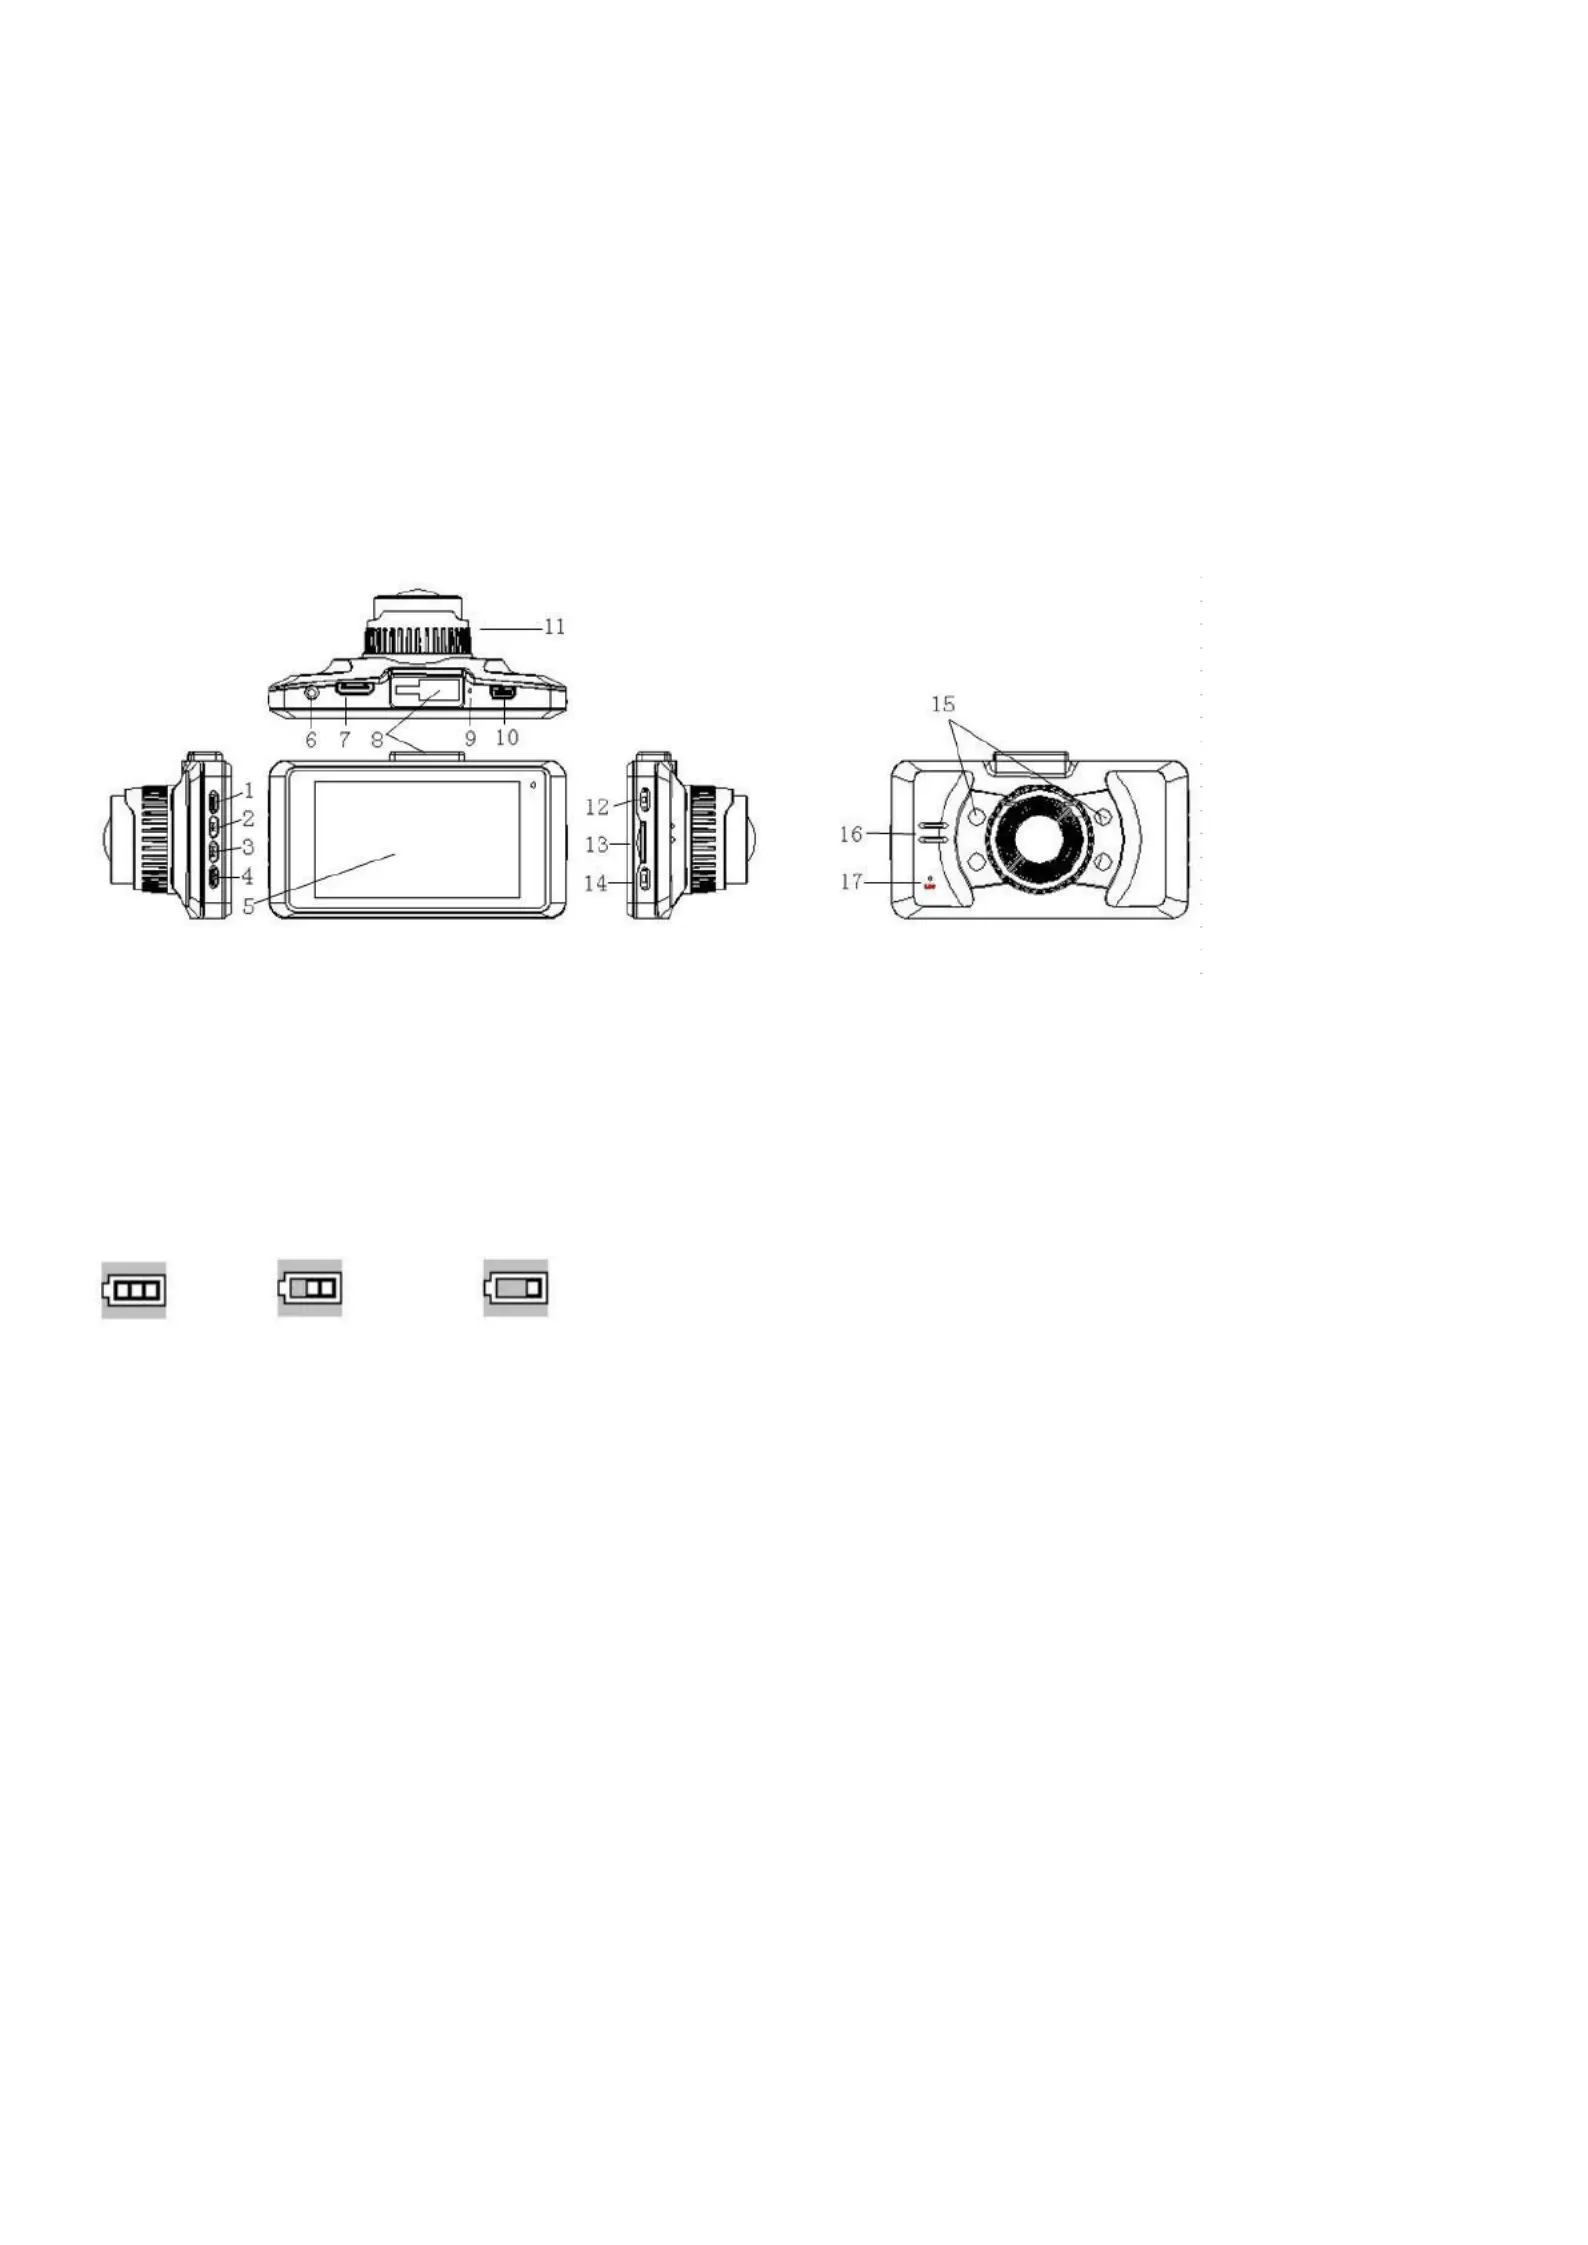
Appearance and Functional Description
1. Menu key
2. Up key
3. Down key
4. Mode key
5. Screen
6. GPS port
7. HDMI port
8. Bracket base
9. Reset
10. USB port
11. Lens
12. Power key
13. TF card slot
14. OK key
15. Infrared light
16. Speaker
17. MIC
Power capacity
Full Middle Low
1. Directly connect the car charger to the USB port of the DVR, then the device will automatically turn on and charge the
battery. In charging, the charge indicator will be on; after charge is over, it will be off.
2. To charge the device with USB, be sure to connect one end of the USB data cable to PC and the other end to the DVR. In
charging, the charge indicator will be on; after charge is over, it will be off.
Installation and Removal of TF Card
1. In the direction as indicated, insert the TF card into the slot until it is held firmly.
2. To take the TF card out, slightly press the TF card to eject it out.
Note:
1. Observe the direction to insert the TF card; if the direction is reverse, the device and the TF card may be damaged.
2. When the TF card is inserted into the device, the machine will set the TF card as preset storage unit and the data in the
original TF card will be unreadable.
3. If the TF card is incompatible with the device, please insert the card again or replace it for retry.
4. Max. 32G supported.
5. Always use a high-speed TF card (CLASS4 above).
Use Guidelines
DVR On/Off
1. Press the On/O key around 1s to switch on the device and 3s to switch it off.
2. Insert the device into the car charger to automatically switch on and turn o the card charger to automatically switch it off.

3. Press the On/Off key to open the night view ll light.
Switch Working Modes
1. Press the Mode key to switch Video/Image/playback, as video mode while as image mode. These icons are
screen on the left upper corner of the screen.
How to Enter System Setup Option
In video or image mode, press the Menu key once and again to enter the “System Setup” option,
* Date/Time: You may set date/time.
* Auto Switch-off: o/1 minute/3minutes.
* Key tone: on/off.
* Language: You may set the desired language menu.
* Power frequency: 50Hz/60Hz
* Format: Format the card.
* Default settings: cancel/OK
* Power saver: Off/10s/30s/1min.
* Version: Software version number.
How to Take Videos and Set Video Options
1. Take Videos
When the DVR enters the video mode and the icon occurs on the left upper corner of the screen, press the OK key to
start recording; in recoding videos, the icon on the left upper corner of the screen will ash. Press the OK key to stop and
then the icon on the left upper corner of the screen will disappear. In video taking process, press the UP key as shortcut
key to activate/inactivate sound, press the DOWN key as shortcut key to have emergency lock; and press the Mode key to
switch off the screen.
2. Set Video Options (Press power key >Menu key)
* Resolution: 1080FHD 1920*1080P , 1080P 1440*1080P , 720P 1280*720P , 480P 640*480 . ( ) ( ) ( ) ( )
* Cyclic video: off/3min/5min/10min.
* EV: -2.0 -5/3 -4/3 -1.0 -2/3 -1/3 +0.0 +1/3 +2/3 +1.0 +4/3 +5/3 +2.0
* Moon detecon: On/O. When car is parked and moon detecon turned On, DVR will detect moving objects in front of
car and trigger recording automacally, or stay at standby state if there’s no object moving.
* Video sound: On/Off.
* Date mark: On/Off.
* G-Sensor: O/1G/2G. Once G-sensor turned ON to 1G or 2G and triggered, there’s an icon of lock appearing on LCD screen ‘ ’
and current video le will be locked as important le. Such locked les won t be recycled by loop recording funcon. ’
Take Photo and Set Photos
1. Press the Power On/Off key to enter the video mode; press the Mode key to enter the image mode indicated with the icon
on the left upper corner of the screen.
2. When the OK key is pressed, when the sound “click” is heard, the image preview waiting will occur. About 1s later, the
shooting will be complete. In shooting, be sure to hold the CVR rmly without shock so as to avoid affecting photo quality.
3. Set Photo Options (Press power key >Mode key>Menu key)
* Shooting mode: Single/Self-timer (2s/5s/10s)/Continuous
*Resolution:12M(4032x3024)/10M(3648x2736)/8M(3264x2448)/5M(2592x1944)/3M(2048x1536)/1.3M(1280x960)

* Cont Shot: On/Off.
* Image quality: Fine/ High/ Normal
* Sharpness: Strong/Standard/Soft
* White balance: Auto/Daylight/Cloud/Tungsten/Fluorescence
* Color: Standard/Black & White/Brown
* ISO: Auto/00/200/400
* Exposure Compensation: -2.0 -5/3 -4/3 -1.0 -2/3 -1/3 +0.0 +1/3 +2/3 +1.0 +4/3 +5/3 +2.0
* Face identication: O/ Standard/Smile
* Anti-hand shock: On/Off
* Fast preview: Off/2s/5s.
* Date mark: Off/Date/(Date/Time)
Playback Mode (After switching on the device, press the Mode key twice to enter the playback mode).
In the playback mode, press the DOWN key to enter the thumbnail interface, press the UP/DOWN key to choose the photo or
video to be previewed; the icon appearing on the left upper corner indicates video les while as image les.
Choose the desired video le and press the OK key to enter the preview of single video and press the OK key again to play the
video; in such case, press the UP/DOWN key to turn up/down the volume. Note: The volume +/- in such case will aect the
strength of the key tone.
Delete
In playback mode, under thumbnails, choose the le to be deleted and press the OK key to enter single preview, press the Menu
key again to have the Delete/Protect menu appearing. Choose Delete and press the OK key to have Delete the current and
Delete all; choose Delete the current to delete the currently chosen le and choose Delete all to delete all videos and images.
Protect
In playback mode, under thumbnails, choose the le to be deleted and press the OK key to enter single preview, press the Menu
key again to have the Delete/Protect menu appearing. Choose Protect and press the OK key to display Lock the current, Unlock
the current, Lock all and Unlock all. The unlocked le cannot be deleted (except formatting). Note: The G-Sensor locked le
may be deleted via menu unlocking.
Tip:
1. In any of the modes of video/image/playback, you may press the Mode key to switch such modes circularly.
Data Backup
USB Backup Mode
Connect the DVR and PC with the USB cable, then the device will automatically power on and the icon MEMORY/CAMEAR
will appear, choose “Memory” and press the OK key to confirm; switch on the PC, then one mobile disc will appear on “My
Computer” on the desktop and you may find the desired file in the Mobile Disc/DCIM folder.
Remarks:
1. PC operation system: Windows 2000/XP/Vista/Windows 7 or above.
2. Choose “Camera”, then the DVR may be used as a camera.
3. Remove the USB cable to turn off the DVR.
Computer playback
USB cable connect the camera and computer, machine start automatically, select the enter the MSDC mode, open the
desktop "my computer" a removable disk appears, use dedicated AP player To play, double-click the
CarDVR.exe to open play page
Click the icon to open, select the le you want to play, and add the le to the AP playlist
Produktspecifikationer
Varumärke: | Denver |
Kategori: | Dashcam |
Modell: | CCT-5000 |
Behöver du hjälp?
Om du behöver hjälp med Denver CCT-5000 ställ en fråga nedan och andra användare kommer att svara dig
Dashcam Denver Manualer
15 Juli 2025
15 Juli 2025
6 September 2024
24 Augusti 2024
22 Augusti 2024
16 Augusti 2024
16 Augusti 2024
8 Augusti 2024
6 Augusti 2024
3 Augusti 2024
Dashcam Manualer
- Dashmate
- Ednet
- Nedis
- DOD
- Mobileye
- Jensen
- Rollei
- Kogan
- KJB Security Products
- Lamax
- ProUser
- Osram
- Steren
- Salora
- Boss
Nyaste Dashcam Manualer
16 Juli 2025
16 Juli 2025
16 Juli 2025
15 Juli 2025
15 Juli 2025
15 Juli 2025
15 Juli 2025
15 Juli 2025
15 Juli 2025
15 Juli 2025