Groen BPP-G Bruksanvisning
Groen
ej kategoriserat
BPP-G
Läs gratis den bruksanvisning för Groen BPP-G (22 sidor) i kategorin ej kategoriserat. Guiden har ansetts hjälpsam av 2 personer och har ett genomsnittsbetyg på 4.4 stjärnor baserat på 1.5 recensioner. Har du en fråga om Groen BPP-G eller vill du ställa frågor till andra användare av produkten? Ställ en fråga
Sida 1/22

OPERATOR MANUAL
IMPORTANT INFORMATION, KEEP FOR OPERATOR
888-994-7636, fax 888-864-7636
goren.com
THIS MANUAL MUST BE RETAINED FOR FUTURE REFERENCE. READ,
UNDERSTAND AND FOLLOW THE INSTRUCTIONS AND WARNINGS CONTAINED
IN THIS MANUAL.
FOR YOUR SAFETY Instructions to be followed in the event user smells gas.
This information shall be obtained by consulting your local gas supplier. As
a minimum, turn off the gas and call your gas company and your authorized
service agent. Evacuate all personnel from the area. Do not store or use
gasoline or other ammable vapors and liquids in the vicinity of this or any
other appliance
WARNING Improper installation, adjustment, alteration, service or
maintenance can cause property damage, injury or death. Read the
installation, operating and maintenance instructions thoroughly before
installing or servicing this equipment.
NOTIFY CARRIER OF DAMAGE AT ONCE It is the responsibility of the
consignee to inspect the container upon receipt of same and to determine
the possibility of any damage, including concealed damage. Groen suggests
that if you are suspicious of damage to make a notation on the delivery
receipt. It will be the responsibility of the consignee to le a claim with the
carrier. We recommend that you do so at once.
Manufacture Service/Questions 888-994-7636.
PART NUMBER 174839, REV. H (03/25)
This manual provides information for:
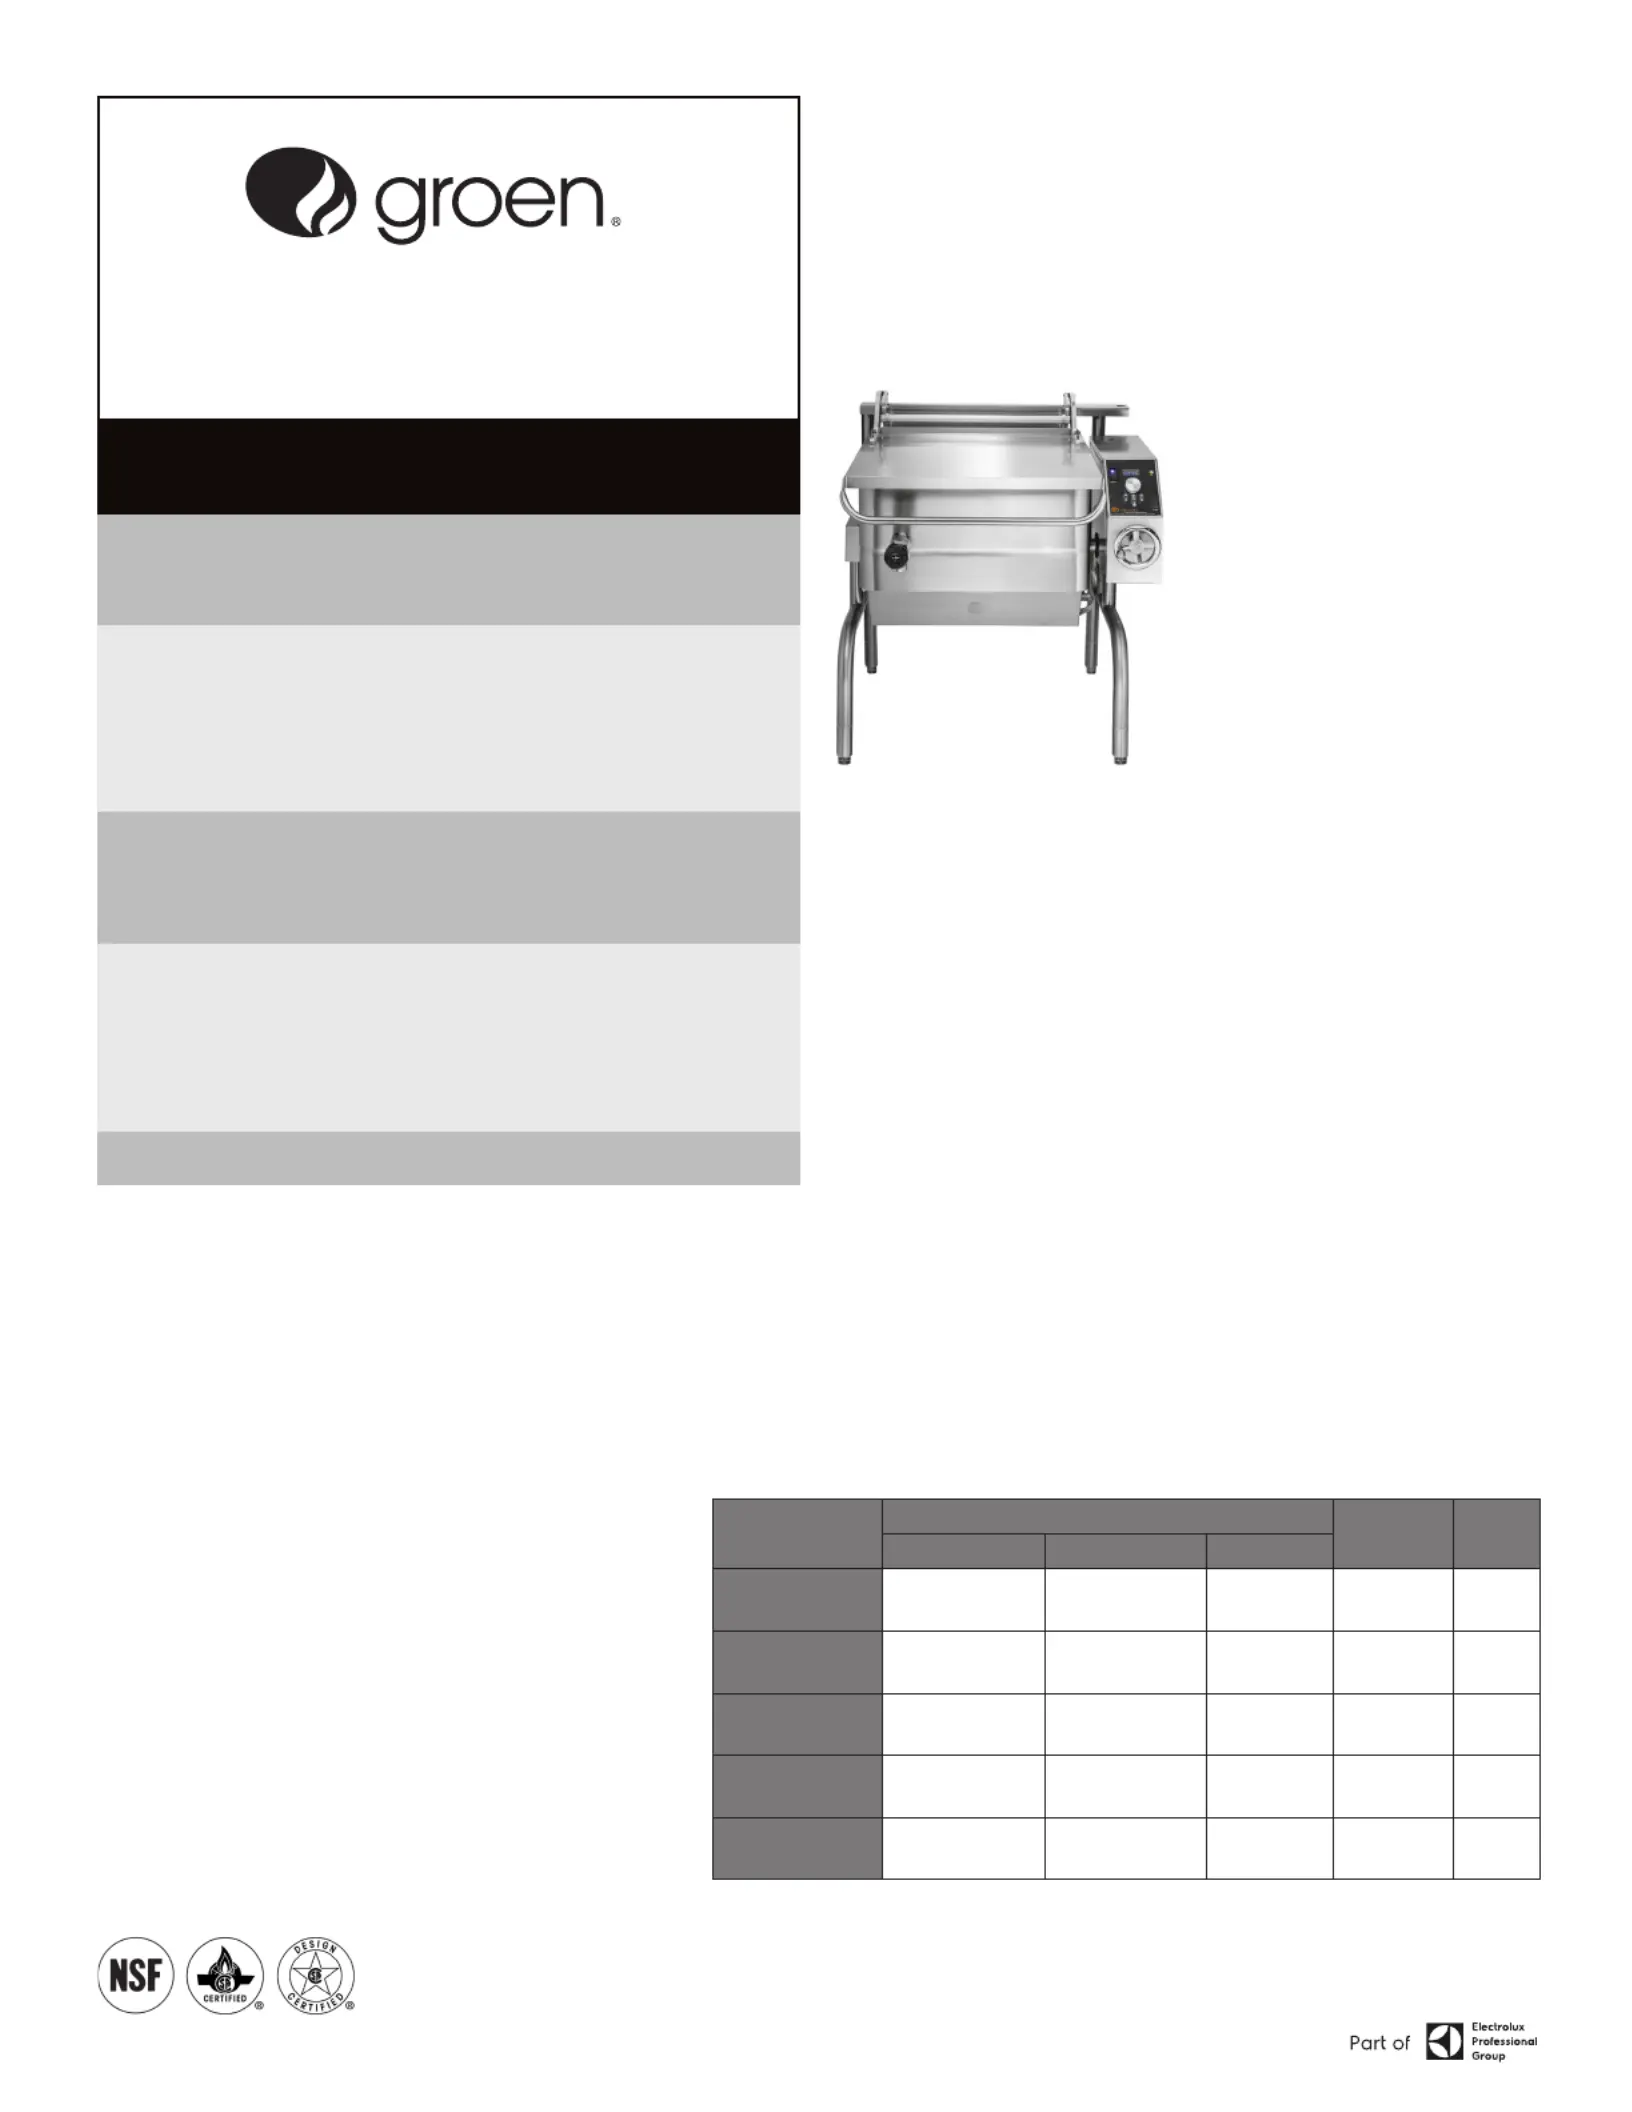
ERGONOMIC TILTING BRAISING PAN
MODELS BPM-15/30/40G(C,A,C2T™) &
BPP-30/40G(C,A,C2T™) DOMESTIC
EQUIPMENT DESCRIPTION
Groen gas-heated Tilting Braising Pans provide a stainless steel
pan equipped with patented heat transfer ns, burner/combustion
chamber, hand-operated or electric powered tilting mechanism,
electronic ignition, electronic controls, and hinged cover. The
appliance serves as braising pan, griddle, fry pan, oven, kettle,
bainmarie and food warmer/server, can be adapted for use as a non-
pressure steamer and can be used to stir-fry, reheat and saute foods.
The pan body is made from heavy-duty stainless steel welded into
one solid piece, with a polished interior and exterior. A pouring
lip is welded to the front wall. The cooking surface is a stainless
steel clad plate tted with welded heat transfer ns which assure
uniform heat transfer over the entire surface. The gas burner/
combustion chamber supplies the heat.
An easily operated worm and gear mechanism tilts the pan and
provides precise control for pouring or dumping the contents of
the pan. This hand-wheel controlled mechanism is located in a
stainless steel console to the right of the pan body. For models with
electric power tilt, a switch operates an electric motor that starts
and stops the pan tilt smoothly. To assist cleaning, the pan body
can be tilted past the vertical position. When the pan is tilted, the
burners shut off automatically.
The electronic control provides automatic control of cooking temperature. Operating the
temperature dial on the front of the control console sets the pan temperature.
A heavy gauge, one-piece, stainless steel cover with a condensate drip shield on the rear edge
is standard on the Braising Pan. A fully enclosed, torsion bar type counterbalance provides
easy operation to open the cover and to maintain it open at any position. The cover opens to
the back and is hinged to the frame, so it moves independently of the pan body.
The braising pan is mounted on an open-leg frame fabricated from tubular stainless steel.
Model
PAN DIMENSIONS
Ignition Tilt
Left to Right Front to Rear Depth
BPM-15GC/GA/
GC2T
18-1/8” (460mm) 28-1/4” (718mm) 8” (203mm) Elec. Spark Manual
BPM-30GC/GA/
GC2T
26-1/4” (667mm) 28-1/4” (718mm) 10” (254mm) Elec. Spark Manual
BPP-30GC/GA/
GC2T
26-1/4” (667mm) 28-1/4” (718mm) 10” (254mm) Elec. Spark Power
BPM-40GC/GA/
GC2T
35-3/4” (908mm) 28-1/4” (718mm) 10” (254mm) Elec. Spark Manual
BPP-40GC/GA/
GC2T
35-3/4” (908mm) 28-1/4” (718mm) 10” (254mm) Elec. Spark Power
REFERENCES
CANADIAN STANDARDS ASSOCIATION
8501 East Pleasant Valley Road
Cleveland, Ohio 44131
AMERICAN NATIONAL STANDARDS INSTITUTE
1403 Broadway
New York, New York 10018
CANADIAN GAS ASSOCIATION
55 Scarsdale Road
Don Mills, Ontario M3B 2 R3
NATIONAL FIRE PROTECTION ASSOCIATION
60 Battery March Park
Quincy, Massachusetts 02269
Z83-11 - Gas Foodservice Equipment
Z223.1 - National Fuel Gas Code
NFPA/54 - Installation of Gas Appliances
& Gas Piping
NFPA/70 - The National Electrical Code
NFPA/96 - Ventilating Hoods
NSF INTERNATIONAL
789 N. Dixboro Road
P.O. Box 130140
Ann Arbor, Michigan 48113-0140
UNDERWRITERS LABORATORIES, INC.
333 Pngsten Road
Northbrook, Illinois 60062
Information contained in this document is known to be current and accurate at the time of printing/creation. Reference our product line website for the most
updated product information and specications. © 2025 Electrolux Professional, Inc. All Rights Reserved.

2 OM-BPM-15/30/40G(C,A,C2T™) & BPP-30/40G(C,A,C2T™) Domestic
IMPORTANT - READ FIRST - IMPORTANT
WARNING: DISCONNECT POWER BEFORE SERVICING. FAILURE TO DISCONNECT
COULD RESULT IN ELECTROCUTION AND DEATH.
CAUTION: UNIT WEIGHS 470 TO 560 LB. (191 TO 255 KG). FOR SAFE HANDLING,
INSTALLER SHOULD OBTAIN HELP AS NEEDED, OR EMPLOY APPROPRIATE
MATERIALS HANDLING EQUIPMENT (SUCH AS A FORKLIFT, DOLLY, OR
PALLET JACK) TO REMOVE THE UNIT FROM THE SKID AND MOVE IT TO THE
PLACE OF INSTALLATION.
WARNING: INSTALLATION OF THE BRAISING PAN MUST BE DONE BY PERSONNEL
QUALIFIED TO WORK WITH GAS AND ELECTRICITY. IMPROPER
INSTALLATION CAN RESULT IN INJURY TO PERSONNEL AND/OR DAMAGE
TO EQUIPMENT.
WARNING: THIS UNIT IS DESIGNED FOR COMMERCIAL USE. NEVER USE HOME
OR RESIDENTIAL GRADE GAS CONNECTIONS. THEY DO NOT MEET
COMMERCIAL GAS CODES AND COULD BE HAZARDOUS.
DANGER: ELECTRICALLY GROUND THE UNIT AT THE TERMINAL PROVIDED. FAILURE
TO GROUND UNIT COULD RESULT IN ELECTROCUTION AND DEATH.
WARNING: KEEP THE APPLIANCE AREA FREE AND CLEAR OF COMBUSTIBLE
MATERIALS. FAILURE TO DO SO COULD RESULT IN FIRE OR PROPERTY
DAMAGE.
CAUTION: BE SURE ALL OPERATORS READ, UNDERSTAND AND FOLLOW THE
OPERATING INSTRUCTIONS, CAUTIONS AND SAFETY INSTRUCTIONS
CONTAINED IN THIS MANUAL.
CAUTION: THE BRAISING PAN IS NOT INTENDED FOR USE AS A DEEP-FAT FRYER.
SHALLOW-FRYING IS PERMISSIBLE AS LONG AS THE OIL LEVEL DOES
NOT EXCEED THE HEIGHT MARK ON THE LOWER REAR WALL (2”, 50MM
MAXIMUM). SEE THE USER INSTRUCTIONS SECTION FOR SPECIFIC
DETAILS.
CAUTION: KEEP FLOORS IN BRAISING PAN WORK AREA CLEAN AND DRY. IF SPILLS
OCCUR, CLEAN IMMEDIATELY TO AVOID THE DANGER OF SLIPS OR FALLS.
WARNING: WHEN TILTING BRAISING PAN FOR PRODUCT TRANSFER:
1) USE CONTAINER DEEP ENOUGH TO CONTAIN AND MINIMIZE PRODUCT
SPLASHING.
2) PLACE CONTAINER ON STABLE, FLAT SURFACE, AS CLOSE TO PAN AS
POSSIBLE.
3) STAND TO SIDE OF PAN WHILE POURING — NOT DIRECTLY IN POUR PATH
OF HOT CONTENTS.
4) RETURN PAN BODY TO LEVEL POSITION AFTER CONTAINER IS FILLED OR
TRANSFER IS COMPLETE.
5) DO NOT OVERFILL CONTAINER, AVOIDING DIRECT SKIN CONTACT WITH
HOT CONTAINER AND ITS CONTENTS.
WARNING: DO NOT HEAT EMPTY PAN FOR MORE THAN 5 MINUTES AT A SETTING HIGHER
THAN 300ºF.
WARNING: IF THE PAN CONTAINS ITEMS IN HOT LIQUIDS SUCH AS SAUCE OR MELTED FAT,
THEY CAN SLIDE FORWARD SUDDENLY DURING TILTING AND CAUSE THE HOT
LIQUID TO SPLASH OUT.
WARNING: AVOID ALL DIRECT CONTACT WITH HOT FOOD PRODUCT OR WATER IN THE
PAN. DIRECT CONTACT COULD RESULT IN SEVERE BURNS.
WARNING: IT IS RECOMMENDED THAT WATER AND SOLUTIONS BE KEPT OUT OF
CONTROLS AND BURNERS. DO NOT USE HIGH PRESSURE SPRAY DIRECTLY ON
THE CONTROL CONSOLE, ELECTRICAL CONNECTIONS AND BURNERS. USE A
GARDEN HOSE SPRAY CONNECTED TO CITY WATER SUPPLY.
CAUTION: MOST CLEANERS ARE HARMFUL TO THE SKIN, EYES, MUCOUS MEMBRANES
AND CLOTHING. PRECAUTIONS SHOULD BE TAKEN TO WEAR RUBBER GLOVES,
GOGGLES OR FACE SHIELD AND PROTECTIVE CLOTHING. CAREFULLY READ THE
WARNINGS AND FOLLOW THE DIRECTIONS ON THE LABEL OF THE CLEANER
TO BE USED. FAILURE TO DISCONNECT COULD RESULT IN ELECTROCUTION
AND DEATH.
WARNING: BEFORE REPLACING ANY PARTS, DISCONNECT THE UNIT FROM THE ELECTRIC
POWER SUPPLY AND CLOSE THE MAIN GAS COCK. ALLOW FIVE MINUTES FOR
UNBURNED GAS TO VENT.
CAUTION: USE OF ANY REPLACEMENT PARTS OTHER THAN THOSE SUPPLIED BY
AUTHORIZED DISTRIBUTORS CAN CAUSE INJURY TO THE OPERATOR AND
DAMAGE TO THE EQUIPMENT AND WILL VOID ALL WARRANTIES.
IMPORTANT
: SERVICE PERFORMED BY OTHER THAN GROEN AUTHORIZED SERVICE AGENT
WILL VOID ALL WARRANTIES.
NOTICE: IT IS RECOMMENDED THAT AN INSTANT-READ THERMOMETER BE USED TO
CHECK THE INTERNAL TEMPERATURE THROUGHOUT THE COOKING PROCESS
AND AFTER THE COOKING PROCESS HAS BEEN COMPLETED TO ENSURE THE
FOOD HAS BEEN COOKED SUFFICIENTLY.
Options/accessories available with these models are:
1. Fill faucet with swing spout. (Left or right mounted) - specify single or double
pantry
2. Fill faucet with 48” or 60” spray hose assembly (left or right mounted) -
specify single or double pantry
3. Caster mounting kit
4. Flanged Feet
5. 2” Tangent draw-off (Factory-installed must
be indicated on initial order)
6. Steamer Insert set
7. Steamer Pan Carrier
8. Quick gas disconnect with restraining cable
9. Pouring Lip Strainer
10. Strainer for 2” TDO valve
PERFORMANCE DATA
Model BTU/HR KW
BPM-15GC/GA/GC2T 65,000 19.0
BPM-30GC/GA/GC2T
BPP-30GC/GA/GC2T
104,000 30.5
BPM-40GC/GA/GC2T
BPP-40GC/GA/GC2T
144,000 42.2
2” Tangent draw-off

3 OM-BPM-15/30/40G(C,A,C2T™) & BPP-30/40G(C,A,C2T™) Domestic
INSPECTION & UNPACKING
CAUTION: SHIPPING STRAPS ARE UNDER TENSION AND CAN SNAP BACK WHEN CUT.
CAUTION: UNIT WEIGHS 420 TO 560 LB (190 TO 255KG). FOR SAFE HANDLING,
INSTALLER SHOULD OBTAIN HELP AS NEEDED, OR EMPLOY APPROPRIATE
MATERIALS HANDLING EQUIPMENT (SUCH AS A FORKLIFT, DOLLY, OR
PALLET JACK) TO REMOVE THE UNIT FROM THE SKID AND MOVE IT TO THE
PLACE OF INSTALLATION.
The unit will arrive completely assembled, wrapped in protective plastic on a heavy
skid, in a heavy wooden crate. Immediately upon receipt, inspect the crate for
damage. Report any apparent shipping damage or an incorrect shipment to the
delivery agent.
When installation is to begin, get someone to assist in removing the crate. Lift it
straight up and away from the unit. Write down the model number, serial number,
and installation date of your unit, and keep this information for future reference.
Space for these entries is provided at the top of the Service Log in this manual.
(Shown is a 40-gallon model with optional 2” tangent draw-off)
Flame Observation Port
One Piece Cover
IPX6 Water Wash-down
Rated Control Console
Power
Switch
Indicator
Light
Manual Tilt
Handwheel
INSTALLATION
WARNING: THE UNIT MUST BE INSTALLED BY PERSONNEL WHO ARE QUALIFIED TO
WORK WITH GAS, ELECTRICITY AND PLUMBING. IMPROPER INSTALLATION
CAN CAUSE INJURY TO PERSONNEL AND/OR DAMAGE TO THE EQUIPMENT.
THE UNIT MUST BE INSTALLED IN ACCORDANCE WITH APPLICABLE CODES.
THE UNIT MUST BE INSTALLED BY A LICENSED PLUMBER OR GAS FITTER
WHEN INSTALLED WITHIN THE COMMONWEALTH OF MASSACHUSETTS.
WARNING: THIS UNIT IS FOR COMMERCIAL USE. NEVER USE HOME OR RESIDENTIAL
GRADE GAS CONNECTIONS. THEY DO NOT MEET GAS CODES AND COULD
BE HAZARDOUS.
WARNING: ELECTRICALLY GROUND THE UNIT AT THE TERMINAL PROVIDED. FAILURE
TO GROUND UNIT COULD RESULT IN ELECTROCUTION AND DEATH.
Install the braising pan in a well ventilated room for efcient performance. Remove
any items which might obstruct or restrict the ow of air for combustion and
ventilation. Clear all combustible material from the area directly around the unit.
1. Installation on combustible oors is allowed. Ensure minimum clearance to
combustible and noncombustible construction.
2. Install the unit under a vent hood.
Min. Clearance Recommended Clearance
Left Side 0” 2” for service, 6” when faucet is installed on left side
Right Side 0” 12-16” for service, 6” when faucet is installed on right side
Rear 3” 12” for service
3. Level the unit by adjusting the bullet feet
or oor anges on the legs. Be sure the
tilting mechanism has been turned all
the way to the horizontal position. Check
levelness with a spirit level set on the
bottom of the pan body. Anchor the rear
legs securely to the oor if oor anges
are ordered or required.
4. Complete piping to the gas service with
3/4” inch IPS pipe or approved equivalent.
5. For unit on casters, the installation shall be made with a connector that
complies with the standard for Connectors for Movable Gas Appliances, ANSI
Z21.69 - CSA 6.16. Restrain movement of the unit by attaching a cable or
chain to the eyelet provided at the back of the frame and anchor the cable or
chain to the wall or oor. Make the length and location of the cable such that
the unit cannot pull on the gas connection while the cable is connected or
quick-disconnect.
6. The gas connection for a unit on casters must be made with a quick-disconnect
device that complies with ANSI Z21.41 - CSA 6.9.
7. Core probe storage bracket (C2T models only)
a. It is recommend that the core probe storage bracket be installed on the
control console. It is not recommend that the core probe storage bracket
be installed on the pan or cover.
b. To obtain proper adhesion, the bonding surface must be unied, clean and
dry. Clean the bonding surface with rubbing alcohol and allow the surface
to dry. Next rmly apply pressure to the storage bracket to help improve
bond strength. After application, the bond strength will increase as the
adhesive ows onto the surface. At room temperature, approximately
50% of the ultimate strength will be achieved after 20 minutes, 90% after
24 hours and 100% after 72 hours.
8. Provide 120VAC, 60 HZ, 1 phase, 5 AMP electrical service (or 230VAC, 50HZ, 1
phase, 2-1/2 AMP service) as appropriate to the eld wiring control box at the
rear of the electrical console. AN ELECTRICAL GROUND IS REQUIRED. The
unit must be electrically ground in accordance with local codes, or in the
absence of local codes, with the National Electrical Code, ANSI/NFPA 70, or the
Canadian Electrical Code, CSA C22.2, or specic country codes as applicable.
9. Installation must conform with local codes or with the American National
Standard Z223, latest edition, National Fuel Gas Code. The pan should be
installed in an adequately ventilated room with a provision for adequate air
supply to the unit. The best ventilation will use a vent hood and exhaust fan.
DO NOT obstruct the ue or vent duct after installation. In Canada, installation
must conform to CAN/CGA B149 Installation Codes for Gas Appliances and
Equipment and/or local codes.
10. Adequate space for proper service and operation is required. DO NOT block
any air intake spacings to the combustion chamber or obstruct air ow.
11. After the pan has been connected to the gas supply, check all gas joints for
leaks. A soap solution or other suitable leak detector should be used. Do not
use ame to check for leaks.
12. Pressure Test Warning:
a. Test pressure exceeding 0.5 PSIG (3.45kPa). During pressure testing
of the gas supply piping system at pressures exceeding 0.5 PSIG , the
braising pan and its individual shutoff valve must be disconnected from
the gas supply piping system.
b. Test pressure equal to or less than 0.5 PSIG (3.45kPa). During pressure
testing of the gas supply piping system at pressures equal to or less than
0.5 PSIG , the braising pan must be isolated from the gas supply piping
system by closing its individual manual shutoff valve.
Electrical Connection
Adjustable
Bullet Feet
Standard Faucet
Bracket
Produktspecifikationer
Varumärke: | Groen |
Kategori: | ej kategoriserat |
Modell: | BPP-G |
Behöver du hjälp?
Om du behöver hjälp med Groen BPP-G ställ en fråga nedan och andra användare kommer att svara dig
ej kategoriserat Groen Manualer
1 September 2025
1 September 2025
31 Augusti 2025
ej kategoriserat Manualer
- Signature Hardware
- Nilox
- Jet-Tech
- Tork
- Oase
- Vevor
- Amica
- Salus
- Vollrath
- Koala
- Finlux
- Angler
- Fluke
- F2
- Hestan
Nyaste ej kategoriserat Manualer
1 September 2025
1 September 2025
1 September 2025
1 September 2025
1 September 2025
1 September 2025
1 September 2025
1 September 2025
1 September 2025
1 September 2025