Olight Osight S Bruksanvisning
Olight ej kategoriserat Osight S
Läs gratis den bruksanvisning för Olight Osight S (1 sidor) i kategorin ej kategoriserat. Guiden har ansetts hjälpsam av 35 personer och har ett genomsnittsbetyg på 4.8 stjärnor baserat på 8 recensioner. Har du en fråga om Olight Osight S eller vill du ställa frågor till andra användare av produkten? Ställ en fråga
Sida 1/1
6.1 省エネ機能については、図 10をご参照ください。
カバーを光学部の上に置くと、レチクルは電力を節約す
るためにオフになります。カバーを外すと自動的にアク
ティブになります。
光学部を手動でオフにすると、レチクルは自動的にアク
ティブになりません。
カバーの電力がなくなると、この機能は無効になりま
す。
7. バッテリー表示については、図 11をご参照ください。
7.1 光学機器のバッテリーインジケーター。
光学機器のいずれかのサイドボタンを押すと、光学機器
のバッテリーレベルが表示されます。
7.2 充電カバーのバッテリーインジケーター。
インジケーターは、オンにしてから 5 秒間バッテリーレ
ベルを表示します。
光学機器のバッテリーレベルの表示:
光学機器にカバーをかぶせて光学機器の充電を開始す
ると、インジケーターに光学機器のバッテリーレベルが
表示されます。
光学機器が充電されているときに、カバーのサイドボタ
ンを押すと、光学機器のバッテリーレベルが再び表示さ
れます。
充電カバーのバッテリーレベルの表示:
カバーが光学機器に装着されていない場合は、カバーの
サイドボタンを押すか、USB-C ケーブルを使用してカ
バーを充電すると、インジケーターにカバーのバッテ
リーレベルが表示されます。
カバーを光学機器にかぶせて USB-C ケーブルで充電す
ると、インジケーターにカバーのバッテリーレベルが表
示されます。
カバーを光学機器から取り外すと、インジケーターにカ
バーのバッテリーレベルが表示されます。
8. 取り付け方法については、図12をご参照ください。
9. ゼロ設定については、図13をご参照ください。
風偏 (左/右) または仰角 (上/下) の調整は、1クリッ
クあたり1MOA です。
Rotate to adjust elevation or windage
Figure 13
Zero Setting
1 MOA per click
1
USER
MANUAL
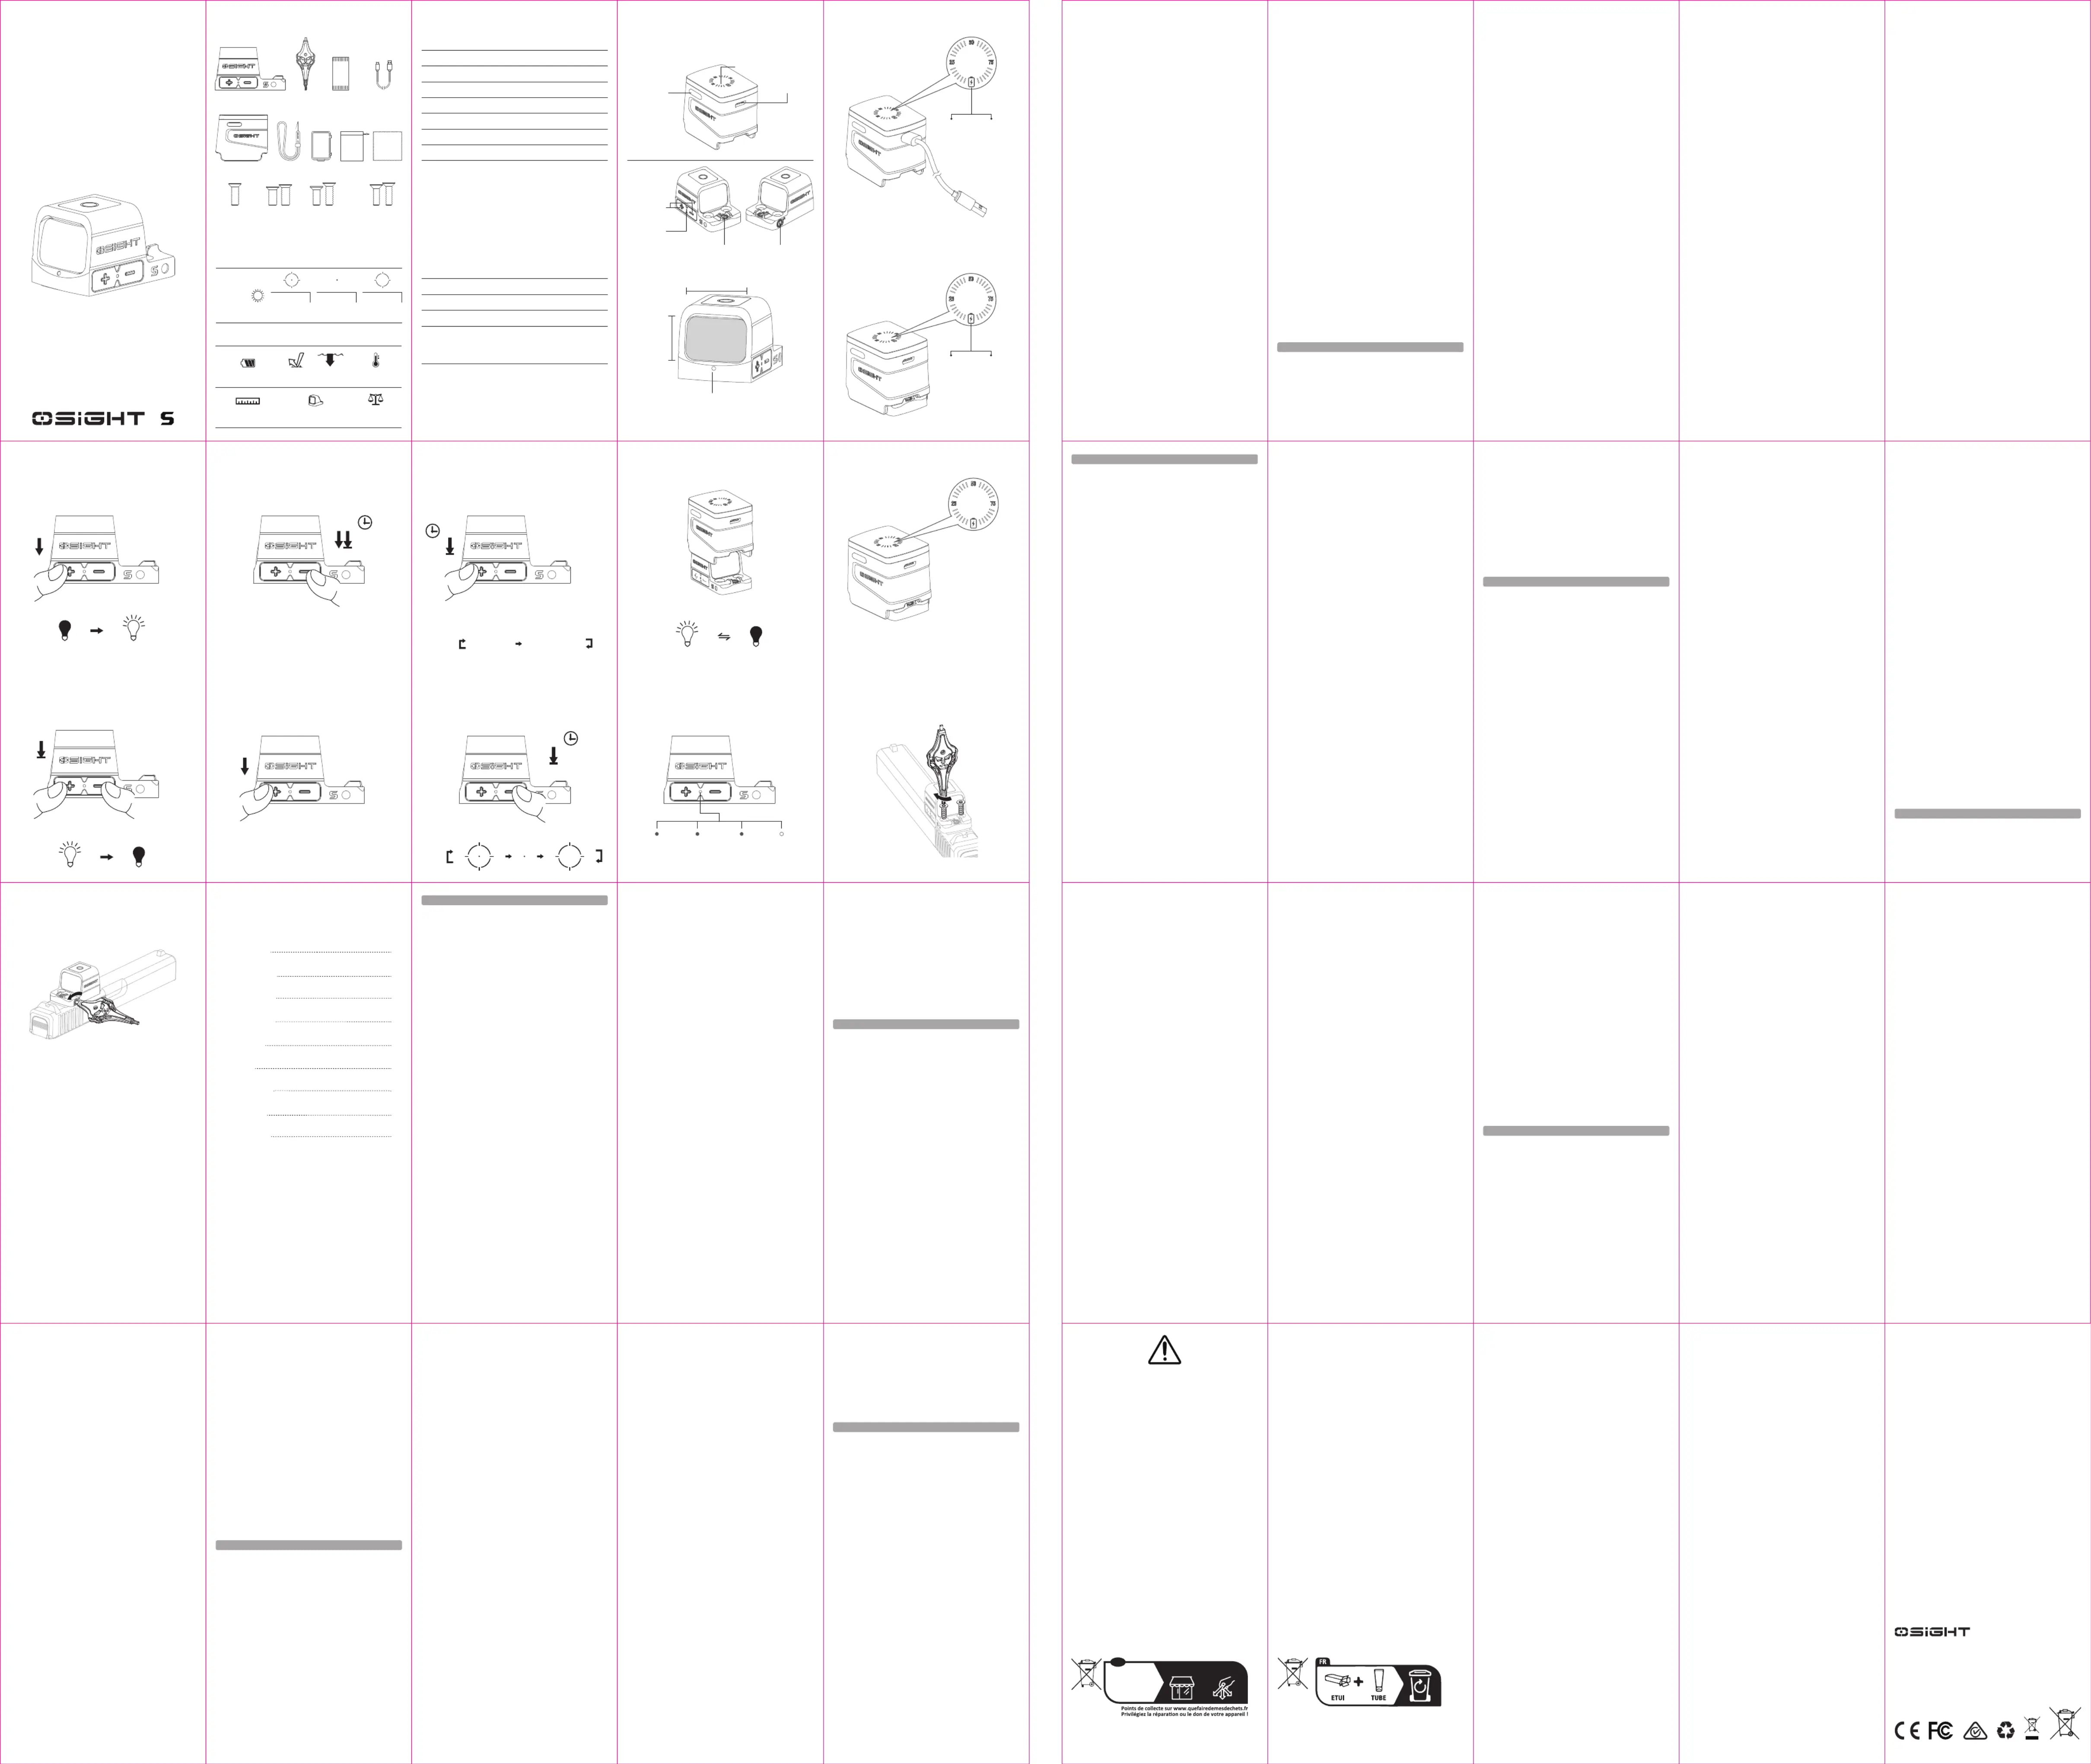
IN THE BOX
USB-C Charging
Cable
Tool
Optic
Time to Fully Charge the
Charging Cover
1.5 H (Requiring a 5 V / 2 A (10 W)
power source. When the power source
capacity is insufficient, the charging
time will be longer).
USB-C Charging Cable
Cable Length
5 V / 2 A
Input
0.8 m
Charge Type
USB-C
Table 2:
Main Body
Dimensions
Weight
Battery Capacity
Input
Output
Plastic+AL6061
42.5*30*37.5 mm / 1.67*1.18*1.48 in
33 g / 1.16 oz
220 mAh 3.87 V (0.85 Wh)
DC 5 V / 2 A (MAX)
DC 4.45 V / 50mA
Time to Fully Charge the Optic
1.5 H
Osight S Charging Cover
Figure 2
Charge the Charging Cover
Figure 3
Figure 4
Charge the Optic With the Cover
Optic Operation Instructison
Manual On
Figure 5
Manual Off
Figure 6
Motion Sensor Function
On/Off
Figure 8
Mode Switching
Constantly on for 5s
Citedhargng Comple
Flash for 5s
Constantly on for 5sFlash for 5s
Cingharg
CitedCinghargng Compleharg
Press any button
2
Press the "+" and "-" buttons simultaneously for more than 0.5 seconds.
3sec
3sec
Press and hold "+" over 3s
Press and hold "" over 3s-
Double press and hold "-" for over 3s
Flash Once: Manual Mode
Flash Twice: Auto Sensing Mode
Flash Once: On
Flash Twice: Off
A. 12, 06, 2024
3.4000.1099
CAN ICES-003 (B) / NMB-003 (B)
1. Product specifications, see Table 1 and Table 2;
2. Product overview, see Figure 1;
3. Operating instructions are as follows:
4. Charging:
Before first use, charge the charging cover and optic fully.
4.1 Charge the charging cover, see Figure 2;
Charge the charging cover with the USB-C cable.
The battery icon of the cover’s battery indicator flashes for 5 seconds and
then turns off, indicating that the cover is being charged; the battery icon is
constantly on for 5 seconds and then turns off, indicating that the cover is
fully charged.
4.2 Charge the optic, see Figure 3;
Place the charging cover over the optic to charge it.
The battery icon flashes for 5 seconds and then turns off, indicating that
the optic is being charged; the battery icon is constantly on for 5 seconds
and then turns off, indicating that the optic is fully charged.
5. Optic operating instructions;
5.1 Turn on, see Figure 4;
Manual on: Press any button to turn the optic on.
Auto on: When the motion sensor function is enabled, the optic will
automatically turn on upon detecting any movement of the optic.
5.2 Turn off, see Figure 5;
Manual off: Press the "+" and "-" buttons simultaneously for over 0.5
seconds to turn off the optic.
Auto off: When the motion sensor function is enabled, the optic will
automatically turn off after no motion for 10 minutes.
5.3 Motion sensor function, see Figure 6;
The motion sensor function has been enabled by default.
When the optic is on, double press and hold the "-" button for over 3
seconds to enable or disable this function.
When the function is enabled, the reticle flashes once.
When the function is disabled, the reticle flashes twice.
5.4 Operation modes, see Figure 7;
Manual Mode: The Manual Mode has been set by default.
In Manual Mode, there are 12 brightness levels. Levels 1 and 2 are night
vision settings, while levels 3 to 12 are daylight settings, with level 12
being the brightest.
Press the “+” button to increase brightness and the “-” button to
decrease brightness.
USA Customer Support
For other countries and regions, please contact Global Customer
Support
OFF
ON
OFF
ON
OFF
ON
Manual ModeAuto Sensing Mode
Cycle
Figure 10
Energy-Saving Function
Desiccant
Figure 7
Brightness Adjustment (Manual Mode)
Press
"+": increase brightness; "-" : decrease brightness
The optic will automatically turn off after 10 minutes of inactivity.
Figure 9
Reticle System Switching
3sec
Figure 12
How to Install
Screw on
Note: Fully charge the product before first use.
PouchScrew BoxCharging CoverCleaning Cloth
The reticle turns off when the cover is placed over the optic; It will be automatically activated
when the cover is removed (The reticle can't be activated when the optic is turned off manually).
Auto Sensing Mode: With light sensor technology, the reticle brightness
adjusts automatically based on the ambient light conditions.
In Auto Sensing Mode, the brightness can be manually adjusted up or
down by one level.
5.5 Switch modes, see Figure 8;
When the optic is on, press and hold the "+" button for over 3 seconds to
switch modes. The modes cycle through Manual >Auto Sensing;
The reticle flashes once to indicate a switch to Manual Mode (at the
brightness of level 8 and remains at this brightness);
The reticle will flash twice times to indicate a switch to Auto Sensing Mode
(at the brightness used in Manual Mode ).
5.6 Mode and brightness memory function;
If the optic turns off in Manual Mode, it will remain in Manual Mode upon
restart, and the reticle brightness will be the last used brightness;
If the optic turns off in Auto Sensing Mode, it will remain in Auto Sensing
Mode upon restart.
Auto Sensing Mode and Manual Mode will memorize the on/off state of the
motion sensor function when it was last used.
5.7 Reticle system switching, see Figure 9;
When the optic is on, press and hold the "-" button for over 3 seconds to
switch between the three reticle options, Dot+Circle, Dot-only and
Circle-only, switching in that order every 2 seconds.
6. Charging cover operating instructions;
6.1 Energy-saving function, see Figure 10;
The reticle turns off to save power when the cover is placed over the optic;
it will be automatically activated when the cover is removed.
The reticle can't be automatically activated when the optic is turned off
manually.
This function is disabled when the cover runs out of power.
7. Battery Indication, see Figure 11;
7.1 Optic’s battery indicator;
Press any side button of the optic to display the optic’s battery level.
7.2 Charging cover’s battery indicator;
The indicator will display battery level for 5 seconds after it’s on.
Display optic’s battery level:
When the cover is placed over the optic to start charging the optic, the
indicator shows the optic’s battery level;
When the optic is being charged, press the side button of the cover to show
the optic’s battery level again.
Display charging cover’s battery level:
Shows the battery level of the
cover or optic depending on
different situations.
Figure 11
Battery Indicators
Green
(≥50%)
Blink Red
(<10%)
Red
(20%-10%)
Yellow
(50%-20%)
1
2
WARRANTY
We are proud to offer a lifetime warranty. If your Osight product ever
experiences any issues, we promise to take care of it. If we are unable to
repair your product, we will promptly replace it with a product in perfect
working condition, which will be of equal or better physical condition. The
warranty covers defects in material and workmanship under normal use,
excluding loss, theft, deliberate damage, or cosmetic damage. For complete
warranty information, please visit osight.com.
• Do not ingest the battery, as there is a Chemical Burn Hazard.
• If the small battery is swallowed, it can cause severe internal burns in just
2 hours and may lead to death. Keep new and used batteries away from
children.
• If the battery compartment does not close securely, stop using the product
and keep it away from children.
• If you think batteries might have been swallowed or placed inside any part
of the body, seek immediate medical attention.
• Do not replace the battery with an incorrect type that can defeat a
safeguard, such as certain types of lithium batteries.
• Do not dispose of the battery in fire, a hot oven, or by crushing or cutting it,
as it may result in an explosion.
• Avoid leaving the battery in extremely high-temperature environments, as
it may cause an explosion or the leakage of flammable liquid or gas.
• A battery exposed to extremely low air pressure may result in an explosion
or the leakage of flammable liquid or gas.
EU Declaration of Conformity
Hereby Zhongshan Osight Co., Ltd declares that the products [Osight S,
OCC-46mA] are in compliance with Directive 2014/30/EU and RoHS
Directive 2011/65/EU & (EU) 2015/863. The full text of the EU declaration
of conformity is available at the following internet address:
https://www.osight.com/certifications
FCC compliance statement
This device complies with part 15 of the FCC Rules. Operation is subject to
the following two conditions:
(1) This device may not cause harmful interference, and (2) this device
must accept any interference received, including interference that may
cause undesired operation.
Any changes or modifications not expressly approved by the party
responsible for compliance could void the user's authority to operate the
equipment.
Note: This equipment has been tested and found to comply with the limits
for a Class B digital device, pursuant to part 15 of the FCC Rules. These
limits are designed to provide reasonable protection against harmful
interference in a residential installation. This equipment generates, uses
and can radiate radio frequency energy and, if not installed and used in
accordance with the instructions, may cause harmful interference to radio
communications. However, there is no guarantee that interference will not
occur in a particular installation. If this equipment does cause harmful
interference to radio or television reception, which can be determined by
turning the equipment off and on, the user is encouraged to try to correct
the interference by one or more of the following measures:
WEEE Disposal and Recycling Information
All products bearing this symbol are waste electrical and electronic
equipment (WEEE as in directive 2012/19/EU) which should not be mixed
with unsorted household waste. Instead, to protect human health and the
environment, you should dispose of your waste equipment at a designated
collection point for the recycling of WEEE, appointed by the government or
local authorities. Proper disposal and recycling will help prevent potential
negative consequences to the environment and human health. Please
contact the installer or local authorities for more information about the
location as well as terms and conditions of such collection points.
46 mAh 3.87 V(0.178 Wh)
Working Temperature
0°C~45°C
27.5 g / 0.97 oz
(Including Battery)
(L)(W)(H)40.5*25*24.5 mm
(L)(W)(H)1.59*0.98*0.97 in
OAL
(Housing Material)
1.0
m
IPX7
Cycle
Table 1: Optic
SPECIFICATIONS
Mode
100%
Mode 3
20000 H20000 H21900 H
Note: Please fully charge the product every three months to maintain stable
power consumption.
This is at full 100% brightness, with motion detection on and ambient light sense
on. For more runtime details please visit osight.com.
Lanyard
Ce appareil et
baerie et
accessoire est
recyclable
À DÉPOSER
EN MAGASIN
À DÉPOSER
EN DÉCHÈTERIE
OU
FRFR
Designed by OSIGHT INC. in Arizona
4330 W Chandler Blvd, Suite 4 Chandler, AZ 85226
Manufacturer:
4th Floor, Building 4, Kegu Industrial Park, No. 6 Zhongnan Road, Chang'an Town,
Dongguan City, Guangdong, China.
Made in China
#6-32#6-40M3M4
( EN) English
( CN ) 简体中文
( DE ) Deutsch
( FR ) Français
( JP ) 日本語
( TH ) ไทย
( ES ) Español
( KR ) 한국어
( IT ) Italiano
CONTENTS
01
03
05
08
10
14
16
18
21
Figure 1
Product Overview
Buttons
USB-C Charging Port
Battery Indicator
Charging Cover
Battery Indicator
Elevation AdjustmentWindage Adjustment
Optic
Light sensor technology is used to detect ambient light to
automatically change the dot brightness
Light Sensor
Button
14 mm / 0.55 in
21 mm / 0.83 in
( EN ) English
( CN ) 简体中文
01
161718
19202122230203
0405060708
0910111213
1415
When the cover is not on the optic, press the cover’s side button or use the
USB-C cable to charge the cover, the indicator shows the cover’s battery
level;
When the cover is placed over the optic and charged with the USB-C cable,
the indicator shows the cover’s battery level;
When the cover is removed from the optic, the indicator shows the cover’s
battery level.
8. How to install, see Figure 12;
9. Zero setting, see Figure 13.
Windage (left/right) or elevation (up/down) adjustment is 1 MOA per click.
1.产品参数,参见 Table 1与 Table 2;
2.产品概述,参见 Figure 1;
3.操作指引见下:
4.充电:
首次使用前,先将充电罩及光学装置充满电。
4.1 充电罩充电,参见 Figure 2;
用 USB-C线给充电罩充电。
充电罩电量指示灯上的电池图标闪烁5S 后熄灭,表示充
电罩正在充电;电池图标常亮 5S 后熄灭,表示充电罩充
满电。
4.2 光学装置充电,参见 Figure 3;
将充电罩盖在光学装置上为光学装置充电。
电池图标闪烁 55后熄灭,表示光学装置正在充电;电池
图标常亮5S 后熄灭,表示光学装置充满电。
5.光学装置操作说明;
5.1 开机,参见 Figure 4;
手动开机:单击任意键开机。
自动开机:开启震动感应功能时,检测到光学装置震动
时,光学装置会自动开机。
5.2 关机,参见 Figure 5;
手动关机:同时单击“+”和“-”键 0.5 秒以上关机。
自动关机:开启震动感应功能时,在检测到光学装置无
运动10分钟后,光学装置会自动关机。
5.3 震动感应功能,参见 Figure 6;
出厂默认开启震动感应功能。
开机状态下,双击“-”键并按住3 秒以上,可以开启和
关闭该功能。
开启震动感应功能时,光学装置光标闪烁1次。
关闭震动感应功能时,光学装置光标闪烁2次。
5.4 操作模式,参见 Figure 7;
手动模式:出厂默认为手动模式。
手动模式下,设置 12 个亮度档位,1 档和 2档为夜视
档,3-12 档为日光档位,12 档为最亮档。
单击“+”键增加亮度,单击“-” 键减少亮度。
自动感光模式:使用光感技术,光标亮度会根据环境光
线的强弱自动调整。
自动感光模式支持手动上下一档调节。
5.5 切换模式,参见 Figure 8;
开机状态下,长按"+”键3秒以上,切换模式,模式按照
手动>自动感光 进行循环切换;
切换为手动模式时,光学装置光标会闪烁1次(以第8档位
亮度闪烁并且保持8档亮度);
切换为自动感光模式时,光学装置光标会闪烁2次(以手
动时的档位闪烁)。
5.6 模式及亮度记忆功能;
在手动模式下关机,再次开机仍为手动模式,光标亮度
为上次关机前亮度;
在光感模式下关机,再次开机仍为光感模式;
光感模式和手动模式均记忆震动感应功能的开启/关闭状
态。
5.7 线标系统切换,参见 Figure 9;
开机状态下,长按“-”键3秒以上,光标将在点+圈,
点,圈三种模式切换,循环切换,2秒切换一次。
6.充电罩操作说明;
6.1 节电功能,参见 Figure 10;
当充电罩盖上光学装置后,光学装置光标关闭以节省电
源;拿下充电罩,光学装置光标自动激活。
手动关机后,光学装置光标无法自动激活。
当充电罩电量耗尽时该功能失效。
7.电量指示灯说明,参见 Figure 11;
7.1 光学装置电量指示灯;
单击光学装置任意侧按键,显示光学装置电量。
7.2 充电罩电量指示灯;
指示灯亮起后,显示时长为 5S。
显示光学装置电量:
充电罩盖在光学装置上开始给光学装置充电时,显示光
学装置电量;
充电过程中,如需再次显示光学装置电量,单击充电罩
侧按键。
显示充电罩电量:
当充电罩不盖在光学装置上时,单击充电罩侧按键或用
USB-C线充电,均显示充电罩电量;
当充电罩盖在光学装置上时,使用 USB-C线充电,显示
充电罩电量;
将充电罩从光学装置上取下时,显示充电罩电量。
8.如何安装,参见 Figure 12;
9.调零,参见 Figure 13.
风阻(左右)和仰角(上下)调整 转动调节钉时,每“咔嚓”
响一声调整1 MOA。
( DE ) Deutsch
( ES ) Español
( JP ) 日本語
( KR ) 한국어
( TH ) ไทย
( FR ) Français
( IT ) Italiano
1. Produktspezifikationen, siehe Tabelle 1 und Tabelle 2;
2. Produktübersicht, siehe Abbildung 1;
3. Bedienung:
4. Aufladen:
Vor der ersten Verwendung müssen die Ladeabdeckung und die Optik
vollständig aufgeladen werden.
4.1 Ladeabdeckung aufladen, siehe Abbildung 2;
Die Ladeabdeckung mit dem USB-C Kabel aufladen.
Das Akkusymbol der Anzeige auf der Abdeckung blinkt 5 Sekunden lang und
schaltet sich dann aus, um anzuzeigen, dass die Abdeckung geladen wird.
Der Akku ist vollständig aufgeladen, wenn das Akkusymbol 5 Sekunden
lang konstant leuchtet und sich schaltet dann ausschaltet.
4.2 Optik aufladen, siehe Abbildung 3;
Die Ladeabdeckung auf die Optik legen, um sie zu laden.
Das Akkusymbol blinkt 5 Sekunden lang und schaltet sich dann aus, um
anzuzeigen, dass die Optik geladen wird. Der Akku ist vollständig
aufgeladen, wenn das Akkusymbol 5 Sekunden lang konstant leuchtet und
sich schaltet dann ausschaltet.
5. Bedienung der Optik;
5.1 Einschalten, siehe Abbildung 4;
Manuelles Einschalten: Zum Einschalten der Optik einen beliebiger Schalter
drücken.
Automatisch einschalten: Bei aktivierter Bewegungssensorfunktion schaltet
sich die Optik automatisch ein, sobald sie bewegt wird.
5.2 Ausschalten, siehe Abbildung 5;
Manuelles Ausschalten: Zum Ausschalten der Optik die Schalter „+“ und
„-“ gleichzeitig für mehr als 0,5 Sekunden drücken.
Automatisches Ausschalten: Bei aktivierter Bewegungssensorrunktion
schaltet sich die Optik automatisch aus, wenn sie 10 Minuten lang nicht
bewegt wird.
5.3 Bewegungssensorfunktion, siehe Abbildung 6;
Die Bewegungssensorfunktion ist standardmäßig aktiviert.
Bei eingeschaltetem Gerät den „-“-Schalter zweimal länger als 3 Sekunden
gedrückt halten, um diese Funktion zu aktivieren oder zu deaktivieren.
Bei aktivierter Funktion blinkt das Fadenkreuz einmal.
Bei deaktivierter Funktion blinkt das Fadenkreuz zweimal.
5.4 Betriebsarten, siehe Abbildung 7;
Manueller Modus: Der manuelle Modus ist standardmäßig eingestellt.
Im manuellen Modus gibt es 12 Helligkeitsstufen. Die Stufen 1 und 2 sind
Nachteinstellungen, die Stufen 3 bis 12 sind Tageseinstellungen, wobei
Stufe 12 die hellste ist. Mit dem „+“-Schalter wird die Helligkeit erhöht,
mit dem „-“-Schalter wird sie verringert.
Automatischer Erkennungsmodus: Mit der Lichtsensortechnologie wird die
Helligkeit des Fadenkreuzes automatisch an die Umgebungslichtbedingun-
gen angepasst.
Im automatischen Erkennungsmodus kann die Helligkeit manuell um eine
Stufe nach oben oder unten angepasst werden.
5.5 Umschalten des Modus, siehe Abbildung 8;
Bei eingeschalteter Optik zum Umschalten des Modus den „+“-Schalter
für mehr als 3 Sekunden gedrückt halten. Der Modus wechselt zwischen
Manuell und automatischer Erkennunsmodus.
Das Fadenkreuz blinkt einmal, um anzuzeigen, dass in den manuellen
Modus gewechselt wurde und die Helligkeit der Stufe 8 wird aktiviert.
Das Fadenkreuz blinkt zweimal, um anzuzeigen, dass in den automatischen
Erkennungsmodus gewechselt wurde und übernimmt zunächst die
Helligkeit aus dem manuellen Modus.
5.6 Modus- und Helligkeitsspeicherfunktion;
Beim Ausschalten der Optik im manuellen Modus wird dieser nach
erneutem Einschalten mit der zuletzt verwendeten Helligkeit
wiederherstgestellt.
Beim Ausschalten der Optik im automatischen Erkennungsmodus wird bei
erneutem Einschalten erneut der automatische Erkennungsmodus aktiviert.
Sowohl im lichtempfindlichen als auch im manuellen Modus wird der Ein-
und Ausschaltzustand der Schwingungserfassung gespeichert.
5.7 Umschalten des Fadenkreuzsystems, siehe Abbildung 9;
Bei eingeschalteter Optik den „-“-Schalter länger als 3 Sekunden gedrückt
halten, um zwischen den drei Optionen Punkt + Kreis, nur Punkt und nur
Kreis zu wechseln, wobei alle 2 Sekunden zwischen den Optionen
gewechselt wird.
6. Bedienung der Ladeabdeckung;
6.1 Energiesparfunktion, siehe Abbildung 10;
Das Fadenkreuz schaltet sich zum Strom sparen aus, wenn die Abdeckung
über der Optik angebracht wird. Das Fadenkreuz wird automatisch aktiviert,
sobald die Abdeckung entfernt wird.
Das Fadenkreuz wird nicht automatisch aktiviert, wenn die Optik manuell
ausgeschaltet wurde.
Diese Funktion wird deaktiviert, wenn die Ladeabdeckung keinen Strom
mehr hat.
7. Akkuanzeige, siehe Abbildung 11;
7.1 Akkuanzeige der Optik:
Durch Drücken eines beliebigen Schalters an der Seite der Optik wird der
Ladestand des Akkus der Optik angezeigt.
7.2 Akkuanzeige der Ladeabdeckung:
Die Anzeige zeigt den Akkustand für 5 Sekunden an, nachdem sie
eingeschaltet wurde.
Anzeige des Akkustandes der Optik:
Wird die Ladeabdeckung zum Aufladen der Optik auf der Optik angebracht,
zeigt die Anzeige den Stand des Akkus der Optik an.
Während des Ladeprozesses kann der seitliche Schalter der
Ladeabdeckung gedrückt werden, um den Akkustand der Optik erneut
anzuzeigen.
Anzeige des Akkustandes der Ladeabdeckung:
Wenn die Abdeckung nicht auf der Optik ist, wird der Akkustand durch
Drücken des seitlichen Schalters oder durch Aufladen mit dem USB-C
Kabel angezeigt.
Durch Anschließen des USB-C Kabels zum Aufladen der Ladeabdeckung
wird der Akkustand der Ladeabdeckung auch dann angezeigt, wenn sie auf
1. 製品仕様については、Table 1およびTable 2をご参
照ください。
2. 製品の概要については、Figure 1をご参照ください。
3. 操作手順は次のとおりです。
4. 充電:
初めて使用する前に、充電カバーと光学部品を完全に充
電してください。
4.1 充電カバーの充電については、Figure 2をご参照く
ださい。
USB-C ケーブルを使用して充電カバーを充電します。
カバーのバッテリー インジケーターのバッテリーアイ
コンが 5 秒間点滅してから消灯するのは、カバーが充電
中であることを示します。バッテリーアイコンが 5 秒間
点灯してから消灯するのは、カバーが完全に充電された
ことを示します。
4.2 光学部品の充電については、Figure 3をご参照くだ
さい。
充電カバーを光学部品の上に置き、充電します。
バッテリーアイコンが 5 秒間点滅してから消灯するの
は、光学部品が充電中であることを示します。バッテ
リーアイコンが 5 秒間点灯してから消灯するのは、光学
部品が完全に充電されたことを示します。
5. 光学機器の操作手順
5.1 電源オンについては、Figure 4をご参照ください。
手動オン:任意のボタンを押して光学機器をオンにし
ます。
自動オン:モーション センサー機能が有効になってい
る場合、光学機器の動きを検出すると自動的にオンにな
ります。
5.2 電源オフについては、Figure 5をご参照ください。
手動オフ:「+」ボタンと「-」ボタンを同時に 0.5 秒以上
押して光学機器をオフにします。
自動オフ:モーション センサー機能が有効になってい
る場合、10 分間動きがないと光学機器が自動的にオフ
になります。
5.3 モーション センサー機能については、Figure 6を
ご参照ください。
モーション センサー機能はデフォルトで有効になって
います。
光学機器がオンになっている場合、「-」ボタンを 3 秒以
上 2 回押して、この機能を有効または無効にします。
この機能が有効になっている場合、レチクルが 1 回点滅
します。
この機能が無効になっている場合、レチクルが 2 回点滅
します。
5.4 操作モードについては、Figure 7をご参照ください。
手動モード:手動モードはデフォルトで設定されてい
ます。
手動モードでは、12段階の明るさレベルがあります。レ
ベル1と2は夜間視力設定、レベル3から12は昼光設
定で、レベル12が最も明るいです。明るさを上げるには
「+」ボタンを押し、明るさを下げるには「-」ボタンを押し
ます。
自動感知モード:光センサー技術により、レチクルの明
るさは周囲の光の状態に基づいて自動的に調整されま
す。
自動感知モードでは、明るさを手動で上下に1段階調整
できます。
5.5 モードの切り替えについては、Figure 8をご参照く
ださい。
光学機器がオンのときに、モードを切り替えるには「+」
ボタンを 3 秒以上押し続けます。モードは、手動 > 自動
感知の順に切り替わります。
レチクルが 1 回点滅して、手動モードへの切り替えを示
します (明るさはレベル 8 で、この明るさのままです)。
レチクルが 2 回点滅して、自動感知モードへの切り替え
を示します (手動モードで使用される明るさ)。
5.6 モードと明るさのメモリ機能。
手動モードで光学機器の電源がオフになった場合、再起
動後も手動モードのままとなり、レチクルの明るさは最
後に使用した明るさになります。
自動感知モードで光学機器の電源がオフになった場合、
再起動後も自動感知モードのままとなります。
自動感知モードと手動モードは振動感知機能のオン/
オフ状態を記憶します。
5.7 レチクル システムの切り替えについては、図 9 をご
参照ください。
光学機器の電源がオンのときに、「-」ボタンを 3 秒以上
押し続けると、ドット + サークル、ドットのみ、サークル
のみの 3 つのレチクル オプションが切り替わり、2 秒ご
とにこの順序で切り替わります。
6. 充電カバーの操作手順。
1. ข้อมูลจาเพาะของผลิตภัณฑ์ ดู Table 1 และ Table 2;
2. ภาพรวมผลิตภัณฑ์ ดู Figure 1;
3. คาแนะนาการใช้งานมีดังนี้:
4. การชาร์จ:
ก่อนใช้งานครั้งแรก ให้ชาร์จฝาครอบชาร์จและเลนส์ให้เต็ม
4.1 ชาร์จฝาครอบชาร์จ ดู Figure 2;
ชาร์จฝาครอบชาร์จด้วยสาย USB-C เมื่อไอคอนแบตเตอรี่กะพริบ 5 วินาทีแล้ว
ดับลง แสดงว่าฝาครอบกาลังชาร์จอยู่ และไอคอนแบตเตอรี่จะสว่างตลอดเวลา
5 วินาทีแล้วดับลง แสดงว่าฝาครอบชาร์จเต็มแล้ว
4.2 ชาร์จเลนส์ ดู Figure 3;
วางฝาครอบชาร์จไว้บนเลนส์เพื่อชาร์จ ไอคอนแบตเตอรี่จะกะพริบ 5 วินาทีแล้ว
ดับลง แสดงว่าเลนส์กาลังชาร์จอยู่ และไอคอนแบตเตอรี่จะสว่างตลอดเวลา 5
วินาทีแล้วดับลง แสดงว่าเลนส์ชาร์จเต็มแล้ว
5. คาแนะนาการใช้งานเลนส์
5.1 เปิดเครื่อง ดู Figure 4;
เปิดด้วยตนเอง: กดปุ่มใดก็ได้เพื่อเปิดเลนส์
เปิดอัตโนมัติ: เมื่อเปิดใช้งานฟังก์ชันเซ็นเซอร์ตรวจจับการเคลื่อนไหว เลนส์จะ
เปิดโดยอัตโนมัติเมื่อตรวจพบการเคลื่อนไหวใดๆ
5.2 ปิดเครื่อง ดู Figure 5;
ปิดเครื่องด้วยตนเอง: กดปุ่ม "+" และ "-" พร้อมกันนานกว่า 0.5 วินาทีเพื่อปิด
เลนส์
ปิดเครื่องอัตโนมัติ: เมื่อเปิดใช้งานฟังก์ชันเซ็นเซอร์ตรวจจับการเคลื่อนไหว
เลนส์จะปิดโดยอัตโนมัติหลังจากไม่มีการเคลื่อนไหวเป็นเวลา 10 นาที
5.3 ฟังก์ชันเซ็นเซอร์ตรวจจับการเคลื่อนไหว ดู Figure 6;
ฟังก์ชันเซ็นเซอร์ตรวจจับการเคลื่อนไหวจะเปิดใช้งานตามค่าเริ่มต้น
เมื่อเลนส์เปิดอยู่ ให้กดปุ่ม "-"" สองครั้งค้างไว้นานกว่า 3 วินาทีเพื่อเปิดใช้งาน
หรือปิดใช้งานฟังก์ชันนี้
เมื่อเปิดใช้งานฟังก์ชันนี้ เรติเคิลจะกะพริบหนึ่งครั้ง
เมื่อปิดใช้งานฟังก์ชันนี้ เรติเคิลจะกะพริบสองครั้ง
5.4 โหมดการทางาน ดู Figure 7;
โหมดแมนนวล: โหมดแมนนวลถูกตั้งค่าไว้เป็นค่าเริ่มต้น
ในโหมดแมนนวล มีระดับความสว่าง 12 ระดับ ระดับ 1 และ 2 เป็นการตั้งค่า
การมองเห็นในเวลากลางคืน ในขณะที่ระดับ 3 ถึง 12 เป็นการตั้งค่าใช้งานเวลา
กลางวัน โดยระดับ 12 เป็นระดับที่สว่างที่สุด กดปุ่ม “+” เพื่อเพิ่มความสว่างและ
ปุ่ม “-” เพื่อลดความสว่าง
โหมดตรวจจับอัตโนมัติ: ด้วยเทคโนโลยีเซ็นเซอร์แสง ความสว่างของเรติเคิลจะ
ปรับโดยอัตโนมัติตามสภาพแสงโดยรอบ
ในโหมดการตรวจจับอัตโนมัติ สามารถปรับความสว่างขึ้นหรือลงได้ด้วยตนเอง
หนึ่งระดับ
5.5 สลับโหมด ดู Figure 8;
เมื่อเลนส์เปิดอยู่ ให้กดปุ่ม "+" ค้างไว้ 3 วินาทีเพื่อสลับโหมด โหมดต่างๆ จะวน
ซ้าไปมาระหว่างโหมดแมนนวล > การตรวจจับอัตโนมัติ; เรติเคิลจะกะพริบหนึ่ง
ครั้งเพื่อระบุการสลับไปยังโหมดแมนนวล (ที่ระดับความสว่าง 8 และคงอยู่ที่
ระดับความสว่างนี้) เรติเคิลจะกะพริบสองครั้งเพื่อระบุการสลับไปยังโหมดการ
ตรวจจับอัตโนมัติ (ที่ระดับความสว่างที่ใช้ในโหมดแมนนวล)
5.6 ฟังก์ชันหน่วยความจาโหมดและความสว่าง;
หากเลนส์ปิดในโหมดแมนนวล เลนส์จะยังคงอยู่ในโหมดแมนนวลเมื่อเปิดใช้งาน
อีกครั้ง และความสว่างของเรติเคิลจะเป็นความสว่างที่ใช้ล่าสุด หากเลนส์ปิดใน
โหมดตรวจจับอัตโนมัติ เลนส์จะยังคงอยู่ในโหมดตรวจจับอัตโนมัติเมื่อเปิดใช้งาน
อีกครั้ง
ทั้งโหมดเซ็นเซอร์แสงและโหมดแมนนวลจะจดจาสถานะเปิด
/ปิดของฟังก์ชันเซ็นเซอร์สั่นสะเทือน
5.7 การสลับระบบเรติเคิล ดู Figure 9;
เมื่อเลนส์เปิดอยู่ ให้กดปุ่ม "-" ค้างไว้เป็นเวลา 3 วินาทีเพื่อสลับระหว่างตัวเลือก
เรติเคิลสามแบบ ได้แก่ จุด+วงกลม จุดอย่างเดียว และวงกลมอย่างเดียว โดย
สลับตามลาดับทุก ๆ 2 วินาที
6. คาแนะนาการใช้งานฝาครอบสาหรับชาร์จ
6.1 ฟังก์ชันประหยัดพลังงาน ดู Figure 10;
เมื่อวางฝาครอบไว้บนเลนส์ เรติเคิลจะปิดเพื่อประหยัดพลังงาน และจะเปิดใช้งาน
โดยอัตโนมัติเมื่อถอดฝาครอบออก ไม่สามารถเปิดใช้งานเรติเคิลโดยอัตโนมัติได้
หากปิดเลนส์ด้วยตนเอง
ฟังก์ชันนี้จะใช้งานไม่ได้เมื่อกล่องชาร์จหมด
7. การระบุแบตเตอรี่ ดู Figure 11;
7.1 ไฟแสดงสถานะแบตเตอรี่ของเลนส์;
กดปุ่มด้านข้างใด ๆ ของเลนส์เพื่อแสดงระดับแบตเตอรี่ของเลนส์
7.2 ไฟแสดงสถานะแบตเตอรี่ของฝาครอบชาร์จ
ไฟแสดงสถานะจะแสดงระดับแบตเตอรี่เป็นเวลา 5 วินาทีหลังจากเปิดเครื่อง
แสดงระดับแบตเตอรี่ของเลนส์:
เมื่อวางฝาครอบไว้บนเลนส์เพื่อเริ่มชาร์จเลนส์ ไฟแสดงสถานะจะแสดงระดับ
แบตเตอรี่ของเลนส์
เมื่อเลนส์กาลังชาร์จ ให้กดปุ่มด้านข้างของฝาครอบเพื่อแสดงระดับแบตเตอรี่ของ
เลนส์อีกครั้ง
แสดงระดับแบตเตอรี่ของฝาครอบชาร์จ:
เมื่อฝาครอบไม่ได้อยู่บนเลนส์ ให้กดปุ่มด้านข้างของฝาครอบหรือใช้สาย USB-C
เพื่อชาร์จฝาครอบ ไฟแสดงสถานะจะแสดงระดับแบตเตอรี่ของฝาครอบ
เมื่อฝาครอบวางบนเลนส์และชาร์จด้วยสาย USB-C ไฟแสดงสถานะจะแสดง
ระดับแบตเตอรี่ของฝาครอบ
เมื่อถอดฝาครอบออกจากเลนส์ ไฟแสดงสถานะจะแสดงระดับแบตเตอรี่ของฝา
ครอบ
8. วิธีการติดตั้ง ดู Figure 12;
9. การตั้งค่าศูนย์ ดู Figure 13;
การปรับทิศทางลม (ซ้าย/ขวา) หรือระดับความสูง (ขึ้น/ลง) คือ 1 MOA ต่อการ
คลิกหนึ่งครั้ง
1. Consulte las especificaciones del producto, en la Tabla 1 y la Tabla 2;
2. Descripción general del producto, consulte la Figura 1;
3. Las instrucciones de uso son las siguientes:
4. Carga:
Antes del primer uso, cargue completamente la cubierta de carga y la óptica.
4.1 Cargue la cubierta de carga, consulte la Figura 2;
Cargue la cubierta de carga con el cable USB-C.
El ícono de batería del indicador de batería de la cubierta parpadea durante
5 segundos y luego se apaga, indicando que la cubierta se está cargando; El
ícono de la batería se enciende constantemente durante 5 segundos y luego
se apaga, lo que indica que cubierta está completamente cargada.
4.2 Cargue la óptica, consulte la Figura 3;
Coloque la cubierta de carga para cargarlo.
El ícono de la batería parpadea durante 5 segundos y luego se apaga,
indicando que la óptica está a cargo; el icono de la batería se enciende
constantemente durante 5 segundos y luego se apaga, indicando que la
óptica está completamente cargado.
5. Instrucciones de uso de la óptica;
5.1 Encienda, consulte la Figura 4;
Encendido manual: Presione cualquier botón para encender la óptica.
Encendido automático: cuando la función del sensor de movimiento está
habilitada, la óptica se encenderá automáticamente cuando detecte
cualquier movimiento de la óptica.
5.2 Apagado, consulte la Figura 5;
Apagado manual: Presione los botones "+" y "-" al mismo tiempo durante
más de 0,5 segundos para apagar la óptica.
Apagado automático: cuando la función del sensor de movimiento está
habilitada, la óptica se apagará automáticamente después de 10 minutos
de inactividad.
5.3 Función del sensor de movimiento, consulte la Figura 6;
La función del sensor de movimiento está habilitada de forma
predeterminada.
Cuando la óptica esté encendida, presione dos veces y mantenga
presionado el botón "-" durante más de 3 segundos para habilitar o
deshabilitar esta función.
Cuando la función está habilitada, la retícula parpadea una vez.
Cuando la función está desactivada, la retícula parpadea dos veces.
5.4 Modos de funcionamiento, consulte la Figura 7;
Modo manual: el modo manual está configurado de forma predeterminada.
En modo manual, hay 12 niveles de brillo disponibles. Los niveles 1 y 2 son
configuraciones de visión nocturna, mientras que los niveles 3 a 12 son
configuraciones de luz diurna, siendo el nivel 12 el más brillante. Presione
el botón "+" para aumentar el brillo y el botón "-" para disminuirlo.
Modo de detección automática: con la tecnología de sensor de luz, el brillo
de la retícula se ajusta automáticamente según las condiciones de luz
ambiental.
Mientras disfruta de la conveniente detección automática, puede ajustar
manualmente el brillo hacia arriba o hacia abajo en un nivel.
5.5 Cambiar modo, consulte la Figura 8;
Cuando la óptica esté encendida, presione y mantenga presionado el botón
"+" durante más de 3 segundos para cambiar de modo. Los modos
cambian entre Manual > Detección automática;
La retícula parpadea una vez para indicar un cambio al modo manual (con
el brillo de la nivel 8 y permanece en este brillo);
La retícula parpadeará dos veces para indicar un cambio al modo de
detección automática (con el brillo utilizado en el modo manual).
5.6 Función de memoria de modo y brillo;
Si el visor se apaga en modo manual, permanecerá en modo manual
cuando se reinicie y el brillo de la retícula será el último brillo utilizado; Si
la óptica se apaga en modo de detección automática, permanecerá en
modo de detección automática cuando se reinicie.
El modo de detección automática y el modo manual memorizarán el estado
de encendido / apagado de la función del sensor de movimiento cuando se
utilizó por última vez.
5.7 Cambio del sistema de rejilla, consulte la Figura 9;
Cuando el visor esté encendido, presione y mantenga presionado el botón
"-" durante más de 3 segundos para recorrer las tres opciones de retícula,
Punto + Círculo, Solo punto y Solo círculo, cambiando en ese orden cada 2
segundos.
6. Instrucciones para usar la cubierta de carga;
6.1 Función de ahorro de energía, consulte la Figura 10;
La retícula se apaga para ahorrar energía cuando se coloca la cubierta en el
visor; Se activará automáticamente cuando se retire la cubierta.
La retícula no se puede activar automáticamente cuando el visor se apaga
manualmente.
Esta función se desactiva cuando la cubierta se queda sin energía.
7. Indicación de batería, consulte la Figura 11;
7.1 Indicador de batería de la óptica;
Presione un botón en el costado del visor para ver el nivel de batería del
visor.
7.2 Indicador de batería de la cubierta de carga;
El indicador mostrará el nivel de la batería durante 5 segundos después de
encenderse.
Muestra el nivel de batería del osciloscopio:
Cuando se coloca la cubierta en el visor para comenzar a cargarlo, el
indicador muestra el nivel de batería del visor;
Cuando el visor se esté cargando, presione el botón de la cubierta lateral
para mostrar nuevamente el nivel de batería del visor.
Ver el nivel de batería de la cubierta de carga:
Cuando la cubierta no esté en la óptica, presione el botón lateral de la
cubierta o use el cable USB-C para cargar la cubierta , el indicador muestra
el nivel de batería de la cubierta ;
Cuando se coloca la cubierta sobre la óptica y se carga con el cable USB-C,
el indicador muestra el nivel de batería de la cubierta;
Cuando se retira la cubierta del visor, el indicador muestra el nivel de batería
de la cubierta.
8. Cómo instalar, consulte la Figura 12;
9. Ajuste a cero, consulte la Figura 13.
El ajuste de deriva (izquierda/derecha) o elevación (arriba/abajo) es de 1
MOA por clic.
1. 제품 사양, Table 1 과 2 참조.
2. 제품 명칭, Figure 1 참조.
3. 작동 사용방법은 다음과 같습니다.
4. 충전:
처음 사용하기 전, 충전 커버와 광학 장치(제품)를 완전히
충전합니다.
4.1 충전 커버 충전, Figure 2 참조.
C타입 케이블로 충전 커버를 충전합니다.
커버 배터리 표시기의 배터리 아이콘이 5초간 깜박였다가
꺼지면 커버가 충전 중임을 나타내며, 배터리 아이콘은 5초
동안 계속 켜져 있다가 꺼지면 커버가 완전히 충전되었음을
나타냅니다.
4.2 광학 장치 충전, Figure 3 참조.
충전 커버를 광학 장치에 씌워서 충전합니다.
배터리 아이콘이 5초간 깜박였다가 꺼지면 장치가 충전
중임을 나타내며, 배터리 아이콘이 5초 동안 계속 켜져
있다가 꺼지면 장치가 완전히 충전되었음을 나타냅니다.
5. 광학 작동 지침.
5.1 전원 켜기, Figure 4 참조.
수동 켜기: 아무 버튼이나 눌러 광학 장치를 켭니다.
자동 켜기: 모션 센서 기능이 활성화된 상태에서, 장치의
움직임을 감지하면 자동으로 켜집니다.
5.2 전원 끄기, Figure 5 참조.
수동 끄기: "+" 및 "-" 버튼을 동시에 0.5초 이상 눌러 광학
장치를 끕니다.
자동 끄기: 모션 센서 기능이 활성화된 상태에서, 10분 동안
움직이지 않으면 광학 장치가 자동으로 꺼집니다.
5.3 모션 센서 기능, Figure 6 참조.
모션 센서 기능은 기본적으로 활성화되어 있습니다.
광학 장치가 켜져있는 상태에서, "-" 버튼을 3초 이상 두 번
눌러 이 기능을 활성화하거나 비활성화합니다.
기능이 활성화되면 레티클(조준선)이 한 번 깜박입니다.
기능이 비활성화되면 레티클(조준선)이 두 번 깜박입니다.
5.4 작동 모드, Figure 7 참조.
수동 모드: 수동 모드는 기본적으로 설정되어 있습니다.
수동 모드에는 12가지 밝기 레벨이 있습니다. 레벨 1과 2는
나이트뷰(야간) 설정이고, 레벨 3부터 12까지는 데이뷰(낮)
설정이며, 레벨 12가 가장 밝습니다. 밝기를 높이려면 "+"
버튼을, 밝기를 줄이려면 "-" 버튼을 누릅니다.
자동 감지 모드: 광 센서 기술을 사용하면 주변 조명 조건에
따라 레티클 밝기가 자동으로 조정됩니다.
편리한 자동 감지 기능을 이용하는 동시에 수동으로 밝기를
한 단계씩 위 또는 아래로 조정하여 사용자에 맞게 조정할
수 있습니다.
5.5 모드 전환, Figure 8 참조.
광학 장치가 켜져 있으면 "+" 버튼을 3초 이상 길게 눌러
모드를 전환합니다. 모드는 수동 > 자동 감지 순으로
순환합니다.
레티클이 한 번 깜박이면, 수동 모드로의 전환을
나타냅니다.(레벨 8의 밝기에서 이 밝기로 유지됨)
레티클이 두 번 깜박이면, 자동 감지 모드로 전환되었음을
나타냅니다.(수동 모드에서 사용되는 밝기)
5.6 모드 및 밝기 메모리 기능.
수동 모드에서 광학 장치가 꺼지면 재시작 시, 수동 모드로
유지되며 레티클 밝기가 마지막으로 사용된 밝기가 됩니다.
자동 감지 모드에서 광학 장치가 꺼지면 재시작 시, 자동
감지 모드로 유지됩니다.
자동 감지 모드 및 수동 모드는 모션 센서 기능의
마지막으로 사용된 켜짐 또는 꺼짐 상태를 저장합니다.
5.7 레티클 시스템 전환, Figure 9 참조.
광학 장치가 켜져있는 상태에서, "-" 버튼을 3초 이상 길게
눌러 3초마다 도트(점선)+서클, 도트(점선) 전용, 서클
전용의 세 가지 레티클 스타일을 선택할 수 있으며 2초마다
순서대로 전환됩니다.
6. 충전 커버 사용 방법.
6.1 에너지 절약 기능, Figure 10 참조.
레티클은 커버를 광학 장치에 씌우면 전력을 절약하기 위해
꺼지며, 커버를 제거하면 자동으로 활성화됩니다.
광학 장치를 수동으로 끄면 레티클을 자동으로 활성화할 수
없습니다.
이 기능은 커버의 전원이 소진되면 비활성화됩니다.
7. 배터리 표시, Figure 11 참조.
7.1 광학 기기 배터리 표시등.
장치의 측면 버튼을 누르면, 배터리량이 표시됩니다.
7.2 충전 커버의 배터리 표시등.
전원을 켜면, 5초 동안 배터리량을 표시합니다.
광학 장치 배터리 레벨 표시:
광학 장치 충전을 위해 커버를 씌우면 배터리량이
표시됩니다.
광학 장치가 충전 중인 상태에서, 커버의 측면 버튼을
누르면 장치의 배터리량이 다시 표시됩니다.
충전 커버 배터리 레벨 표시:
커버가 광학 장치에 씌워져있지 않은 경우, 커버의 측면
버튼을 누르거나 USB-C 케이블을 사용하여 커버를
충전하면 표시기에 배터리량이 표시됩니다;
커버가 광학 장치에 씌워져있는 경우, USB-C 케이블로
충전하면 표시기에 커버의 배터리량이 표시됩니다;
광학 장치에서 커버를 제거하면 표시기에 커버의
배터리량이 표시됩니다.
8. 설치 방법, Figure 12 참조.
9. 조준 영점 조정, Figure 13 참조.
왼쪽/오른쪽 또는 위/아래 조정은 클릭당 1 MOA입니다.
1. Specifiche del prodotto, vedere Tabella 1 e Tabella 2;
2. Panoramica del prodotto, vedere Figura 1;
3. Le istruzioni per l'uso sono le seguenti:
4. Ricarica:
Prima del primo utilizzo, caricare completamente la cover di ricarica e
l'ottica.
4.1 Caricare la cover di ricarica, vedere Figura 2;
Caricare la cover di ricarica con il cavo USB-C.
L'icona della batteria dell'indicatore della batteria della cover lampeggia per
5 secondi e poi si spegne, indicando che la cover è in carica; l'icona della
batteria è costantemente accesa per 5 secondi e poi si spegne, indicando
che la cover è completamente carica.
4.2 Caricare l'ottica, vedere Figura 3;
Posizionare la cover di ricarica sull'ottica per caricarla.
L'icona della batteria lampeggia per 5 secondi e poi si spegne, indicando
che l'ottica è in carica; l'icona della batteria è costantemente accesa per 5
secondi e poi si spegne, indicando che l'ottica è completamente carica.
5. Istruzioni per l'uso dell'ottica;
5.1 Accendere, vedere Figura 4;
Accensione manuale: premere un pulsante qualsiasi per accendere l'ottica.
Accensione automatica: quando la funzione sensore di movimento è
abilitata, l'ottica si accenderà automaticamente quando rileva qualsiasi
movimento dell'ottica.
5.2 Spegnimento, vedere Figura 5;
Spegnimento manuale: premere contemporaneamente i pulsanti "+" e "-"
per oltre 0,5 secondi per spegnere l'ottica.
Spegnimento automatico: quando la funzione sensore di movimento è
abilitata, l'ottica si spegnerà automaticamente dopo 10 minuti di inattività.
5.3 Funzione sensore di movimento, vedere Figura 6;
La funzione sensore di movimento è abilitata per impostazione predefinita.
Quando l'ottica è accesa, premere due volte e tenere premuto il pulsante
"-" per oltre 3 secondi per abilitare o disabilitare questa funzione.
Quando la funzione è abilitata, il reticolo lampeggia una volta.
Quando la funzione è disabilitata, il reticolo lampeggia due volte.
5.4 Modalità operative, vedere Figura 7;
Modalità manuale: la modalità manuale è impostata per impostazione
predefinita.
In modalità manuale, sono disponibili 12 livelli di luminosità. I livelli 1 e 2
sono impostazioni per la visione notturna, mentre i livelli da 3 a 12 sono
impostazioni per la luce diurna, con il livello 12 che è il più luminoso.
Premere il pulsante "+" per aumentare la luminosità e il pulsante "-" per
diminuirla.
Modalità di rilevamento automatico: con la tecnologia del sensore di luce,
la luminosità del reticolo si regola automaticamente in base alle condizioni
di luce ambientale.
In Modalità di rilevamento automatico, la luminosità può essere regolata
manualmente di un livello verso l'alto o verso il basso.
5.5 Cambia modalità, vedere Figura 8;
Quando l'ottica è accesa, premere e tenere premuto il pulsante "+" per
oltre 3 secondi per cambiare modalità. Le modalità passano da Manuale >
Rilevamento automatico;
Il reticolo lampeggia una volta per indicare un passaggio alla modalità
manuale (alla luminosità del livello 8 e rimane a questa luminosità);
Il reticolo lampeggerà due volte per indicare un passaggio alla modalità di
rilevamento automatico (alla luminosità utilizzata in modalità manuale).
5.6 Funzione di memoria modalità e luminosità;
Se l'ottica si spegne in modalità manuale, rimarrà in modalità manuale al
riavvio e la luminosità del reticolo sarà l'ultima luminosità utilizzata; Se
l'ottica si spegne in modalità di rilevamento automatico, rimarrà in
modalità di rilevamento automatico al riavvio.
Le modalità di rilevamento della luce e la modalità manuale memorizzano
entrambe lo stato di attivazione/disattivazione della funzione di vibrazione.
5.7 Commutazione del sistema di reticolo, vedere Figura 9;
Quando l'ottica è accesa, premere e tenere premuto il pulsante "-" per oltre
3 secondi per passare tra le tre opzioni di reticolo, Punto+Cerchio, Solo
punto e Solo cerchio, commutando in quest'ordine ogni 2 secondi.
6. Istruzioni per l'uso del coperchio di ricarica;
6.1 Funzione di risparmio energetico, vedere Figura 10;
Il reticolo si spegne per risparmiare energia quando il coperchio viene
posizionato sull'ottica; verrà attivato automaticamente quando il coperchio
viene rimosso.
Il reticolo non può essere attivato automaticamente quando l'ottica viene
spenta manualmente.
Questa funzione è disabilitata quando la cover è scarica.
7. Indicazione della batteria, vedere Figura 11;
7.1 Indicatore della batteria dell'ottica;
Premere un pulsante laterale dell'ottica per visualizzare il livello della
batteria dell'ottica.
7.2 Indicatore della batteria del coperchio di ricarica;
L'indicatore visualizzerà il livello della batteria per 5 secondi dopo
l'accensione.
Visualizza il livello della batteria dell'ottica:
Quando il coperchio viene posizionato sull'ottica per iniziare a caricarla,
l'indicatore mostra il livello della batteria dell'ottica;
Quando l'ottica è in carica, premere il pulsante laterale del coperchio per
mostrare di nuovo il livello della batteria dell'ottica.
Visualizza il livello della batteria del coperchio di ricarica:
Quando il coperchio non è sull'ottica, premere il pulsante laterale del
coperchio o utilizzare il cavo USB-C per caricare il coperchio, l'indicatore
mostra il livello della batteria del coperchio;
Quando il coperchio viene posizionato sull'ottica e caricato con il cavo
USB-C, l'indicatore mostra il livello della batteria del coperchio;
Quando il coperchio viene rimosso dall'ottica, l'indicatore mostra il livello
della batteria del coperchio.
8. Come installare, vedere la Figura 12;
9. Impostazione zero, vedere la Figura 13.
La regolazione della deriva (sinistra/destra) o dell'elevazione (su/giù) è di 1
MOA per clic.
-Reorient or relocate the receiving antenna.
-Increase the separation between the equipment and receiver.
-Connect the equipment into an outlet on a circuit different from that to
which the receiver is connected.
-Consult the dealer or an experienced radio/TV technician for help.
ISED Notice
This device complies with Industry Canada’s ICES standard(s). Operation is
subject to the following two conditions:
(1) this device may not cause interference, and (2) this device must accept
any interference, including interference that may cause undesired operation
of the device.
Cet appareil est conforme aux normes ICES d’industrie Canada.L'exploita-
tion est autorisée aux deux conditions suivantes:
(1) l'appareil nedoit pas produire de brouillage, et
(2) l'utilisateur de l'appareil doit accepter tout brouillage radioélectrique
subi,
même si le brouillage est susceptible d'en compromettre le fonctionnement.
This Class B digital apparatus complies with Canadian ICES-003.
Cet appareil numérique de la classe B est conforme à la norme NMB-003
du Canada.
1. Spécifications du produit, voir Tableau 1 et Tableau 2 ;
2. Aperçu du produit, voir Figure 1 ;
3. Instructions d'utilisation :
4. Chargement :
Avant la première utilisation, charger complètement le couvercle de
chargement et l'optique.
4.1 Charger le couvercle de chargement, voir Figure 2 ;
Charger le couvercle de chargement avec le câble USB-C.
L'icône de l'indicateur de batterie du couvercle clignote pendant 5 secondes
puis s'éteint, indiquant que le couvercle est en charge ; l'icône s'allume en
continu pendant 5 secondes puis s'éteint, cela indique que le couvercle est
complètement chargé.
4.2 Charger l'optique, voir Figure 3 ;
Placer le couvercle de chargement sur l'optique pour la charger.
L'icône clignote pendant 5 secondes puis s'éteint, indiquant que l'optique
est en charge ; elle s'allume en continu pendant 5 secondes puis s'éteint,
indiquant que l'optique est complètement chargée.
5. Instructions d'utilisation de l'optique ;
5.1 Allumage, voir Figure 4 ;
Allumage manuel : Appuyez sur n'importe quel bouton pour allumer
l'optique.
Allumage automatique : Lorsque la fonction de capteur de mouvement est
activée, l'optique s'allumera automatiquement dès qu'un mouvement de
l'optique sera détecté.
5.2 Extinction, voir Figure 5 ;
Extinction manuelle : Appuyez simultanément sur les boutons "+" et "-"
pendant plus de 0,5 seconde pour éteindre l'optique.
Extinction automatique : Lorsque la fonction de capteur de mouvement est
activée, l'optique s'éteindra automatiquement après 10 minutes sans
mouvement détecté.
5.3 Fonction de capteur de mouvement, voir Figure 6 ;
La fonction de capteur de mouvement est activée par défaut.
Lorsque l'optique est allumée, appuyez deux fois et maintenez le bouton "-"
enfoncé pendant plus de 3 secondes pour activer ou désactiver cette
fonction.
Lorsque la fonction est activée, le réticule clignote une fois.
Lorsque la fonction est désactivée, le réticule clignote deux fois.
5.4 Modes d'opération, voir Figure 7 ;
Mode Manuel : Le Mode Manuel est réglé par défaut.
En Mode Manuel, il y a 12 niveaux de luminosité. Les niveaux 1 et 2 sont
des réglages de vision nocturne, tandis que les niveaux 3 à 12 sont des
réglages de vision diurne, le niveau 12 étant le plus lumineux. Appuyez sur
le bouton "+" pour augmenter la luminosité et sur le bouton "-" pour la
diminuer.
Mode de Détection Automatique : Grâce à la technologie de capteur de
lumière, la luminosité du réticule s'ajuste automatiquement en fonction des
conditions lumineuses ambiantes.
En mode de Détection Automatique, la luminosité peut être modifiée
manuellement vers le haut ou vers le bas d'un niveau.
5.5 Changement de modes, voir Figure 8 ;
Lorsque l'optique est allumée, appuyez et maintenez le bouton "+" enfoncé
pendant plus de 3 secondes pour changer de mode. Les modes passent du
mode Manuel au mode de Détection Automatique ;
Le réticule clignote une fois pour indiquer le passage en Mode Manuel (à la
luminosité de niveau 8 et reste à cette luminosité) ;
Le réticule clignotera deux fois pour indiquer le passage en Mode de
Détection Automatique (à la luminosité utilisée en Mode Manuel).
5.6 Fonction de mémoire de mode et de luminosité ;
Si l'optique s'éteint en Mode Manuel, il restera en Mode Manuel lors du
réallumage et la luminosité du réticule sera celle utilisée précédemment ;
Si l'optique s'éteint en Mode de Détection Automatique, elle restera en
Mode de Détection Automatique lors du réallumage.
Le mode de Détection Automatique et le mode Manuel mémorisent l'état
d'activation/désactivation de la fonction de capteur de mouvement.
5.7 Changement de système du réticule, voir Figure 9 ;
Lorsque l'optique est allumée, appuyez et maintenez enfoncé le bouton "-"
pendant plus de 3 secondes pour changer de mode de réticule,
Point+Cercle, Point unique et Cercle unique, selon cet ordre toutes les 2
secondes.
6. Instructions d'utilisation du couvercle de charge ;
6.1 Fonction d'économie d'énergie, voir Figure 10 ;
Le réticule s'éteint pour économiser l'énergie lorsque le couvercle est placé
sur l'optique ; il s'allumera automatiquement lorsque le couvercle sera
retiré. Le réticule ne peut pas être activé automatiquement lorsque
l'optique est éteinte manuellement.
Cette fonction sera désactivée lorsque le couvercle de charge est à court
d'énergie.
7. Indicateur de batterie, voir Figure 11 ;
7.1 Indicateur de batterie de l'optique ;
Appuyez sur n'importe quel bouton latéral de l'optique pour afficher le
niveau de batterie de l'optique.
7.2 Indicateur de batterie du couvercle de charge ;
L'indicateur affichera le niveau de batterie pendant 5 secondes après son
allumage.
Affichage du niveau de batterie de l'optique :
Lorsque le couvercle est placé sur l'optique pour commencer à la charger,
l'indicateur affiche le niveau de batterie de l'optique ;
Lorsque l'optique est en charge, appuyez sur le bouton latéral du couvercle
pour afficher à nouveau le niveau de batterie de l'optique.
Affichage du niveau de batterie du couvercle de charge :
Lorsque le couvercle n'est pas placé sur l'optique, appuyez sur le bouton
latéral du couvercle ou charger le couvercle avec un câble USB-C pour
afficher le niveau de batterie du couvercle ;
Lorsque le couvercle est placé sur l'optique et chargé avec un câble USB-C,
l'indicateur affiche le niveau de batterie du couvercle ;
Lorsque le couvercle est retiré de l'optique, l'indicateur affiche le niveau de
batterie du couvercle.
8. Guide d'installation, voir Figure 12 ;
9. Réglage à zéro, voir Figure 13.
Le réglage de dérive (gauche/droite) ou d'élévation (haut/bas) est de 1
MOA par clic.
der Optik befestigt ist.
Wenn die Ladeabdeckung von der Optik entfernt wird, zeigt die Anzeige den
Ladestand des Akkus der Ladeabdeckung an.
8. Montage, siehe Abbildung 12;
9. Nullstellung, siehe Abbildung 13.
Die Einstellung von Windrichtung (links/rechts) oder Höhe (oben/unten)
beträgt 1 MOA pro Klick.
Produktspecifikationer
| Varumärke: | Olight |
| Kategori: | ej kategoriserat |
| Modell: | Osight S |
Behöver du hjälp?
Om du behöver hjälp med Olight Osight S ställ en fråga nedan och andra användare kommer att svara dig
ej kategoriserat Olight Manualer

6 Oktober 2025
18 Augusti 2025
18 Augusti 2025
18 Augusti 2025
18 Augusti 2025
17 Augusti 2025
17 Augusti 2025
14 Augusti 2025
14 Augusti 2025
ej kategoriserat Manualer
Nyaste ej kategoriserat Manualer
3 April 2026
3 April 2026
3 April 2026
3 April 2026
3 April 2026
3 April 2026
3 April 2026
3 April 2026
3 April 2026