Salus WQ615RX Bruksanvisning
Salus ej kategoriserat WQ615RX
Läs gratis den bruksanvisning för Salus WQ615RX (2 sidor) i kategorin ej kategoriserat. Guiden har ansetts hjälpsam av 32 personer och har ett genomsnittsbetyg på 4.6 stjärnor baserat på 6 recensioner. Har du en fråga om Salus WQ615RX eller vill du ställa frågor till andra användare av produkten? Ställ en fråga
Sida 1/2
HEAD OFFICE
SA
L
U
S Con
trol
s, U
nits
8-10,
Nort
hfieldBus iness
Par
k,
Forge
Way, Par
kg
ate
Rot
herha
m,
S60
1S
D
SALUS Controa meofls is mber e Coime thmputGroup
Maitaining a cy cotinouprct veopnt npoliof nus odudelme
SAProtct whicis madLUCotrd SaLUS eh eupSA S noanls fe4
reserves the right to change specifictidesign d aon, an
materials of prlisproducts tedwitutho ior
notice.
DE / NL: [email protected]
www.saluscontrols.com
SALUS Controls GmbH,
Dieselstrasse 34,
63165 Mühlheim am Main,
Germany
2
1
3
ZIGBEE RECEIVER
Model:WQ615RX
V01
XII/2024
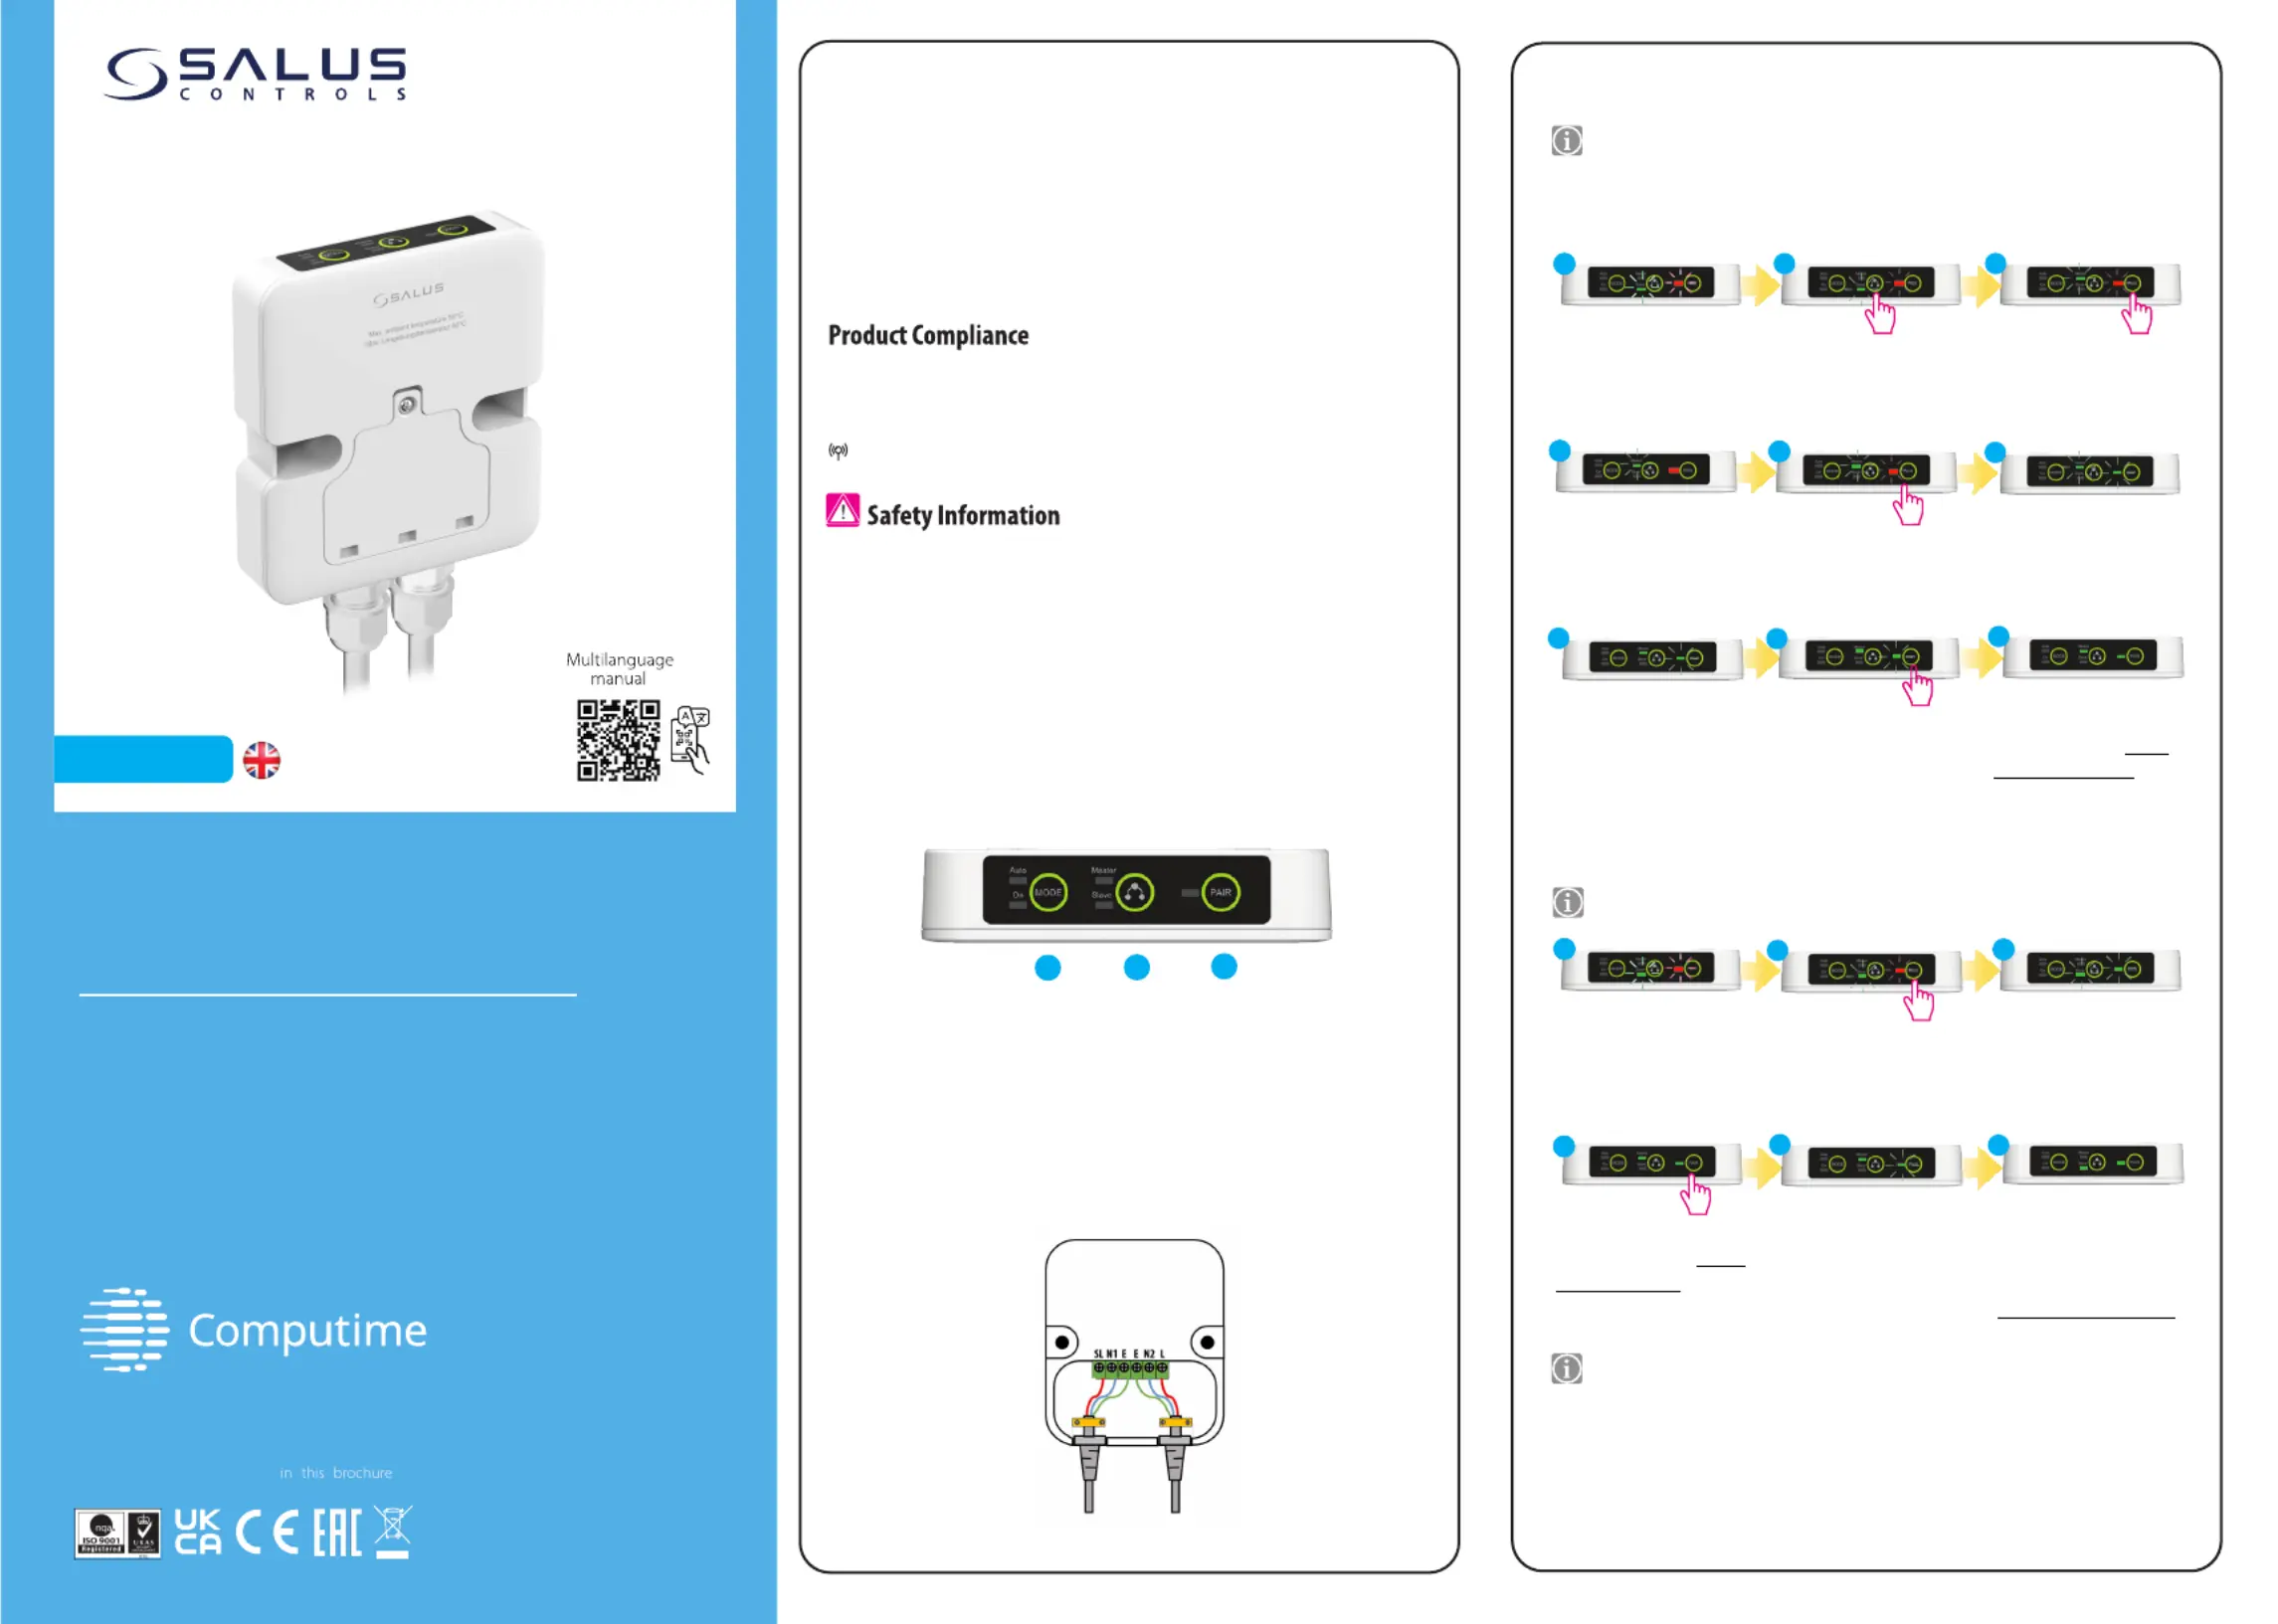
Receiver buttons
The SALUS WQ615RX receiver designed for effective management of electric is
heating systems utilizing the Zigbee protocol. The receiver can be set
up as a master
unit, allowing it to connect with up to four additional slave receivers, thereby
creating a unified and synchronized network for controlling multiple infrared
panels.Each WQ615RX receiver can function as either a master or a slave,
depending on the system's requirements, ensuring smooth control and
integration.
This flexibility allows for effortless management of the entire heating
or cooling system, improving the efficiency and responsiveness of your setup.
2405-2480MHz, <14dBm
Wiring diagram
1. MODE button: Auto/On/Off selection
2. Master/Slave selection: Master can control up to 4 slaves
3. PAIR button for quick pairing procedure
Power supply
Infrared panel
Quick Guide
Th product compl with the essential requirements and other relevant provisions of isies
Directives 2014/53/EU and 2015/863/EU. The full text of the EU Declaration of Conformity is
available at the following internet address: www.saluslegal.com.
To ensure both safety and optimal performance, the WQ615RX receivershould be used in
accordance with all relevant regulations. Thdevice designedexclusively for indoor isis
use and must not be installed in environments exposed to extreme temperatures or
other harsh conditions. Keep the receiver completely dry; any inadequate installation
may cause damage or malfunction. Always disconnect the power before cleaning and use
a dry cloth only. For safe operation, position install the WQ615RX receiver at a and
convenient height to allow easy access. The device'maximum operating temperature is s
50°C, so avoid placing them in locations that may exceed this limit to prevent overheating.
Note: The WQ615TX thermostat comes prepaired with the WQ615RX receiver, which
can also be linked to an additional 4 more receivers(5th slave will be rejected), all
connected to infrared heating panels. To starta newpairing
process, it is necessary to
factory reset the devices.
•Resetting the master: master deletes the thermostat, all slaves and coordinator
information.
•Resetting the slave: slave deletes its own connection information and leaves the
ZigBee network.
Pairing process
3
2
Press and hold the PAIR button
for 10 seconds to reset the
master receiver.
10 s
Short press the Master/Slave
button to change to Master.
1111
Power up the receiver. PAIR
LED will flash red. Slave LED
will flash green.
4
The PAIR LED will show
solid red for 5 seconds then
will start flashing red.
5
Press and hold the PAIR
button for 5 seconds to start
pairing the master receiver.
5
s
6
Master LED and PAIR LED will
both flash green.
7
A few seconds later, Master LED
will show solid green. PAIR LED
will keep flashing green.
8
5 s
Both PAIR and Master LEDs
show solid green. Master
receiver is now paired.
9
Press and hold the PAIR
button for 5 seconds.
Pairing a slave receiver (optional)
Press and hold the PAIR button
for 10 seconds to reset the
slave receiver.
10 s
10
Power up the slave receiver.
PAIR LED will flash red.
Slave LED will flash green.
Note:Skip steps 10 - 15 if you only pair one master receiver. Resume pairing from step 16.
11
12
The Slave LED and
PAIR LED will both
start flashing green.
13
Press and hold the PAIR
button for 5 seconds ON THE
MASTER RECEIVERto start
pairing the SLAVE receiver.
5
s
The PAIR LED on the master
receiver will start flashing
green.
14
Master receiver
Wait until Slave LED and
PAIR LED both show solid
green on the slave receiver.
Slave receiver is now paired.
15
Note:Repeat the slave pairing process to connect up to a maximum of 4 slaves.
Master receiver
Introduction
Produktspecifikationer
| Varumärke: | Salus |
| Kategori: | ej kategoriserat |
| Modell: | WQ615RX |
Behöver du hjälp?
Om du behöver hjälp med Salus WQ615RX ställ en fråga nedan och andra användare kommer att svara dig
ej kategoriserat Salus Manualer

28 September 2025
24 Augusti 2025
18 Augusti 2025
18 Augusti 2025
17 Augusti 2025
4 Augusti 2025
4 Augusti 2025
3 Augusti 2025
3 Augusti 2025
3 Augusti 2025
ej kategoriserat Manualer
Nyaste ej kategoriserat Manualer
3 April 2026
3 April 2026
3 April 2026
3 April 2026
3 April 2026
3 April 2026
3 April 2026
3 April 2026
3 April 2026