Shuttle D 8100XA Bruksanvisning
Läs gratis den bruksanvisning för Shuttle D 8100XA (1 sidor) i kategorin Skrivbord. Guiden har ansetts hjälpsam av 46 personer och har ett genomsnittsbetyg på 4.6 stjärnor baserat på 5 recensioner. Har du en fråga om Shuttle D 8100XA eller vill du ställa frågor till andra användare av produkten? Ställ en fråga
Sida 1/1
__p
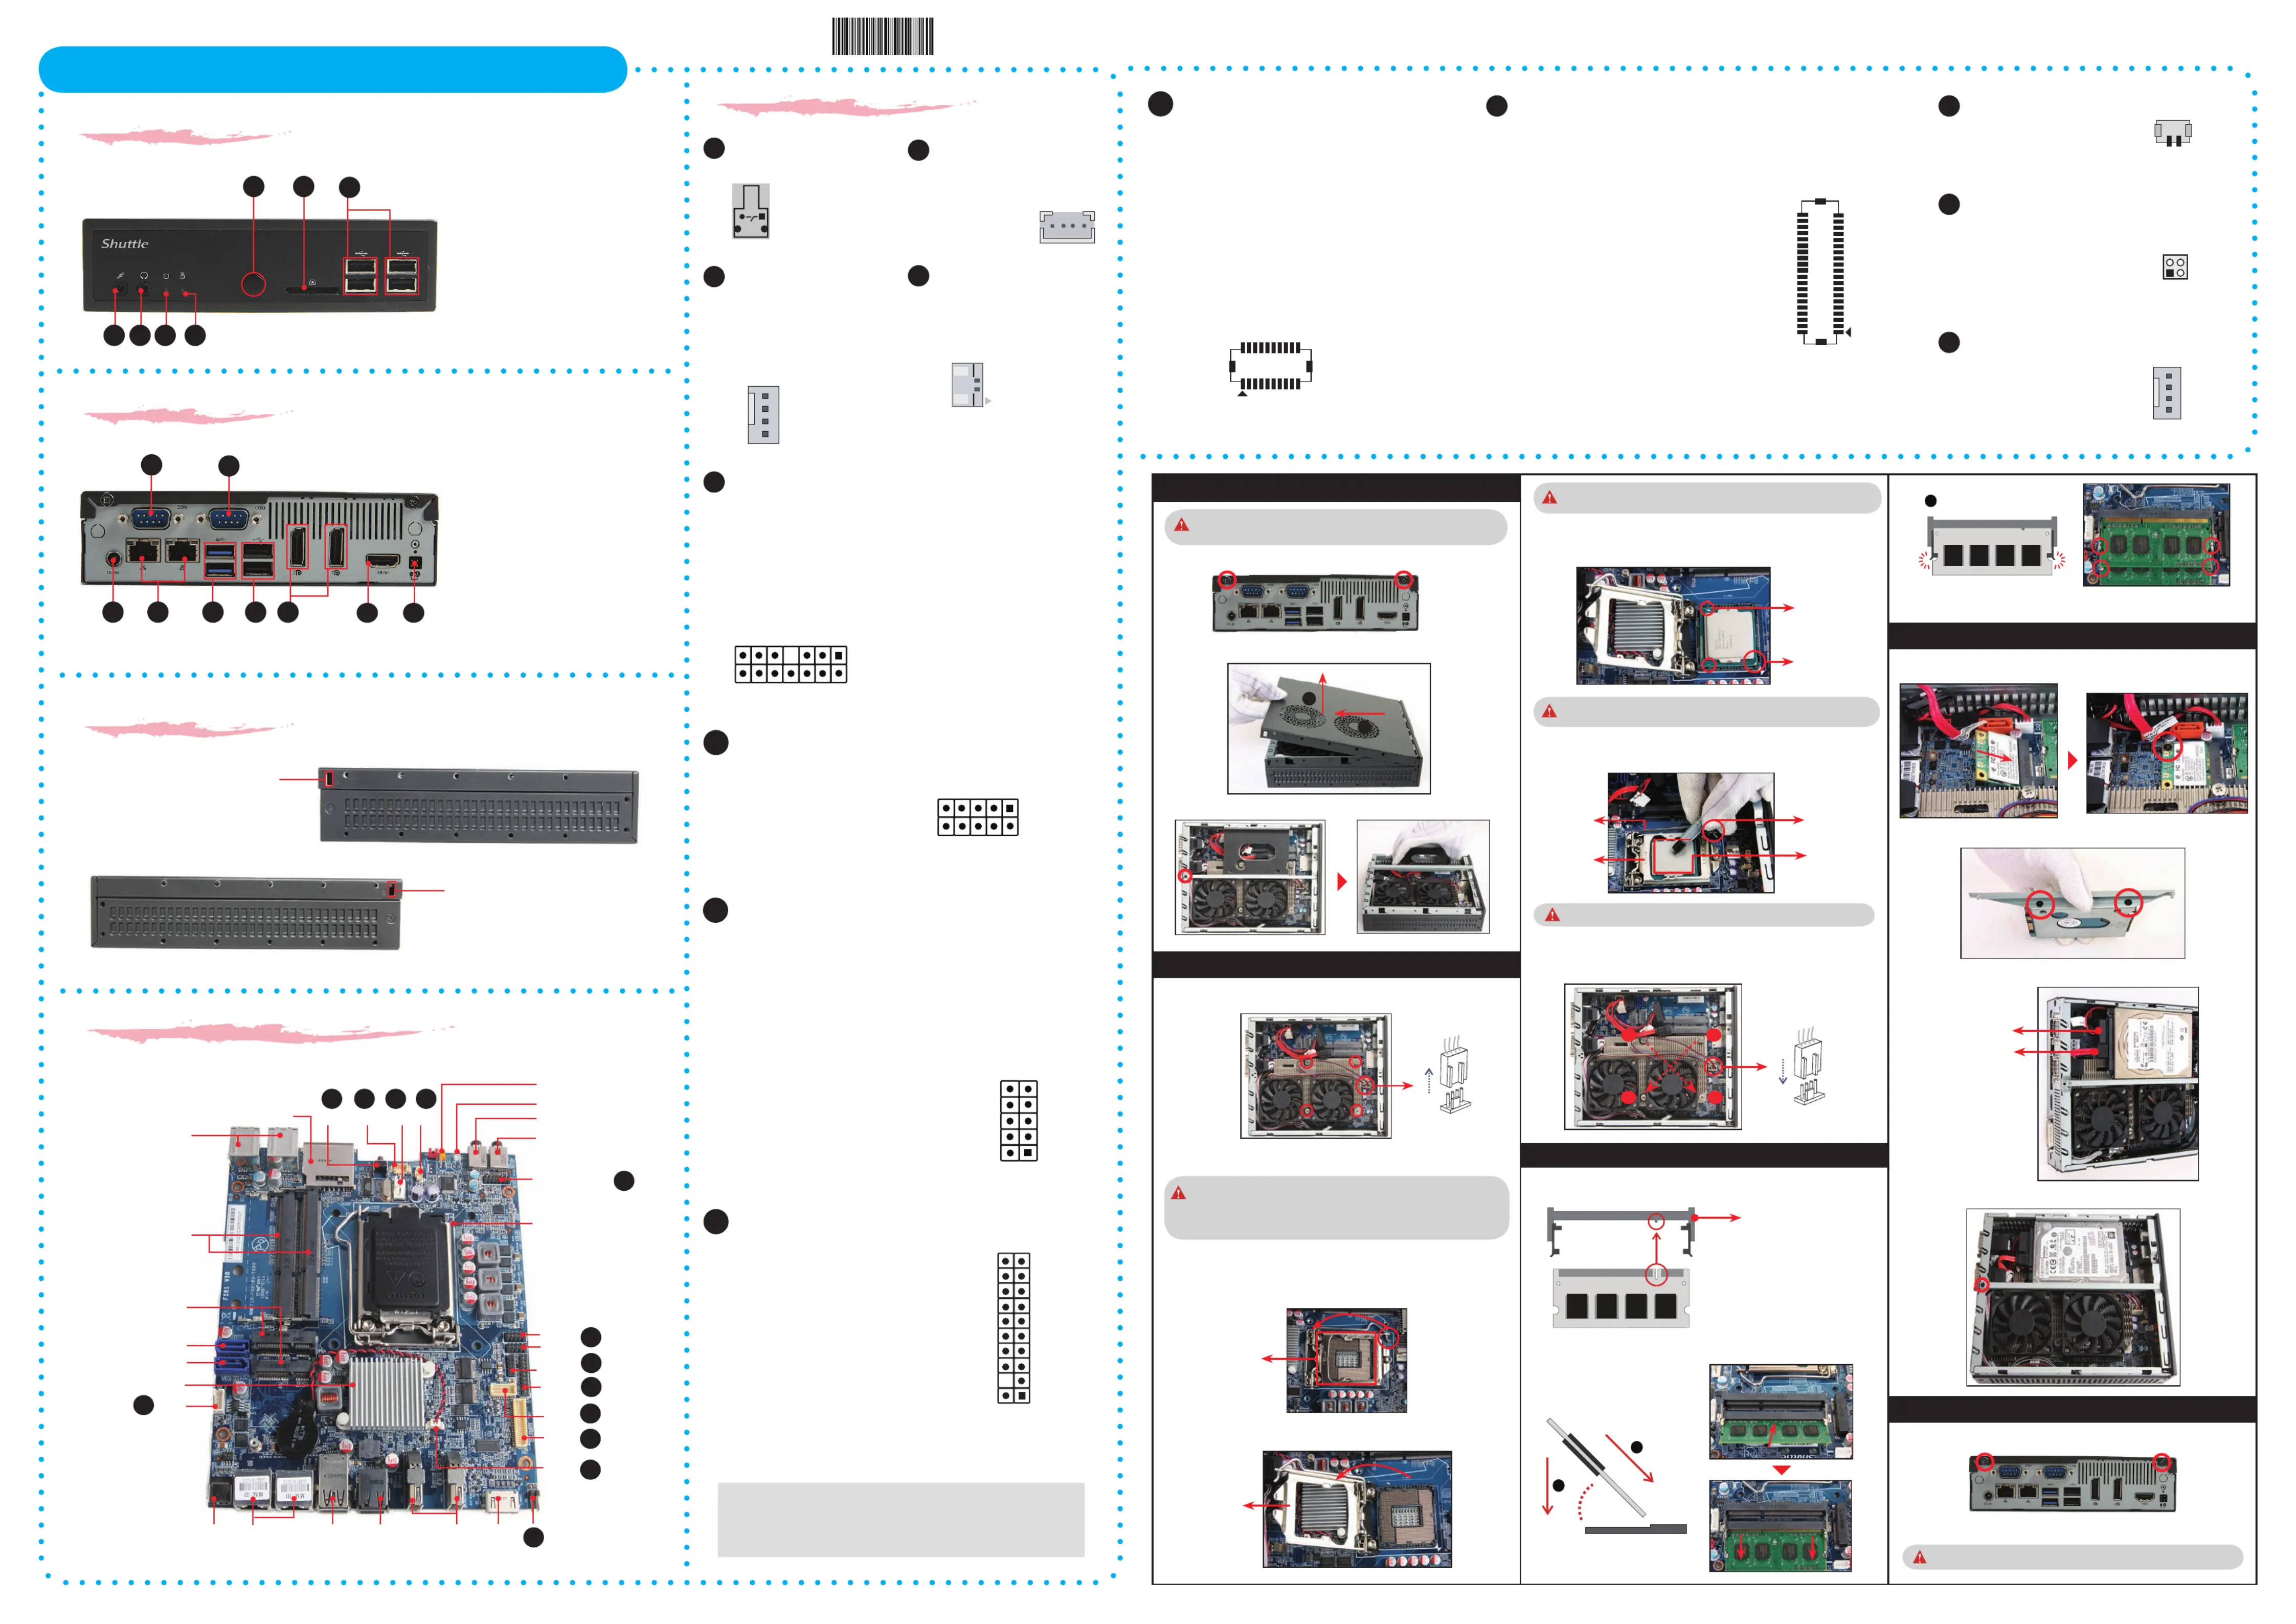
DS81 Series Quick Guide
【
English
】
Jumper Settings
C. Memory Module Installation
53R-DS8103-2001
Front Panel
Back Panel
L
The product’s color and specification will depend on the actual shipping product.
A. Begin Installation
D. Component Installation
Safety Information
Read the following precautions before setting up a Shuttle XPC.
CAUTION
Incorrectly replacing the battery may damage this computer.
Replace only with the same or equivalent as recommended by Shuttle.
Dispose of used batteries according to the manufacturer's instructions.
E. Complete
1. Unscrew the two screws of the chassis cover.
1. Install the Mini PCIE card into the Mini PCIE slot and
secure with
screw
.
3. Connect the Serial ATA and power cables to the HDD.
B. CPU and ICE Module Installation
2. Place the HDD in the rack and secure with the four screws from the side.
For safety reasons, please ensure that the power cord is discon-
nected before opening the case.
Please note this 1150 pin socket bends easily. Always apply
extreme care and little force when installing a CPU and limit the
number of times you remove or exchange it. Before installation,
make sure to turn off the computer and unplug the power cord
from the mains to avoid damage.
notch
SODIMM slot
DO NOT touch socket contacts. To protect the CPU socket, always
replace the protective socket cover when the CPU is not installed.
Triangle Pin1
Marking on the CPU
Notch on the CPU/
Alignment Key of the
CPU Socket
Latch
Latch
Please be aware of the CPU orientation, DO NOT force the CPU into
the socket to avoid bending of pins on the socket and damage of CPU!
Please do not apply excess amount of thermal paste.
2 . Complete.
2. Slide the cover backwards and upwards.
3. Unfasten the rack mount screw and remove the rack.
1. Unfasten the four ICE module attachment screws and unplug the fan
connector.
2. Remove the ICE module from the chassis and put it aside.
4. Slide the rack in the chassis and refasten the screw.
Please load the optimized BIOS settings.
3. Tear off the protective membrane first, then unlock and raise the socket
lever.
Follow the steps below to correctly install the CPU into the
motherboard CPU socket.
5. Orientate the CPU and socket and please align the CPU notches with
the socket alignment keys. Make sure the CPU is perfectly horizontal,
insert it into the socket.
4. Lift the metal load plate on the CPU socket.
6. Close the metal load plate, lower the CPU socket lever and lock in place.
7. Spread thermal paste evenly on the CPU surface.
1. Locate the SODIMM slot on the mainboard.
2. Align the notch of the memory module with the one of the memory slot.
3. Gently insert the module into the slot in a 45-degree angle.
4. Carefully push down the memory
module until it snaps into the
locking mechanism.
5. Repeat the above steps to install additional memory modules, if required.
F1. Mic-In
F2. Headphone
F3. Power LED
F4. HDD LED
F5. Power Button
F6. Card reader
F7. USB2.0 Ports
Serial ATA Cable
Serial ATA Power Cable
8. Screw the ICE module to the mainboard. Note to press down on the
opposite diagonal corner while tightening each screw.
9. Connect the fan connector.
Retention tab
Fan connector
Fan connector
Metal load plate
Thermal Paste
application area
Load lever
COM PORT
Pin Assignments (COM1&COM2):
1=DCD 2=RX
3=TX 4=DTR
5=GND 6=DSR
7=RTS 8=CTS
9=RI 10=NC
9 7 5 3 1
10 8 6 4 2
C6
Left / Right Panel
Motherboard Illustration
Kensington® Lock Port
Kensington® Lock Port
B1. COM1 Port
(RS232/RS422/RS485)
B2. COM2 Port (RS232 only)
B3. Power Jack (DC-in)
B4. LAN Ports
B5. USB3.0 Ports
B6. USB2.0 Ports
B7. DisplayPort
B8. HDMI Port
B9. Clear CMOS&POWER
BUTTON
HDD Rack
3
Audio Connector
C5
Pin Assignments (AUDIO2):
1=PULL AGND 2=LINE-R
3=NC 4=LINE-L
5=PULL AGND 6=FRONT_L
7=NC 8=FRONT_SENSE
9=PULL AGND 10=FRONT_R
11=BK_AUDIO-JD 12=MIC1_R
13=AGND 14=MIC1_L
13 11 9 7 5 3 1
14 12 10 8 6 4 2
1. Replace the cover and refasten the screws.
F5F6
F7
F1F2F3F4
Remove the
protective
membrane
Metal load plate
LGA1150 Package
CPU Socket
Intel H81 Chipset
Audio Connector
DDR3 SODIMM
slots
Mini PCIE Slot
SPK1
DC INLAN PortsUSB2.0
(x2) Ports
USB3.0
(x2) Ports
Display
Port
HDMI
Port
SW3
SW2
USB
MC In
Headphone
Power LED
HDD LED
Card
Reader Slot
USB 2.0
C1C2C4
C5
C12
Power Button (SW3)
C1
C3
Fan Connector
Pin Assignments (FAN1):
1=GND
2=+12V
3=SPEED_SENSE
4=PWM_CTRL
1
2
3
4
SPK1
C4
VGA Connector
Pin Assignments (CN25):
1=GND 11=CRT_HSYNC_R
2=GND 12=GND
3=SDVO_CLK_D 13=GND
4=GND 14=GND
5=SDVO_DATE_D 15=BOUT-O
6=GND 16=VGA_PWR
7=GND 17=GOUT-O
8=GND 18=VGA_PWR
9=CRT_VSYNC_R 19=ROUT-O
10=GND 20=VGA_PWR
C9
1
220
19
C10
EDP Connector V1.0
Pin Assignments:
1=PANEL_VDD
2=CAD_56B
3=PANEL_VDD
4=HPD_56B_C
5=PANEL_VDD
6=NC
7=PANEL_VDD
8=NC
9=PANEL_VDD
10=NC
11=GND
12=GND
13=EDP_BKLTCTL
14=AUX-_56B_C
15=EDP_BKLTEN
16=AUX+_56B_C
17=GND
18=GND
19=NC
20=D3-_56B_C
1
2
3940
PW1
C13
CN1
C11
Battery connector
Pin Assignments (CN1):
1=V_BAT
2=GND
C11
1
1
2
Clear CMOS&POWER BUTTON
Pin Assignments (SW2):
1=RTCRST-
2=+5V
3=GND
4=PWRSW-
C12
C13
SATA POWER connector
Pin Assignments (PW1):
1=GND
2=GND
3=+5v
4=+5v
4
3
2
1
1 2 3 4
USB Connector
Pin Assignments :
1=GND
2=USB10P
3=USB10N
4=USBPW04
C2
19
1 2
20
LPC connector
Pin Assignments (LPC1):
1=CLK-33M 11=L_AD0
2=GND 12=GND
3=LFRAME 13=LPC_48M
4=NC 14=PCH_PME-
5=SIORST# 15=+3.3VS
6=-XRI3 16=SERIRQ
7=L_AD3 17=GND
8=L_AD2 18=+3.3V
9=+3.3V 19=+3.3V
10=L_AD1 20=SUS_CLK
FAN1
C3
C8
62R-DS8100-0601
English.Spanish.Korean.
Traditional Chinese.Japanese.
French. German Quick Guide
1
2
4
3
2
1
Socket
1155
CPU
45-degree
angle
1
2
21=NC
22=D3+_56B_C
23=GND
24=GND
25=INV_PWR_SRC
26=D2-_56B_C
27=INV_PWR_SRC
28=D2+_56B_C
29=INV_PWR_SRC
30=GND
31=INV_PWR_SRC
32=D1-56B_C
33=INV_PWR_SRC
34=D1+56B_C
35=GND
36=GND
37=NC
38=D0-_56B_C
39=NC
40=D0+_56B_C
Pin Assignments (CN1):
1=SPKR_OUT
2=GND
Cutout
Support RS232 Back panel
Independent External Power 12V / 5V
(DEFAULT=SHORT 1-2,3-4)
IF JUMP1 Connector Pin 5 and Pin 7 = COM1 is +5V
IF JUMP2 Connector Pin 6 and Pin 8 = COM2 is +5V
IF JUMP1 Connector Pin 7 and Pin 9 = COM1 is +12V
IF JUMP2 Connector Pin 8 and Pin 10 = COM2 is +12V
Pin Assignments (JP3):
1=-XRI1 2=COM_-XRI1
3=-XRI2 4=COM_-XRI2
5=+5V 6=+5V
7=COM1_PWR 8=COM2_PWR
9=+12V 10=+12V
1
2
1920
C7
Serial ATA Connectors
SATA3
SATA6
CN25
EDP
C9
C10
COM 2
C6
LPC
C8
JP3
C7
COM 1
B3
B4
B8
B2
B7
B9
B5B6
B1
Produktspecifikationer
| Varumärke: | Shuttle |
| Kategori: | Skrivbord |
| Modell: | D 8100XA |
| Produkttyp: | PC |
| Vikt: | 1300 g |
| Bredd: | 165 mm |
| Djup: | 190 mm |
| Höjd: | 43 mm |
| Strömförsörjning: | 90 W |
| Processorfrekvens: | 3.4 GHz |
| Processorfamilj: | Intel® Core™ i3 |
| Wi-Fi: | Nej |
| Ljudsystem: | Realtek ALC 662-VC |
| Antal HDMI-portar: | 1 |
| DVI-port: | Nej |
| Lösenordsskydd: | Ja |
| Hörlursutgångar: | 1 |
| Certifiering: | FCC, CE, BSMI, C-Tick, CB, BSMI, ETL |
| Internminne: | 4 GB |
| Kabelteknik: | 10/100/1000Base-T(X) |
| Processor: | i3-4130 |
| Intel® Wireless Display (Intel® WiDi): | Ja |
| Processorns driftlägen: | 64-bit |
| Processorns cache: | 3 MB |
| Busstyp: | DMI2 |
| Maximalt internminne: | 16 GB |
| Total lagringskapacitet: | 120 GB |
| Intel® My WiFi Technology (Intel® MWT): | Nej |
| Intel® Hyper Threading Technology (Intel® HT Technology): | Ja |
| Intel® InTru™ 3D-teknik: | Ja |
| Intel® Insider™: | Nej |
| Intel® AES nya instruktioner (Intel® AES-NI): | Ja |
| Idle stater: | Ja |
| Intel® 64: | Ja |
| Intel® Virtualization Technology for Directed I/O (VT-d): | Nej |
| Intel® Trusted Execution Technology: | Nej |
| Intel® Stable Image Platform Program (SIPP): | Nej |
| Minnestyper som stöds av processorn: | DDR3-1333/1600, DDR3L-1333/1600 @ 1.5V |
| Minneslayout: | - GB |
| Minnesplatser: | 2x DIMM |
| Minnesbandbredd som stöds av processorn (max): | 25.6 GB/s |
| Skalbarhet: | 1S |
| FSB-paritet: | Nej |
| Tcase: | 72 ° C |
| Processorserie: | Intel Core i3-4100 Desktop series |
| Intel® FDI-teknik: | Nej |
| Intel® Rapid Storage Technology: | Nej |
| Kompatibla processorer: | Intel Celeron G, Intel Pentium G |
| Vattenkylningssystem: | Nej |
| Processorgenerering: | 4:e generationens Intel® Core™ i3 |
| Typ av minneskort: | SD, SDHC, SDXC |
| Produktens färg: | Svart |
| bruksanvisning: | Ja |
| Antal displayportar: | 2 |
| Inbyggd kortläsare: | Ja |
| processortillverkare: | Intel |
| Installerat operativsystem: | Nej |
| Datahastighet för Ethernet-LAN: | 10,100,1000 Mbit/s |
| Antal LAN (RJ-45) anslutningar: | 2 |
| Temperatur vid drift: | 0 - 45 ° C |
| Intervall för relativ operativ luftfuktighet: | 10 - 90 % |
| processorsockel: | LGA 1150 (uttag H3) |
| Processorns kodnamn: | Haswell |
| Maximalt inbyggt grafikadapterminne: | 1.74 GB |
| Intel® Clear Video Technology för MID (Intel® CVT för MID): | Nej |
| Processorns cachetyp: | Smart Cache |
| Seriella portar: | 1 |
| Typ av internminne: | DDR3-SDRAM |
| Placeringar som kan användas: | horisontell |
| Nätverksansluten (Ethernet): | Ja |
| Likströmsingång: | Ja |
| Intel Clear Video Technology: | Nej |
| Antal USB 2.0 anslutningar: | 6 |
| Minneskanaler: | Dubbla kanaler |
| Antal USB 3.2 Gen 1 (3.1 Gen 1) typ A-portar: | 2 |
| Moderkortets chipset: | Intel® H81 |
| Processorkärnor: | 2 |
| Produktvikt (oz): | Ja |
| Typ av kabellåsanslutning: | Kensington |
| Kvalitet på VGA (D-Sub) porten: | 1 |
| Processor främre buss: | - MHz |
| Systembuss, hastighet: | 5 GT/s |
| Processortrådar: | 4 |
| Processorlitografi: | 22 nm |
| Stegning: | C0 |
| Processor med ECC-stöd: | Ja |
| Värmeavledningseffekt (TDP): | 65, 54 W |
| Högsta antal PCI Express-platser: | 16 |
| PCI Express-kortplatser version: | 3.0 |
| PCI Express konfigurationer: | 1x8, 1x16, 2x4, 2x8 |
| Lagringsmedia: | SSD |
| Antalet installerade SSD: | 1 |
| Solid-state drive kapacitet: | 120 GB |
| Optisk enhetstyp: | Nej |
| Ombord grafikkort modell: | Intel® HD Graphics 4400 |
| Diskret grafikkortsmodell: | Ej tillgänglig |
| Basfrekvens för inbyggt grafikkort: | 350 MHz |
| Högsta dynamiska frekvens för inbyggt grafikkort: | 1150 MHz |
| Grafik enhets-ID: | 0x41E |
| Ombord grafikkort: | Ja |
| Familj av inbyggda grafikkort: | Intel® HD Graphics |
| Uttag för mikrofon/linje in: | Ja |
| Intel® Stöldskydd Teknik (Intel® AT): | Nej |
| Intel® Turbo Boost Technology: | Nej |
| Förstärkt Intel Speedstep Technology: | Ja |
| Intel® Clear Video HD Technology (Intel® CVT HD): | Ja |
| Intel® Quick Sync Video Technology: | Ja |
| Intel® Flex minnesåtkomst: | Nej |
| Intel® Förbättrad Halt State: | Ja |
| Intel® VT-x med utökad Sida Tabeller (EPT): | Ja |
| Intel® Efterfrågan Baserad Växla: | Nej |
| Execute Disable Bit-säkerhet: | Ja |
| Termiska övervakningsteknik: | Ja |
| Processorns förpackningsstorlek: | 37.5 x 37.5 mm |
| Stödda instruktionsset: | AVX 2.0 |
| CPU konfiguration (max): | 1 |
| Inbäddade alternativ: | Nej |
| Grafik & IMC litografi: | 22 nm |
| Intel Virtualization Technology (VT-x): | Ja |
| Etisk processor (Conflict Free): | Ja |
| Intel® Dual Display Kan Teknik: | Nej |
| Intel® Snabb Memory Access: | Nej |
| ARK-ID för processor: | 77480 |
| Minnesklockfrekvens som stöds av processorn: | 1333,1600 MHz |
| Högsta internminne som stöds av processorn: | 32 GB |
| Antal skärmar som stöds (inbyggt grafikkort): | 3 |
| Mus inkluderad: | Nej |
| Tangentbord inkluderat: | Nej |
| Specifikation för kylningslösning: | PCG 2013C |
| Intel TSX-NI-version: | 0.00 |
| Intel® TSX-NI: | Nej |
| Strömförsörjning ingångsspänning: | 100 - 240 V |
| Display inkluderad: | Nej |
| Drivrutiner medföljer: | Ja |
| Solid-state drive-gränssnitt: | SATA III |
| Chassityp: | Nettop |
| Antal processorer installerade: | 1 |
| DirectX-version på inbyggt grafikkort: | 11.1 |
| Intel Small Business Advantage (SBA)-version: | 1.00 |
| Intel Stable Image Platform Program (SIPP)-version: | 0.00 |
| Strömförsörjning ingångsfrekvens: | 50 - 60 hz |
Behöver du hjälp?
Om du behöver hjälp med Shuttle D 8100XA ställ en fråga nedan och andra användare kommer att svara dig
Skrivbord Shuttle Manualer

30 Juli 2025
30 Juli 2025
30 Juli 2025
30 Juli 2025
30 Juli 2025
30 Juli 2025
30 Juli 2025
30 Juli 2025
30 Juli 2025
30 Juli 2025
Skrivbord Manualer
Nyaste Skrivbord Manualer
2 April 2026
29 Mars 2026
27 Mars 2026
24 Mars 2026
22 Mars 2026
20 Mars 2026
19 Mars 2026
10 Mars 2026
8 Mars 2026
4 Mars 2026