SSV Works X3-F4 Bruksanvisning
Läs gratis den bruksanvisning för SSV Works X3-F4 (4 sidor) i kategorin högtalare. Guiden har ansetts hjälpsam av 19 personer och har ett genomsnittsbetyg på 4.9 stjärnor baserat på 10 recensioner. Har du en fråga om SSV Works X3-F4 eller vill du ställa frågor till andra användare av produkten? Ställ en fråga
Sida 1/4

X3-F4
2017+ Can-Am Maverick p1-x3 & p1-x3 Ma
4” Speaker Dash Pods
SSV WORKS, 201 N. Rice Ave Unit A, Oxnard, CA 93030
www.SSVworks.com | Phone: 818-991-1778 | Fax: 866-293-6751
!
Please read and understand these
instructions completely before
installation to avoid possible injury, or
damage to the accessory or vehicle.
WARRANTY INFORMATION:
All SSV Works enclosures are covered by a limited lifetime warranty against defects
in material or workmanship. All SSV Works Electronics are covered by a limited 1 year
warranty against defects in material or workmanship. All SSV Works Speakers are
covered by a limited 1 year warranty against defects in material or workmanship. Labor
for replacement of defective components is not covered. Contact SSV Works for further
warranty information.
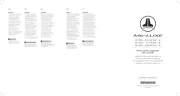
1. X3-F4 Enclosures (1 pair)
2. Acoustic Lens (1 pair)
3. M6 x 1.0 Screws x 4
TOOLS NEEDED FOR INSTALLATION PARTS LIST
PARTS LIST IMAGES
4. M6 x 25mm Screws x 2
5. M6 Washers x 6
6. 10mm Nut x 2
3. M6 x 1.0 Screws x 4
4. M6 x 25mm Screws x 2
2. Acoustic Lens (1 pair)
1. X3-F4 Enclosures
(1 pair)
5. M6 Washers x 6 6. 10mm Nut x 2
- T-30 Torx Driver
- Drill 1/4” Drill bit
- 10mm Wrench or Rachet
- Utility Knife
Produktspecifikationer
| Varumärke: | SSV Works |
| Kategori: | högtalare |
| Modell: | X3-F4 |
Behöver du hjälp?
Om du behöver hjälp med SSV Works X3-F4 ställ en fråga nedan och andra användare kommer att svara dig
högtalare SSV Works Manualer

12 September 2024

12 September 2024

12 September 2024

12 September 2024

12 September 2024

12 September 2024

12 September 2024

12 September 2024

12 September 2024

12 September 2024
högtalare Manualer
- Digitech
- ADAM Audio
- TWF
- Cabasse
- CyberData Systems
- Fresh N Rebel
- Neumann
- DAP
- Lanzar
- Avantree
- DAP Audio
- Eltax
- Easymaxx
- Denver
- Monoprice
Nyaste högtalare Manualer
23 Oktober 2025
20 Oktober 2025
19 Oktober 2025

19 Oktober 2025
19 Oktober 2025
19 Oktober 2025
19 Oktober 2025
19 Oktober 2025
19 Oktober 2025
18 Oktober 2025