4ms Mini PEG Bruksanvisning

4ms Tangentbord Mini PEG

Läs gratis den bruksanvisning för 4ms Mini PEG (12 sidor) i kategorin Tangentbord. Guiden har ansetts hjälpsam av 3 personer och har ett genomsnittsbetyg på 4.6 stjärnor baserat på 2 recensioner. Har du en fråga om 4ms Mini PEG eller vill du ställa frågor till andra användare av produkten? Ställ en fråga

Sida 1/12
Mini PEG
4ms Company
User Manual 1.0 – September 12, 2022
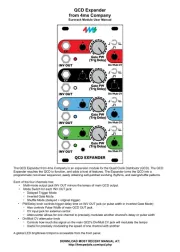
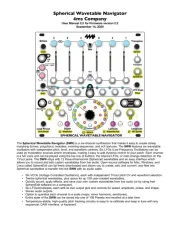
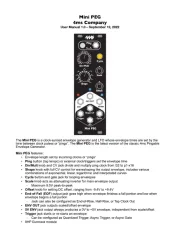
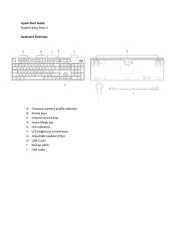
The Mini PEG is a clock-synced envelope generator and LFO whose envelope times are set by the
time between clock pulses or “pings”. The Mini PEG is the latest version of the classic 4ms Pingable
Envelope Generator.
Mini PEG features:
Envelope length set by incoming clocks or “pings”
Ping button (tap tempo) or external clock/triggers set the envelope time
Div/Mult knob and CV jack divide and multiply ping clock from /32 to p1-x16
Shape knob with full CV control for waveshaping the output envelope, includes various
combinations of exponential, linear, logarithmic and interpolated curves
Cycle button and gate jack for looping envelopes
Scale knob acts as attenuating inverter for main envelope output
Maximum 9.5V peak-to-peak
Offset knob for setting DC offset, ranging from -9.4V to +9.4V
End-of-Fall (EOF) output jack goes high when envelope finishes a fall portion and low when
envelope begins a fall portion
Jack can also be configured as End-of-Rise, Half-Rise, or Tap Clock Out
ENV OUT jack outputs scaled/offset envelope
5V ENV jack output always produces a 0V to +5V envelope, independent from scale/offset
Trigger jack starts or re-starts an envelope
Can be configured as Quantized Trigger, Async Trigger, or Async Gate
8HP Eurorack module
6
7
8
=
x2/2
44
55
6
7
8
1216
x16/32
33
Div/Mult
Shape
Scale
Offset
Div
Shape CV
Trigger
Mini PEG
Cycle
EOF
5V ENV
ENV OUT
Ping
Cycle
Table of Contents
Setting up your Mini PEG
1. Power off your Eurorack system.
2. On the back of the Mini PEG you will see a 16-pin header. Connect one end
of the power cable to a 16-pin Eurorack power header on your power supply
distribution board and the other end to the Mini PEG with the red stripe on
the power cable oriented towards the bottom of the module.
3. Using the included screws, securely attach the Mini PEG to the rails of your
case.
4. Power on your Eurorack system.
Note: The Mini PEG is reverse-polarity protected, but incorrectly connecting any
module in any system can damage other modules on the power bus.
Setting up your Mini PEG! "......................................................................................2
Overview! "................................................................................................................3
Beginning Patch! ".....................................................................................................3
Control Details! ".......................................................................................................4
Ping! "..................................................................................................................4
Div/Mult! "............................................................................................................4
Cycle! "................................................................................................................5
Trigger! "..............................................................................................................5
Shape! "...............................................................................................................5
Scale! "................................................................................................................5
Offset! "...............................................................................................................5
ENV OUT! "..........................................................................................................6
EOF! "..................................................................................................................6
Maximum and Minimum Clock Times! "...................................................................6
Sync and Async Modes! ".........................................................................................7
Changing between Sync and Async Mode! "......................................................7
Cycle Button in Sync and Async mode! "...........................................................7
Modulating Div/Mult in Sync and Async Mode! "................................................7
Using the Trigger jack in Sync and Async Mode! ".............................................8
Quantize Trigger Re-Phasing! ".................................................................................8
Tap Clock Output! "...................................................................................................8
Bus Clock! "..............................................................................................................8
Updating Firmware! "................................................................................................9
Updating Firmware! "..........................................................................................9
Viewing the firmware Version! ".........................................................................10
System Mode! ".......................................................................................................10
Saving the Clock Time and Cycle State! "........................................................10
Electrical and Mechanical Specifications!............................................................12
Page of 2 12

Produktspecifikationer

Varumärke: 4ms
Kategori: Tangentbord
Modell: Mini PEG

Behöver du hjälp?

Om du behöver hjälp med 4ms Mini PEG ställ en fråga nedan och andra användare kommer att svara dig