4ms WAV Recorder Bruksanvisning
4ms
Tangentbord
WAV Recorder
Läs gratis den bruksanvisning för 4ms WAV Recorder (16 sidor) i kategorin Tangentbord. Guiden har ansetts hjälpsam av 3 personer och har ett genomsnittsbetyg på 3.7 stjärnor baserat på 2 recensioner. Har du en fråga om 4ms WAV Recorder eller vill du ställa frågor till andra användare av produkten? Ställ en fråga
Sida 1/16

WAV Recorder
4ms Company
User Manual 1.2 – June 8, 2021
for firmware v1.0
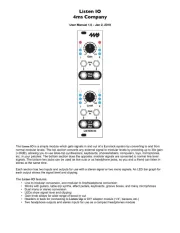
The WAV Recorder from 4ms Company is a high fidelity, two-channel stereo audio recorder with basic playback
features. Accepting a wide range of input signals, from line-level to modular-level, the WAV Recorder stores
audio onto a microSD card in lossless .wav format up to 96kHz/24-bit. The trigger jack can be used for capturing
rhythmic loops or synchronizing multiple WAV Recorder modules for multi-track recording. In Playback mode,
the trigger jack or button plays the most recent recording. A simple file/folder navigation system can be used to
browse the folders on the card for playing back .wav files. A Gain knob allows for up to +20dB of boost, and an
LED Signal Meter indicates clipping and the signal level.
•
Records up to 96kHz/24-bit, creating stereo or mono .wav files on the microSD card
•
Gain knob and LED level meter make it easy to record a wide range of signal levels
•
Plays standard .wav files from the card, without renaming files
•
Browse any folder on the card for playback
•
Card can be hot-swapped without rebooting module
•
Extremely low noise, high-fidelity design
•
Includes 16GB microSD card (Class 10), SD adaptor, 10-to-16 pin power cable and M3 screws
•
Can be used as a stereo pre-amp (line to modular level), providing up to +20dB of gain
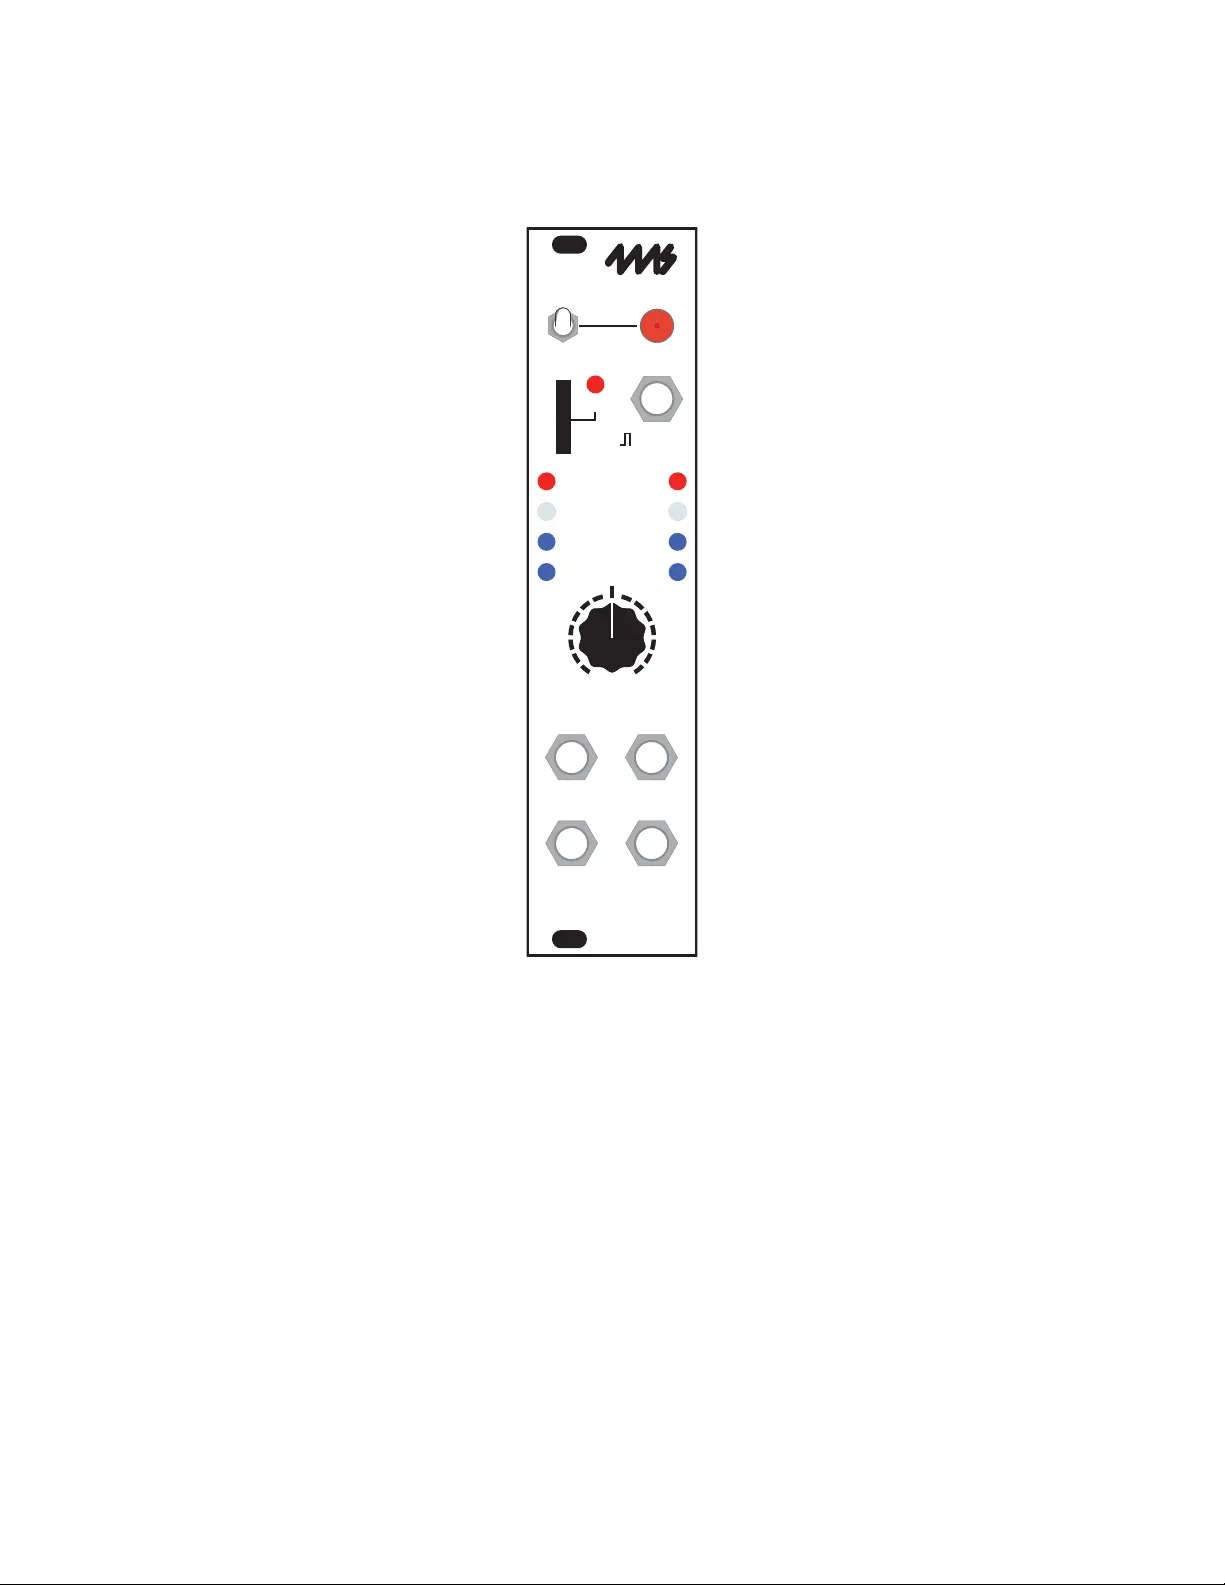
Record
WAV RECORDER
Left Right
IN
OUT
Clip
Input Gain
Busy
Playback
Record
0dB
-∞ +20dB

Table of Contents
!
Setting up your WAV Recorder
1. Power your Eurorack modular case off and find 6HP of available space.!
2. Connect the free end of the power cable to a 16-pin Eurorack power header on
your power supply distribution system, with the red stripe towards to the -12V.
The other end of the power cable is a 10-pin connector which should already be
connected to the WAV Recorder with the red stripe on the power cable orientated
towards the bottom of the module. Note: The WAV Recorder is reverse-polarity
protected, but other modules being incorrectly connected could damage
anything on the power bus.
3. Using the included Knurlie screws, securely fasten the WAV Recorder to the rails
of your case. !
4. Power the system on.!
5. Begin with Tutorial: Basic Recording on page 4 of this manual."
Setting up your WAV Recorder# 2!..............................................................................
Controls: Button, Knob, Switch and Jacks# 3!............................................................
Tutorial: Basic Recording# 4!.......................................................................................
Folders and File Organization# 5!................................................................................
Playback# 5!................................................................................................................
Browsing Files for Playback# 6!...................................................................................
Trigger Jack# 7!...........................................................................................................
Pausing Recording# 7!.................................................................................................
Example Patch: Multi-track Recording# 8!..................................................................
Using the WAV Recorder as a Pre-amp# 9!.................................................................
Busy Light# 9!..............................................................................................................
Checking for Free Space# 9!.......................................................................................
Hot Swapping the microSD Card# 10!........................................................................
LED Signal Meter and Clipping# 10!............................................................................
Recording For Long Periods# 10!................................................................................
System Mode# 11!.......................................................................................................
Recording Rates and Selecting microSD Cards# 12!..................................................
Checking the Firmware Version# 13!...........................................................................
Updating Firmware (Audio Bootloader)# 13!...............................................................
microSD Card# 14!......................................................................................................
Left->Right Jumper# 15!..............................................................................................
Integration with 4ms Listen Modules# 15!...................................................................
Electrical and Mechanical Specifications# 16............................................................
Page of 2 16
Important!
Never remove the microSD card when the Busy light is on. This could
corrupt the files on the card.
If you remove the Wav Recorder from your case, always store and
transport it in the included anti-static bag.
Produktspecifikationer
Varumärke: | 4ms |
Kategori: | Tangentbord |
Modell: | WAV Recorder |
Behöver du hjälp?
Om du behöver hjälp med 4ms WAV Recorder ställ en fråga nedan och andra användare kommer att svara dig
Tangentbord 4ms Manualer
2 Augusti 2025
2 Augusti 2025
2 Augusti 2025
2 Augusti 2025
2 Augusti 2025
2 Augusti 2025
2 Augusti 2025
2 Augusti 2025
31 Juli 2025
27 December 2024
Tangentbord Manualer
- Eminent
- Fender
- V7
- IOPLEE
- Black Box
- Krom
- Vimar
- Fellowes
- Behringer
- Sandberg
- Trekstor
- Havis
- Logik
- Venom
- Nord
Nyaste Tangentbord Manualer
2 Augusti 2025
2 Augusti 2025
2 Augusti 2025
1 Augusti 2025
1 Augusti 2025
1 Augusti 2025
1 Augusti 2025
1 Augusti 2025
1 Augusti 2025
1 Augusti 2025