IPEGA PG-P5S023 Bruksanvisning
IPEGA ej kategoriserat PG-P5S023
Läs gratis den bruksanvisning för IPEGA PG-P5S023 (1 sidor) i kategorin ej kategoriserat. Guiden har ansetts hjälpsam av 33 personer och har ett genomsnittsbetyg på 4.2 stjärnor baserat på 9 recensioner. Har du en fråga om IPEGA PG-P5S023 eller vill du ställa frågor till andra användare av produkten? Ställ en fråga
Sida 1/1
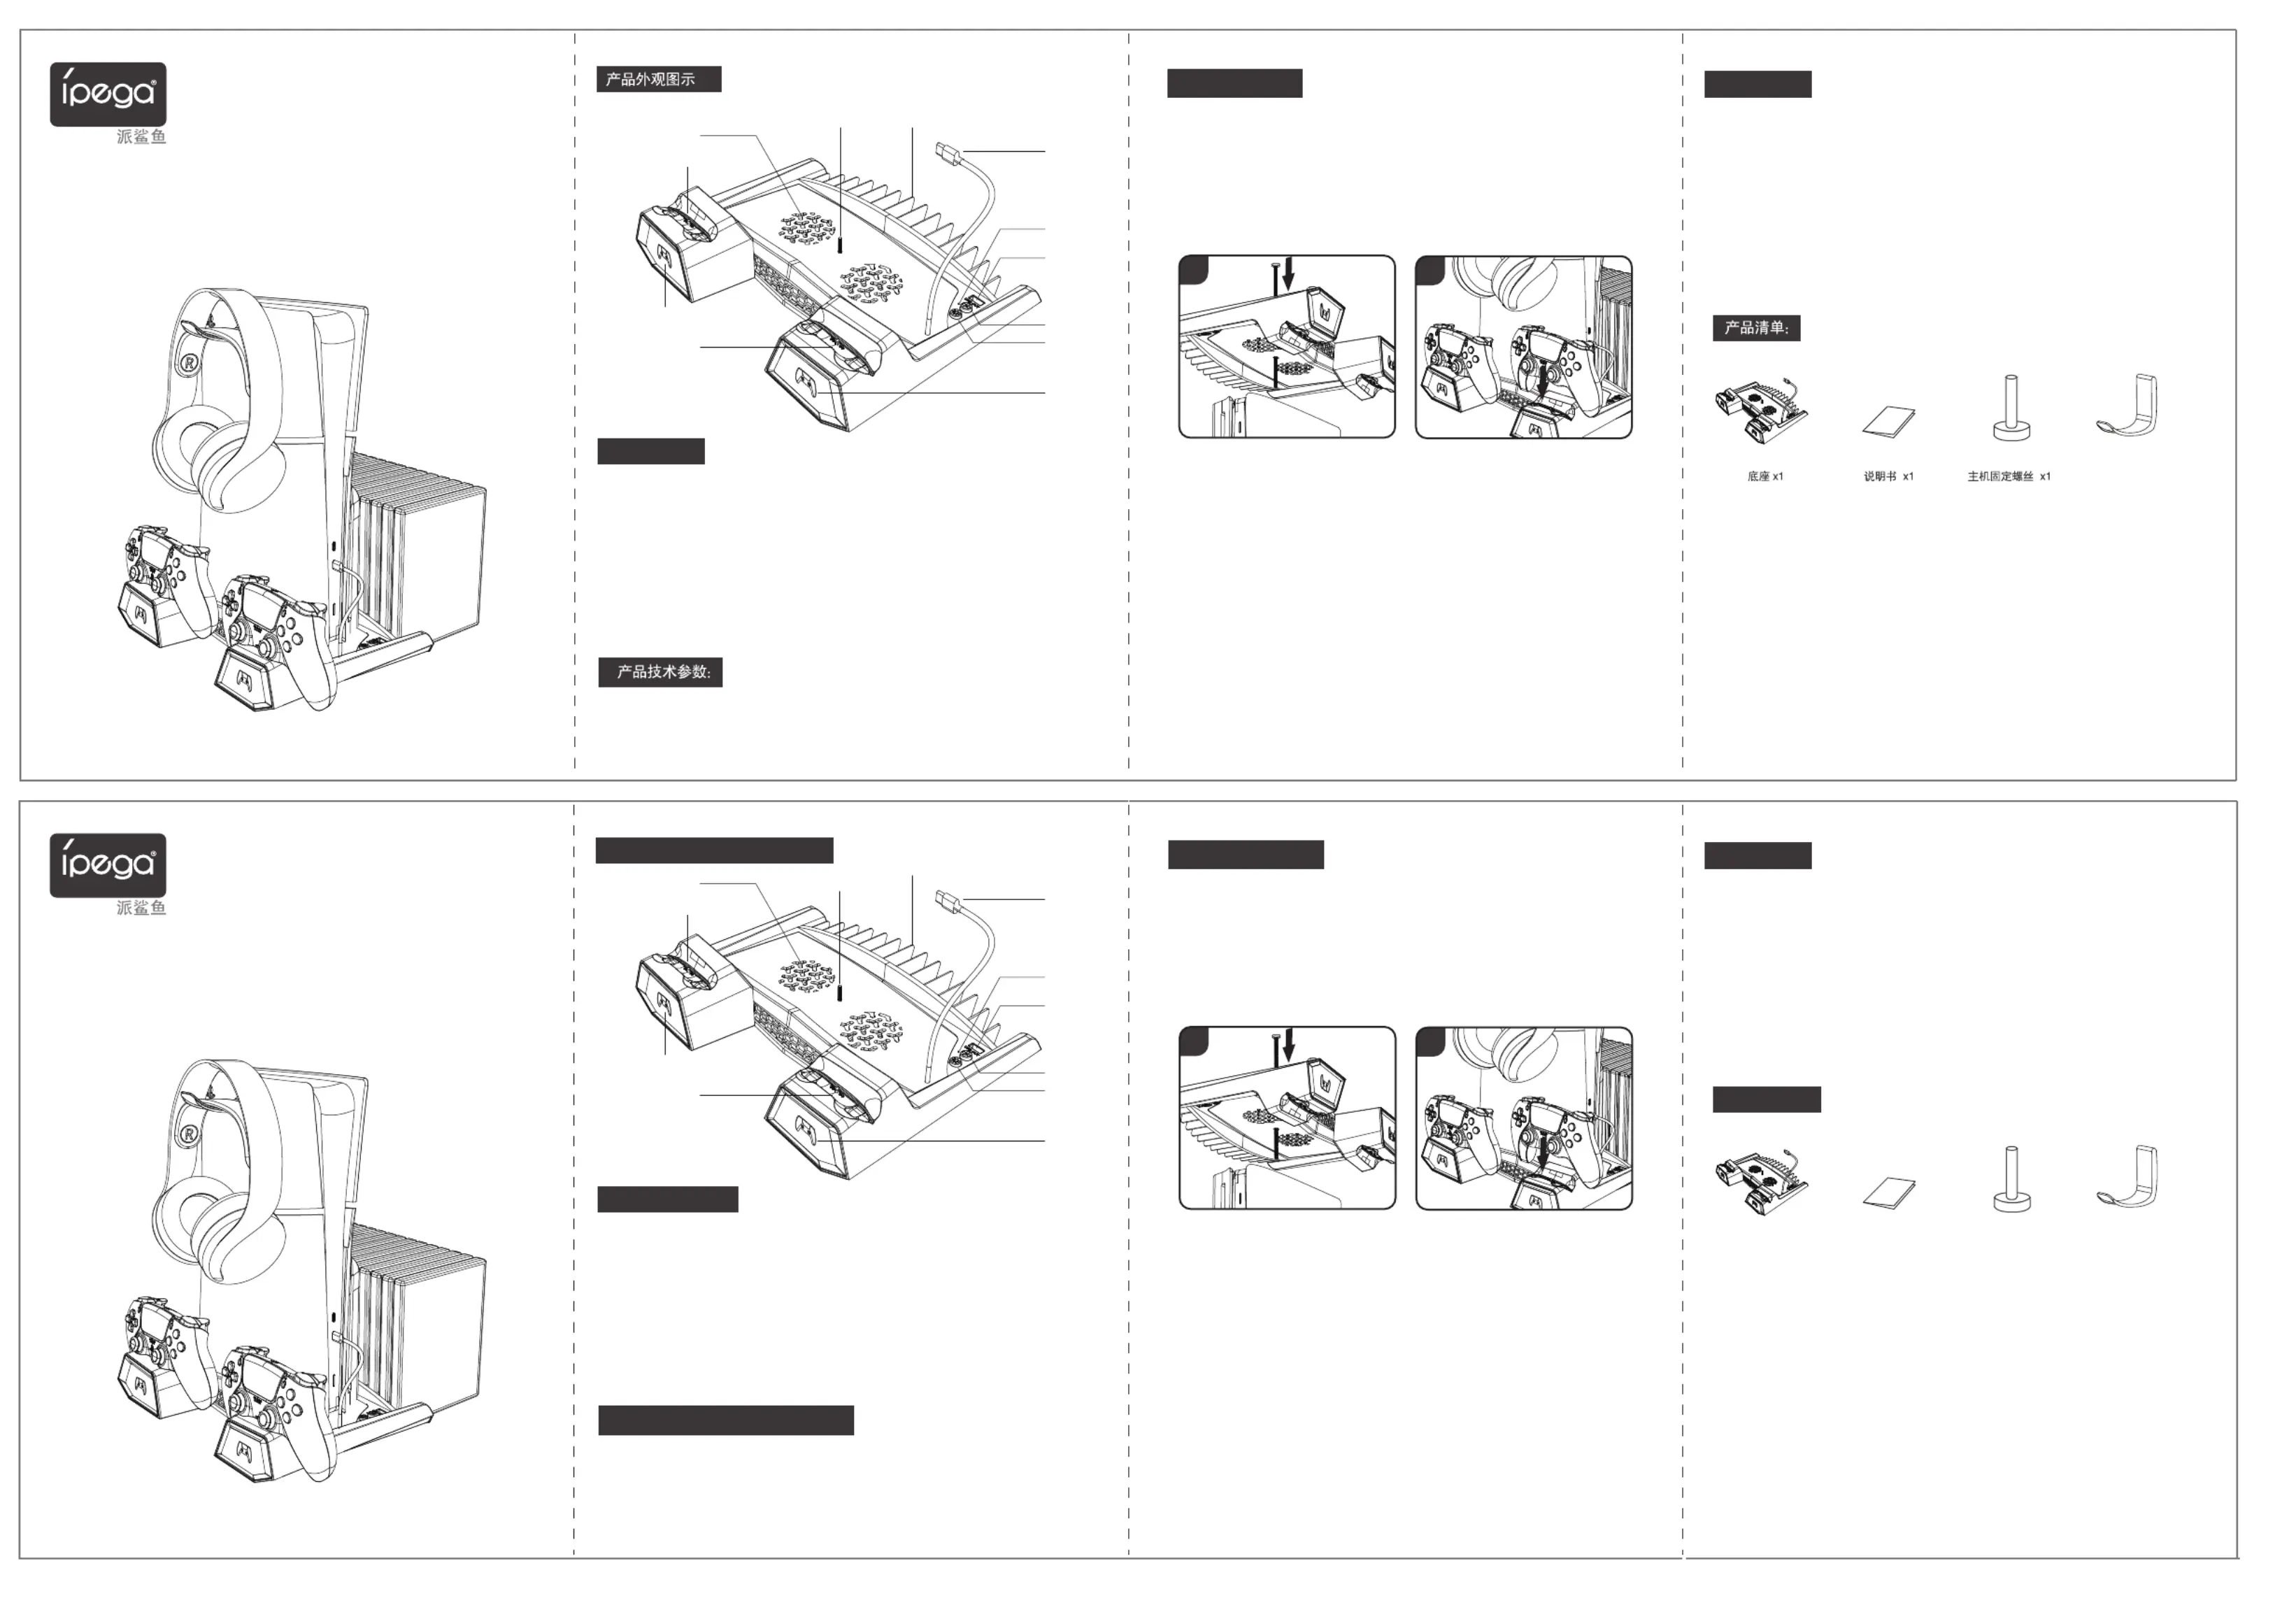
散热风扇
游戏碟架主机固定螺丝孔
产品说明书(PG-P5S023)
炫光多功能座充
手柄充电
指示灯2
手柄充电位1
灯效开关
手柄充电位2
手柄充电
指示灯1
工作电压:DC 4.75 - 5.25V 工作电流:≤2.3A
产品特征:
注意事项:
产品使用说明:
:
耳机挂钩 X1
主机连接线
USB充电端口
风扇指示灯
风扇开关
1.本产品适用于P5/ P5 Slim光驱版和数字版主机散热与P5原装手柄(兼容P5 Edge版手柄)充电。
2.具备P5手柄充电状态指示灯与散热风扇工作状态指示灯。
3.具备一个P5主机USB2.0扩展口。
4.给P5主机散热同时可以给两个P5原装手柄快速充电。
5.可以放置15个P5游戏碟
6.支持15种RGB幻彩灯效
1、将P5主机竖直放置在座充上,并从座充底部拧入主机固定螺丝固定,将座充上的Type-C主机连接
线插入到P5主机前置Type-C端口中。如图1
2、将P5主机开机,手柄充电指示灯蓝灯亮起,座充处于待机状态。
3、将P5原装手柄放置到手柄充电探针位置上时,对应的手柄充电指示灯亮红灯,手柄开始充电,当
手柄充满电时,对应的手柄充电指示灯亮蓝灯。如图2
4、按下风扇开关,散热风扇进入工作状态,同时风扇绿色指示灯亮起,再次按下风扇开关,散热风
扇停止工作,同时风扇指示灯熄灭。
5、USB 2.0带数据扩展功能
6、按RGB灯效开关键可以在15种灯光效果中依次切换:光谱循环、多彩快速跑马、多彩慢速跑马、
单色轮流闪烁、反向多彩快速跑马、多彩闪烁、反向多彩慢速跑马、多彩往返跑马、红色常亮、绿色
常亮、蓝色常亮、黄绿色常亮、青色常亮、紫色常亮、白色常亮、熄灭。
7、长按灯光模式切换键3秒,保存当前灯光模式并熄灯,再次按下灯光模式切换键,进入已保存的灯
光模式;关机断电时自动保存当前灯光模式,再次开机时进入最近一次断电前的灯光模式。
1. 本产品手柄充电功能专为P5原装手柄设计,请勿使用本产品给其它型号手柄充电。
2. 当使用本产品同时给两个P5原装手柄充电时,扩展USB口供电能力会下降,此时如果在扩展
USB口外接功率超过2W的设备(如充电宝、手机、手柄等),可能会导致本产品工作异常,拔
出扩展USB口中的设备或者移走正在充电的P5原装手柄,本产品即可恢复正常使用。
3.手柄充电探针之间存在电压,请勿将水、金属片或者其他导体接触手柄充电探针,以免造成产
品损坏。
2
1
Cooling fan
Game disc rack
Main unit fixing
screw hole
Product manual (PG-P5S023)
Glowing Multi-function
Charging Base
Controller charging
indicator light 2
Controller
charging slot 1
Lighting
effect
switch
Controller charging slot 2
Controller
charging
indicator
light 1
Working voltage: DC 4.75 - 5.25V Working current: ≤2.3A
Product features:
Product technical specifications:
Precautions:
Product List:
Usage instructions:
Main unit
connection
cable
USB
charging
port
Fan indicator
light
Fan switch
1. Place the P5 main unit vertically on the charging base and secure it by screwing in the main unit
fixing screw from the bottom of the base. Connect the Type-C cable from the base to the front
Type-C port of the P5 main unit. As shown in Figure 1.
2. Turn on the P5 main unit. The controller charging indicator will illuminate in blue, indicating the
base is in standby mode.
3. When placing the P5 original controller on the charging probe, the corresponding controller
charging indicator turns red, indicating the controller is charging. When fully charged, the indicator
turns blue. As shown in Figure 2.
4. Press the fan switch to activate the cooling fan. The fan's green indicator light will turn on. Press
the fan switch again to turn off the fan, and the fan indicator light will go out.
5. USB 2.0 with data expansion feature.
6. Press the RGB light effect switch to cycle through the 15 lighting effects: Spectrum cycling,
multicolor fast marquee, multicolor slow marquee, single-color alternating flash, reverse multicolor
fast marquee, multicolor flashing, reverse multicolor slow marquee, multicolor back and forth
marquee, steady red, steady green, steady blue, steady yellow-green, steady cyan, steady purple,
steady white, and off.
7. Press and hold the light mode switch button for 3 seconds to save the current light mode and turn
off the light. Press the light mode switch button again to enter the saved light mode. The current
light mode is automatically saved when the power is turned off, and the last light mode used before
the power was cut will be restored upon restarting.
1. This product's charging handle is specifically designed for the original P5 controller. Do not
use this product to charge controllers of other models.
2. When using this product to charge two original P5 controllers simultaneously, the power
supply capability of the extended USB port will decrease. If a device exceeding 2W power
(such as a power bank, phone, or handle) is connected to the extended USB port at this time,
it may cause the product to malfunction. Remove the device from the extended USB port or
unplug the charging original P5 controller to resume normal operation of the product.
3. There is a voltage between the handle charging probes. Avoid contact with water, metal
pieces, or other conductors to prevent product damage.
2
1
Product appearance diagram:
1. Compatible with P5/P5 Slim Disc and Digital Versions for cooling and charging the P5
original controller (also compatible with P5 Edge version controller).
2. Equipped with P5 controller charging status indicator and cooling fan operation indicator.
3. Features one P5 main unit USB2.0 expansion port.
4. Provide cooling for the P5 main unit and rapid charging for two P5 original controllers.
5. Can hold 15 P5 game discs.
6. Support 15 RGB lighting effects.
Headphone
hook ×1
Main unit fixing
screw ×1
Manual ×1Base ×1
Produktspecifikationer
| Varumärke: | IPEGA |
| Kategori: | ej kategoriserat |
| Modell: | PG-P5S023 |
Behöver du hjälp?
Om du behöver hjälp med IPEGA PG-P5S023 ställ en fråga nedan och andra användare kommer att svara dig
ej kategoriserat IPEGA Manualer

12 Oktober 2025
12 Oktober 2025
12 Oktober 2025
12 Oktober 2025
12 Oktober 2025
12 Oktober 2025
12 Oktober 2025
12 Oktober 2025
12 Oktober 2025
12 Oktober 2025
ej kategoriserat Manualer
Nyaste ej kategoriserat Manualer
3 April 2026
3 April 2026
3 April 2026
3 April 2026
3 April 2026
3 April 2026
3 April 2026
3 April 2026
3 April 2026